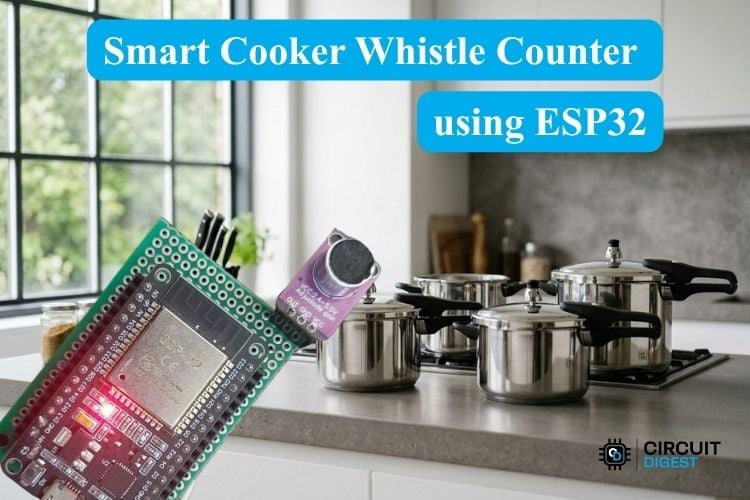
Almost every kitchen has a pressure cooker, but we've all had trouble handling them. It’s too easy to turn on the stove, get distracted by work, TV, or housework, and forget to turn it off. If we miss a whistle count, food gets burned, utensils get spoiled, and there are chances of accidents in the kitchen. But then again, being in the kitchen and manually counting the whistles is a waste of time.
So to solve this problem, in this tutorial we are building a smart cooker whistle counter using ESP32. This device will listen for spikes in sound to automatically capture cooker whistles while we do something else. It connects to CircuitDigest Cloud, where we can configure our target whistle count through a custom dashboard, start or stop listening and trigger an instant notification on WhatsApp the moment the preset number of whistles countdown is completed. You can also check out similar ESP32 Projects and IoT projects done previously here at Circuit Digest.
Table of Contents
What is an Automatic Cooker Whistle Counter and How Does It Work?
The MAX4466 electret microphone module is the primary acoustic sensor that detects the sound waves from the pressure cooker and converts them to a varying analog voltage signal. The built-in op-amp conditions and amplifies these signals. The signals are biased around a reference point of 1.65V. The conditioned analog signal is input to an ADC pin on the ESP32.
The ESP32 reads incoming sound through its internal 12-bit Analog-to-Digital Converter (ADC), which converts the analog audio voltage into digital values ranging from 0 to 4095. Setting the ADC attenuation to ADC_11db allows the input pin to safely measure full voltage swings up to 3.3V without clipping.
To measure ambient noise accurately, the ESP32 listens to the microphone in 50-millisecond windows (SAMPLE_WINDOW). During each sample window, it tracks the highest and lowest voltage points to determine the peak-to-peak voltage wave using the formula below:
ΔV = Vmax - Vmin
Finally, the code converts this peak-to-peak voltage into a readable sound level in decibels (dB) using the formula below:
dB = 41.52 • log₁₀(ΔV) + 64.02
Calibrating the MAX4466 Microphone for the Cooker Whistle Counter
Calibrating the MAX4466 Microphone Amplifier is important because it will show a higher or lower value if not calibrated properly. To calibrate it, upload the code and adjust the physical trimmer potentiometer to set the ambient noise to 30 dB. Here is another Arduino Whistle Detector Switch using Sound Sensor project where the AC lamp is switched based on a high-frequency whistle.
Components Required for the Pressure Cooker Whistle Counter
Below is the list of components required to build this project
| S.No | Components | Specification | Quantity |
| 1 | Microcontroller | ESP32 Dev Kit | 1 |
| 2 | Microphone Amplifier | MAX4466 | 1 |
Circuit Diagram and Wiring for the ESP32 Cooker Whistle Counter
Below is the wiring diagram of the smart cooker whistle alert

Below Table is the wiring of the microphone module with the ESP32
| Microphone Module Pin | ESP32 |
| OUT | GPIO 34 |
| GND | GND |
| VCC | 3.3V |
Step-by-Step CircuitDigest Cloud Setup Guide for the Cooker Whistle Counter using ESP32
A step-by-step guide for this smart cooker whistle counter is listed below.
Step 1⇒ Sign Up / Login
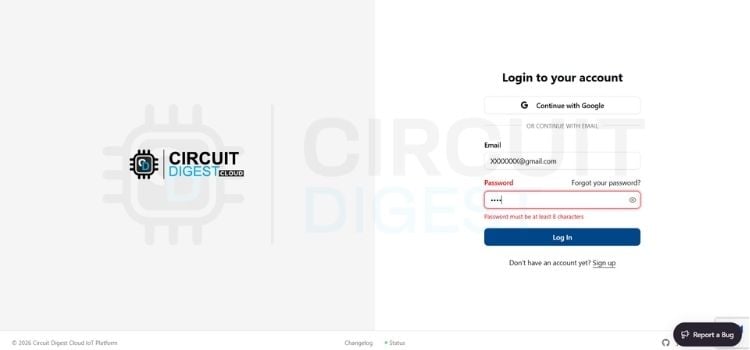
Sign up or login into your account CircuitDigest Cloud by giving valid email and password.
Step 2⇒Adding New Device
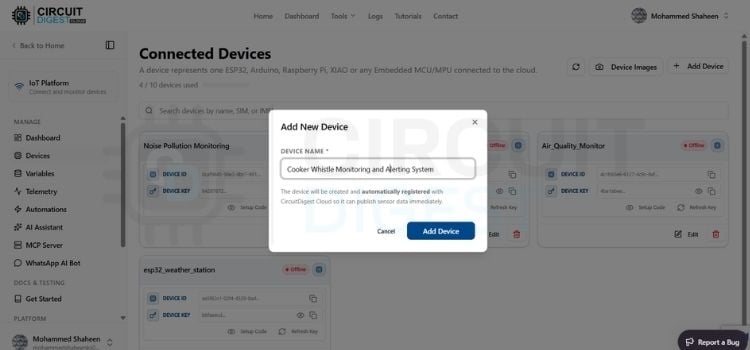
After logging in, click Dashboard at the top, click the device option on the left side of the website, click Add New Device and enter what you want for your project. For us, we have given it the Cooker Whistle Monitoring and Alerting System. You can give the name you want to display for this device and click the Add Device button in blue.
Step 3⇒ Adding New Variables
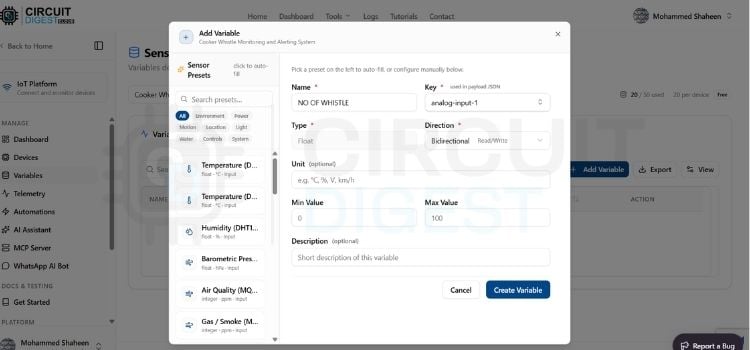
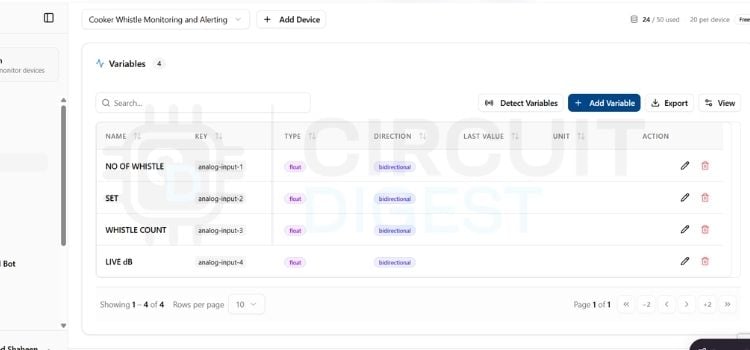
After creating a new device, click Variables on the left side of the website. Now select the device you created from the drop-down option. Click the Add Variable option. You will see a pop-up in the name section. First, we will create a variable for the number of whistles. Give the name you want to display for the variable. We have named it NO OF WHISTLE. Select the key you want for this variable. We have selected analog-input-1, set the direction to bidirectional, and pressed Create Variable. The variable will be created. Do the same for 3 more variables.
Step 4⇒Variable List
These 4 variable names allow us to choose the key we want: analog-input-1 for the NO OF WHISTLE, analog-input-2 for the SET, analog-input-3 for the WHISTLE COUNT, analog-input-4 for the LIVE DB.
Step 5⇒Adding Widget
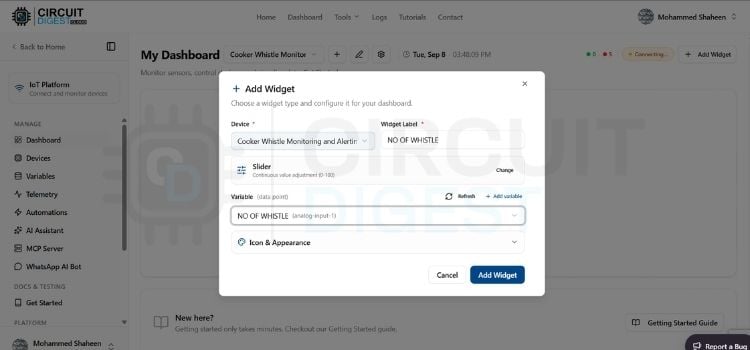
After adding the variable, click the dashboard on the left side of the website and select the device you created from the drop-down. First, we will create a widget for NO OF WHISTLE. Click Add Widget, then click SliderWidget. A menu bar will pop up. Select the device you created from the drop-down, and name it NO OF WHISTLE. Set the variable as analog-input-1and click Add Widget. Do the same for the other 3 widgets, but select the proper variable for the widget placed. Now the dashboard setup is over.
Step 6⇒ WhatsApp API Integration
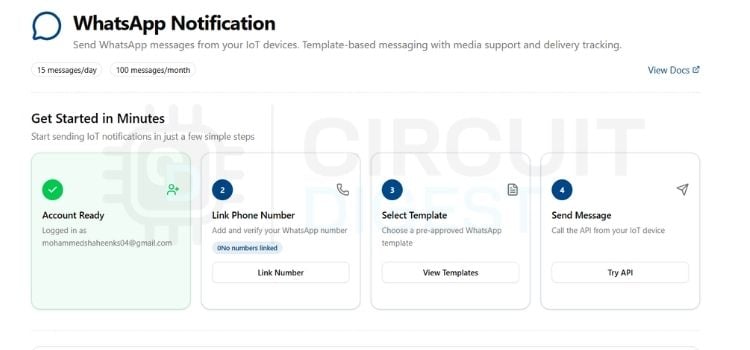
Click the Home tab at the top, scroll down, and you will see the WhatsApp notification; click it. There, you will see the link number option; click it, then enter your number. An OTP will be sent to your number; verify it, and then your WhatsApp API setup is complete. You can also check out a similar How to Build an AI-based Air Quality Monitoring using ESP32 project where the air quality is monitored on a TFT and also through the CircuitDigest Cloud dashboard, which was previously done here at Circuit Digest.
Program Workflow of the Automatic Cooker Whistle Counter
Below is the program workflow of this smart cooker whistle counter
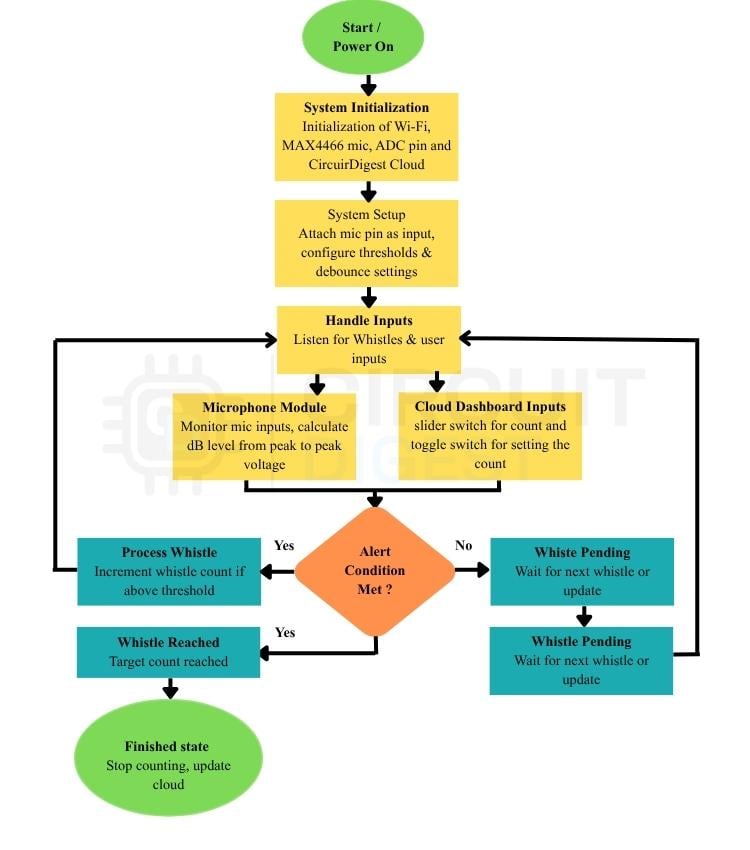
Upon powering on, the ESP32 performs System Initialization and System Setup. It sets up GPIO34 as an analog input, configures the ADC attenuation to ADC_11db, initializes Wi-Fi, and establishes a connection with CircuitDigest Cloud.
In the main loop, the system performs Handling Inputs by executing two parallel tasks:
1. Microphone Module: The ESP32 continuously samples the MAX4466 microphone in 20 ms windows, calculates peak-to-peak voltage, and converts it into a logarithmic decibel level.
2. Cloud Dashboard Inputs: Through background callbacks (CDcloud.loop()), the ESP32 receives real-time updates from the dashboard slider (analog-input-1) to update targetWhistles and the toggle switch (analog-input-2) to turn active listening ON or OFF (isListening).
The system then evaluates the Alert Condition Met? decision block. When listening is active, if a sound spike exceeds WHISTLE_ON_DB (60 dB) for at least MIN_WHISTLE_MS (300 ms) and falls back below WHISTLE_OFF_DB (50 dB), the Process Whistle block increments whistleCount, pushes the updated value to the cloud dashboard (analog-input-3), and triggers an 800 ms debounce cooldown. If the whistle target has not been met, the program enters the Whistle Pending state, looping back to wait for the next event.
Once whistleCount equals or exceeds targetWhistles, the system transitions to Whistle Reached and executes an HTTP POST request to dispatch a WhatsApp notification to our phone. Finally, in the Finished State, the ESP32 automatically stops listening (isListening = false) and turns the dashboard switch back to OFF. You can also check out a similar How to Build a Smart ESP32 Noise Pollution Monitoring System with IoT project where the noise pollution is monitored through the CircuitDigest Cloud dashboard, which was previously done here at Circuit Digest.
Code Explanation: Programming the ESP32 for Whistle Detection
The code is written in the Arduino IDE for a smart cooker whistle counter using an ESP32 microcontroller.
pinMode(AUDIO_PIN, INPUT);
analogSetAttenuation(ADC_11db);
CDcloud.subscribe(KEY_TARGET_SET, onTargetSlider);
CDcloud.subscribe(KEY_LISTEN_SW, onListenSwitch);
if (!CDcloud.begin(WIFI_SSID, WIFI_PASS, DEVICE_ID, CONNECTION_KEY, API_KEY)) { ESP.restart(); }
publishWithRetry(KEY_LISTEN_SW, 0.0f);
Upon powering this automatic cooker counter, the ESP32 configures GPIO34 as an analog input and sets ADC attenuation to 11dB for sound reading. It subscribes to cloud keys for the target slider (KEY_TARGET_SET) and the switch (KEY_LISTEN_SW). Wi-Fi and CircuitDigest Cloud connections are initialized using CDcloud.begin() with user credentials.
float readDBLevel() {
 // Samples MAX4466 over 20ms to measure peak-to-peak amplitude
 float voltage = (peakToPeak * V_REF) / ADC_RESOLUTION;
 float rawDb = (41.52 * log10(voltage)) + 64.02;
 return (rawDb < 30.0 || !lastReadingValid) ? 30.0 : rawDb;
}
In this loop, the MAX4466 output is sampled across 20ms windows to find signal peak-to-peak amplitude. Peak voltage is calculated as (peakToPeak * V_REF) / ADC_RESOLUTION and mapped to logarithmic decibels. The calculated decibel value is clamped to 30.0 dB to normalise low-level background noise. Every second, the processed live dB level is published to the cloud dashboard (KEY_LIVE_DB) for real-time monitoring.
CDcloud.loop(); // Handlers update targetWhistles and toggle isListening
void onTargetSlider(float v) { targetWhistles = (int)v; }
void onListenSwitch(float v) { isListening = (bool)v; whistleCount = 0; }
if (WiFi.status() != WL_CONNECTED) ESP.restart();
The background handler CDcloud.loop() processes incoming MQTT/HTTP telemetry packets continuously. Moving the dashboard slider triggers onTargetSlider() to update the active targetWhistles count. Toggling the dashboard switch calls onListenSwitch(), resetting whistleCount to 0 when turned on. If Wi-Fi drops, the system detects connection loss in loop() and calls ESP.restart() to auto-recover.
if (isListening && !inWhistle && db > WHISTLE_ON_DB && now > cooldownUntilMs) {
 inWhistle = true; whistleStartMs = now;
} else if (inWhistle && db < WHISTLE_OFF_DB) {
 inWhistle = false;
 if ((now - whistleStartMs) >= MIN_WHISTLE_MS) {
   whistleCount++;
   cooldownUntilMs = now + WHISTLE_COOLDOWN_MS; // WHISTLE_COOLDOWN_MS = 10000UL
   CDcloud.publish(KEY_LIVE_COUNT, (float)whistleCount);
 }
}
When isListening is active, a signal rising above WHISTLE_ON_DB marks the potential start of a whistle event. If the signal stays above for MIN_WHISTLE_MS (300ms) and drops below WHISTLE_OFF_DB, a valid whistle is logged. whistleCount increments, updates KEY_LIVE_COUNT on the cloud, and sets cooldownUntilMs = now + 10000UL. This 10-second lock prevents long-duration whistle echoes from triggering double counts.
if (whistleCount >= targetWhistles) {
 sendWhatsAppAlert(whistleCount); // HTTP POST to www.circuitdigest.cloud:443
 isListening = false;
 CDcloud.publish(KEY_LISTEN_SW, 0.0f); // Sync switch back to OFF
}
When whistleCount >= targetWhistles, the system sends a JSON payload containing the final count and sends an HTTP POST request to WhatsApp. After sending the alert, isListening is set to false to prevent duplicate messaging on extra noise spikes.
Output: Testing the Automatic Cooker Whistle Counter
The automatic cooker whistle counter was tested using a pressure cooker in a kitchen. Users can set their desired target count (1–20 whistles) on the CircuitDigest Cloud dashboard slider and switch it on. The system continuously measures ambient sound levels, counts each whistle, and updates the live whistle count on the dashboard. Once the specified whistle limit is reached, it automatically triggers an instant WhatsApp alert to the phone and stops listening.
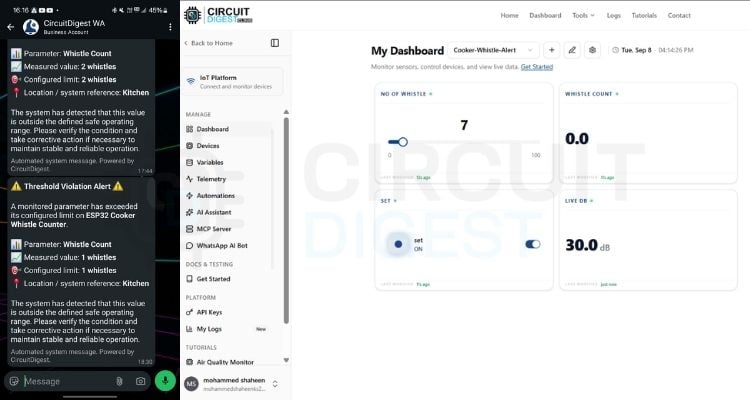
Real-Time Demo: Automatic Cooker Whistle Counter
This isn't a theoretical build; we assembled, wired, and tested this pressure cooker whistle counter in a real kitchen with a standard stovetop cooker.
Troubleshooting Common Issues in the Cooker Whistle Counter using ESP32
| S.No | Issue | Fix |
| 1. | How do I calibrate the MAX4466 module? | Rotate the trim potentiometer on the underside of the module counterclockwise to increase gain, or clockwise to decrease it. |
| 2. | What if the ESP32 won't connect to Wi-Fi? | Double-check that the correct Wi-Fi credentials are entered in the code. |
| 3. | Why does a quiet room still read around 80 dB even after adjusting the potentiometer? | Replace the MAX4466 module with a new one and recalibrate using the same procedure. |
| 4. | What if the whistle isn't detected by the MAX4466 module? | Lower the WHISTLE_ON_DB and WHISTLE_OFF_DB values in the code so the module is more sensitive to the whistle sound. |
GitHub Repository
The complete Arduino source code for this automatic cooker whistle counter using ESP32 is available on our GitHub repository. It includes the MAX4466 sampling logic, CircuitDigest Cloud integration, and WhatsApp alert function used in this project. Clone or download the repo to upload the code directly to your ESP32 board.


Frequently Asked Questions (FAQs)
1. How does a whistle counter in an automatic cooker work?
The whistle counter works by detecting sound signals coming from a pressure cooker with the help of a microphone (like MAX4466) that sends audio signals to a microcontroller (like ESP32), which converts the sound into decibels and counts the whistles whenever there is a sound crossing a certain threshold for a few seconds, after which it triggers a buzzer.
2. What type of microphone is best for detecting the whistles of pressure cookers?
The MAX4466 microphone module is best for detecting the sound of a pressure cooker. This microphone sensor module is best suited because it includes a variable gain trimmer to adjust the signal arriving at the microphone.
3. How does CircuitDigest Cloud provide the WhatsApp whistle notifications?
CircuitDigest Cloud works in such a way that the moment the required number of whistles is reached, the ESP32 sends an HTTP request in JSON format to CircuitDigest Cloud, which is connected to your mobile number using the WhatsApp API, so that the notification is sent automatically without any manual intervention needed.
4. Does the automatic cooking whistle counter need to be connected to Wi-Fi?
Using Wi-Fi is essential to operate this device, as the ESP32 must access the internet to link with the CircuitDigest Cloud dashboard, process all slider/switch changes, and send a WhatsApp notification via HTTP POST whenever the cooking whistle has reached the target.
5. What is the maximum number of whistles that I can define on the CircuitDigest Cloud dashboard?
One can set any number of whistles from 1 to 20 through the slider.
Sound Sensor Projects Using Arduino and ESP32
Explore sound sensor projects using Arduino and ESP32 for detecting and measuring sound. Learn to interface the KY-038 and other sound sensors with microcontrollers. These projects demonstrate sound-level monitoring, LEDs, displays, and alarm systems. Ideal for beginners interested in sound detection, automation, and security applications.
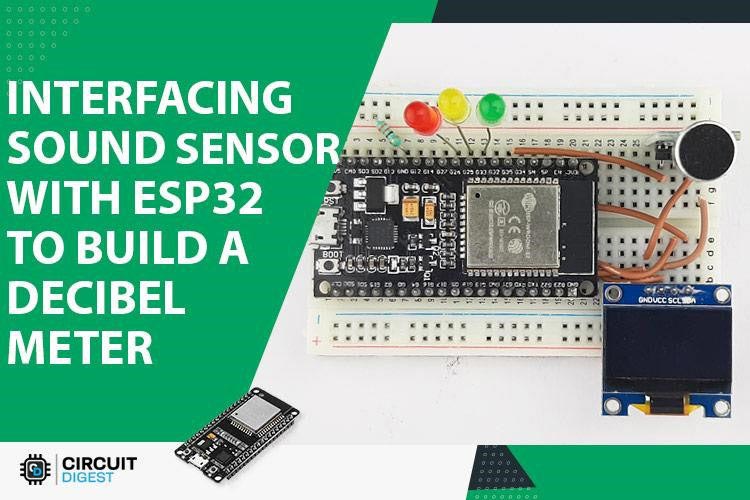
How does a KY-038 Sound Sensor work, and how to interface it with an ESP32?
So in this article, we decided to interface a KY-038 sensor with an ESP32 and build a simple decibel meter out of it. In the process, we will let you know how a sound sensor works, how to work with it, and its pros and cons.
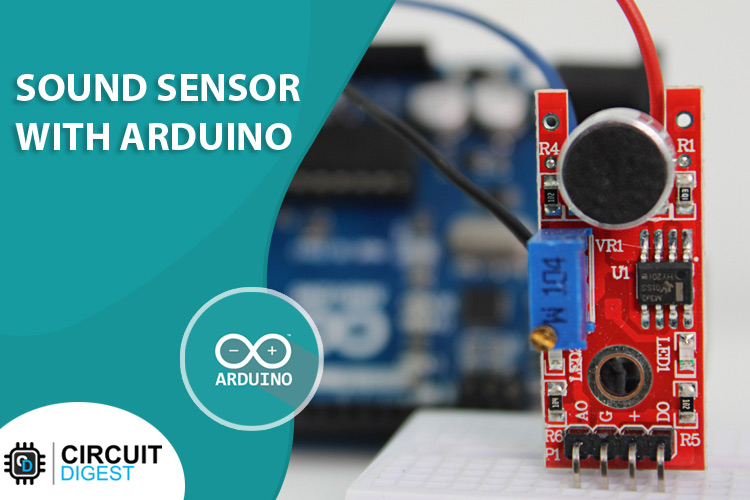
How Does a Sound Sensor Work and how to Interface it with Arduino?
A sound sensor is a simple, easy-to-use, and low-cost device that is used to detect sound waves travelling through the air. Not only that, but it can also measure its intensity, and most importantly, it can convert it to an electrical signal which we can read through a microcontroller.

Dog Barking Security Alarm using Arduino, PIR Sensor and Dog Barking Sound Module
So in this tutorial, we are going to build a Dog Barking Security Alarm using Arduino Nano, PIR Motion Sensor, and Dog Barking Sound Module. When someone gets close to your house door, a barking dog alarm will be triggered from inside the house, making all undesirable guests go away.
Complete Project Code
/*
 Cooker Whistle Counter with WhatsApp Alert - ESP32 + MAX4466
 CircuitDigest Cloud (no display, headless)
 Dashboard:
   analog-input-1 (Slider, 0-20, direction: output->device)  -> Set target whistle count
   analog-input-2 (Toggle/Switch, direction: output->device) -> Start/Stop listening (turn ON to arm, turns itself OFF once target whistle count is reached and alert is sent)
   analog-input-3 (Gauge/Number, direction: input->dashboard, optional) -> Live whistle count while listening
   analog-input-4 (Gauge/Number, direction: input->dashboard) -> Live dB level, updated continuously (~1x/sec)
 Detection logic:
   A whistle is a sharp dB spike that stays loud for a short burst then dies away. We track an envelope dB level, and count one whistle every time the level rises above WHISTLE_ON_DB, stays above it for at least MIN_WHISTLE_MS, then falls back below WHISTLE_OFF_DB. A cooldown after each detected whistle prevents one long whistle from being counted twice.
 On every power-up/reset: whistle count, target, listening state, and the live dB/count dashboard widgets are all forced back to zero/off, so the dashboard never shows a stale value left over from before the reset.
 Wiring (Generic ESP32 Dev Kit / DevKitC):
   MAX4466 VCC -> 3.3V
   MAX4466 GND -> GND
   MAX4466 OUT -> GPIO34   (ADC1_CH6, input-only, safe from Serial/USB/WiFi)
 NOTE: GPIO1 (used in some XIAO ESP32-S3 reference sketches as "A0") is actually the UART TX0 pin on a generic ESP32 DevKitC — it's reserved for USB-serial communication. Reading the mic there conflicts with Serial and causes garbage output / boot issues. GPIO34 avoids that entirely, and also stays reliable with WiFi active (ADC2 pins can get flaky when WiFi is on; GPIO34 is ADC1).
*/
#include <CircuitDigestCloud.h>
#include <WiFi.h>
#include <WiFiClientSecure.h>
// ── Fill in your credentials ────────────────────────────────────────────
#define WIFI_SSID      "YOUR_WIFI_SSID"
#define WIFI_PASS      "YOUR_WIFI_PASSWORD"
#define DEVICE_ID      "YOUR_DEVICE_ID"
#define CONNECTION_KEY "YOUR_CONNECTION_KEY"
#define API_KEY        "YOUR_API_KEY"
#define PHONE_NUMBER   "YOUR_PHONE_NUMBER"
#define KEY_TARGET_SET   "analog-input-1"   // slider: desired whistle count
#define KEY_LISTEN_SW    "analog-input-2"   // switch: start/stop listening
#define KEY_LIVE_COUNT   "analog-input-3"   // live whistle count readback
#define KEY_LIVE_DB      "analog-input-4"   // live dB level readback
const char* host = "www.circuitdigest.cloud";
// ──────────────────────────────────────────────────────────────────────
CircuitDigestCloud CDcloud;
// ---------- Mic Config ----------
#define AUDIO_PIN 34             // GPIO34 (ADC1_CH6) — generic ESP32 Dev Kit / DevKitC
#define SAMPLE_WINDOW 20         // ms per envelope sample (fast, for bursts)
#define ADC_RESOLUTION 4095.0
#define V_REF 3.3
// ---------- Whistle Detection ----------
#define WHISTLE_ON_DB       60.0    // dB level that counts as "whistle sound"
#define WHISTLE_OFF_DB      50.0    // must drop below this to end the whistle
#define MIN_WHISTLE_MS      100UL   // must stay loud at least this long
#define WHISTLE_COOLDOWN_MS 10000UL // ignore new whistles for this long after one ends
// ---------- State ----------
bool     isListening      = false;
int      targetWhistles   = 0;      // starts at 0 until dashboard slider sets it
int      whistleCount     = 0;
bool     inWhistle        = false;  // currently inside a loud burst
unsigned long whistleStartMs = 0;
unsigned long cooldownUntilMs = 0;
#define CLOUD_PUBLISH_MS 1000UL     // how often live dB is pushed to the dashboard
unsigned long lastCloudPublish = 0;
// Raw diagnostics from the last readDBLevel() call — printed in loop() so
// you can see WHY dB is stuck instead of just the final number.
unsigned int lastSignalMax = 0;
unsigned int lastSignalMin = 0;
unsigned int lastPeakToPeak = 0;
// Raw (unclamped) dB from the last readDBLevel() call — lets you see real
// gradations below the 30.0 floor for calibration. The clamped/floored
// value is still what's used for whistle detection and cloud publishing.
float lastRawDB = 30.0;
bool  lastReadingValid = true;
// A genuinely disconnected/floating mic tends to read a FLAT, unchanging
// value (near-zero peakToPeak) persistently over many samples in a row —
// unlike a loud transient (snap/whistle), which has large peakToPeak and
// only lasts briefly. We only flag a fault after several consecutive
// flatlined samples, so a real loud sound is never mistaken for a fault.
#define FLATLINE_P2P_MAX     3      // peakToPeak this low counts as "flat"
#define FLATLINE_FAULT_COUNT 15     // consecutive flat samples (~300ms) before flagging fault
unsigned int flatlineStreak = 0;
// ── Read instantaneous envelope dB over SAMPLE_WINDOW ───────────────────
float readDBLevel() {
 unsigned long startMillis = millis();
 unsigned int signalMax = 0;
 unsigned int signalMin = 4095;
 while (millis() - startMillis < SAMPLE_WINDOW) {
   unsigned int sample = analogRead(AUDIO_PIN);
   if (sample < 4095) {
     if (sample > signalMax) signalMax = sample;
     if (sample < signalMin) signalMin = sample;
   }
 }
 unsigned int peakToPeak = signalMax - signalMin;
 lastSignalMax = signalMax;
 lastSignalMin = signalMin;
 lastPeakToPeak = peakToPeak;
 // Fault detection: only a SUSTAINED flatline counts as disconnected.
 // A loud transient (snap/whistle) has large peakToPeak and resets the
 // streak immediately, so it's never mistaken for a fault.
 if (peakToPeak <= FLATLINE_P2P_MAX) {
   if (flatlineStreak < 65000) flatlineStreak++;
 } else {
   flatlineStreak = 0;
 }
 lastReadingValid = (flatlineStreak < FLATLINE_FAULT_COUNT);
 float voltage = (peakToPeak * V_REF) / ADC_RESOLUTION;
 if (voltage < 0.01) voltage = 0.01;
 float rawDb = (41.52 * log10(voltage)) + 64.02;
 lastRawDB = rawDb;
 float db = rawDb;
 if (db < 30.0) db = 30.0;
 // Invalid (persistently flatlined/disconnected) readings never count as
 // loud — report them as silence rather than letting a stuck pin trigger
 // a whistle. A real loud sound always has nonzero peakToPeak, so it is
 // never affected by this.
 if (!lastReadingValid) db = 30.0;
 return db;
}
// ── WhatsApp alert ───────────────────────────────────────────────────────
void sendWhatsAppAlert(int completedWhistles) {
 WiFiClientSecure client;
 client.setInsecure();
 client.setTimeout(5000);
 Serial.println("Attempting WhatsApp alert connection...");
 if (!client.connect(host, 443)) {
   Serial.println("WhatsApp API Connection FAILED - could not reach host");
   return;
 }
 Serial.println("Connected to CircuitDigest Cloud host. Sending request...");
 // NOTE: "threshold_violation_alert" is reused here since it's a generic
 // template with device/parameter/measured_value/limit/location fields.
 // If your CircuitDigest Cloud account has a dedicated whistle-alert
 // template, swap template_id below to that instead.
 String payload =
   "{\"phone_number\":\"" + String(PHONE_NUMBER) + "\","
   "\"template_id\":\"threshold_violation_alert\","
   "\"variables\":{"
   "\"device_name\":\"ESP32 Cooker Whistle Counter\","
   "\"parameter\":\"Whistle Count\","
   "\"measured_value\":\"" + String(completedWhistles) + " whistles\","
   "\"limit\":\"" + String(completedWhistles) + " whistles\","
   "\"location\":\"Kitchen\"}}";
 client.println("POST /api/v1/whatsapp/send HTTP/1.1");
 client.println("Host: www.circuitdigest.cloud");
 client.println("X-API-Key: " + String(API_KEY));
 client.println("Content-Type: application/json");
 client.println("Connection: close");
 client.print("Content-Length: ");
 client.println(payload.length());
 client.println();
 client.print(payload);
 unsigned long responseStart = millis();
 while (client.connected() && !client.available()) {
   if (millis() - responseStart > 5000) {
     Serial.println("WhatsApp API response TIMEOUT - no reply from server");
     client.stop();
     return;
   }
   delay(10);
 }
 Serial.println("---- Server Response ----");
 String responseBody = "";
 while (client.connected() || client.available()) {
   if (client.available()) {
     String line = client.readStringUntil('\n');
     Serial.println(line);
     responseBody += line;
   }
 }
 Serial.println("--------------------------");
 if (responseBody.indexOf("200") > 0 || responseBody.indexOf("201") > 0) {
   Serial.println("WhatsApp Alert appears to have SENT successfully.");
 } else {
   Serial.println("WhatsApp Alert may have FAILED - check response above for error details.");
 }
 client.stop();
}
// Publishes a value, checking the actual success/failure return instead of
// firing-and-forgetting. Retries a few times with the loop pumped in
// between, since a publish can fail if the cloud session isn't fully
// settled yet (e.g. right after boot).
void publishWithRetry(const char* key, float value) {
 for (int attempt = 1; attempt <= 5; attempt++) {
   bool ok = CDcloud.publish(key, value);
   Serial.print("Publish ");
   Serial.print(key);
   Serial.print(" = ");
   Serial.print(value);
   Serial.print(" (attempt ");
   Serial.print(attempt);
   Serial.print("): ");
   Serial.println(ok ? "OK" : "FAILED");
   if (ok) return;
   CDcloud.loop();
   delay(300);
 }
 Serial.print("Giving up publishing ");
 Serial.println(key);
}
// ── Cloud → device callbacks ─────────────────────────────────────────────
void onTargetSlider(float v) {
 targetWhistles = (int)v;
 if (targetWhistles < 1) targetWhistles = 1;
 Serial.print("Target whistle count set to: ");
 Serial.println(targetWhistles);
}
void onListenSwitch(float v) {
 bool turningOn = (bool)v;
 if (turningOn && !isListening) {
   // Arm fresh: reset count, clear any in-progress whistle state
   isListening = true;
   whistleCount = 0;
   inWhistle = false;
   cooldownUntilMs = 0;
   CDcloud.publish(KEY_LIVE_COUNT, 0.0f);
   Serial.println("Listening STARTED - whistle count reset to 0");
 } else if (!turningOn && isListening) {
   isListening = false;
   Serial.println("Listening STOPPED by user");
 }
}
void setup() {
 Serial.begin(115200);
 delay(1000);
 pinMode(AUDIO_PIN, INPUT);
 analogSetAttenuation(ADC_11db);
 // ---- Force a clean slate on every power-up/reset ----
 isListening    = false;
 whistleCount   = 0;
 targetWhistles = 0;
 inWhistle      = false;
 cooldownUntilMs = 0;
 CDcloud.subscribe(KEY_TARGET_SET, onTargetSlider);
 CDcloud.subscribe(KEY_LISTEN_SW, onListenSwitch);
 Serial.println("Connecting to Wi-Fi & CircuitDigest Cloud...");
 if (!CDcloud.begin(WIFI_SSID, WIFI_PASS, DEVICE_ID, CONNECTION_KEY, API_KEY)) {
   Serial.println("CDcloud begin() failed — check credentials. Rebooting...");
   delay(2000);
   ESP.restart();
 } else {
   Serial.println("CDcloud initialized successfully.");
 }
 // CDcloud.begin() succeeding only means WiFi + the initial handshake
 // worked — the cloud session isn't necessarily ready to accept publishes
 // the instant it returns. Pump the loop for a bit so it fully settles
 // before we push the reset values, or they can silently get dropped.
 for (int i = 0; i < 15; i++) {
   CDcloud.loop();
   delay(200);
 }
 // Push the reset state to the dashboard so it never shows a stale value
 // from before this boot (switch OFF, count/db back to zero). Each
 // publish is retried a few times since a single attempt can still land
 // before the connection is fully ready.
 publishWithRetry(KEY_LISTEN_SW, 0.0f);
 publishWithRetry(KEY_LIVE_COUNT, 0.0f);
 publishWithRetry(KEY_LIVE_DB, 0.0f);
 Serial.println("System Ready. Set target on analog-input-1, arm with analog-input-2.");
}
void loop() {
 CDcloud.loop();
 if (WiFi.status() != WL_CONNECTED) {
   Serial.println("Wi-Fi Disconnected! Restarting system...");
   delay(2000);
   ESP.restart();
 }
 // Always sample the mic (even when not armed) so you can watch live dB
 // in Serial Monitor and tune WHISTLE_ON_DB / WHISTLE_OFF_DB before relying
 // on the automatic detection.
 float db = readDBLevel();
 static unsigned long lastDbPrint = 0;
 unsigned long nowDb = millis();
 if (nowDb - lastDbPrint >= 200) {
   lastDbPrint = nowDb;
   Serial.print("Live dB: ");
   Serial.print(db, 1);
   Serial.print(" (raw: ");
   Serial.print(lastRawDB, 1);
   Serial.print(")  | ADC min: ");
   Serial.print(lastSignalMin);
   Serial.print(" max: ");
   Serial.print(lastSignalMax);
   Serial.print(" p2p: ");
   Serial.print(lastPeakToPeak);
   Serial.print(" | mic: ");
   Serial.println(lastReadingValid ? "OK" : "DISCONNECTED?");
 }
 if (isListening) {
   unsigned long now = millis();
   if (!inWhistle) {
     // Waiting for a whistle to start (respect cooldown after last one)
     if (db > WHISTLE_ON_DB && now > cooldownUntilMs) {
       inWhistle = true;
       whistleStartMs = now;
     }
   } else {
     // Currently inside a whistle burst — has it ended?
     if (db < WHISTLE_OFF_DB) {
       unsigned long whistleDuration = now - whistleStartMs;
       inWhistle = false;
       if (whistleDuration >= MIN_WHISTLE_MS) {
         whistleCount++;
         cooldownUntilMs = now + WHISTLE_COOLDOWN_MS;
         Serial.print("Whistle detected! Count: ");
         Serial.print(whistleCount);
         Serial.print(" / ");
         Serial.println(targetWhistles);
         CDcloud.publish(KEY_LIVE_COUNT, (float)whistleCount);
         if (whistleCount >= targetWhistles) {
           Serial.println("Target whistle count reached! Sending WhatsApp alert...");
           sendWhatsAppAlert(whistleCount);
           // Auto-disarm so it doesn't keep counting/alerting
           isListening = false;
           CDcloud.publish(KEY_LISTEN_SW, 0.0f); // sync dashboard switch back to OFF
         }
       }
       // else: too short, was just noise — ignored, no count
     }
   }
 }
 // ---- Publish live dB to the dashboard every second ----
 unsigned long nowPub = millis();
 if (nowPub - lastCloudPublish >= CLOUD_PUBLISH_MS) {
   lastCloudPublish = nowPub;
   CDcloud.publish(KEY_LIVE_DB, db);
 }
 // ---- Periodic serial debug ----
 static unsigned long lastDebug = 0;
 unsigned long now2 = millis();
 if (now2 - lastDebug >= 500) {
   lastDebug = now2;
   Serial.print("Listening: ");
   Serial.print(isListening ? "YES" : "NO");
   Serial.print(" | Count: ");
   Serial.print(whistleCount);
   Serial.print(" / ");
   Serial.println(targetWhistles);
 }
}