

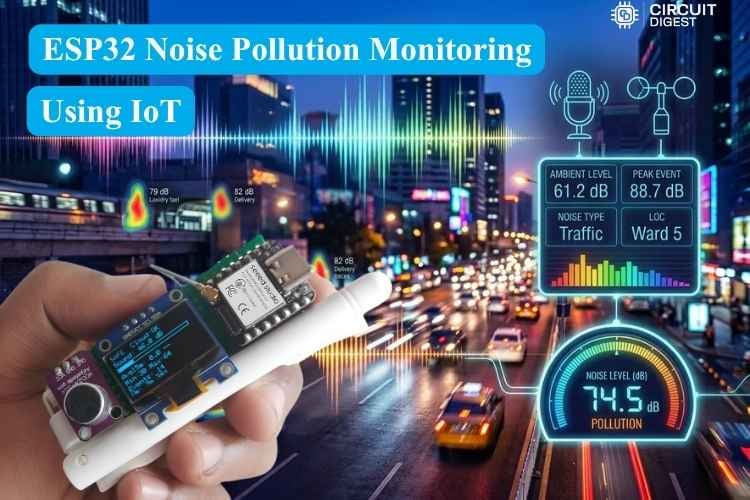
Urban areas are now affected by acoustic disturbances; major Indian cities such as Mumbai, Kolkata, and Delhi rank among the noisiest in the world, driven by dense traffic, construction, festivals, and industrial activity. Extended exposure to these noise levels leads to health issues, including disturbed sleep, increased stress, cardiovascular risk, hearing damage, and reduced productivity.
To address this problem, this tutorial builds an ESP32 Noise Pollution Monitor to track, analyse, and alert on rising noise levels in real time. The ESP32 noise pollution monitoring project continuously measures ambient sound and vibration, displays the readings locally, and pushes data to CircuitDigest Cloud to access the data from anywhere. You can also check out similar ESP32 Projects and IoT projects done previously here at Circuit Digest.
What You'll Learn in This ESP32 Noise Pollution Monitoring Project
∗ How ambient noise is recorded, converted into decibels, and defined as either safe or unsafe in real time.
∗ How to wire up the XIAO ESP32-S3 with a MAX4466 microphone amplifier and calibrate it.
∗ How to understand the ESP32 noise pollution monitoring system and replicate its architecture.
∗ How to set up CircuitDigest Cloud dashboards, variables, and WhatsApp alerts to monitor things remotely.
∗ How to solve the five most frequent construction problems based on practical experiments.
Table of Contents
- How Does This ESP32 Noise Pollution Monitor Work?
- └ Noise Level Threshold Table
- ESP32 Noise Pollution Monitor vs. Other Sound Measurement Methods
- Calibration of MAX4466 Microphone Amplifier
- Components Required
- Block Diagram
- Circuit Diagram
- Step-by-Step CircuitDigest Cloud Setup
- Code Explanation
- Live Demo
- Output
- Troubleshooting
- GitHub
How Does this ESP32 Noise Pollution Monitor Work?
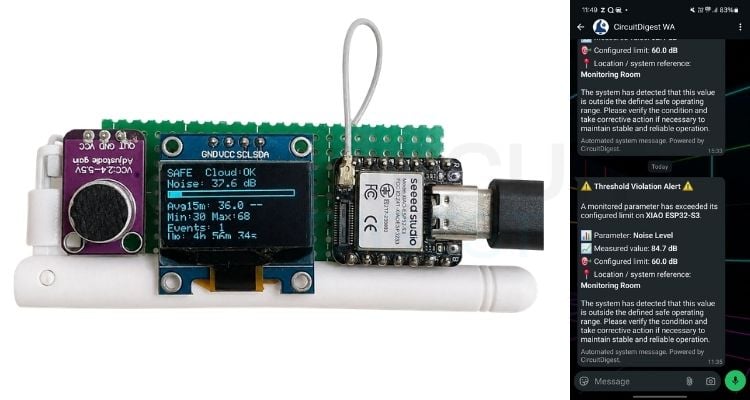
When this noise pollution monitor is turned on, it connects to our Wi-Fi, the mic senses the surrounding noise level and displays the parameters like current sound level, is the sound level safe or not, average sound level in 15 minutes, minimum sound level reached in 15 minutes, maximum sound level reached in 15 minutes, number of high sound level events occurred counts and on time of our device in the OLED display.
All the sound parameters are in CircuitDigest Cloud too. The threshold value for the sound level is 60 dB for a high sound event; if a high sound event occurs, it sends a WhatsApp alert to our mobile phone. With AI assistance in CircuitDigest Cloud, we can analyse all the sound parameters. Here is another project: How to Detect the Direction of Sound Using Arduino project where we showcased how to determine the direction of the sound.
Noise Level Threshold Table
The table below summarises how this ESP32 noise pollution monitoring project classifies sound levels into safe and unsafe zones based on WHO ambient noise guidance:
| SI.No | dB Range | Status Shown |
| 1. | 30-60 dB | SAFE |
| 2. | 60-85 dB | UNSAFE-Elevated noise |
| 3. | Above 85 dB | UNSAFE-Hearing risk |
ESP32 Noise Pollution Monitor vs. Other Sound Measurement Methods
Before building, it helps to see how this ESP32-based approach compares with the two most common alternatives makers consider:
Feature | ESP32 + MAX4466 (This Project) | Arduino + Basic Sound Sensor | Dedicated Handheld dB Meter |
| Real-time cloud logging | Yes, via built-in Wi-Fi to CircuitDigest Cloud | No, needs an added Wi-Fi module | No |
| Remote WhatsApp alerts | Yes, automatic on threshold breach | No | No |
| Historical trend tracking (15-min avg, min/max) | Yes, built into firmware and dashboard | Limited, requires custom code | Rarely, only on premium models |
| Approximate cost | Low (single board + mic module) | Lowest | Moderate to high |
| Best for | Continuous unattended IoT monitoring | Simple threshold-triggered projects | One-off spot measurements |
Calibration of MAX4466 Microphone Amplifier:
Calibrating the MAX4466 Microphone Amplifier is important because it will show a higher or lower value if not calibrated properly. To calibrate it, upload the code and adjust the physical trimmer potentiometer to set the ambient noise that is displayed between 30 and 40 dB on the OLED. Here is another Arduino Whistle Detector Switch using Sound Sensor project where the AC lamp is switched based on a high-frequency whistle.
Components Required for This ESP32 Noise Pollution Monitoring Project
Below is the list of components required to build this project
| S.No | Components | Specification | Quantity |
| 1. | Microcontroller | XIAO ESP32-S3 | 1 |
| 2. | OLED | 0.96 inch SSD1306 | 1 |
| 3. | Microphone Amplifier | MAX4466 | 1 |
| 4. | Antenna | 2.4 GHz Rod Antenna | 1 |
ESP32 Noise Pollution Monitoring System Block Diagram
Below is the ESP32 noise pollution monitoring system block diagram
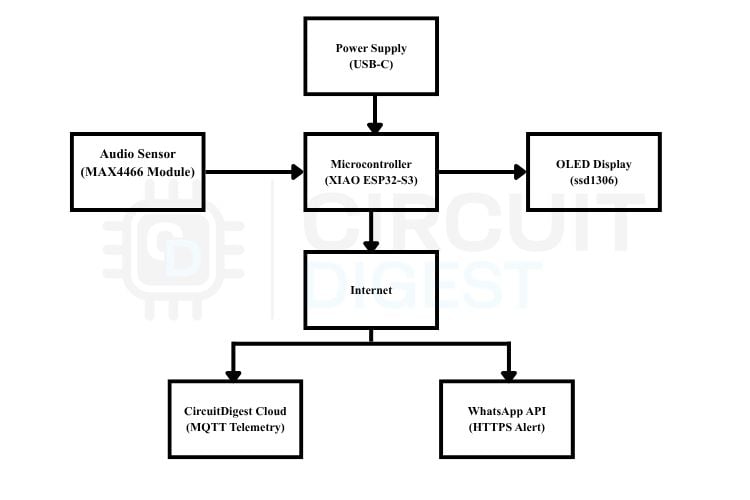
MAX4466 Module is an electret microphone with an integrated adjustable-gain amplifier. XIAO ESP32-S3 has a dual-core 240 MHz microcontroller with built-in Wi-Fi, responsible for peak-hold processing, threshold logic, and network requests. SSD1306 OLED has a 128 x 64 pixel monochrome display interfacing over I2C to output real-time readings and bar graphs. CircuitDigest Cloud has an MQTT cloud server responsible for telemetry updates for remote monitoring. CircuitDigest WhatsApp is responsible for sending WhatsApp alerts via a JSON payload.
Circuit Diagram of the Noise Pollution Monitor Using ESP32
Below is the wiring diagram of this AI-based noise pollution monitor

Connect the 2.4 GHz Rod Antenna to the U.FL Connector of the XIAO ESP32-S3 Board.
MAX4466 Module Wiring:
- MAX4466 VCC - XIAO board 3.3 V
- MAX4466 GND - XIAO board GND
- MAX4466 OUT - XIAO board GPIO 1
OLED Wiring:
- OLED VCC - XIAO board 3.3 V
- OLED GND - XIAO board GND
- OLED SDA - XIAO board GPIO 5
- OLED SCL - XIAO board GPIO 6
Here is another Measure Sound/Noise Level in dB with Microphone and Arduino project where we showcased how the sound measurement is integrated with the “Sound Meter” Android application.
Step-by-Step CircuitDigest Cloud Setup Guide
A step-by-step guide for the Noise Pollution Monitor with CircuitDigest Cloud is listed below.
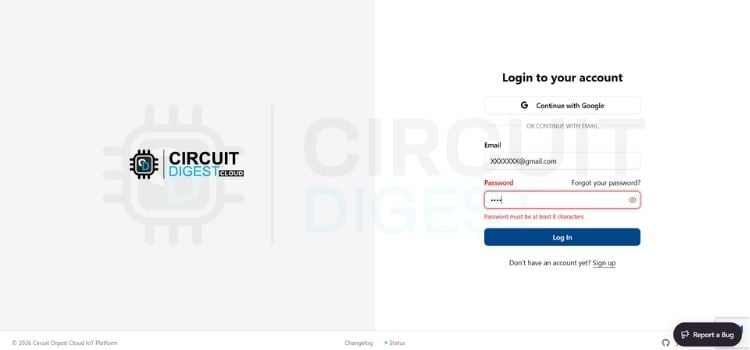
Step 1⇒ Sign Up / Login
Sign up or login into your account CircuitDigest Cloud by giving valid email and password.
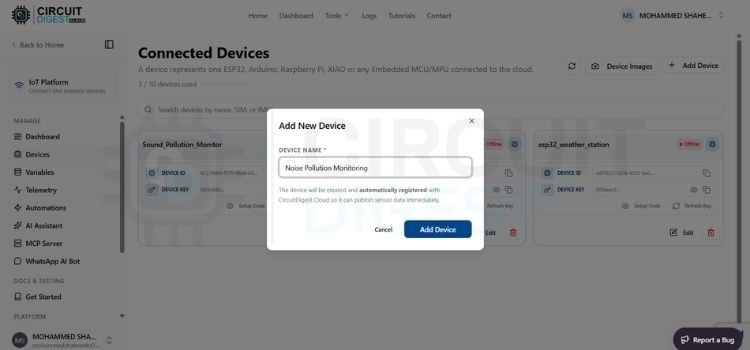
Step 2⇒ Adding New Device
After logging in, click Dashboard at the top, click the device option on the left side of the website, click Add New Device and enter what you want for your project. For us, we have given it Noise Pollution Monitoring; you can give the name you want to display for this device and click the Add Device button in blue.
Step 3⇒ Adding New Variables
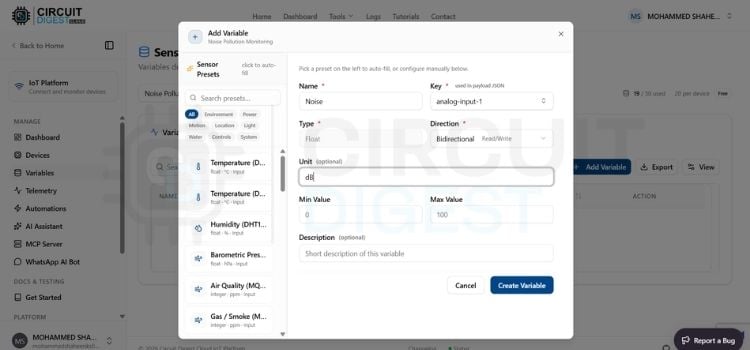
After creating a new device, click Variables on the left side of the website. Now select the device you created from the drop-down option. Click the Add Variable option. You will see a pop-up in the name section; first, we will create a variable for noise. Give the name you want to display for the variable; we have named it noise. Select the key you want for this variable; we have selected analog-input-1, set the direction to bidirectional, set the unit to dB, and pressed Create Variable. The variable will be created. Do the same for 4 more variables and change the units as per the variable we are measuring.
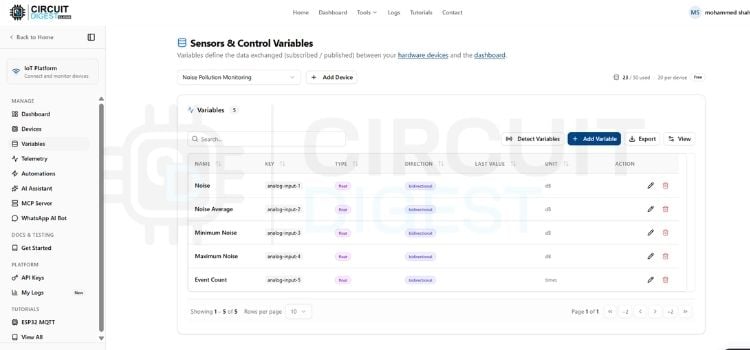
Step 4⇒ Variable List
These 5 variable names allow us to choose the key we want: analog-input-1 for the noise, analog-input-2 for the noise average, analog-input-3 for the minimum noise, analog-input-4 for the maximum noise, analog-input-5 for the event count.
Step 5⇒ Adding Widget
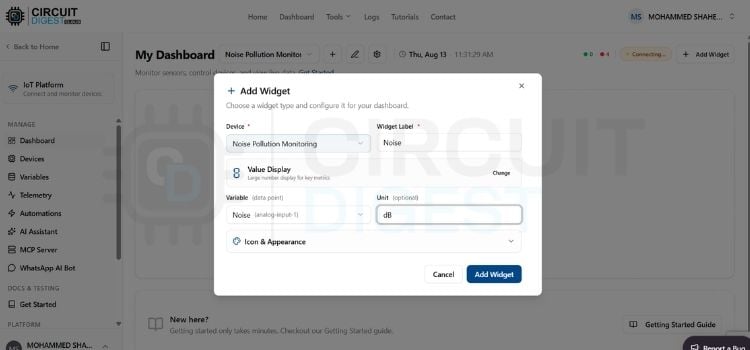
After adding the variable, click the Dashboard on the left side of the website and select the device you created from the drop-down. First, we will create a widget for sound. Click Add Widget, then click Value Display Widget. A menu bar will pop up; select the device you created from the drop-down, name it as a noise set variable as analog-input-1, then set the unit as dB and click Add Widget. Do the same for the other 4 widgets, but select the proper variable for the widget placed. Now the dashboard setup is complete.
Step 6⇒ WhatsApp API Integration
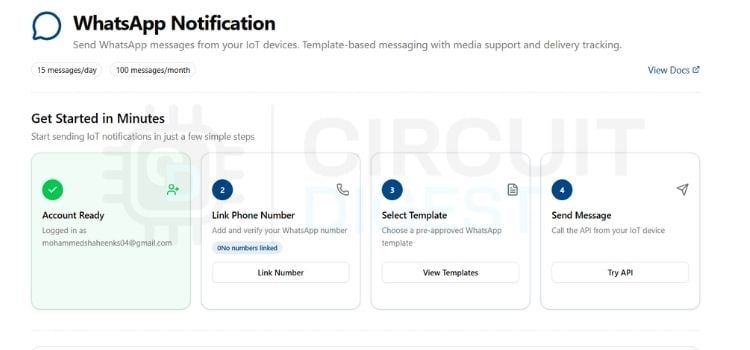
Click the Home tab at the top, scroll down, and you will see WhatsApp notification; click it. There, you will see the link number option; click it, enter your number, an OTP will be sent to your number, verify it, then your WhatsApp API setup is over. You can also check out a similar Arduino Controlled Musical Fountain using Sound Sensor project where a musical water fountain is implemented, which was previously done here at Circuit Digest.
Code Explanation for the ESP32 Noise Pollution Monitoring Project
The code is written in Arduino IDE for a Sound Pollution Monitoring system using an ESP32 microcontroller.
// ---------- Mic Config ----------
#define AUDIO_PIN 1
#define SAMPLE_WINDOW 50
#define ADC_RESOLUTION 4095.0
#define V_REF 3.3
// ---------- OLED Config ----------
#define SCREEN_WIDTH 128
#define SCREEN_HEIGHT 64
#define OLED_RESET -1
#define SDA_PIN 5
#define SCL_PIN 6
Adafruit_SSD1306 display(SCREEN_WIDTH, SCREEN_HEIGHT, &Wire, OLED_RESET);
Pin Configuration
The pin for the MAX4466 module is declared as AUDIO_ PIN and set to GPIO 1; a peak-to-peak sampling window of 50 ms is set. It has a 12-bit ADC resolution with a 3.3 V reference. The I2C pins for the OLED are declared as GPIO 5 for SDA and GPIO 6 for SCL.
#define WIFI_SSID      "Your-Wi-Fi-Name"
#define WIFI_PASS      "Your-Wi-Fi-Password"
#define DEVICE_ID      "Your-Device-ID"
#define CONNECTION_KEY "Your-Connection-Key"
#define API_KEY        "Your-API-Key"
#define PHONE_NUMBER   "Your-Phone-Number"
#define KEY_SOUND_NOW  "analog-input-1"
#define KEY_AVG_15MIN  "analog-input-2"
#define KEY_MIN        "analog-input-3"
#define KEY_MAX        "analog-input-4"
#define KEY_EVENTS     "analog-input-5"
const char* host = "www.circuitdigest.cloud";
Network Credentials and Authentication Parameters
This configuration section establishes the essential network credentials, cloud identifiers, and telemetry data keys. It stores the local Wi-Fi login details with unique CircuitDigest Cloud authentication tokens like device ID, connection key, and an API key with the user's phone number for automated WhatsApp alerts. The key for current noise is analog-input-1, the key for average noise is analog-input-2, the key for minimum noise is analog-input-3, the key for maximum noise is analog-input-4, the key for event count is analog-input-5.
float readDBLevel() {
 unsigned long startMillis = millis();
 unsigned int signalMax = 0;
 unsigned int signalMin = 4095;
while (millis() - startMillis < SAMPLE_WINDOW) {
   unsigned int sample = analogRead(AUDIO_PIN);
   if (sample < 4095) {
     if (sample > signalMax) signalMax = sample;
     if (sample < signalMin) signalMin = sample;
   }
 }
unsigned int peakToPeak = signalMax - signalMin;
 float voltage = (peakToPeak * V_REF) / ADC_RESOLUTION;
 if (voltage < 0.01) voltage = 0.01;
float db = (41.52 * log10(voltage)) + 64.02;
 if (db < 30.0) db = 30.0;
return db;
}
Analog Signal Conversion
This loop captures raw analog audio data for a 50 ms sampling window to track the minimum and maximum signal values. It calculates the peak-to-peak voltage difference while filtering out zero-voltage signal levels. Finally, it converts the voltage into decibels using a logarithmic formula, and it clamps the output to 30 dB.
void updateOLED(bool safe, bool cloudConnected) {
 display.clearDisplay();
 display.setTextSize(1);
 display.setTextColor(SSD1306_WHITE);
// Row 1: Safe/Unsafe + Cloud status
 display.setCursor(0, 0);
 display.print(safe ? "SAFE" : "UNSAFE");
 display.print("  Cloud:");
 display.println(cloudConnected ? "OK" : "OFF");
// Row 2: Live dB value
 display.setCursor(0, 10);
 display.print("Noise: ");
 display.print(displayDB, 1);
 display.println(" dB");
// Bar graph
 int barWidth = map(constrain((int)displayDB, 30, 100), 30, 100, 0, 118);
 display.drawRect(0, 20, 120, 6, SSD1306_WHITE);
 display.fillRect(2, 21, barWidth, 4, SSD1306_WHITE);
// Row 3: 15-min average + trend
 display.setCursor(0, 30);
 display.print("Avg15m: ");
 display.print(last15MinAvg, 1);
 if (last15MinAvg > previous15MinAvg + 0.5) {
   display.print(" UP");
 } else if (last15MinAvg < previous15MinAvg - 0.5) {
   display.print(" DN");
 } else {
   display.print(" --");
 }
// Row 4: Min / Max
 display.setCursor(0, 40);
 display.print("Min:");
 display.print(windowMin, 0);
 display.print(" Max:");
 display.print(windowMax, 0);
// Row 5: Loud event count
 display.setCursor(0, 50);
 display.print("Events: ");
 display.print(loudEventCount);
// Row 6: Uptime
 display.setCursor(0, 58);
 display.print("Up: ");
 display.print(getUptimeString());
display.display();
}
Real-Time Visual Interface Driver
This function refreshes the SSD1306 display by clearing the screen. It draws current noise state (SAFE/UNSAFE), cloud connectivity status(OK/NOT), live decibel readings, and a noise intensity bar graph. Finally, it displays historical trends including 15-minute averages with indicators (UP/DN), min/max windows for noise in the current 15-minute window, loud event counts, and total system uptime.
if (!cloudConnected) {
   Serial.println("Wi-Fi Disconnected! Restarting system...");
   delay(2000);
   ESP.restart();
 }
// Sample mic (blocks ~50ms)
 instantDB = readDBLevel();
// Track loudest reading since last OLED refresh
 if (instantDB > peakDBSinceLastDisplay) {
   peakDBSinceLastDisplay = instantDB;
 }
// Track loudest reading since last CLOUD publish (this is what fixes the snap issue)
 if (instantDB > cloudPeakDB) {
   cloudPeakDB = instantDB;
 }
// Accumulate for 15-min average
 dbSum += instantDB;
 sampleCount++;
// Track min/max for this window
 if (instantDB < windowMin) windowMin = instantDB;
 if (instantDB > windowMax) windowMax = instantDB;
Non-Blocking Peak Hold Loop
This block serves as the primary data acquisition within the main program loop. First, it triggers a safety restart if the Wi-Fi connection drops, before sampling the MAX4466 microphone for current decibel levels. Finally, it captures peak audio spikes for both OLED and cloud publishing windows while continuously accumulating decibel sample counts and min/max decibel levels to maintain ongoing noise metrics.
// ---- Every 15 minutes, finalise average, reset window stats ----
 if (now - periodStartMillis >= AVG_WINDOW_MS) {
   if (sampleCount > 0) {
     previous15MinAvg = last15MinAvg;
     last15MinAvg = dbSum / sampleCount;
     Serial.print("15-min average: ");
Serial.println(last15MinAvg, 1);
   }
dbSum = 0; sampleCount = 0;
   windowMin = 999.0;
   windowMax = 0.0;
   loudEventCount = 0;
   periodStartMillis = now;
 }
// ---- Publish to CircuitDigest Cloud every 1 second using PEAK value ----
 if (now - lastCloudPublish >= CLOUD_PUBLISH_MS) {
   lastCloudPublish = now;
float reportedMin = (windowMin > 900.0) ? instantDB : windowMin;
CDcloud.publish({
     {KEY_SOUND_NOW, cloudPeakDB},
     {KEY_AVG_15MIN, last15MinAvg},
     {KEY_MIN,       reportedMin},
     {KEY_MAX,       windowMax},
     {KEY_EVENTS,    (float)loudEventCount}
   });
   Serial.print("Cloud publish | Peak dB: ");
   Serial.print(cloudPeakDB, 1);
   Serial.print(" | 15min Avg: ");
   Serial.print(last15MinAvg, 1);
   Serial.print(" | Min: ");
   Serial.print(reportedMin, 1);
   Serial.print(" | Max: ");
   Serial.print(windowMax, 1);
   Serial.print(" | Events: ");
   Serial.println(loudEventCount);
cloudPeakDB = 0.0;  // reset tracker for next 1-second window
 }
MQTT Cloud Telemetry
The sound metrics are published to CircuitDigest Cloud every second via the MQTT protocol. The average reading is updated. Every 15 minutes, the window recalculates and resets without interrupting the continuous MQTT data stream. You can also check out similar AI Projects done previously here at Circuit Digest.
Live Demo: Real-Time ESP32 Noise Pollution Monitoring
Watch the smart ESP32 noise pollution monitoring system measure sound levels in real time. See live noise readings, safety status, and monitoring data displayed on the OLED and cloud dashboard. Experience how the system detects high-noise events and provides instant alerts for effective noise monitoring.
Output of the ESP32 Noise Pollution Monitor
The OLED display is organized into six rows, each showing a specific noise metric in real time. The first row displays the current safety level status (SAFE or UNSAFE) along with the CircuitDigest Cloud connection status. The second row shows the current sound level in decibels, with a live bar graph that visually represents the sound intensity. The third row displays the 15-minute average sound level, along with a trend indicator showing whether noise levels are rising, falling, or holding steady compared to the previous 15-minute window.
The fourth row shows the minimum and maximum sound levels recorded during the current 15-minute window, while the fifth row displays the number of high-noise event instances where the sound crossed the 60 dB threshold, recorded during that same window. Finally, the sixth row shows the device's uptime since it was powered on.
Troubleshooting the ESP32 Noise Pollution Monitoring Project
| Issue | Fix |
| How to calibrate the MAX4466 module? | Rotate the trim potentiometer on the bottom of the module counterclockwise to increase gain, clockwise to decrease it. |
| OLED not turning on | Check that SDA and SCL are properly connected to GPIO 5 and GPIO 6. |
| Wi-Fi not connecting to the XIAO board | Ensure the external antenna is properly connected to the XIAO board. |
| Device does not turn on after all connections | Common-ground the MAX4466 module and OLED with the XIAO board's ground. |
| Quiet room reads ~80 dB even after calibration | Replace the MAX4466 module with a new one and repeat the calibration procedure. |
GitHub Repository
The GitHub repository contains the source code and project files for the ESP32-based noise pollution monitoring system. It helps users access, manage, and understand the code used for real-time noise monitoring and cloud connectivity. The repository is available online for reference and further development of the project.


Frequently Asked Questions About ESP32 Noise Pollution Monitoring
1. What is a noise pollution monitoring system using ESP32?
In simple terms, it can be described as an Internet of Things system having a microphone amplifier and an ESP32 microcontroller which measures the surrounding noise level in terms of decibels and displays the result on the OLED as well as via an online dashboard accessible at any time for real-time as well as historical data.
2. Which microphone sensor is best for noise measuring with ESP32?
Amongst several options, the MAX4466 electret mic amplifier has emerged as one of the best choices because it has a calibration facility resulting from adjustable gain features, the price is low, and the analog output can easily be interpreted by the ESP32 ADC.
3. How accurate is DIY hail ESP32 dB meter when compared with professional sound level meters?
Although a calibrated MAX4466-based solution can yield correctly valued readings in terms of trend monitoring, it is not applicable for lab measurements; thus, a legally prescribed certified device is still highly recommended for validation purposes.
4. Is it possible to track the sound pollution statistics using this project remotely?
Certainly. Each sound parameter currently considered- level, 15-minute averages, minimum and maximum level, and number of events is sent to CircuitDigest Cloud each second via MQTT and can be accessed from any device with internet.
5. When does the system refresh the noise data?
The sensor records the sound constantly and updates the peak-hold value in the CircuitDigest Cloud every second. The average, max, and min values are updated every 15 minutes.
Explore Similar Sound Projects
Explore more hands-on projects focused on sound sensing, sound detection, and sound-based automation using Arduino and ESP32. Learn how to interface sound sensors, detect noise levels, and build practical applications such as sound monitoring systems, sound-activated devices, and security alarms.
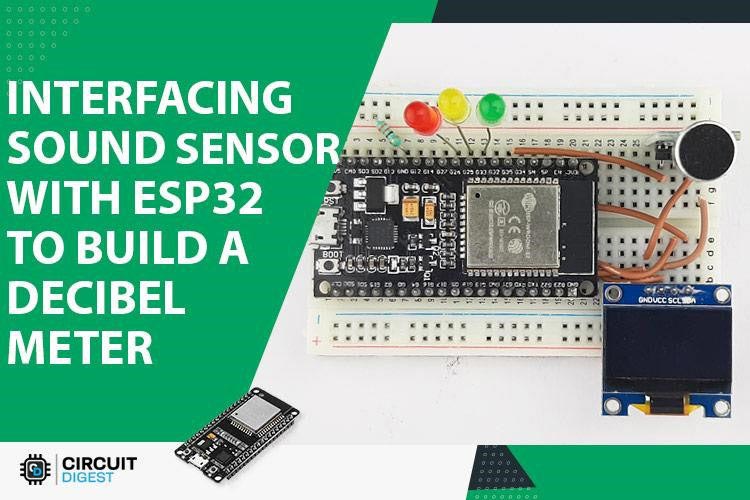
How does a KY-038 Sound Sensor work, and how to interface it with ESP32?
The KY-038 sound sensor we are using uses a condenser-type microphone to detect sound waves, which gives us a perfect balance of stability and reliability. So in this article, we decided to interface a KY-038 sensor with ESP32 and build a simple decibel meter out of it.
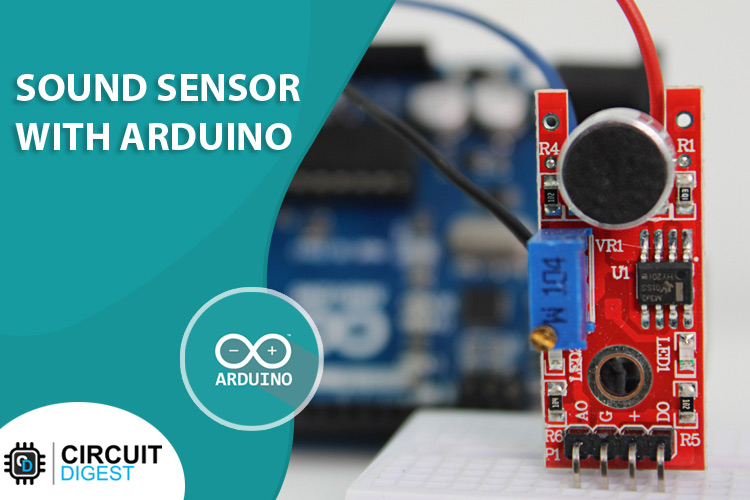
How Does a Sound Sensor Work and How to Interface it with Arduino?
A sound sensor is a simple, easy-to-use, and low-cost device that is used to detect sound waves travelling through the air. Not only that, but it can also measure its intensity, and most importantly, it can convert it to an electrical signal which we can read through a microcontroller.

Dog Barking Security Alarm using Arduino, PIR Sensor and Dog Barking Sound Module
So in this tutorial, we are going to build a Dog Barking Security Alarm using Arduino Nano, PIR Motion Sensor, and Dog Barking Sound Module. When someone gets close to your house door, a barking dog alarm will be triggered from inside the house, making all undesirable guests go away.
Complete Project Code
/*
 Simple Sound Pollution Monitor - XIAO ESP32-S3
 MAX4466 Mic + SSD1306 OLED + CircuitDigest Cloud + WhatsApp Alerts
 Uses PEAK-HOLD logic so short spikes like snaps/claps are correctly
 captured and published. Sends a WhatsApp alert when the threshold is
 crossed, with hysteresis so it doesn't spam repeated alerts.
 FIXED: WhatsApp alert now uses a longer timeout (5s instead of 1s) and
 actually reads/prints the server's HTTP response, so failures are
 visible in Serial Monitor instead of failing silently.
 Cloud Keys:
   analog-input-1 -> Present Sound Level (dB) - peak held over publish window
   analog-input-2 -> 15-min Average (dB)
   analog-input-3 -> Minimum dB (current 15-min window)
   analog-input-4 -> Maximum dB (current 15-min window)
   analog-input-5 -> Loud Event Count (current 15-min window)
*/
#include <Wire.h>
#include <Adafruit_GFX.h>
#include <Adafruit_SSD1306.h>
#include <CircuitDigestCloud.h>
#include <WiFi.h>
#include <WiFiClientSecure.h>
// ── Fill in your credentials ────────────────────────────────────────────
#define WIFI_SSID      "Your-Wi-Fi-Name"
#define WIFI_PASS      "Your-Wi-Fi-Password"
#define DEVICE_ID      "Your-Device-ID"
#define CONNECTION_KEY "Your-Connection-Key"
#define API_KEY        "Your-API-Key"
#define PHONE_NUMBER   "Your-Phone-Number"
#define KEY_SOUND_NOW  "analog-input-1"
#define KEY_AVG_15MIN  "analog-input-2"
#define KEY_MIN        "analog-input-3"
#define KEY_MAX        "analog-input-4"
#define KEY_EVENTS     "analog-input-5"
const char* host = "www.circuitdigest.cloud";
// ──────────────────────────────────────────────────────────────────────
CircuitDigestCloud CDcloud;
// ---------- Mic Config ----------
#define AUDIO_PIN 1
#define SAMPLE_WINDOW 50
#define ADC_RESOLUTION 4095.0
#define V_REF 3.3
// ---------- OLED Config ----------
#define SCREEN_WIDTH 128
#define SCREEN_HEIGHT 64
#define OLED_RESET -1
#define SDA_PIN 5
#define SCL_PIN 6
Adafruit_SSD1306 display(SCREEN_WIDTH, SCREEN_HEIGHT, &Wire, OLED_RESET);
// ---------- Safety Thresholds ----------
#define SAFE_LIMIT 60.0        // dB - adjust based on your environment
#define HYSTERESIS_LIMIT 55.0  // Level must drop below this to re-arm alert
// ---------- Timing ----------
#define AVG_WINDOW_MS 900000UL  // 15 minutes
#define OLED_REFRESH_MS 500UL
#define CLOUD_PUBLISH_MS 1000UL // Publish every 1 second
unsigned long periodStartMillis = 0;
unsigned long lastOLEDUpdate = 0;
unsigned long lastCloudPublish = 0;
unsigned long bootMillis = 0;
// ---------- Running State (15-min average) ----------
double dbSum = 0;
unsigned long sampleCount = 0;
float last15MinAvg = 0.0;
float previous15MinAvg = 0.0;
// ---------- Min/Max/Events (current 15-min window) ----------
float windowMin = 999.0;
float windowMax = 0.0;
unsigned int loudEventCount = 0;
// ---------- Sound Reading State ----------
float instantDB = 0.0;
float displayDB = 0.0;
float peakDBSinceLastDisplay = 0.0;   // for OLED refresh
float cloudPeakDB = 0.0;              // for cloud publish window
// ---------- State Lock for WhatsApp Alerts ----------
bool alertState = false;
void sendWhatsAppAlert(float currentDB) {
 WiFiClientSecure client;
 client.setInsecure();
 client.setTimeout(5000); // Increased from 1000ms - TLS handshake often needs more time
 Serial.println("Attempting WhatsApp alert connection...");
 if (!client.connect(host, 443)) {
   Serial.println("WhatsApp API Connection FAILED - could not reach host");
   return;
 }
 Serial.println("Connected to CircuitDigest Cloud host. Sending request...");
 String payload =
   "{\"phone_number\":\"" + String(PHONE_NUMBER) + "\","
   "\"template_id\":\"threshold_violation_alert\","
   "\"variables\":{"
   "\"device_name\":\"XIAO ESP32-S3\","
   "\"parameter\":\"Sound Level\","
   "\"measured_value\":\"" + String(currentDB, 1) + " dB\","
   "\"limit\":\"" + String(SAFE_LIMIT, 1) + " dB\","
   "\"location\":\"Monitoring Room\"}}";
 client.println("POST /api/v1/whatsapp/send HTTP/1.1");
 client.println("Host: www.circuitdigest.cloud");
 client.println("X-API-Key: " + String(API_KEY));
 client.println("Content-Type: application/json");
 client.println("Connection: close");
 client.print("Content-Length: ");
 client.println(payload.length());
 client.println();
 client.print(payload);
 // ---- Wait for and read the actual server response ----
 unsigned long responseStart = millis();
 while (client.connected() && !client.available()) {
   if (millis() - responseStart > 5000) {
     Serial.println("WhatsApp API response TIMEOUT - no reply from server");
     client.stop();
     return;
   }
   delay(10);
 }
 Serial.println("---- Server Response ----");
 String responseBody = "";
 while (client.connected() || client.available()) {
   if (client.available()) {
     String line = client.readStringUntil('\n');
     Serial.println(line);
     responseBody += line;
   }
 }
 Serial.println("--------------------------");
 // Quick success check based on HTTP status line
 if (responseBody.indexOf("200") > 0 || responseBody.indexOf("201") > 0) {
   Serial.println("WhatsApp Alert appears to have SENT successfully.");
 } else {
   Serial.println("WhatsApp Alert may have FAILED - check response above for error details.");
 }
 client.stop();
}
void setup() {
 Serial.begin(115200);
 delay(1000);
 pinMode(AUDIO_PIN, INPUT);
 analogSetAttenuation(ADC_11db);
 Wire.begin(SDA_PIN, SCL_PIN);
 if (!display.begin(SSD1306_SWITCHCAPVCC, 0x3C)) {
   Serial.println("SSD1306 allocation failed");
   while (1) delay(10);
 }
 display.clearDisplay();
 display.setTextColor(SSD1306_WHITE);
 display.setTextSize(1);
 display.setCursor(0, 0);
 display.println("Sound Pollution Monitor");
 display.println("Initializing...");
 display.display();
 Serial.println("Connecting to Wi-Fi & CircuitDigest Cloud...");
 if (!CDcloud.begin(WIFI_SSID, WIFI_PASS, DEVICE_ID, CONNECTION_KEY, API_KEY)) {
   Serial.println("CDcloud begin() failed — check credentials. Rebooting...");
   delay(2000);
   ESP.restart();
 } else {
   Serial.println("CDcloud initialized successfully.");
 }
 periodStartMillis = millis();
 bootMillis = millis();
 delay(500);
 Serial.println("System Ready.");
}
float readDBLevel() {
 unsigned long startMillis = millis();
 unsigned int signalMax = 0;
 unsigned int signalMin = 4095;
 while (millis() - startMillis < SAMPLE_WINDOW) {
   unsigned int sample = analogRead(AUDIO_PIN);
   if (sample < 4095) {
     if (sample > signalMax) signalMax = sample;
     if (sample < signalMin) signalMin = sample;
   }
 }
 unsigned int peakToPeak = signalMax - signalMin;
 float voltage = (peakToPeak * V_REF) / ADC_RESOLUTION;
 if (voltage < 0.01) voltage = 0.01;
 float db = (41.52 * log10(voltage)) + 64.02;
 if (db < 30.0) db = 30.0;
 return db;
}
String getUptimeString() {
 unsigned long totalSeconds = (millis() - bootMillis) / 1000;
 unsigned long days = totalSeconds / 86400;
 unsigned long hours = (totalSeconds % 86400) / 3600;
 unsigned long minutes = (totalSeconds % 3600) / 60;
 unsigned long seconds = totalSeconds % 60;
 String result = "";
 if (days > 0) {
   result += String(days) + "d " + String(hours) + "h " + String(minutes) + "m";
 } else if (hours > 0) {
   result += String(hours) + "h " + String(minutes) + "m " + String(seconds) + "s";
 } else {
   result += String(minutes) + "m " + String(seconds) + "s";
 }
 return result;
}
void updateOLED(bool safe, bool cloudConnected) {
 display.clearDisplay();
 display.setTextSize(1);
 display.setTextColor(SSD1306_WHITE);
 // Row 1: Safe/Unsafe + Cloud status
 display.setCursor(0, 0);
 display.print(safe ? "SAFE" : "UNSAFE");
 display.print("  Cloud:");
 display.println(cloudConnected ? "OK" : "OFF");
 // Row 2: Live dB value
 display.setCursor(0, 10);
 display.print("Sound: ");
 display.print(displayDB, 1);
 display.println(" dB");
 // Bar graph
 int barWidth = map(constrain((int)displayDB, 30, 100), 30, 100, 0, 118);
 display.drawRect(0, 20, 120, 6, SSD1306_WHITE);
 display.fillRect(2, 21, barWidth, 4, SSD1306_WHITE);
 // Row 3: 15-min average + trend
 display.setCursor(0, 30);
 display.print("Avg15m: ");
 display.print(last15MinAvg, 1);
 if (last15MinAvg > previous15MinAvg + 0.5) {
   display.print(" UP");
 } else if (last15MinAvg < previous15MinAvg - 0.5) {
   display.print(" DN");
 } else {
   display.print(" --");
 }
 // Row 4: Min / Max
 display.setCursor(0, 40);
 display.print("Min:");
 display.print(windowMin, 0);
 display.print(" Max:");
 display.print(windowMax, 0);
 // Row 5: Loud event count
 display.setCursor(0, 50);
 display.print("Events: ");
 display.print(loudEventCount);
 // Row 6: Uptime
 display.setCursor(0, 58);
 display.print("Up: ");
 display.print(getUptimeString());
 display.display();
}
void loop() {
 unsigned long now = millis();
 CDcloud.loop();
 bool cloudConnected = (WiFi.status() == WL_CONNECTED);
 if (!cloudConnected) {
   Serial.println("Wi-Fi Disconnected! Restarting system...");
   delay(2000);
   ESP.restart();
 }
 // Sample mic (blocks ~50ms)
 instantDB = readDBLevel();
 // Track loudest reading since last OLED refresh
 if (instantDB > peakDBSinceLastDisplay) {
   peakDBSinceLastDisplay = instantDB;
 }
 // Track loudest reading since last CLOUD publish (this is what fixes the snap issue)
 if (instantDB > cloudPeakDB) {
   cloudPeakDB = instantDB;
 }
 // Accumulate for 15-min average
 dbSum += instantDB;
 sampleCount++;
 // Track min/max for this window
 if (instantDB < windowMin) windowMin = instantDB;
 if (instantDB > windowMax) windowMax = instantDB;
 // ---- State-locked WhatsApp alert dispatch ----
 // Fires once when crossing SAFE_LIMIT, then stays locked (won't fire again)
 // until the reading drops below HYSTERESIS_LIMIT, preventing alert spam
 // while sound stays elevated.
 if (instantDB > SAFE_LIMIT && !alertState) {
   alertState = true;
   loudEventCount++;
   sendWhatsAppAlert(instantDB);
 } else if (instantDB < HYSTERESIS_LIMIT && alertState) {
   alertState = false;
 }
 // ---- Refresh OLED every 500ms using PEAK value ----
 bool safe = true;
 if (now - lastOLEDUpdate >= OLED_REFRESH_MS) {
   displayDB = peakDBSinceLastDisplay;
   safe = (displayDB <= SAFE_LIMIT);
   updateOLED(safe, cloudConnected);
   peakDBSinceLastDisplay = 0.0;
   lastOLEDUpdate = now;
 }
 // ---- Every 15 minutes, finalize average, reset window stats ----
 if (now - periodStartMillis >= AVG_WINDOW_MS) {
   if (sampleCount > 0) {
     previous15MinAvg = last15MinAvg;
     last15MinAvg = dbSum / sampleCount;
     Serial.print("15-min average: ");
     Serial.println(last15MinAvg, 1);
   }
   dbSum = 0; sampleCount = 0;
   windowMin = 999.0;
   windowMax = 0.0;
   loudEventCount = 0;
   periodStartMillis = now;
 }
 // ---- Publish to CircuitDigest Cloud every 1 second using PEAK value ----
 if (now - lastCloudPublish >= CLOUD_PUBLISH_MS) {
   lastCloudPublish = now;
   float reportedMin = (windowMin > 900.0) ? instantDB : windowMin;
   CDcloud.publish({
     {KEY_SOUND_NOW, cloudPeakDB},
     {KEY_AVG_15MIN, last15MinAvg},
     {KEY_MIN,       reportedMin},
     {KEY_MAX,       windowMax},
     {KEY_EVENTS,    (float)loudEventCount}
   });
   Serial.print("Cloud publish | Peak dB: ");
   Serial.print(cloudPeakDB, 1);
   Serial.print(" | 15min Avg: ");
   Serial.print(last15MinAvg, 1);
   Serial.print(" | Min: ");
   Serial.print(reportedMin, 1);
   Serial.print(" | Max: ");
   Serial.print(windowMax, 1);
   Serial.print(" | Events: ");
   Serial.println(loudEventCount);
   cloudPeakDB = 0.0;  // reset tracker for next 1-second window
 }
 // ---- Serial debug ----
 Serial.print("dB: "); Serial.print(instantDB, 1);
 Serial.print(" | Min: "); Serial.print(windowMin, 1);
 Serial.print(" | Max: "); Serial.print(windowMax, 1);
 Serial.print(" | Events: "); Serial.print(loudEventCount);
 Serial.print(" | Avg15m: "); Serial.print(last15MinAvg, 1);
 Serial.print(" | Uptime: "); Serial.println(getUptimeString());
}

Add a comment
No account needed. Your comment appears once a moderator has reviewed it.