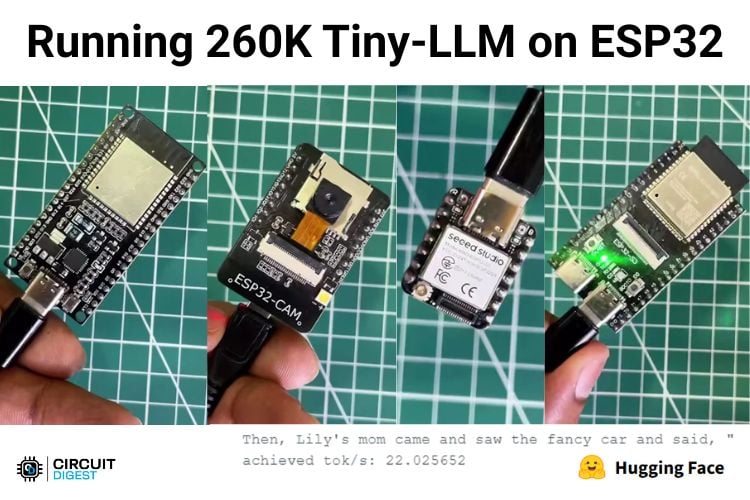
We are all facing a huge transition in tech due to AI. In projects, we can run AI models on PCs, SBCs or even Cloud servers. In this tutorial, we are trying to see if we can run an AI model on a microcontroller board like the ESP32. To test this out, we are going to deploy and benchmark the 260K-parameter Tiny-LLM by Andrej Karpathy using his open-source llama2.c Tiny-LLM framework across four distinct ESP32 boards. This model is designed to run in pure C. We will learn how to run the model on this memory-constrained microcontroller, examine the memory bandwidth limitations of SPI Flash streaming versus PSRAM, and evaluate real-world token generation speeds.
Hardware Test Bench
| S no | Board | Flash | PSRAM |
| 1 | ESP32 DevKit V1 | 4 MB | 0 MB |
| 2 | ESP32-CAM | 4 MB | 4 MB |
| 3 | Seeed XIAO ESP32-S3 | 8 MB | 8 MB |
| 4 | ESP32-S3 DevKit (N16R8) | 16 MB | 8 MB |
In the past, we have run .ino code on Arduino and ESP Boards, but in this case, it's slightly different. We need to flash this Tiny-LLM also onto the ESP32 Flash memory. Every ESP32 comes with Flash Memory, but it's optional that they have PSRAM. Depending on the project requirements. We need to buy the appropriate ESP32 Board. So, first of all. We are going to load the Tiny-LLM onto the Flash Memory of the ESP32. This has to be done no matter if the board has PSRAM or not. Let’s see where to go and download the model from.
Downloading the Tiny-LLM
First of all, we need to go to the Hugging Face page for Andrej Karpathy’s stories260L Tiny-LLM page and download the stories260K.bin and tok512.bin files which are by clicking the download option to their right side. Trained on the TinyStories dataset, this model outputs simple stories using the vocabulary of 3-to-4-year-olds. We cannot expect a high level of storytelling considering its size, which is around 1 MB.
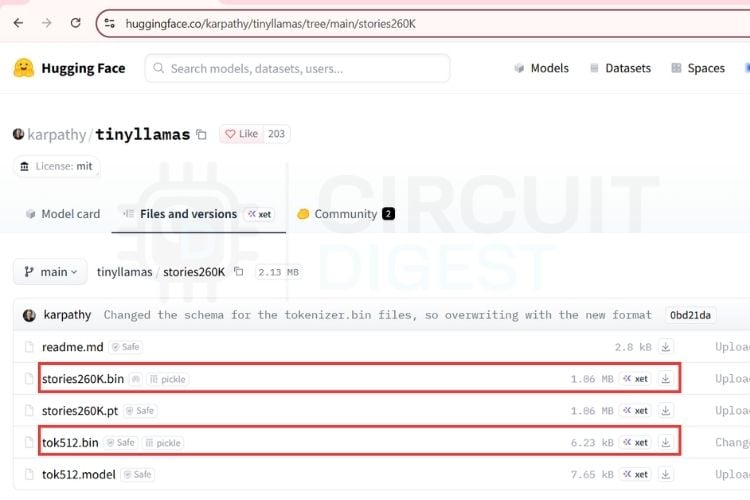
Let's see what exactly these files do. The stories260K.bin is the raw binary file containing the actual learned weights of the 260K parameter model. stories260K.pt is the same stories260K.bin file, but in the PyTorch format. It contains the same mathematical weights as the .bin file. Its use is to load the model into Python code to fine-tune it or analyze it using PyTorch code. For our tutorial, we are not going to use it. The tok512.bin is a custom binary version of the tokeniser. It tells the C program (run.c), which we will run in Arduino IDE, how to map numeric IDs into English letters and words. tok512.model is used by some Python text-processing libraries to break down sentences into tokens before training. We are not going to use that as well. As of now, let's download the stories260K.bin and tok512.bin files for the tutorial.
Flashing Tiny-LLM to ESP32 Flash Memory
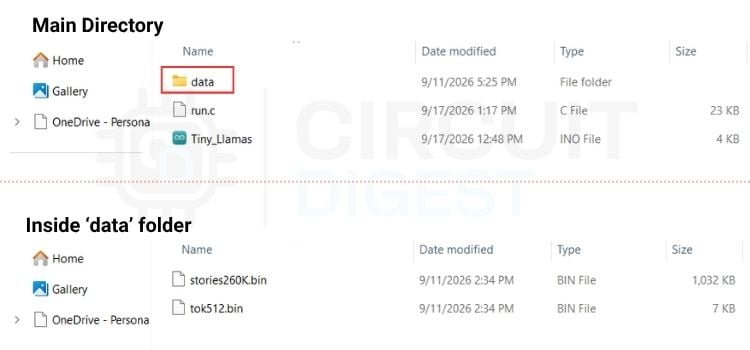
Before flashing the model, let's see what the folder structure should look like for this to work. We have the ino code and a run.c code. In the same directory where these code files reside, create a folder named data and save these models, which we downloaded just now, to the data folder. This is what my folder structure looks like. These files are also provided in the GitHub repo provided below.
Once this is set up, let's go ahead and flash the models in the data folder to the ESP32 Flash. By default, Arduino IDE only allows us to upload code (.ino files). So, we need an additional tool to flash these files to the ESP32. The Arduino LittleFS Upload Plugin is a tool that allows US to store non-code files on our local PC (like web pages, images, or configuration files) directly onto the built-in flash memory of microcontrollers like ESP8266, ESP32, or RP2040.
We need to go to the official Earle Philhower LittleFS Upload Releases page and download the file named arduino-littlefs-upload-1.6.3.vsix. This is the latest version of the compiled release file at the time of writing this tutorial. Copy the downloaded file and paste it into “C:\Users\User name\.arduinoIDE\plugins”. If it gives any error when executing, then keep the file directly within the “C:\Users\Pavilion\.arduinoIDE” directory.
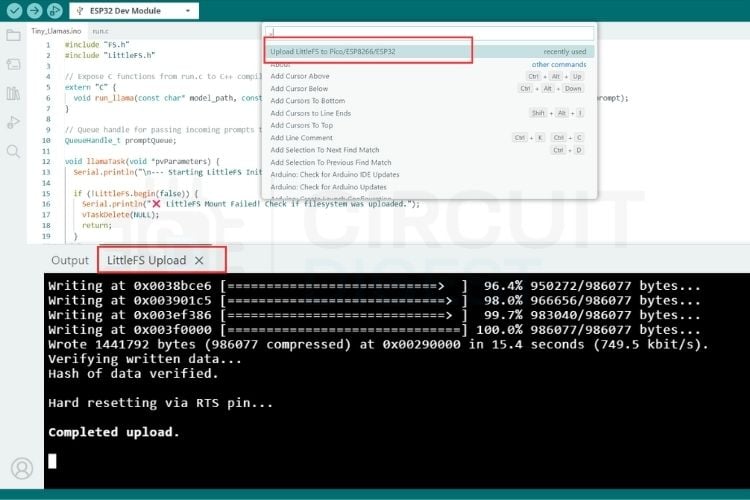
For flashing the Model weights to Flash Memory, use the shortcut Ctrl + Shift + P and click Upload LittleFS to Pico/ESP8266/ESP32. Wait for the LittleFS Upload terminal window to turn to “Completed Upload”. Once this is done, we have successfully loaded the model weights to the ESP32 Flash Memory. If any error comes up, the most likely reason is improper folder structure or folder naming. Just make sure that part is done properly as mentioned above. Once this is done, we are ready to upload the code to the ESP32.
Arduino IDE Configurations
Check the following configurations in the Tools menu in Arduino IDE as shown below. The options must be selected as per the RAM and Flash size of the specific ESP32 board you are using. If it does not have PSRAM, just keep the PSRAM option disabled. If it has PSRAM, select the PSRAM size. In the screenshot, it shows the settings for an ESP32 S3 Dev board with 16 MB Flash and 8 MB PSRAM on the right and a normal ESP32 Dev Board with the default 4 MB Flash and no PSRAM on the left. The right configuration for your board will make this work.
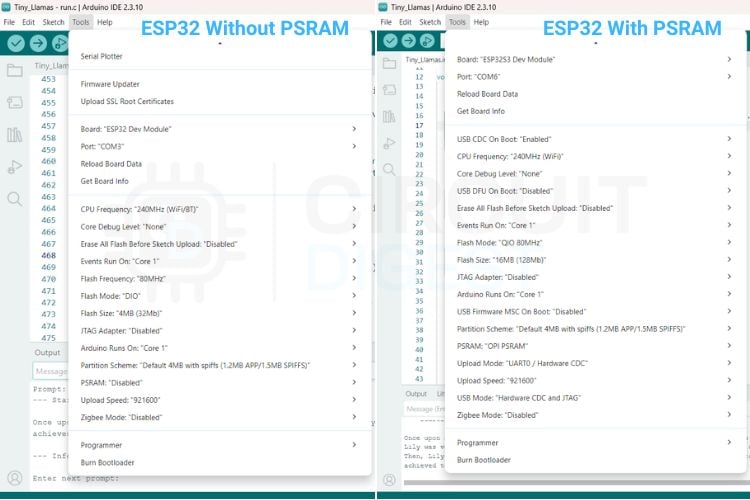
From the GitHub link below, all the code and the models are available for download. One thing to note is that the run.c code to be flashed on an ESP32 Dev board that does not have any PSRAM is kept in a separate folder named “run.c code for ESP32 without PSRAM” in the repo. Use that run.c if the ESP32 does not have any PSRAM; otherwise, use the one in the main directory. After setting the right configurations. Hit the upload button. The code will be successfully flashed onto your ESP32.
Code Explanation
Let's take a look at the coding part of this tutorial.
#include "FS.h"
#include "LittleFS.h"
// Expose C functions from run.c to C++ compiler
extern "C" {
 void run_llama(const char* model_path, const char* tokenizer_path, float temperature, float topp, int steps, const char* prompt);
}
Imports the flash file system libraries required to read files directly from the ESP32’s flash chip. extern "C" { ... } allows the C++ sketch to link directly to run_llama(), which is written in plain C inside the companion run.c file.
void llamaTask(void *pvParameters) {
 Serial.println("\n--- Starting LittleFS Initialization ---");
 if (!LittleFS.begin(false)) {
   Serial.println("LittleFS Mount Failed! Check if filesystem was uploaded.");
   vTaskDelete(NULL);
   return;
 }
 Serial.println("LittleFS Mounted Successfully.");

 if (!LittleFS.exists("/stories260K.bin")) {
   Serial.println("Error: /stories260K.bin not found on LittleFS!");
   vTaskDelete(NULL);
   return;
 }

 if (!LittleFS.exists("/tok512.bin")) {
   Serial.println("Error: /tok512.bin not found on LittleFS!");
   vTaskDelete(NULL);
   return;
 }
void llamaTask() defines the body of the FreeRTOS background task. LittleFS.begin(false) mounts the SPI Flash file system. Passing false ensures it won't auto-format the storage if mounting fails, protecting existing files. LittleFS.exists() checks whether the two essential binary files that we downloaded into the folder named ‘data’ exist on flash. So make sure they exist, or else it gives an error. vTaskDelete(NULL) safely terminates and cleans up this task if storage mounting or file verification fails.
void setup() {
 Serial.begin(115200);
 delay(2000); // Allow hardware serial connection to settle
 Serial.println("==========================================");
 Serial.println("   ESP32-S3 Tiny Llama Inference Engine   ");
 Serial.println("==========================================");
 // Non-blocking memory mode log
 if (ESP.getPsramSize() == 0) {
   Serial.println("ℹ️ PSRAM not detected. Running in Flash-Streaming mode.");
 } else {
   Serial.printf("PSRAM Available: %d Bytes\n", ESP.getFreePsram());
 }
Serial.begin(115200) initializes the primary hardware serial line at 115,200 baud. ESP.getPsramSize() checks if external PSRAM is attached to the ESP32-S3. If none is found, it notes that the system will stream weights directly out of Flash memory.
void loop() {
 // Read typed text from the Serial Monitor
 if (Serial.available() > 0) {
   String inputString = Serial.readStringUntil('\n');
   inputString.trim(); // Strip carriage returns and spaces
   if (inputString.length() > 0) {
     char promptBuffer[256];
     inputString.toCharArray(promptBuffer, sizeof(promptBuffer));
     // Push user text into queue for llamaTask to consume
     xQueueSend(promptQueue, &promptBuffer, pdMS_TO_TICKS(100));
   }
 }
 vTaskDelay(pdMS_TO_TICKS(50)); // Poll serial smoothly
}
Serial.available() > 0 checks if the user has typed text into the Arduino Serial Monitor. Serial.readStringUntil('\n') & .trim() reads characters until a newline is reached and strips out extra whitespace or carriage returns (\r). inputString.toCharArray() converts the Arduino C++ String object into a plain C-style char array buffer. xQueueSend() pushes the new prompt into promptQueue with a 100 ms timeout. Core 1 instantly picks up this message to run the next inference. vTaskDelay(pdMS_TO_TICKS(50)) pauses Core 0 execution briefly to keep the processor watchdog timer happy and yield control back to background OS routines.
Results
After the code is successfully uploaded, open the serial monitor. It will start generating its default story the moment Arduino IDE detects the board. The code is made in such a way that we can give a starting prompt for the story in the serial monitor, and the model generates a continuing story. But, practically, it doesn't work like that. It’s just a 1 MB tiny LLM that doesn't perform like a real LLM. But at least it generates words and outputs the tokens/second in the serial monitor. We can keep this as a starting point for running tiny LLMs on microcontroller boards.
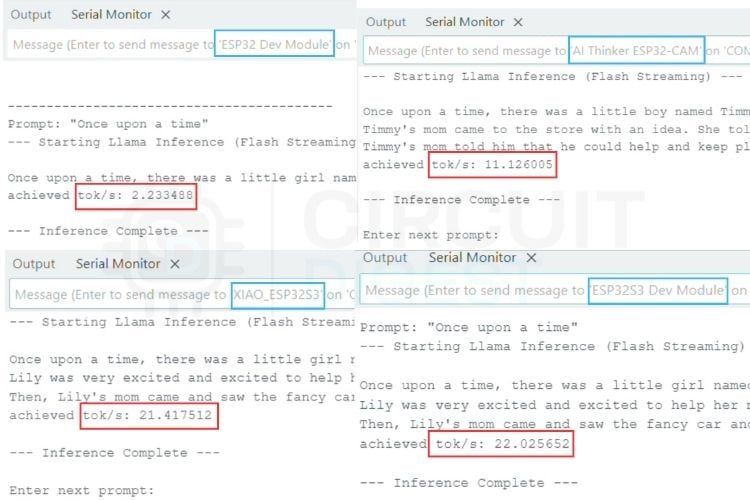
Above are the results of the model running on 4 different ESP32-based boards. The Board names and respective speeds are highlighted in the image above and listed in the table below.
| S no | Board | Flash | PSRAM | Speed (tok/sec) |
| 1 | ESP32 DevKit V1 | 4 MB | 0 MB | 2.33 tok/sec |
| 2 | ESP32-CAM | 4 MB | 4 MB | 11.12 tok/sec |
| 3 | Seeed XIAO ESP32-S3 | 8 MB | 8 MB | 21.41 tok/sec |
| 4 | ESP32-S3 DevKit (N16R8) | 16 MB | 8 MB | 22.02 tok/sec |
Conclusion
This benchmark confirms that PSRAM bandwidth is the single most critical factor for running local Generative AI models at the edge. While running on Flash enables low-cost non-PSRAM hardware to execute basic inference tasks (2.33 tok/sec), enabling Octal-SPI PSRAM on the ESP32-S3 unlocks nearly a 10x performance gain (22.02 tok/sec). This opens up practical possibilities for TinyML engineers to deploy lightweight, fully offline Micro-LLMs for local intent classification, offline smart home interfaces, and real-time edge processing without sending data to external cloud APIs.