

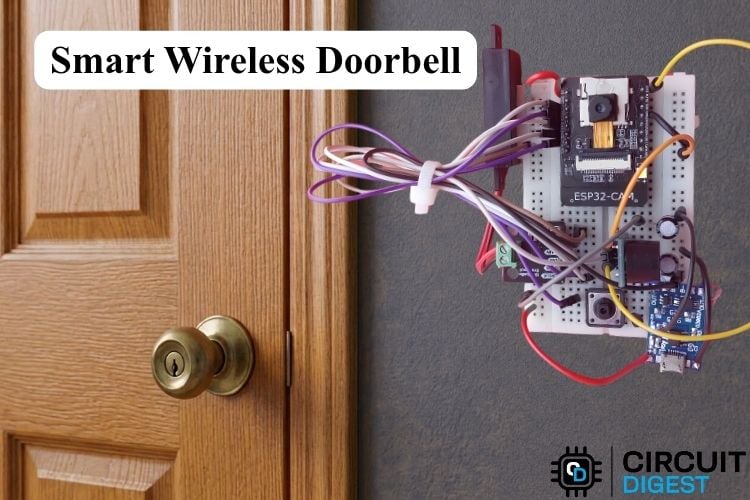
Missing a visitor at the front door usually means missed package deliveries, keeping friends waiting outside, or missing unexpected guests. Standard doorbells only work if we happen to be sitting nearby and the chime is loud enough to hear. If we are stuck in a work meeting, listening to music with headphones, or away from home, it is easy to miss the ring, leaving visitors waiting outside with no idea whether anyone is home.
To bridge this gap, we created a smart, connected solution that provides real-time presence monitoring and instant interaction for the person at the door. Whether we are in another room or not in the house, this system ensures we never miss a visitor at our front door. In this project, we build a DIY doorbell camera using an ESP32-CAM. This smart wireless doorbell is connected to Wi-Fi, so it can alert your phone. Because every press uploads a photo to your dashboard, it also works as a basic smart doorbell security system using IoT for your front door. If you are interested in this type of project, check ESP32 projects and IoT projects previously published on Circuit Digest.
Table of Contents
How Does This Smart ESP32 Cam Voice Doorbell Work?
When a visitor presses the front door button, the ESP32-CAM detects the input through an interrupt on GPIO 13 and immediately begins executing its notification sequence. First, it plays a pre-recorded Audio Voice Prompt ("Doorbell ringing, please wait") from flash memory to the MAX98357A I2S amplifier, driving the 8Ω outdoor speaker by Direct Memory Access (DMA). Simultaneously, the microcontroller initialises the OV2640 camera sensor, applies exposure and white balance adjustments, and clears the stalled frame buffers. It then captures a JPEG image of the visitor and schedules a non-blocking timer to activate the indoor active buzzer on GPIO 12 for three seconds.
Once the photo is captured, the ESP32-CAM establishes a secure TLS connection over Wi-Fi to push the image directly to the CircuitDigest Cloud dashboard. Simultaneously, it constructs an HTTPS POST request to the cloud messaging API, including the image payload along with device identity and dispatches an instant photo alert to the user's WhatsApp and schedules a non-blocking timer to activate the indoor buzzer on GPIO 12 for three seconds. When the user selects a quick response toggle on the cloud dashboard, an MQTT message is published to the ESP32-CAM. The ESP32-CAM analyses this payload inside its main execution loop and streams the corresponding WAV file (e.g., delivery instructions or arrival delays) to the outdoor speaker. For step-by-step guidance on hardware setup, FTDI wiring, and flashing code to the ESP32-CAM board via Arduino IDE, you can see how to program the ESP32-CAM using Arduino IDE.
Voice Responses You Can Trigger From the Dashboard
The table is the spoken audio line for that individual scenario when chosen in the cloud dashboard.
| Scenario | Spoken Audio Line |
| After Button Pressed | “Doorbell ringing, please wait” |
| Deliveries & couriers button | "Please leave the package by the door. Thank you!" |
| Working, busy, or resting button | "We can't come to the door right now. Please check back later." |
| Buying time to get to the door button | "Please wait! We'll be right there." |
| While not at home for family, friends or neighbours button | We're not home right now. Please give us a call! |
Components Required for the DIY Doorbell Camera
Below is the list of components required to build this project. It is a compact IoT-based smart doorbell built from just a handful of components.
| S.No | Components | Specification | Quantity |
| 1. | Microcontroller | ESP32 CAM | 1 |
| 2. | Audio Amplifier | MAX98357A I2S | 1 |
| 3. | Push Button | Momentary | 1 |
| 4. | Speaker | 8Ω | 1 |
| 5. | Buzzer | Active | 1 |
| 6. | Charging module | TP4056 | 1 |
| 7. | Capacitor | Electrolytic (100uF) | 2 |
How to Convert MP4 Voice Prompts to a C Byte Array
To store the voice prompts directly in the ESP32’s flash memory without using an external SD card, the original .mp4 video clips were first converted into mono .wav audio files using an Online Audio Converter (formatted to a 16 kHz sample rate in 16-bit PCM). These .wav files were then processed through the web-based FileToCArray tool to generate raw C-byte arrays stored inside the audio_data.h header file. Storing these arrays in flash memory using PROGMEM allows the ESP32 to instantly fetch and stream the raw PCM buffers (voice_doorbell, voice_switch1 through voice_switch4) directly to the MAX98357A I2S amplifier and speaker when triggered.
Circuit Diagram of the Smart Wireless Doorbell Using IoT
Below is the wiring diagram of this smart doorbell using IoT

Power Section and Push Button Wiring
Connect the IN+ terminal of TP4056 to the 5V pin of the ESP32-CAM, and connect the other terminal, IN-, of TP4056 to the GND pin of the ESP32-CAM. Connect one terminal of the pushbutton to GPIO13 of the ESP32-CAM and connect the other terminal to the GND pin of the ESP32-CAM. Place one 100uF decoupling capacitor between the 5V pin and the GND pin of the ESP32-CAM, and place the other 100uF decoupling capacitor between the 3V3 pin and the GND pin of the ESP32-CAM. For a classic RF-based setup without cloud or camera features, explore our earlier Wireless Doorbell using Arduino and RF Module on Circuit Digest.
The table below shows the wiring of the buzzer with the ESP32-CAM
| Buzzer Module Pin | ESP32 CAM Pin |
| VCC | 3V3 |
| I/O | GPIO 12 |
| GND | GND |
The table shows the wiring of the amplifier with the speaker and ESP32CAM
| MAX98357A Amplifier Pin | ESP32-CAM Pin | Speaker |
| LRCLK | GPIO 14 | - |
| BCLK | GPIO 2 | - |
| DIN | GPIO 15 | - |
| VO+ | - | Positive terminal |
| VO- | - | Negative terminal |
CircuitDigest Cloud Setup Guide for the IoT Smart Doorbell
A step-by-step CircuitDigest Cloud guide for this IoT-based smart doorbell is listed below.
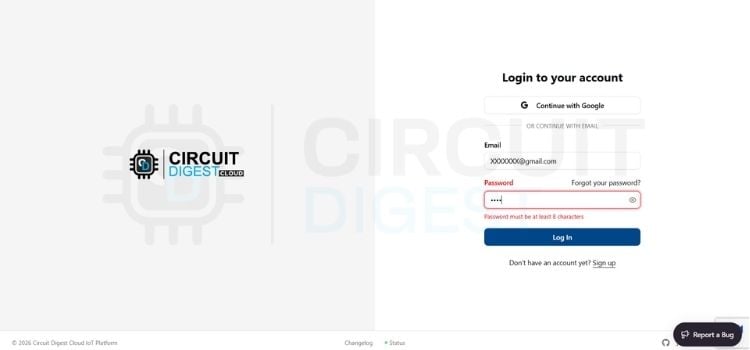
Step 1⇒ Sign Up / Log In
Sign up or log in to your CircuitDigest Cloud account by providing a valid email and password.
Step 2 ⇒ Adding a New Device
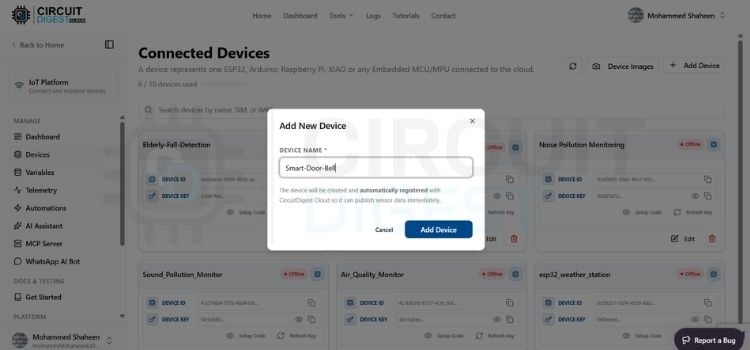
After logging in, click Dashboard at the top, click the device option on the left side of the website, click Add New Device and enter what you want for your project. For us, we have given it the name Smart Doorbell. You can give the name you want to display for this device and click the Add Device button in blue.
Step 3⇒ Adding New Variables
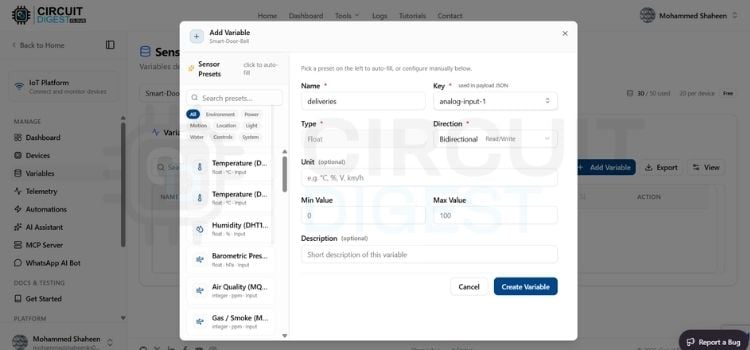
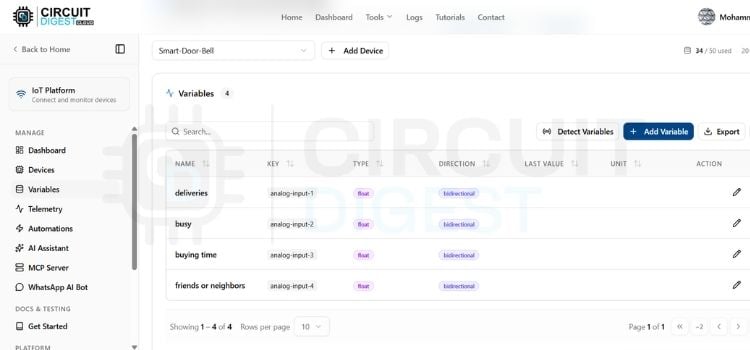
After creating a new device, click Variables on the left side of the website. Now select the device you created from the drop-down option. Click the Add Variable option. You will see a pop-up in the name section. First, we will create a variable for deliveries. Give the name you want to display for the variable. We have named it deliveries. Select the key you want for this variable. We have selected analog-input-1, set the direction to bidirectional, and pressed Create Variable. The variable will be created. Do the same for 3 more variables.
Step 4⇒ Variable List
These variable names allow us to choose the key we want: analog-input-1 for the deliveries, analog-input-2 for the busy, analog-input-3 for the buying time, analog-input-4 for the friends or neighbours.
Step 5⇒ Adding Widget
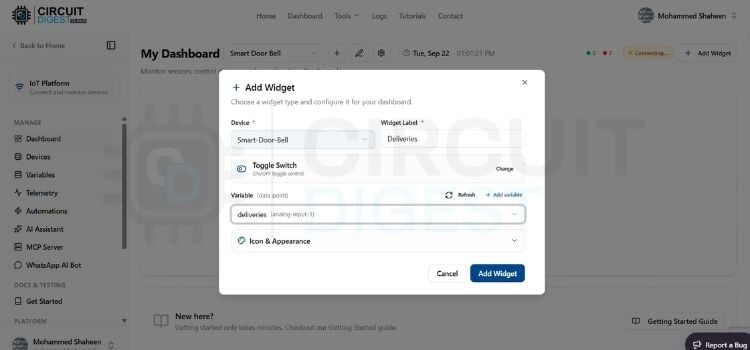
After adding the variable, click the dashboard on the left side of the website and select the device you created from the drop-down. First, we will create a widget for deliveries. Click Add Widget, then click Toggle Switch Widget. A menu bar will pop up. Select the device you created from the drop-down, and name it deliveries. Set the variable to analog-input-1 and click Add Widget. Do the same for the other 3 widgets, but select the proper variable for the widget placed.
Step 6-WhatsApp API Integration
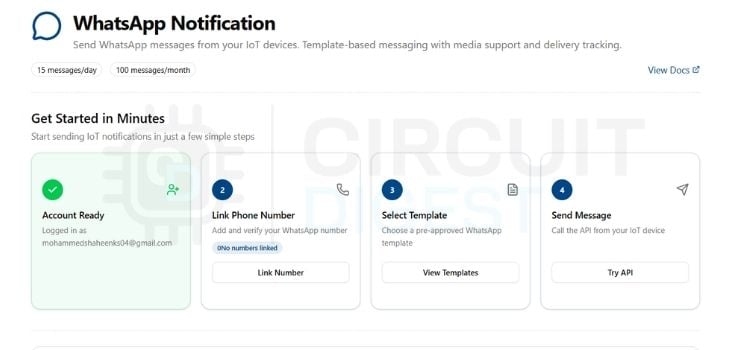
Click the Home tab at the top, scroll down, and you will see the WhatsApp notification; click it. There, you will see the link number option; click it, then enter your number. An OTP will be sent to your number; verify it, and your WhatsApp API setup is complete. For a simpler, non-cloud alternative without camera streaming,
IoT Smart Doorbell Code Explanation
The code is written in the Arduino IDE for this DIY doorbell camera using the ESP32CAM.
#include <CircuitDigestCloud.h>
#include <WiFi.h>
#include <WiFiClientSecure.h>
#include "driver/i2s.h"
#include "audio_data.h" // Holds voice_doorbell, voice_switch1..4
#include "time.h"       // NTP time sync (needed for TLS handshake to MQTT broker)
// ── Select Board Model ───────────────────────────────────────────────────────
#define CAMERA_MODEL_AI_THINKER
#include "camera.h"
// ── Cloud Credentials ───────────────────────────────────────────────────────
#define WIFI_SSID      "your-Wi-Fi-name"
#define WIFI_PASS      "Your-Wi-Fi-password"
#define DEVICE_ID      "Your-Device-ID"
#define CONNECTION_KEY "Your-Connection-Key"
#define API_KEY        "Your-API-Key"
// ── WhatsApp Alert (Circuit Digest Cloud) ───────────────────────────────────
#define WHATSAPP_PHONE_NUMBER "yourphone number" //91xxxxxxxxxx
#define WHATSAPP_TEMPLATE_ID  "image_capture_alert"
#define WHATSAPP_HOST         "www.circuitdigest.cloud"
// Dashboard Keys
#define REMOTE_CAPTURE "capture-1"
#define SLOT_SWITCH_1  "analog-input-1"
#define SLOT_SWITCH_2  "analog-input-2"
#define SLOT_SWITCH_3  "analog-input-3"
#define SLOT_SWITCH_4  "analog-input-4"
// Pins & Durations
#define DOORBELL_BTN_PIN   13
#define BUZZER_PIN         12
#define DEBOUNCE_MS        50
#define BUZZER_DURATION_MS 3000
#define BUZZER_ACTIVE_HIGH 0
#define BUZZER_ON  (BUZZER_ACTIVE_HIGH ? HIGH : LOW)
#define BUZZER_OFF (BUZZER_ACTIVE_HIGH ? LOW  : HIGH)
#define I2S_LRC  14
#define I2S_BCLK 2
#define I2S_DOUT 15
#define I2S_NUM  I2S_NUM_1
CircuitDigestCloud CDcloud;
This part includes essential core libraries for Wi-Fi, secure TLS connections, camera control, time synchronization, and I2S digital audio output. It configures Wi-Fi credentials, API authentication keys, and unique device IDs required to connect with Circuit Digest Cloud. It defines pin mappings for the push button (GPIO 13), active buzzer (GPIO 12), and MAX98357A I2S amplifier (GPIOs 14, 2, 15). It also establishes an active-low polarity configuration for the buzzer and defines subscription keys (capture-1, analog-input-1..4) for remote dashboard triggers.
volatile uint32_t lastEdgeMs = 0;
bool remoteCapture = false;
volatile bool captureBusy = false;
uint32_t buzzerStartTime = 0;
bool buzzerActive = false;
#define BUZZER_DELAY_MS 3000
bool buzzerPending = false;
uint32_t buzzerPendingSince = 0;
volatile int playResponseIndex = 0;
void IRAM_ATTR onDoorbellButton() {
 lastEdgeMs = millis();
}
void triggerBuzzer() {
 digitalWrite(BUZZER_PIN, BUZZER_ON);
 buzzerStartTime = millis();
 buzzerActive = true;
}
bool startI2SAudio() {
 i2s_config_t i2s_config = {
   .mode = (i2s_mode_t)(I2S_MODE_MASTER | I2S_MODE_TX),
   .sample_rate = AUDIO_SAMPLE_RATE,
   .bits_per_sample = I2S_BITS_PER_SAMPLE_16BIT,
   .channel_format = I2S_CHANNEL_FMT_ONLY_LEFT,
   .communication_format = I2S_COMM_FORMAT_STAND_I2S,
   .intr_alloc_flags = 0,
   .dma_buf_count = 8,
   .dma_buf_len = 64,
   .use_apll = false
 };
 i2s_pin_config_t pin_config = {
   .bck_io_num = I2S_BCLK,
   .ws_io_num = I2S_LRC,
   .data_out_num = I2S_DOUT,
   .data_in_num = I2S_PIN_NO_CHANGE
 };
 esp_err_t err = i2s_driver_install(I2S_NUM, &i2s_config, 0, NULL);
 if (err != ESP_OK) return false;
 err = i2s_set_pin(I2S_NUM, &pin_config);
 if (err != ESP_OK) {
   i2s_driver_uninstall(I2S_NUM);
   return false;
 }
 return true;
}
void stopI2SAudio() {
 i2s_driver_uninstall(I2S_NUM);
}
void playAudioBuffer(const unsigned char* audio_arr, size_t arr_len) {
 if (arr_len <= 44) return;
 if (!startI2SAudio()) return;
 size_t bytesWritten = 0;
 const uint8_t* audio_data = audio_arr + 44; // Skip 44-byte WAV header
 size_t audio_len = arr_len - 44;
 i2s_write(I2S_NUM, audio_data, audio_len, &bytesWritten, portMAX_DELAY);
 delay(100);
 stopI2SAudio();
}
This section defines the IRAM interrupt service routine for GPIO 13 button presses, non-blocking timer controls for the 3-second delayed buzzer, and functions to manage I2S1 digital audio output. The startI2SAudio() and stopI2SAudio() functions configure the I2S1 peripheral for 16-bit mono PCM transmission to the MAX98357A amplifier without interfering with the camera sensor on I2S0.
void sendWhatsAppAlertWithImage(const uint8_t* imageBuf, size_t imageLen, const char* eventLabel) {
 if (!imageBuf || imageLen == 0) return;
 WiFiClientSecure client;
 client.setInsecure();
 if (!client.connect(WHATSAPP_HOST, 443)) {
   Serial.println("WhatsApp: connection failed");
   return;
 }
 String boundary = "ESP32CAMBound7MA4YWxkTrZu0gW";
 String crlf = "\r\n";
 String dash = "--";
 // Force "captured_time" directly to "Just now" without NTP formatting
 String variablesJson = String("{\"event_type\":\"") + eventLabel + "\","
                      + "\"location\":\"Front Door\","
                      + "\"device_name\":\"Outdoor Doorbell\","
                      + "\"captured_time\":\"Just now\"}";
 String bodyHead = dash + boundary + crlf +
                   "Content-Disposition: form-data; name=\"phone_number\"" + crlf + crlf +
                   WHATSAPP_PHONE_NUMBER + crlf +
                   dash + boundary + crlf +
                   "Content-Disposition: form-data; name=\"template_id\"" + crlf + crlf +
                   WHATSAPP_TEMPLATE_ID + crlf +
                   dash + boundary + crlf +
                   "Content-Disposition: form-data; name=\"variables\"" + crlf + crlf +
                   variablesJson + crlf +
                   dash + boundary + crlf +
                   "Content-Disposition: form-data; name=\"image\"; filename=\"p.jpg\"" + crlf +
                   "Content-Type: image/jpeg" + crlf + crlf;
 String bodyTail = crlf + dash + boundary + dash + crlf;
 size_t totalContentLength = bodyHead.length() + imageLen + bodyTail.length();
 client.println("POST /api/v1/whatsapp/send-with-image HTTP/1.1");
 client.print("Host: "); client.println(WHATSAPP_HOST);
 client.print("Authorization: "); client.println(API_KEY);
 client.print("Content-Type: multipart/form-data; boundary="); client.println(boundary);
 client.print("Content-Length: "); client.println(totalContentLength);
 client.println();
 client.print(bodyHead);
 client.write(imageBuf, imageLen);
 client.print(bodyTail);
 uint32_t startMs = millis();
 while ((client.connected() || client.available()) && millis() - startMs < 8000) {
   if (client.available()) {
     Serial.println(client.readStringUntil('\n'));
   }
 }
 client.stop();
}
This function opens an encrypted HTTPS connection directly to the Circuit Digest Cloud WhatsApp messaging API endpoint. It constructs an HTTP POST request utilizing a custom boundary string. The payload packs target recipient phone numbers, template IDs, location tags, and a fixed "captured_time": "Just now" JSON parameter string. It streams the raw JPEG byte array directly over the TLS socket to deliver real-time image notifications to WhatsApp.
bool resetCamera() {
 esp_camera_deinit();
 delay(50);
 #ifdef PWDN_GPIO_NUM
 if (PWDN_GPIO_NUM != -1) {
   pinMode(PWDN_GPIO_NUM, OUTPUT);
   digitalWrite(PWDN_GPIO_NUM, HIGH); // Power down camera sensor
   delay(100);
   digitalWrite(PWDN_GPIO_NUM, LOW);  // Power back up
   delay(100);
 }
 #endif
 return initCamera();
}
The resetCamera() function safely de-initialises the active ESP32 camera driver when capture failures occur. If a Power Down (PWDN) pin is configured, it toggles the line HIGH and LOW to power-cycle the OV2640 camera sensor hardware directly. Once reset, it calls initCamera() to restore frame buffers, clock configurations, and sensor settings, providing an automated hardware recovery step before resorting to a full system reboot.
void handleCapture(float value) {
 if ((bool)value && !captureBusy) remoteCapture = true;
 CDcloud.publish(REMOTE_CAPTURE, 0.0f);
}
void handleSwitch1(float value) {
 if ((bool)value) { playResponseIndex = 1; CDcloud.publish(SLOT_SWITCH_1, 0.0f); }
}
void handleSwitch2(float value) {
 if ((bool)value) { playResponseIndex = 2; CDcloud.publish(SLOT_SWITCH_2, 0.0f); }
}
void handleSwitch3(float value) {
 if ((bool)value) { playResponseIndex = 3; CDcloud.publish(SLOT_SWITCH_3, 0.0f); }
}
void handleSwitch4(float value) {
 if ((bool)value) { playResponseIndex = 4; CDcloud.publish(SLOT_SWITCH_4, 0.0f); }
}
static void captureAndUpload() {
 if (captureBusy) return;
 captureBusy = true;
 buzzerPending = true;
 buzzerPendingSince = millis();
 playAudioBuffer(voice_doorbell, voice_doorbell_len);
 sensor_t * s = esp_camera_sensor_get();
 if (s != NULL) {
   s->set_whitebal(s, 1);
   s->set_awb_gain(s, 1);
   s->set_wb_mode(s, 0);
   s->set_exposure_ctrl(s, 1);
   s->set_aec2(s, 1);
   s->set_gain_ctrl(s, 1);
   s->set_bpc(s, 1);
   s->set_wpc(s, 1);
   s->set_raw_gma(s, 1);
   s->set_lenc(s, 1);
   s->set_special_effect(s, 0);
   s->set_saturation(s, 0);
 }
 camera_fb_t* dummy_fb = esp_camera_fb_get();
 if (dummy_fb) esp_camera_fb_return(dummy_fb);
 dummy_fb = esp_camera_fb_get();
 if (dummy_fb) esp_camera_fb_return(dummy_fb);
 delay(200);
 Serial.println("Capturing photo...");
 camera_fb_t* fb = esp_camera_fb_get();
 if (!fb) {
   bool recovered = false;
   for (int attempt = 1; attempt <= 2 && !recovered; attempt++) {
     if (resetCamera()) {
       delay(300);
       fb = esp_camera_fb_get();
       if (fb) recovered = true;
     }
   }
   if (!recovered) ESP.restart();
 }
 if (!fb) {
   captureBusy = false;
   return;
 }
 bool ok = CDcloud.sendImage(fb->buf, fb->len, "image/jpeg");
 sendWhatsAppAlertWithImage(fb->buf, fb->len, "Doorbell Pressed");
 esp_camera_fb_return(fb);
 captureBusy = false;
}
The handleCapture() and handleSwitch1..4() callbacks process incoming dashboard MQTT triggers, setting flags to initiate image captures or play selected voice responses. The captureAndUpload() routine orchestrates the doorbell sequence. It plays the primary doorbell audio prompt over I2S, and fine-tunes OV2640 sensor parameters (auto white balance, exposure, gain control). It flushes two stale frame buffers from memory, captures a fresh JPEG frame, uploads the image to Circuit Digest Cloud via CDcloud.sendImage(), dispatches the WhatsApp image alert, and frees the buffer memory.
void waitForNTPSync() {
 Serial.print("Syncing time via NTP");
 configTime(0, 0, "time.google.com", "pool.ntp.org", "1.1.1.1");
 time_t now = time(nullptr);
 uint32_t startMs = millis();
 while (now < 8 * 3600 * 2 && millis() - startMs < 15000) {
   delay(250);
   now = time(nullptr);
 }
}
void setup() {
 Serial.begin(115200);
 pinMode(DOORBELL_BTN_PIN, INPUT_PULLUP);
 attachInterrupt(digitalPinToInterrupt(DOORBELL_BTN_PIN), onDoorbellButton, FALLING);
 pinMode(BUZZER_PIN, OUTPUT);
 digitalWrite(BUZZER_PIN, BUZZER_OFF);
 delay(300);
 bool camOk = initCamera();
 for (int attempt = 1; !camOk && attempt <= 3; attempt++) {
   delay(500);
   camOk = initCamera();
 }
 if (!camOk) ESP.restart();
 WiFi.mode(WIFI_STA);
 if (!CDcloud.begin(WIFI_SSID, WIFI_PASS, DEVICE_ID, CONNECTION_KEY, API_KEY)) {
   while (true) delay(1000);
 }
 if (WiFi.status() == WL_CONNECTED) WiFi.setSleep(false);
 waitForNTPSync();
 CDcloud.subscribe(REMOTE_CAPTURE, handleCapture);
 CDcloud.subscribe(SLOT_SWITCH_1, handleSwitch1);
 CDcloud.subscribe(SLOT_SWITCH_2, handleSwitch2);
 CDcloud.subscribe(SLOT_SWITCH_3, handleSwitch3);
 CDcloud.subscribe(SLOT_SWITCH_4, handleSwitch4);
}
void loop() {
 if (WiFi.status() != WL_CONNECTED) {
   static uint32_t lastReconnectAttempt = 0;
   uint32_t currentMs = millis();
   if (currentMs - lastReconnectAttempt >= 5000) {
     lastReconnectAttempt = currentMs;
     WiFi.disconnect();
     WiFi.reconnect();
   }
   delay(100);
   return;
 }
 CDcloud.loop();
 if (buzzerPending && (millis() - buzzerPendingSince >= BUZZER_DELAY_MS)) {
   buzzerPending = false;
   triggerBuzzer();
 }
 if (buzzerActive && (millis() - buzzerStartTime >= BUZZER_DURATION_MS)) {
   digitalWrite(BUZZER_PIN, BUZZER_OFF);
   buzzerActive = false;
 }
 if (lastEdgeMs && (millis() - lastEdgeMs >= DEBOUNCE_MS)) {
   lastEdgeMs = 0;
   if (digitalRead(DOORBELL_BTN_PIN) == LOW) {
     captureAndUpload();
   }
 }
 if (remoteCapture) {
   remoteCapture = false;
   captureAndUpload();
 }
 if (playResponseIndex > 0) {
   int choice = playResponseIndex;
   playResponseIndex = 0;
   switch (choice) {
     case 1: playAudioBuffer(voice_switch1, voice_switch1_len); break;
     case 2: playAudioBuffer(voice_switch2, voice_switch2_len); break;
     case 3: playAudioBuffer(voice_switch3, voice_switch3_len); break;
     case 4: playAudioBuffer(voice_switch4, voice_switch4_len); break;
   }
 }
}
The setup() function configures GPIO modes, attaches the button interrupt, initializes camera hardware, connects to Wi-Fi with modem sleep disabled (WiFi.setSleep(false)), and syncs local time via NTP servers. It subscribes device endpoints to Circuit Digest Cloud MQTT channels (capture-1 and analog-input-1 to analog-input-4). Inside loop(), the code handles network connection with active reconnects every 5 seconds if disconnected. For a similar camera-enabled build, take a look at our previous Smart Video Doorbell using ESP32 Cam project on Circuit Digest.
Live Demo: Smart Wireless Doorbell Using IoT
This DIY doorbell using IoT has a MAX98357A amplifier, an 8Ω speaker and an indoor buzzer, and needs only a few components. Press the button to get a visitor photo on WhatsApp, and reply with one-tap voice messages from the CircuitDigest Cloud dashboard.
Output: Testing the Smart Wireless Doorbell
This smart door is tested by placing it outside the house; pressing the button instantly triggers the local speaker to play an audio voice prompt ("Doorbell ringing, please wait") while the ESP32-CAM simultaneously captures a photo of the visitor and uploads it to the CircuitDigest Cloud over Wi-Fi. The cloud dashboard shows the captured image from anywhere and dispatches an automated WhatsApp notification to the user's phone. Additionally, it enables remote interaction by allowing users to click controls on the cloud dashboard to instantly play pre-recorded voice responses, such as custom delivery instructions, directly through the outdoor speaker.
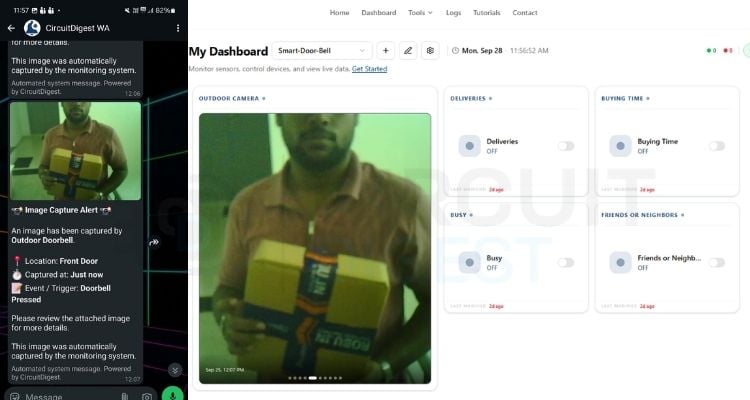
This project shows how a smart wireless doorbell with camera, WhatsApp alerts and remote voice replies can be built at low cost and fully customised.
Troubleshooting
1. Which ohm rating of speaker to use?
Fix: We can use 4-Ω, 6-Ω, or 8-Ω speakers, but never use a speaker rated below 4 ohms, as it can overheat or damage the amplifier.
2. Why is the sound distorted, crackling, or cutting out during playback?
Fix: Ensure the MAX98357A is powered from a stable 5V
3. Why does the ESP32-CAMreset when the voice audio starts playing?
Fix: The amplifier and Wi-Fi radio together exceed the current limit of a computer USB port. Power the system using a dedicated 5V / 2A external DC power adapter.
4. What should I do if the speaker emits a high-pitched buzzing or humming noise when idle?
Fix: Share a single GND connection between the ESP32-CAM, MAX98357A and buzzer.
Applications of an IoT Wireless Doorbell With Camera
» Homes and apartments, to see visitors and deliveries remotely
» Home offices, to manage interruptions during calls
» Elderly care, so family can see who is at the door
» Small shops and clinics, for an after-hours visitor alert
» Student and maker projects that combine IoT, audio and camera skills
GitHub Repository
The GitHub Repository contains the complete source code, project files, documentation, and resources required to understand, develop, and maintain the project. Built with a MAX98357A I2S amplifier for local voice prompts and CircuitDigest Cloud/MQTT for remote voice replies. Includes full wiring diagrams, Arduino code and a step-by-step cloud dashboard setup.


Smart IoT Projects Using ESP32 & AI
These IoT projects use ESP32, sensors, AI, and cloud connectivity for real-world applications such as elderly fall detection, smart parking alerts, and air-quality monitoring, showcasing smart sensing, automation, and real-time monitoring.
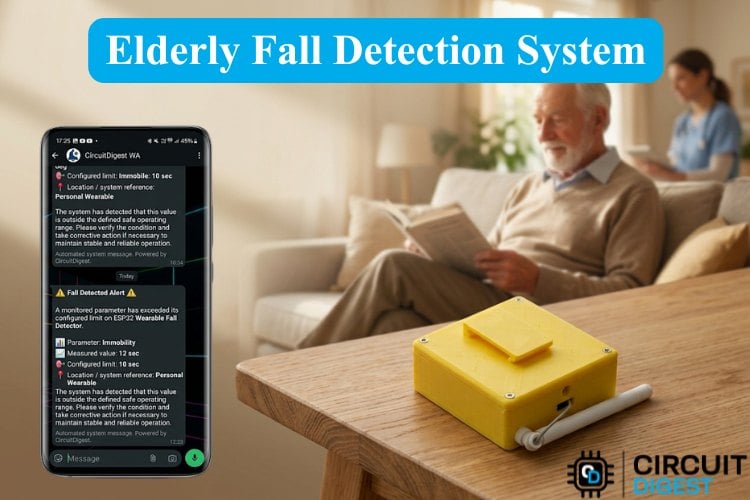
How to Build an Elderly Fall Detection System with XIAO ESP32-S3
We built an elderly fall detection and alert system, which is a wearable elderly fall detection system. The moment a real fall is detected, this elderly fall detection and alert system sends an instant emergency message over WhatsApp via CircuitDigest Cloud to family members, making it a practical elderly care fall detection system for homes where checking in constantly is difficult.
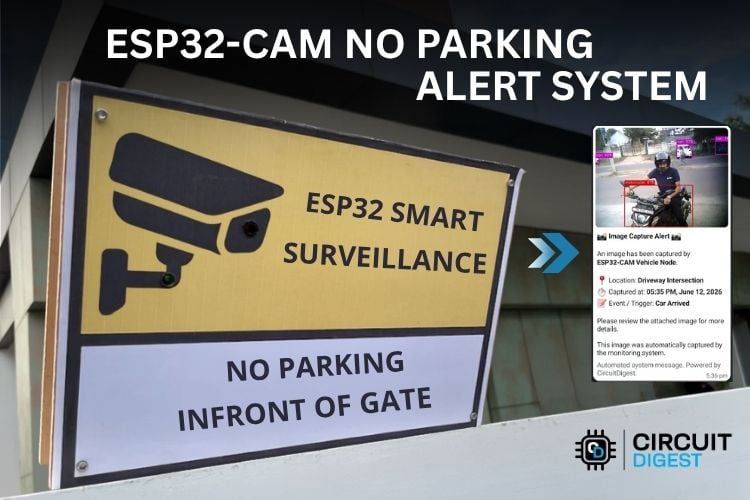
AI-Based No Parking Alert System using ESP32-CAM
In this project, we are going to build an AI-Based No Parking Alert System using ESP32-CAM, in which, if someone parks their vehicle in front of the gate, the ESP32-CAM recognises it and sends an alert to our WhatsApp and also powers on a buzzer and indicator LED onboard as well.
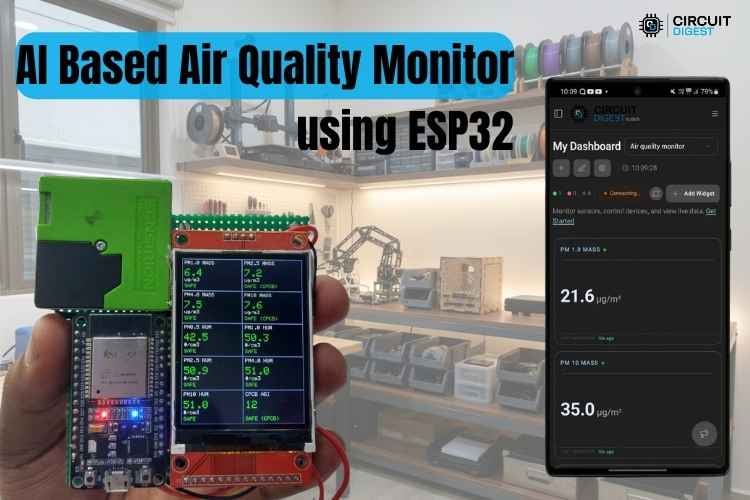
How to Build an AI-based Air Quality Monitoring using ESP32
In this tutorial, we are going to build an AI-based air quality monitor using ESP32 to measure particulate matter in the air. This displays the quantity of different types of PM based on their size on the TFT display and also in CircuitDigest Cloud.
Complete Project Code
// SPDX-License-Identifier: MIT
// Outdoor ESP32-CAM Smart Doorbell: 4 Cloud Triggers + GPIO 12 Active Buzzer
#include <CircuitDigestCloud.h>
#include <WiFi.h>
#include <WiFiClientSecure.h>
#include "driver/i2s.h"
#include "audio_data.h" // Holds voice_doorbell, voice_switch1..4
#include "time.h"       // NTP time sync (needed for TLS handshake to MQTT broker)
// ── Select Board Model ───────────────────────────────────────────────────────
#define CAMERA_MODEL_AI_THINKER
#include "camera.h"
// ────────────────────────────────────────────────────────────────────────────
// ── Cloud Credentials ───────────────────────────────────────────────────────
#define WIFI_SSID       "Bad"
#define WIFI_PASS       "123456789"
#define DEVICE_ID       "564843c4-1164-42d6-b1b2-3311a7a3f08c"
#define CONNECTION_KEY "c35d6731ba605cad03a0783982419745"
#define API_KEY        "cd_moh_240626_11WynF"
// ── WhatsApp Alert (Circuit Digest Cloud) ───────────────────────────────────
#define WHATSAPP_PHONE_NUMBER "917539912128"
#define WHATSAPP_TEMPLATE_ID  "image_capture_alert"
#define WHATSAPP_HOST         "www.circuitdigest.cloud"
// Dashboard Keys
#define REMOTE_CAPTURE "capture-1"
#define SLOT_SWITCH_1  "analog-input-1"
#define SLOT_SWITCH_2  "analog-input-2"
#define SLOT_SWITCH_3  "analog-input-3"
#define SLOT_SWITCH_4  "analog-input-4"
// ────────────────────────────────────────────────────────────────────────────
// Pins & Durations
#define DOORBELL_BTN_PIN   13
#define BUZZER_PIN         12
#define DEBOUNCE_MS        50
#define BUZZER_DURATION_MS 3000 // Buzzer sound time (3 seconds)
// Set to 1 if your buzzer module turns ON when the pin goes HIGH.
// Set to 0 if it's wired active-low (turns ON when the pin goes LOW).
#define BUZZER_ACTIVE_HIGH 0
#define BUZZER_ON  (BUZZER_ACTIVE_HIGH ? HIGH : LOW)
#define BUZZER_OFF (BUZZER_ACTIVE_HIGH ? LOW  : HIGH)
#define I2S_LRC  14
#define I2S_BCLK 2
#define I2S_DOUT 15
// I2S1 is used for audio so camera on I2S0 remains untouched
#define I2S_NUM  I2S_NUM_1
CircuitDigestCloud CDcloud;
// State tracking
volatile uint32_t lastEdgeMs = 0;
bool remoteCapture = false;
volatile bool captureBusy = false;
// Non-blocking Buzzer tracking
uint32_t buzzerStartTime = 0;
bool buzzerActive = false;
// Buzzer is scheduled to sound BUZZER_DELAY_MS after the doorbell trigger
#define BUZZER_DELAY_MS 3000
bool buzzerPending = false;
uint32_t buzzerPendingSince = 0;
// Pending Audio Voice Prompt Triggers
volatile int playResponseIndex = 0;
void IRAM_ATTR onDoorbellButton() {
 lastEdgeMs = millis();
}
// Trigger Active Buzzer
void triggerBuzzer() {
 digitalWrite(BUZZER_PIN, BUZZER_ON);
 buzzerStartTime = millis();
 buzzerActive = true;
}
bool startI2SAudio() {
 i2s_config_t i2s_config = {
   .mode = (i2s_mode_t)(I2S_MODE_MASTER | I2S_MODE_TX),
   .sample_rate = AUDIO_SAMPLE_RATE,
   .bits_per_sample = I2S_BITS_PER_SAMPLE_16BIT,
   .channel_format = I2S_CHANNEL_FMT_ONLY_LEFT,
   .communication_format = I2S_COMM_FORMAT_STAND_I2S,
   .intr_alloc_flags = 0,
   .dma_buf_count = 8,
   .dma_buf_len = 64,
   .use_apll = false
 };
 i2s_pin_config_t pin_config = {
   .bck_io_num = I2S_BCLK,
   .ws_io_num = I2S_LRC,
   .data_out_num = I2S_DOUT,
   .data_in_num = I2S_PIN_NO_CHANGE
 };
 esp_err_t err = i2s_driver_install(I2S_NUM, &i2s_config, 0, NULL);
 if (err != ESP_OK) {
   Serial.printf("i2s_driver_install failed: %d\n", err);
   return false;
 }
 err = i2s_set_pin(I2S_NUM, &pin_config);
 if (err != ESP_OK) {
   Serial.printf("i2s_set_pin failed: %d\n", err);
   i2s_driver_uninstall(I2S_NUM);
   return false;
 }
 return true;
}
void stopI2SAudio() {
 i2s_driver_uninstall(I2S_NUM);
}
// Send a WhatsApp alert with the captured photo via multipart/form-data
void sendWhatsAppAlertWithImage(const uint8_t* imageBuf, size_t imageLen, const char* eventLabel) {
 if (!imageBuf || imageLen == 0) return;
 WiFiClientSecure client;
 client.setInsecure();
 if (!client.connect(WHATSAPP_HOST, 443)) {
   Serial.println("WhatsApp: connection failed");
   return;
 }
 String boundary = "ESP32CAMBound7MA4YWxkTrZu0gW";
 String crlf = "\r\n";
 String dash = "--";
 // Force "captured_time" directly to "Just now" without NTP formatting
 String variablesJson = String("{\"event_type\":\"") + eventLabel + "\","
                      + "\"location\":\"Front Door\","
                      + "\"device_name\":\"Outdoor Doorbell\","
                      + "\"captured_time\":\"Just now\"}";
 String bodyHead = dash + boundary + crlf +
                   "Content-Disposition: form-data; name=\"phone_number\"" + crlf + crlf +
                   WHATSAPP_PHONE_NUMBER + crlf +
                   dash + boundary + crlf +
                   "Content-Disposition: form-data; name=\"template_id\"" + crlf + crlf +
                   WHATSAPP_TEMPLATE_ID + crlf +
                   dash + boundary + crlf +
                   "Content-Disposition: form-data; name=\"variables\"" + crlf + crlf +
                   variablesJson + crlf +
                   dash + boundary + crlf +
                   "Content-Disposition: form-data; name=\"image\"; filename=\"p.jpg\"" + crlf +
                   "Content-Type: image/jpeg" + crlf + crlf;
 String bodyTail = crlf + dash + boundary + dash + crlf;
 size_t totalContentLength = bodyHead.length() + imageLen + bodyTail.length();
 client.println("POST /api/v1/whatsapp/send-with-image HTTP/1.1");
 client.print("Host: "); client.println(WHATSAPP_HOST);
 client.print("Authorization: "); client.println(API_KEY);
 client.print("Content-Type: multipart/form-data; boundary="); client.println(boundary);
 client.print("Content-Length: "); client.println(totalContentLength);
 client.println();
 client.print(bodyHead);
 client.write(imageBuf, imageLen);
 client.print(bodyTail);
 uint32_t startMs = millis();
 while ((client.connected() || client.available()) && millis() - startMs < 8000) {
   if (client.available()) {
     Serial.println(client.readStringUntil('\n'));
   }
 }
 client.stop();
}
// Cleanly deinit + init the camera sensor
bool resetCamera() {
 esp_camera_deinit();
 delay(50);
 #ifdef PWDN_GPIO_NUM
 if (PWDN_GPIO_NUM != -1) {
   pinMode(PWDN_GPIO_NUM, OUTPUT);
   digitalWrite(PWDN_GPIO_NUM, HIGH); // Power down camera sensor
   delay(100);
   digitalWrite(PWDN_GPIO_NUM, LOW);  // Power back up
   delay(100);
 }
 #endif
 return initCamera();
}
// Play specified WAV array buffer over I2S1
void playAudioBuffer(const unsigned char* audio_arr, size_t arr_len) {
 if (arr_len <= 44) return;
 if (!startI2SAudio()) {
   Serial.println("Audio playback aborted (I2S1 init failed).");
   return;
 }
 size_t bytesWritten = 0;
 const uint8_t* audio_data = audio_arr + 44; // Skip WAV header
 size_t audio_len = arr_len - 44;
 esp_err_t werr = i2s_write(I2S_NUM, audio_data, audio_len, &bytesWritten, portMAX_DELAY);
 Serial.printf("i2s_write: err=%d, wrote %u of %u bytes\n", werr, (unsigned)bytesWritten, (unsigned)audio_len);
 delay(100);
 stopI2SAudio();
}
// Cloud Callbacks
void handleCapture(float value) {
 if ((bool)value && !captureBusy) remoteCapture = true;
 CDcloud.publish(REMOTE_CAPTURE, 0.0f);
}
void handleSwitch1(float value) {
 if ((bool)value) { playResponseIndex = 1; CDcloud.publish(SLOT_SWITCH_1, 0.0f); }
}
void handleSwitch2(float value) {
 if ((bool)value) { playResponseIndex = 2; CDcloud.publish(SLOT_SWITCH_2, 0.0f); }
}
void handleSwitch3(float value) {
 if ((bool)value) { playResponseIndex = 3; CDcloud.publish(SLOT_SWITCH_3, 0.0f); }
}
void handleSwitch4(float value) {
 if ((bool)value) { playResponseIndex = 4; CDcloud.publish(SLOT_SWITCH_4, 0.0f); }
}
static void captureAndUpload() {
 if (captureBusy) return;
 captureBusy = true;
 // Schedule buzzer to sound BUZZER_DELAY_MS after this press
 buzzerPending = true;
 buzzerPendingSince = millis();
 // 1. Play Doorbell Audio Prompt
 playAudioBuffer(voice_doorbell, voice_doorbell_len);
 // 2. Full sensor tuning
 sensor_t * s = esp_camera_sensor_get();
 if (s != NULL) {
   s->set_whitebal(s, 1);
   s->set_awb_gain(s, 1);
   s->set_wb_mode(s, 0);
   s->set_exposure_ctrl(s, 1);
   s->set_aec2(s, 1);
   s->set_gain_ctrl(s, 1);
   s->set_bpc(s, 1);
   s->set_wpc(s, 1);
   s->set_raw_gma(s, 1);
   s->set_lenc(s, 1);
   s->set_special_effect(s, 0);
   s->set_saturation(s, 0);
 }
 // 3. Flush Stale Frame Buffers
 camera_fb_t* dummy_fb = esp_camera_fb_get();
 if (dummy_fb) esp_camera_fb_return(dummy_fb);
 dummy_fb = esp_camera_fb_get();
 if (dummy_fb) esp_camera_fb_return(dummy_fb);
 delay(200);
 // 4. Capture Photo
 Serial.println("Capturing photo...");
 camera_fb_t* fb = esp_camera_fb_get();
 if (!fb) {
   Serial.println("Capture failed! Doing a full camera reset and retrying...");
   bool recovered = false;
   for (int attempt = 1; attempt <= 2 && !recovered; attempt++) {
     if (resetCamera()) {
       delay(300);
       fb = esp_camera_fb_get();
       if (fb) recovered = true;
     }
     if (!recovered) {
       Serial.printf("Camera reset attempt %d did not recover the sensor.\n", attempt);
       delay(300);
     }
   }
   if (!recovered) {
     Serial.println("Camera unrecoverable via soft reset - restarting device...");
     Serial.flush();
     delay(200);
     ESP.restart();
   }
 }
 if (!fb) {
   Serial.println("Capture failed permanently!");
   captureBusy = false;
   return;
 }
 // 5. Upload to Cloud
 Serial.printf("Captured %u bytes — uploading... (RSSI=%d dBm, free heap=%u, largest block=%u)\n",
               fb->len, WiFi.RSSI(), ESP.getFreeHeap(), ESP.getMaxAllocHeap());
 bool ok = CDcloud.sendImage(fb->buf, fb->len, "image/jpeg");
 Serial.printf("Upload Result: %s (err=%d)\n", ok ? "SUCCESS" : "FAILED", CDcloud.lastError());
 // 6. Send WhatsApp Notification with Captured Image Attached
 Serial.println("Sending WhatsApp alert with image...");
 sendWhatsAppAlertWithImage(fb->buf, fb->len, "Doorbell Pressed");
 esp_camera_fb_return(fb);
 captureBusy = false;
}
// Block until RTC has a valid timestamp for TLS/MQTT handshake
void waitForNTPSync() {
 Serial.print("Syncing time via NTP");

 configTime(0, 0, "time.google.com", "pool.ntp.org", "1.1.1.1");
 time_t now = time(nullptr);
 uint32_t startMs = millis();
 while (now < 8 * 3600 * 2 && millis() - startMs < 15000) {
   delay(250);
   Serial.print(".");
   now = time(nullptr);
 }
 Serial.println();
 if (now < 8 * 3600 * 2) {
   Serial.println("WARNING: NTP sync failed (no internet reply within 15s).");
 } else {
   struct tm timeinfo;
   localtime_r(&now, &timeinfo);
   Serial.printf("Time synced: %04d-%02d-%02d %02d:%02d:%02d UTC\n",
                 timeinfo.tm_year + 1900, timeinfo.tm_mon + 1, timeinfo.tm_mday,
                 timeinfo.tm_hour, timeinfo.tm_min, timeinfo.tm_sec);
 }
}
void setup() {
 Serial.begin(115200);
 // Setup Push Button
 pinMode(DOORBELL_BTN_PIN, INPUT_PULLUP);
 attachInterrupt(digitalPinToInterrupt(DOORBELL_BTN_PIN), onDoorbellButton, FALLING);
 // Setup Active Buzzer
 pinMode(BUZZER_PIN, OUTPUT);
 digitalWrite(BUZZER_PIN, BUZZER_OFF);
 delay(300);
 bool camOk = initCamera();
 for (int attempt = 1; !camOk && attempt <= 3; attempt++) {
   Serial.printf("Camera init failed, retrying (%d/3)...\n", attempt);
   delay(500);
   camOk = initCamera();
 }
 if (!camOk) {
   Serial.println("Camera init failed after retries - restarting device...");
   Serial.flush();
   delay(200);
   ESP.restart();
 }
 Serial.println("Camera initialized successfully.");
 WiFi.mode(WIFI_STA);
 // Connect to Wi-Fi & Cloud
 if (!CDcloud.begin(WIFI_SSID, WIFI_PASS, DEVICE_ID, CONNECTION_KEY, API_KEY)) {
   Serial.println("Cloud connection failed");
   while (true) delay(1000);
 }
 if (WiFi.status() == WL_CONNECTED) {
   WiFi.setSleep(false);
 }
 waitForNTPSync();
 // Subscriptions bound to analog-input keys
 CDcloud.subscribe(REMOTE_CAPTURE, handleCapture);
 CDcloud.subscribe(SLOT_SWITCH_1, handleSwitch1);
 CDcloud.subscribe(SLOT_SWITCH_2, handleSwitch2);
 CDcloud.subscribe(SLOT_SWITCH_3, handleSwitch3);
 CDcloud.subscribe(SLOT_SWITCH_4, handleSwitch4);
 Serial.println("Doorbell Ready!");
}
void loop() {
 // Handle Wi-Fi Disconnections and Force Periodic Reconnects
 if (WiFi.status() != WL_CONNECTED) {
   static uint32_t lastReconnectAttempt = 0;
   uint32_t currentMs = millis();
   if (currentMs - lastReconnectAttempt >= 5000) {
     lastReconnectAttempt = currentMs;
     Serial.println("Wi-Fi link lost. Triggering active reconnect...");
     WiFi.disconnect();
     WiFi.reconnect();
   }
   delay(100);
   return;
 }
 // Normal Cloud Execution when connected
 CDcloud.loop();
 // Fire the buzzer once its scheduled delay has elapsed
 if (buzzerPending && (millis() - buzzerPendingSince >= BUZZER_DELAY_MS)) {
   buzzerPending = false;
   triggerBuzzer();
 }
 // Non-blocking timer: Auto turn off buzzer after duration
 if (buzzerActive && (millis() - buzzerStartTime >= BUZZER_DURATION_MS)) {
   digitalWrite(BUZZER_PIN, BUZZER_OFF);
   buzzerActive = false;
 }
 // Physical Button Handler
 if (lastEdgeMs && (millis() - lastEdgeMs >= DEBOUNCE_MS)) {
   lastEdgeMs = 0;
   if (digitalRead(DOORBELL_BTN_PIN) == LOW) {
     Serial.println("Doorbell Button Pressed!");
     captureAndUpload();
   }
 }
 // Dashboard Capture Command Handler
 if (remoteCapture) {
   remoteCapture = false;
   captureAndUpload();
 }
 // Quick Response Voice Triggers from Dashboard
 if (playResponseIndex > 0) {
   int choice = playResponseIndex;
   playResponseIndex = 0;
   switch (choice) {
     case 1:
       Serial.println("Triggered analog-input-1: Playing 'Leave package...'");
       playAudioBuffer(voice_switch1, voice_switch1_len);
       break;
     case 2:
       Serial.println("Triggered analog-input-2: Playing 'Check back later...'");
       playAudioBuffer(voice_switch2, voice_switch2_len);
       break;
     case 3:
       Serial.println("Triggered analog-input-3: Playing 'Be right out...'");
       playAudioBuffer(voice_switch3, voice_switch3_len);
       break;
     case 4:
       Serial.println("Triggered analog-input-4: Playing 'Call on mobile...'");
       playAudioBuffer(voice_switch4, voice_switch4_len);
       break;
   }
 }
}

Add a comment
No account needed. Your comment appears once a moderator has reviewed it.