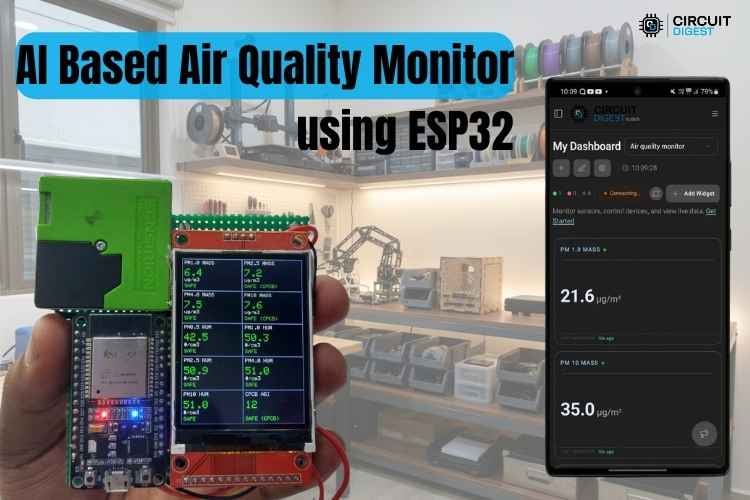
Air is a necessity for us human beings, so monitoring it is important. Air quality is monitored in terms of the Air Quality Index(AQI), a single-number scale used to tell how polluted the air is and what health effects it might cause. Particulate Matter is the microscopic solid or liquid which is present in air in the form of dust or smoke. Particulate Matter is the primary thing which is measured in AQI. That's exactly why an ESP32 air quality monitor is such a useful DIY build: it turns invisible particulate pollution into a number you can actually see, track, and act on.
In this tutorial, we are going to build an AI-based air quality monitor using ESP32 to measure those Particulate Matter in the air. This displays the quantity of different types of PM based on their size on the TFT display and also in CircuitDigest Cloud. When the readings reach above the threshold, it displays that the surrounding air is not safe and also sends an alert to the linked WhatsApp number. Giving this AI-based air quality monitoring project a practical, real-world safety layer that a basic sensor readout doesn't offer. You can also check out similar ESP32 Projects and IoT projects done previously here at Circuit Digest.
Table of Contents
What Exactly Is an ESP32 Air Quality Monitor and Why Is AQI Important?
An ESP32 air quality monitor is a wireless monitoring device capable of measuring pollution levels and providing a result represented as AQI. Unlike a simple dust sensor connected to an LED, the ESP32 based air quality monitor has three features that are absent in DIY projects: a complete specification of PM readings, cloud logging with AI thresholds, and WhatsApp notifications, which allow you to react to the information obtained from the sensor.
Key Advantages Overview
- Real-time monitoring- processes data related to 10 parameters at 5-second intervals.
- Powered from a battery- can operate from a single 18650 battery with the help of a step-up converter.
- Cloud dashboard - every reading is logged and shown in visual diagrams through CircuitDigest Cloud service, with MQTT.
- Instant notifications - you receive notifications through WhatsApp when AQI changes to “poor” level.
- Display -readings can be seen on a 2.4’’ screen without a phone.
How This ESP32 Air Quality Monitor Works
When this air quality monitor is turned on, it connects to our Wi-Fi, and the Air Quality Index (AQI), PM 1.0 mass, PM 2.5 mass, PM 4 mass, PM 10 mass, PM 0.5 number of particle, PM 1.0 number of particle, PM 2.5 number of particle, PM 4.0 number of particle, PM 10 number of particle are Displayed in TFT display and in CircuitDigest Cloud by MQTT and also there it says weather the particular parameter is safe or unsafe.
When the set threshold is reached, the TFT displays that the particular parameter is not safe, and an alert will be sent to our WhatsApp number. The AI air quality monitoring layer inside CircuitDigest Cloud lets you monitor, control, and access all logged data from anywhere. Here is another Wearable Air Quality Pendant project where we showcased how this air quality monitoring is integrated in a pendant form factor.
The table shows the threshold of all the parameters of this air quality monitor.
| SI.No | Parameter | Threshold |
| 1. | PM 1.0 mass | 30 μg/m³ |
| 2. | PM 2.5 mass | 60 μg/m³ |
| 3. | PM 4.0 mass | 80 μg/m³ |
| 4. | PM 10 mass | 100 μg/m³ |
| 5. | PM 0.5 number of particles | 1000 particles/cm³ |
| 6. | PM 1.0 number of particles | 800 particles/cm³ |
| 7. | PM 2.5 number of particles | 700 particles/cm³ |
| 8. | PM 4 number of particles | 500 particles/cm³ |
| 9. | PM 10 number of particles | 400 particles/cm³ |
Below is the AQI range and their Category
| SI.No | AQI Range | Category |
| 1. | 0-50 | Good |
| 2. | 51-100 | Satisfactory |
| 3. | 101-200 | Moderate |
| 4. | 201-300 | Poor |
| 5. | 301-400 | Very Poor |
| 6. | 401-500 | Severe |
Components Required for This ESP32 Air Quality Monitor Project
Below is the list of components required to build this project with their description.
| S.No | Components | Specification | Quantity |
| 1. | Microcontroller | ESP32 Dev Kit | 1 |
| 2. | Sensirion Air Quality Sensor | SPS30 | 1 |
| 3. | TFT Display | 2.4 TFT SPI 240*320 (TJCTM24024-SPI) | 1 |
| 4. | Charging Module | TP4056A | 1 |
| 5. | Boost Converter | V599 (CKCS BS01) | 1 |
| 6. | Battery | 3.7V 18650 battery | 1 |
Circuit Diagram: Wiring the SPS30 Sensor to ESP32
Below is the AI air quality monitor wiring diagram

This DIY Air quality monitor circuit is quite simple. Connect positive terminal of 18650 3.7 V battery to B+ terminal of TP4056 charging module, negative terminal of battery is connected to the B- terminal of TP4056 charging module, connect OUT+ terminal of TP4056 charging module to side terminal of toggle switch, connect middle terminal of toggle switch to IN+ terminal of boost converter, connect OUT- terminal of TP4056 charging module to the IN- terminal of boost converter. Connect the OUT+ terminal of the boost converter to the VIN pin of ESP32, and connect the OUT- terminal of the boost converter to the GND pin of ESP32.
Connect the VCC pin of the SPS30 sensor to the VIN pin of ESP32, connect the GND pin of the SPS30 sensor to the GND pin of ESP32, connect the RX pin of the SPS30 sensor to the TX 2 (GPIO 17) pin OF ESP32, and connect the TX pin of the SPS30 sensor to the RX 2 (GPIO 16) pin OF ESP32. Connect the VCC pin of TFT display to 3.3 V pin of ESP32, Connect the GND pin of TFT display to GND pin of ESP32, connect CS pin of TFT display to GPIO 2 of ESP32, connect reset pin of TFT display to GPIO 4 of ESP32, connect DC pin of TFT display to GPIO 5 of ESP32, connect SDI (MOSI) pin of TFT display to GPIO 23 of ESP32, connect SCK pin of TFT display to GPIO 18 of ESP32, connect LED pin of TFT display to 3.3 V pin of ESP32, connect SDO (MISO) pin of TFT display to GPIO 19 of ESP32. Here is another Air Quality Analyzer using Arduino and Nova PM Sensor SDS011 project where PM2.5 and PM10 can be measured with it.
SPS30 vs PMS5003 vs SDS011: Choosing the Right PM Sensor
The Sensirion SPS30 is not the only PM sensor to be paired with ESP32 devices. Below is a comparison of it with other two widely used laser scattering sensors in DIY air quality monitor with the ESP32.
| Feature | Sensirion SPS30 | Plantower PMS5003 | Nova SDS011 |
| Mass concentration output | PM1.0, PM2.5, PM4.0, PM10 | PM1.0, PM2.5, PM10 | PM2.5, PM10 only |
| Particle number count | Yes — 5 size bins (0.5 to 10 µm) | Yes - 6 size bins (0.3 to 10 µm) | No particle count output |
| Sensing principle | Laser scattering | Laser scattering | Laser scattering |
| Interface | UART or I2C | UART | UART or PWM |
| Best suited for | Full-spectrum AQI monitoring, cloud dashboards | Budget indoor AQ projects | Simple PM2.5/PM10 loggers |
We picked the SPS30 for this ESP32 air quality monitor project because it's the only one of the three that outputs all nine PM mass-and-count parameters our dashboard and threshold logic need; the PMS5003 and SDS011 both skip some of that granularity
Step-by-Step CircuitDigest Cloud Setup Guide:
Follow these steps to connect your ESP32 based air quality monitor to CircuitDigest Cloud so you can check air quality from your smartphone anywhere.
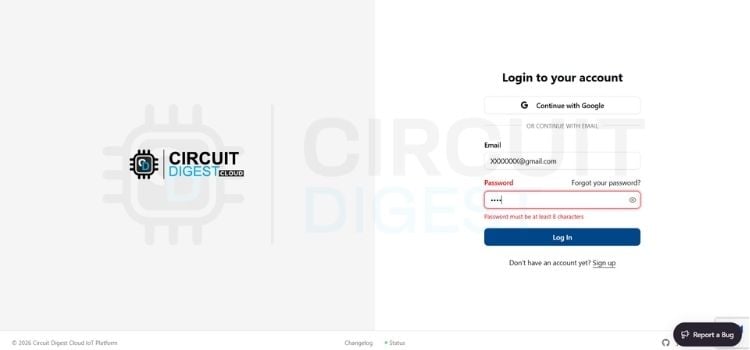
Step 1⇒ Sign Up / Login
Sign up or login into your account CircuitDigest Cloud by giving valid email and password.
Step 2⇒ Add New Device
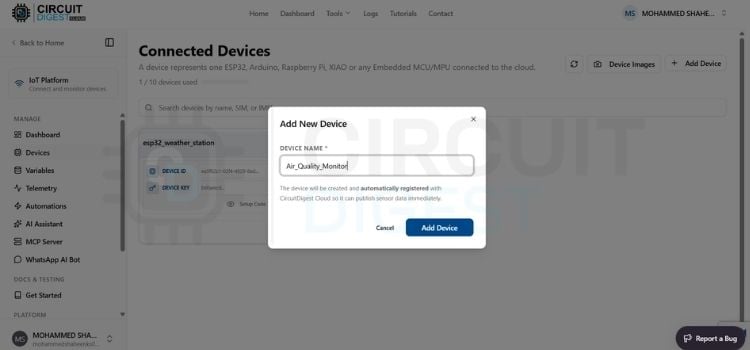
After logging in, click Dashboard at the top, click the device option on the left side of the website, click Add New Device and give the name you want to give your project. For us, we have given Air_Quality_Monitor; you can give the name you want to display for this device and click the Add Device button in blue colour.
Step 3⇒Adding New Variables
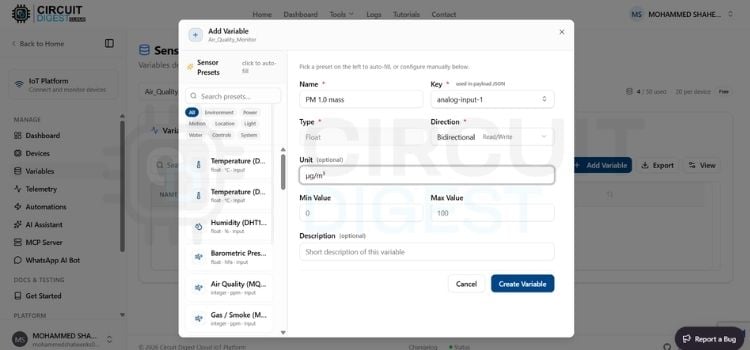
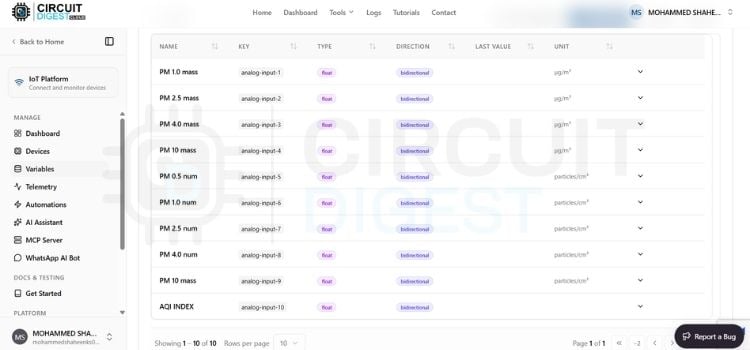
After creating a new device, click Variables on the left side of the website. Now select the device you created from the drop-down option. Click the Add Variable option. You will see a pop-up in the name section, first we will create a variable for PM 1.0 mass; give the name you want to display for the variable; we have named it PM 1.0 mass. Select the key you want for this variable; we have selected analogue-input-1. Set the direction as bidirectional, set the unit as μg/m³, and press Create Variable. The variable will be created. Do the same for 9 more variables and change the units as per the variable we are measuring
Step 4⇒Variable List
These 10 variable names allow us to choose the key we want: analog-input-1 for the PM 1.0 mass, analog-input-2 for the PM 2.5 mass, analog-input-3 for the PM 4.0 mass, analog-input-4 for the PM 10 mass, analog-input-5 for the PM 0.5 num, analog-input-6 for the PM 1.0 num, analog-input-7 for the PM 2.5 num, analog-input-8 for the PM 4.0 num, analog-input-9 for the PM 10 num, analog-input-10 for the AQI Index.
Step 5⇒Adding Widget
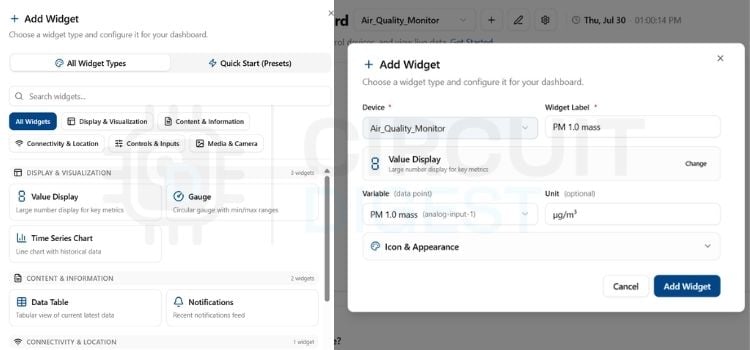
After adding the variable, click the dashboard from the left side of the website and select the device you created from the drop-down. First, we will create a widget for PM 1.0 mass. Click Add Widget, then click Value Display Widget. A menu bar will pop up. Select the device you created from the drop-down, name it PM 1.0 mass, set the variable as analogue-input-1, then set the unit as μg/m³ and click Add Widget. Do the same for the other 9 widgets, but select the proper variable for the widget placed. For all PM mass, the unit is μg/m³, and for all PM num, the unit is partciles/cm³ Now the dashboard setup is over.
Step 6⇒WhatsApp API Integration
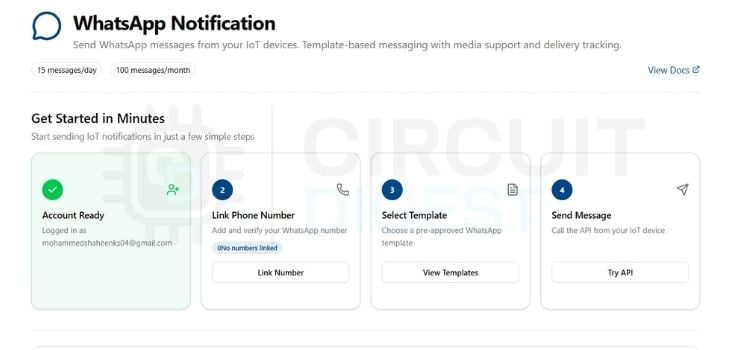
Click the home tab at the top, scroll down, and you will see a WhatsApp notification; click it. There you will see the link number option; click it, give your number, and an OTP will be sent to your number. Verify it, then your WhatsApp API setup is over. You can also check out a similar AI-Based Air Quality Index Monitoring and Suggestion System project where AI is implemented, which was previously done here at Circuit Digest.
Code Explanation: ESP32 Air Quality Monitor Firmware
The firmware for this ESP32 air quality monitor project is written in Arduino IDE. Below is a breakdown of the key code blocks.
#define WIFI_SSID      "xxxxx" //your Wi-Fi SSID
#define WIFI_PASS      "xxxxx" //your Wi-Fi password
#define DEVICE_ID      "xxxxxxxxxx" // Physical Device ID
#define CONNECTION_KEY "xxxxxxxxxx" // Connection Key
#define API_KEY        "xxxxxxxxxx" // API Key
// WhatsApp Notification Settings
#define WHATSAPP_PHONE     "xxxxxxxxxx"   // Linked phone number with country code
Network Credentials and Cloud Authentication
This block stores the credentials needed to connect the hardware to the local Wi-Fi and the cloud, like Wi-Fi name, password, device ID, connection key, and API key. Make sure to change all the credentials above with yours.
// --- Layout: 2 columns x 5 rows = 10 boxes, 240x320 Portrait ---
const int boxW = 120; // 2 cols * 120 = 240px width
const int boxH = 64;  // 5 rows * 64  = 320px height
const int cols = 2;
const int rows = 5;
struct ParamBox {
 const char* label;
 const char* unit;
 float threshold;
 bool  isCPCB;
};
ParamBox params[10] = {
 { "PM1.0 MASS", "ug/m3",  30.0,  false },
 { "PM2.5 MASS", "ug/m3",  60.0,  true  },
 { "PM4.0 MASS", "ug/m3",  80.0,  false },
 { "PM10 MASS",  "ug/m3",  100.0, true  },
 { "PM0.5 NUM",  "#/cm3",  1000.0,false },
 { "PM1.0 NUM",  "#/cm3",  800.0, false },
 { "PM2.5 NUM",  "#/cm3",  700.0, false },
 { "PM4.0 NUM",  "#/cm3",  500.0, false },
 { "PM10 NUM",   "#/cm3",  400.0, false },
 { "CPCB AQI",  "",       100.0, true  }
};
TFT Screen Layout and Metric Mapping
The above part configures the UI of the TFT display, where the partition of 2 X 5 grid of 120X64 pixel each box. The threshold of the parameters is also defined here.
void setup() {
 // 1. Disable brownout detector to prevent rebooting on battery voltage dips
 WRITE_PERI_REG(RTC_CNTL_BROWN_OUT_REG, 0);
 Serial.begin(115200);
 delay(2000); // Initial 2s delay for power supply voltage stabilization
 // --- Step 1: Initialize Display ---
 Serial.println("[Boot Step 1/3] Starting TFT Display...");
 tft.begin();
 tft.setRotation(0);             // Portrait mode, 240x320
 tft.fillScreen(ILI9341_BLACK);
 drawDashboardGrid();
 Serial.println("Waiting 5 seconds for display power stabilization...");
 delay(5000); // 5-second pause to isolate display power draw
 // --- Step 2: Initialize SPS30 Sensor ---
 Serial.println("[Boot Step 2/3] Starting SPS30 Sensor...");
 SENSOR_SERIAL_INTERFACE.begin(115200, SERIAL_8N1, 16, 17);
 sensor.begin(SENSOR_SERIAL_INTERFACE);
 sensor.stopMeasurement();
 int8_t serialNumber[32] = {0};
 error = sensor.readSerialNumber(serialNumber, 32);
 if (error != NO_ERROR) {
   Serial.print("Error reading serial number: ");
   errorToString(error, errorMessage, sizeof errorMessage);
   Serial.println(errorMessage);
 }
 error = sensor.startMeasurement(SPS30_OUTPUT_FORMAT_OUTPUT_FORMAT_FLOAT);
 if (error != NO_ERROR) {
   Serial.print("Error starting measurement: ");
   errorToString(error, errorMessage, sizeof errorMessage);
   Serial.println(errorMessage);
 } else {
   Serial.println("SPS30 Measurement started successfully.");
 }
 Serial.println("Waiting 5 seconds for SPS30 internal fan to stabilize...");
 delay(5000); // 5-second pause to let fan motor reach full operational speed
 // --- Step 3: Lower Wi-Fi TX Power & Connect to Cloud ---
 Serial.println("[Boot Step 3/3] Turning on Wi-Fi & Connecting to Cloud...");
 // Lower Wi-Fi transmit power to prevent voltage sags on battery power
 WiFi.setTxPower(WIFI_POWER_15dBm);
 if (!CDcloud.begin(WIFI_SSID, WIFI_PASS, DEVICE_ID, CONNECTION_KEY, API_KEY)) {
   Serial.println("CDcloud begin() failed — check credentials. Rebooting...");
   delay(2000);
   ESP.restart(); // Reset system if initial cloud connection fails
 } else {
   Serial.println("CDcloud initialized successfully.");
 }
 Serial.println("Boot sequence complete. Entering main loop.");
}
Boot Sequence and System Initialization
This function executes a staged soft start sequence to prevent battery Brownout. First 2 seconds delay for the boost converter to reach 5V at the output, 5 seconds delay to turn on the display, and another 5 seconds to turn on the SPS30 sensor. After all these steps, Wi-Fi is turned on, and it reduces Wi-Fi transmission power to 15 dBm to minimise peak current draw.
if (WiFi.status() != WL_CONNECTED) {
   Serial.println("Wi-Fi Disconnected!");
   Serial.println("Shutting down sensor and restarting system to execute staged soft-start...");
   // Stop SPS30 fan before resetting system
   sensor.stopMeasurement();
   // 2-second delay to settle power grid before rebooting
   delay(2000);
   // Trigger full ESP32 microcontroller software reboot
   ESP.restart();
 }
Fail-Safe Wi-Fi Reconnection Logic
This monitors the Wi-Fi status to keep the device safely connected to the network. If the connection drops, it immediately shuts down the sensor motor to save battery power and avoid motor strain. After connecting to the network all the devices will start working.
// 4. Check CPCB AQI Threshold for WhatsApp Alert (Poor Category > 200)
   if (cpcbAqi > AQI_POOR_THRESHOLD) {
     if (!whatsappAlertTriggered) {
       Serial.println("CPCB AQI in POOR Category (>200)! Triggering WhatsApp Alert...");
       sendWhatsAppAlert(cpcbAqi);
       whatsappAlertTriggered = true; // Lock alert until AQI recovers below 200
     }
   } else {
     // Reset alert state when AQI drops back to Safe/Moderate range (<= 200)
     whatsappAlertTriggered = false;
   }
MQTT Cloud Dispatch and AQI Threshold Monitor
The above loop executes every 5 seconds to acquire mass concentration, particle count, and AQI Index from the Sensirion SPS30 sensor while handling communication errors. The device then publishes all 10 telemetry values to the CDcloud via MQTT across two sequential JSON batches separated by a 200 ms interval to prevent packet dropping, and it also evaluates the AQI value for the threshold set before, which is 200. If it reaches the threshold, it initiates a WhatsApp alert and engages a lock to prevent the phone from receiving spam messages. You can also check out similar AI Projects done previously here at Circuit Digest.
Output: DIY ESP32 Air Quality Monitor Project Results
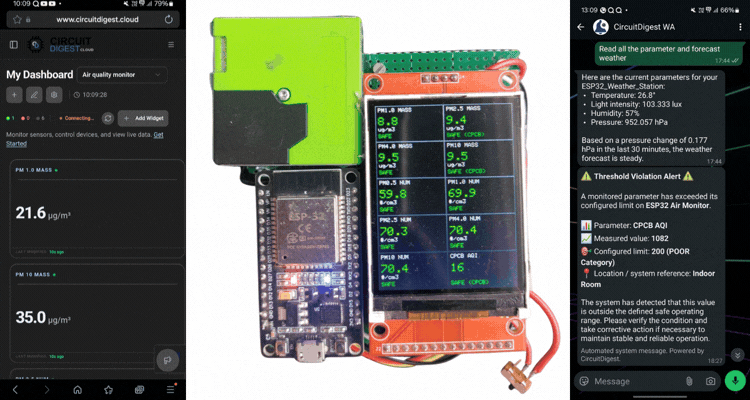
This AI-based air quality monitor has a TFT display which visualizes the readings of all 10 Particulate Matter (PM) parameters in the form of 5 rows and 2 columns and also displays and stores the data in CircuitDigest Cloud. If the set threshold from the above table of AQI index is reached, it sends a WhatsApp alert to the phone number in the code, which needs to be registered in CircuitDigest Cloud WhatsApp API.
Troubleshooting Common ESP32 Air Quality Monitor Issues
| Problem | Fix |
| Sensor doesn't turn on after powering the system | Confirm the SPS30's VCC pin is connected to 5V or VIN on the ESP32, not 3.3V. |
| Which battery type to use | Avoid an 800 mAh 3.7V LiPo — the SPS30's fan draws around 800 mA at startup. Use an 18650 cell instead. |
| System won't connect to Wi-Fi | Set your phone hotspot or router to 2.4 GHz — the ESP32 doesn't support 5 GHz networks. |
| Where to add an on/off switch | Don't add a switch between the boost converter's OUT+ and ESP32 VIN — the boost converter stays on regardless. Instead, add a switch between TP4056 OUT+ and the boost converter's IN+. |
| TFT display flickering | This usually points to a power supply issue; verify a clean 3.3V output from the ESP32's 3.3V pin. |
ESP32 Air Quality Monitor GitHub Repository
The ESP32 Air Quality Monitor is an IoT-based project that measures and monitors air quality in real time. It uses an ESP32 with environmental sensors to collect and display important air-quality data. The GitHub repository includes the source code, circuit details, and setup instructions for building the project.


Related Air Quality Monitoring Projects
Explore these projects covering Arduino- and ESP32-based air quality monitoring, including PM2.5, PM10, CO, and dust sensing. They demonstrate practical sensor interfacing, air quality analysis, and real-time monitoring approaches. These references can help in designing and improving an IoT-based air quality monitoring system.

Arduino Air Quality Monitoring System
For this project, we will keep things simple and use the popular Arduino UNO board to build a simple DIY air quality sensor. So, let’s dive straight into it. Design a professional air quality monitoring system using Arduino to monitor the overall environmental conditions in real-time.

Interfacing Sharp GP2Y1014AU0F Sensor with Arduino to build Air Quality Analyser
Here we are going to interface the Sharp GP2Y1014AU0F Sensor with Arduino Nano to measure the Dust Density in Air. Apart from the Dust sensor and Arduino Nano, an OLED display is also used to display the measured values.
IoT Based Air Quality Index Monitoring System – Monitor PM2.5, PM10, and CO using ESP32
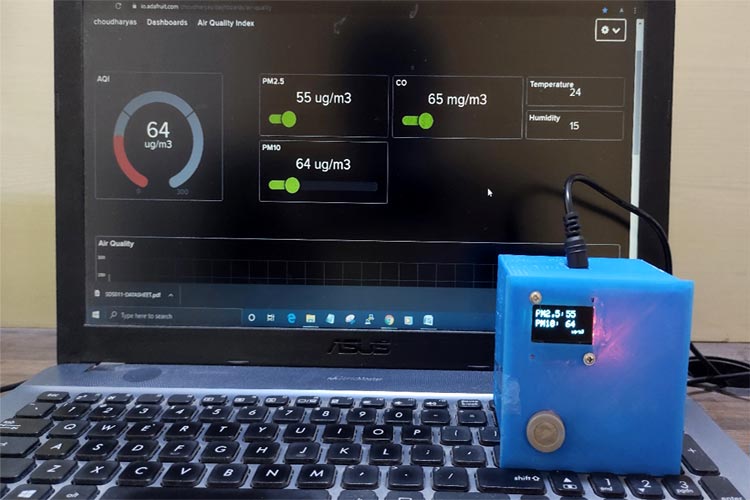
So in this project, we are going to build an ESP32 Air Quality Monitoring System using a Nova PM SDS011 sensor, an MQ-7 sensor, and a DHT11 sensor. We will also be using an OLED Display module to display Air Quality Values.
Complete Project Code
// Copyright (c) 2026 Jobit Joseph, Circuit Digest
// SPDX-License-Identifier: MIT
// =====================================================================
// ESP32 + SPS30 (UART) + ILI9341 + CircuitDigestCloud + WhatsApp Alert
// 2x5 Dashboard (PORTRAIT MODE) + Dual-batch MQTT + Indian CPCB AQI
// Extended 5-Second Soft-Start, Brownout Handling & Auto-Reset on Wi-Fi Loss
// =====================================================================
#include <Adafruit_GFX.h>
#include <Adafruit_ILI9341.h>
#include <SPI.h>
#include <SensirionUartSps30.h>
#include <CircuitDigestCloud.h>
#include <WiFiClientSecure.h>
// ESP32 System Headers for Brownout Detector Configuration
#include "soc/soc.h"
#include "soc/rtc_cntl_reg.h"
// ── Fill in your credentials ────────────────────────────────────────────────
#define WIFI_SSID      "your-Wi-Fi SSID"       // your Wi-Fi SSID
#define WIFI_PASS      "your-Wi-Fi password"   // your Wi-Fi password
#define DEVICE_ID      "your-device-id"        // Physical Device ID
#define CONNECTION_KEY "your-connection-key"   // Connection Key
#define API_KEY        "your-api-key"          // API Key
// WhatsApp Notification Settings
#define WHATSAPP_PHONE     "your-registered-phone-number" // Linked phone number with country code
#define AQI_POOR_THRESHOLD 200.0f                         // CPCB limit for POOR Air Quality (AQI > 200)
// Cloud Variable Keys
#define KEY_PM1_0_MASS "analog-input-1"
#define KEY_PM2_5_MASS "analog-input-2"
#define KEY_PM4_0_MASS "analog-input-3"
#define KEY_PM10_MASS  "analog-input-4"
#define KEY_PM0_5_NUM  "analog-input-5"
#define KEY_PM1_0_NUM  "analog-input-6"
#define KEY_PM2_5_NUM  "analog-input-7"
#define KEY_PM4_0_NUM  "analog-input-8"
#define KEY_PM10_NUM   "analog-input-9"
#define KEY_AQI        "analog-input-10" // Indian CPCB AQI
// ────────────────────────────────────────────────────────────────────────────
#define SENSOR_SERIAL_INTERFACE Serial2   // ESP32 HW Serial2 -> RX16 / TX17
#ifdef NO_ERROR
#undef NO_ERROR
#endif
#define NO_ERROR 0
CircuitDigestCloud CDcloud;
SensirionUartSps30 sensor;
static char errorMessage[64];
static int16_t error;
// Flag to track alert state and prevent spamming WhatsApp messages
static bool whatsappAlertTriggered = false;
// --- TFT Pin Configurations ---
#define TFT_CS   2   // GPIO 2
#define TFT_DC   5   // GPIO 5
#define TFT_RST  4   // GPIO 4
Adafruit_ILI9341 tft = Adafruit_ILI9341(TFT_CS, TFT_DC, TFT_RST);
// --- Layout: 2 columns x 5 rows = 10 boxes, 240x320 Portrait ---
const int boxW = 120; // 2 cols * 120 = 240px width
const int boxH = 64;  // 5 rows * 64  = 320px height
const int cols = 2;
const int rows = 5;
struct ParamBox {
 const char* label;
 const char* unit;
 float threshold;
 bool  isCPCB;
};
ParamBox params[10] = {
 { "PM1.0 MASS", "ug/m3",  30.0,  false },
 { "PM2.5 MASS", "ug/m3",  60.0,  true  },
 { "PM4.0 MASS", "ug/m3",  80.0,  false },
 { "PM10 MASS",  "ug/m3",  100.0, true  },
 { "PM0.5 NUM",  "#/cm3",  1000.0,false },
 { "PM1.0 NUM",  "#/cm3",  800.0, false },
 { "PM2.5 NUM",  "#/cm3",  700.0, false },
 { "PM4.0 NUM",  "#/cm3",  500.0, false },
 { "PM10 NUM",   "#/cm3",  400.0, false },
 { "CPCB AQI",  "",       100.0, true  }
};
void drawDashboardGrid();
void updateBox(int i, float value);
void sendWhatsAppAlert(float aqiValue);
float calculateAQI_CPCB(float pm25, float pm10);
void setup() {
 // 1. Disable brownout detector to prevent rebooting on battery voltage dips
 WRITE_PERI_REG(RTC_CNTL_BROWN_OUT_REG, 0);
 Serial.begin(115200);
 delay(2000); // Initial 2s delay for power supply voltage stabilization
 // --- Step 1: Initialize Display ---
 Serial.println("[Boot Step 1/3] Starting TFT Display...");
 tft.begin();
 tft.setRotation(0);             // Portrait mode, 240x320
 tft.fillScreen(ILI9341_BLACK);
 drawDashboardGrid();
 Serial.println("Waiting 5 seconds for display power stabilization...");
 delay(5000); // 5-second pause to isolate display power draw
 // --- Step 2: Initialize SPS30 Sensor ---
 Serial.println("[Boot Step 2/3] Starting SPS30 Sensor...");
 SENSOR_SERIAL_INTERFACE.begin(115200, SERIAL_8N1, 16, 17);
 sensor.begin(SENSOR_SERIAL_INTERFACE);
 sensor.stopMeasurement();
 int8_t serialNumber[32] = {0};
 error = sensor.readSerialNumber(serialNumber, 32);
 if (error != NO_ERROR) {
   Serial.print("Error reading serial number: ");
   errorToString(error, errorMessage, sizeof errorMessage);
   Serial.println(errorMessage);
 }
 error = sensor.startMeasurement(SPS30_OUTPUT_FORMAT_OUTPUT_FORMAT_FLOAT);
 if (error != NO_ERROR) {
   Serial.print("Error starting measurement: ");
   errorToString(error, errorMessage, sizeof errorMessage);
   Serial.println(errorMessage);
 } else {
   Serial.println("SPS30 Measurement started successfully.");
 }
 Serial.println("Waiting 5 seconds for SPS30 internal fan to stabilize...");
 delay(5000); //5-second pause to let fan motor reach full operational speed
 // --- Step 3: Lower Wi-Fi TX Power & Connect to Cloud ---
 Serial.println("[Boot Step 3/3] Turning on Wi-Fi & Connecting to Cloud...");

 // Lower Wi-Fi transmit power to prevent voltage sags on battery power
 WiFi.setTxPower(WIFI_POWER_15dBm);
 if (!CDcloud.begin(WIFI_SSID, WIFI_PASS, DEVICE_ID, CONNECTION_KEY, API_KEY)) {
   Serial.println("CDcloud begin() failed — check credentials. Rebooting...");
   delay(2000);
   ESP.restart(); // Reset system if initial cloud connection fails
 } else {
   Serial.println("CDcloud initialized successfully.");
 }
 Serial.println("Boot sequence complete. Entering main loop.");
}
void loop() {
 // Drive WiFi reconnect, MQTT connection, and auto-heartbeat
 CDcloud.loop();
 // ── Wi-Fi Disconnection & Full System Reboot Handler ───────────────────────
 if (WiFi.status() != WL_CONNECTED) {
   Serial.println("Wi-Fi Disconnected!");
   Serial.println("Shutting down sensor and restarting system to execute staged soft-start...");
   // Stop SPS30 fan before resetting system
   sensor.stopMeasurement();
   // 2-second delay to settle power grid before rebooting
   delay(2000);
   // Trigger full ESP32 microcontroller software reboot
   ESP.restart();
 }
 // ──────────────────────────────────────────────────────────────────────────
 static uint32_t lastPublish = 0;
 if (millis() - lastPublish >= 5000) { // Update every 5 seconds
   lastPublish = millis();
   float mc1p0 = 0, mc2p5 = 0, mc4p0 = 0, mc10p0 = 0;
   float nc0p5 = 0, nc1p0 = 0, nc2p5 = 0, nc4p0 = 0, nc10p0 = 0;
   float typicalParticleSize = 0;
   error = sensor.readMeasurementValuesFloat(mc1p0, mc2p5, mc4p0, mc10p0,
                                              nc0p5, nc1p0, nc2p5, nc4p0,
                                              nc10p0, typicalParticleSize);
   if (error != NO_ERROR) {
     Serial.print("Error reading SPS30 values: ");
     errorToString(error, errorMessage, sizeof errorMessage);
     Serial.println(errorMessage);
     return;
   }
   // Compute Indian CPCB AQI based on PM2.5 and PM10
   float cpcbAqi = calculateAQI_CPCB(mc2p5, mc10p0);
   float values[10] = {
     mc1p0, mc2p5, mc4p0, mc10p0,
     nc0p5, nc1p0, nc2p5, nc4p0, nc10p0,
     cpcbAqi
   };
   // 1. Refresh local TFT screen boxes
   for (int i = 0; i < 10; i++) {
     updateBox(i, values[i]);
   }
   // 2. Publish BATCH 1 (5 Parameters)
   CDcloud.publish({
     {KEY_PM1_0_MASS, mc1p0},
     {KEY_PM2_5_MASS, mc2p5},
     {KEY_PM4_0_MASS, mc4p0},
     {KEY_PM10_MASS,  mc10p0},
     {KEY_PM0_5_NUM,  nc0p5}
   });
   delay(200);
   // 3. Publish BATCH 2 (5 Parameters)
   CDcloud.publish({
     {KEY_PM1_0_NUM,  nc1p0},
     {KEY_PM2_5_NUM,  nc2p5},
     {KEY_PM4_0_NUM,  nc4p0},
     {KEY_PM10_NUM,   nc10p0},
     {KEY_AQI,        cpcbAqi}
   });
   Serial.println("SPS30 metrics published to Cloud.");
   // 4. Check CPCB AQI Threshold for WhatsApp Alert (Poor Category > 200)
   if (cpcbAqi > AQI_POOR_THRESHOLD) {
     if (!whatsappAlertTriggered) {
       Serial.println(" CPCB AQI in POOR Category (>200)! Triggering WhatsApp Alert...");
       sendWhatsAppAlert(cpcbAqi);
       whatsappAlertTriggered = true; // Lock alert until AQI recovers below 200
     }
   } else {
     // Reset alert state when AQI drops back to Safe/Moderate range (<= 200)
     whatsappAlertTriggered = false;
   }
 }
}
// ---------------------------------------------------------------
// Indian CPCB AQI Calculation Sub-functions
// ---------------------------------------------------------------
float getSubIndex_PM25(float pm25) {
 if (pm25 <= 0.0f)   return 0.0f;
 if (pm25 <= 30.0f)  return (50.0f / 30.0f) * pm25;
 if (pm25 <= 60.0f)  return 51.0f + ((100.0f - 51.0f) / (60.0f - 30.0f)) * (pm25 - 30.0f);
 if (pm25 <= 90.0f)  return 101.0f + ((200.0f - 101.0f) / (90.0f - 60.0f)) * (pm25 - 60.0f);
 if (pm25 <= 120.0f) return 201.0f + ((300.0f - 201.0f) / (120.0f - 90.0f)) * (pm25 - 90.0f);
 if (pm25 <= 250.0f) return 301.0f + ((400.0f - 301.0f) / (250.0f - 120.0f)) * (pm25 - 120.0f);
 return 401.0f + ((500.0f - 401.0f) / (150.0f)) * (pm25 - 250.0f);
}
float getSubIndex_PM10(float pm10) {
 if (pm10 <= 0.0f)   return 0.0f;
 if (pm10 <= 50.0f)  return (50.0f / 50.0f) * pm10;
 if (pm10 <= 100.0f) return 51.0f + ((100.0f - 51.0f) / (100.0f - 50.0f)) * (pm10 - 50.0f);
 if (pm10 <= 250.0f) return 101.0f + ((200.0f - 101.0f) / (250.0f - 100.0f)) * (pm10 - 100.0f);
 if (pm10 <= 350.0f) return 201.0f + ((300.0f - 201.0f) / (350.0f - 250.0f)) * (pm10 - 250.0f);
 if (pm10 <= 430.0f) return 301.0f + ((400.0f - 301.0f) / (430.0f - 350.0f)) * (pm10 - 430.0f);
 return 401.0f + ((500.0f - 401.0f) / (70.0f)) * (pm10 - 430.0f);
}
float calculateAQI_CPCB(float pm25, float pm10) {
 float subPM25 = getSubIndex_PM25(pm25);
 float subPM10 = getSubIndex_PM10(pm10);
 return (subPM25 > subPM10) ? subPM25 : subPM10;
}
// ---------------------------------------------------------------
// Function to send WhatsApp HTTP REST API alert
// ---------------------------------------------------------------
void sendWhatsAppAlert(float aqiValue) {
 WiFiClientSecure client;
 client.setInsecure(); // Bypass SSL certificate verification
 if (!client.connect("www.circuitdigest.cloud", 443)) {
   Serial.println("WhatsApp connection failed!");
   return;
 }
 String payload =
   "{\"phone_number\":\"" + String(WHATSAPP_PHONE) + "\","
   "\"template_id\":\"threshold_violation_alert\","
   "\"variables\":{"
   "\"device_name\":\"ESP32 Air Monitor\","
   "\"parameter\":\"CPCB AQI\","
   "\"measured_value\":\"" + String((int)aqiValue) + "\","
   "\"limit\":\"200 (POOR Category)\","
   "\"location\":\"Indoor Room\"}}";
 client.println("POST /api/v1/whatsapp/send HTTP/1.1");
 client.println("Host: www.circuitdigest.cloud");
 client.println("X-API-Key: " + String(API_KEY));
 client.println("Content-Type: application/json");
 client.println("Connection: close");
 client.print("Content-Length: ");
 client.println(payload.length());
 client.println();
 client.print(payload);
 Serial.println("WhatsApp API Payload Sent. Server Response:");
 while (client.connected() || client.available()) {
   if (client.available()) {
     String line = client.readStringUntil('\n');
     Serial.println(line);
   }
 }
 client.stop();
}
// ---------------------------------------------------------------
// Draw static 2x5 grid dashboard (Portrait Layout)
// ---------------------------------------------------------------
void drawDashboardGrid() {
 tft.setTextColor(ILI9341_WHITE);
 tft.setTextSize(1);
 for (int i = 0; i < 10; i++) {
   int col = i % cols;
   int row = i / cols;
   int x = col * boxW;
   int y = row * boxH;
   tft.drawRect(x, y, boxW, boxH, ILI9341_DARKGREY);
   tft.setCursor(x + 5, y + 4);
   tft.print(params[i].label);
 }
}
// ---------------------------------------------------------------
// Update content area of one dashboard slot (Portrait Layout)
// ---------------------------------------------------------------
void updateBox(int i, float value) {
 int col = i % cols;
 int row = i / cols;
 int x = col * boxW;
 int y = row * boxH;
 // Clear value and status area inside the box
 tft.fillRect(x + 2, y + 16, boxW - 4, boxH - 18, ILI9341_BLACK);
 bool hasThreshold = params[i].threshold > 0;
 bool safe = true;
 uint16_t valColor = ILI9341_CYAN;
 if (hasThreshold) {
   safe = (value <= params[i].threshold);
   valColor = safe ? ILI9341_GREEN : ILI9341_RED;
 }
 // --- Value Line ---
 tft.setTextSize(2);
 tft.setTextColor(valColor);
 tft.setCursor(x + 5, y + 20);

 // Format AQI without decimals, keep 1 decimal for other values
 if (i == 9) {
   tft.print(value, 0);
 } else {
   tft.print(value, 1);
 }
 // --- Unit Line ---
 tft.setTextSize(1);
 tft.setCursor(x + 5, y + 38);
 tft.setTextColor(ILI9341_WHITE);
 tft.print(params[i].unit);
 // --- Status Banner Line ---
 tft.setCursor(x + 5, y + 50);
 if (!hasThreshold) {
   tft.setTextColor(ILI9341_YELLOW);
   tft.print("INFO ONLY");
 } else if (safe) {
   tft.setTextColor(ILI9341_GREEN);
   tft.print(params[i].isCPCB ? "SAFE (CPCB)" : "SAFE");
 } else {
   tft.setTextColor(ILI9341_RED);
   tft.print(params[i].isCPCB ? "NOT SAFE(CPCB)" : "NOT SAFE");
 }
}