
Breathing clean, healthy air is vital for our well-being, yet air quality remains a concern in many environments. In this article, we delve into creating an Arduino-based Air Quality Monitoring System. Previously, we have also built an IoT-based Air pollution monitoring system using ESP8266, but for this project, we will keep things simple and use the popular Arduino UNO board to build a simple DIY air quality sensor. We will start by talking about various components and then move on to interfacing the MQ135 sensor with the Arduino board, and then its coding. So, let’s dive straight into it. Design a professional air quality monitoring system using Arduino to monitor the overall environmental conditions in real-time. If you want to try your hand at building an air quality monitoring system project yourself, this detailed guide has step-by-step instructions all the way from choosing the electronic components to writing the software.
Table of Contents
What is an Air Quality Monitoring System?
An air quality monitoring system is a device that measures pollutants in the environment and is able to provide real-time information on the state of air quality and cleanliness. Our Arduino air quality sensor system will, in fact, monitor several different parameters (gas levels, temperature, and humidity) to provide accurate and reliable AQI readings.
Advantages of Arduino Air Quality Monitoring
- Real-time environmental data monitoring
- Cost-effective DIY solution
- Ability to customise the sensors based on user configuration
- Educational, practical purposes
What is an AQI Sensor or Air Quality Index Sensor?
The Air Quality Index (AQI) is a standardised measurement used to communicate how polluted or clean the air is in a specific area at a given time. It provides an easily understandable way to convey information about air quality to the public.
AQI typically takes into account several major air pollutants regulated by environmental agencies worldwide, such as ground-level ozone, particulate matter (PM2.5 and PM10), carbon monoxide (CO), sulfur dioxide (SO2), and nitrogen dioxide (NO2). Each pollutant has its own scale and threshold levels that determine the AQI value.
The AQI scale ranges from 0 to 500, with specific categories indicating the level of health concern associated with the air quality:
- 0 to 150: Normal to Moderately Polluted-This range encompasses air quality conditions that are considered acceptable for most individuals, with occasional concerns for sensitive groups in the higher end of the scale.
- 151 to 200: Poor- Everyone may start to experience health effects, and sensitive groups are more likely to be significantly affected.
- 201 to 300: Very bad - Health warnings of emergency conditions. The entire population is likely to be affected, and serious health effects may arise.
- 301 to 500: Toxic - Health alert: everyone may experience more serious health effects due to the extremely poor air quality.
| AQI Range | Category | Health Impact | Color Code |
| 0-50 | Good | Minimal impact | Green |
| 51-100 | Moderate | Acceptable for most people | Yellow |
| 101-150 | Unhealthy for Sensitive Groups | Sensitive individuals may experience symptoms | Orange |
| 151-200 | Unhealthy | Everyone may experience health effects | Red |
| 201-300 | Very Unhealthy | Health warnings for emergency conditions | Purple |
| 301-500 | Hazardous | Health alert - serious effects for everyone | Maroon |
For this project, we will not be measuring PM2.5 and PM10, but you can check the AQI monitoring system if you want to learn more and add it as an upgrade to this project later.
How does the Air Quality Monitoring System Work?
The Air Quality Monitoring System operates by utilising sensors to detect environmental parameters like gas levels, temperature, and humidity. Specifically, analog readings from the gas sensor, connected to an Arduino's analog pin, provide data on the air quality. These readings are mapped to predefined thresholds, categorising the air quality as "Good," "Poor," "Very Bad," or "Toxic." Simultaneously, a DHT11 sensor measures humidity and temperature. The collected data is displayed in real-time on an OLED screen using the Adafruit libraries. By continuously monitoring these parameters, the system offers a snapshot of air quality conditions, enabling users to assess and respond to changes in their environment.
Arduino Air Quality Monitoring System Components
- Arduino board
- MQ135 gas sensor for detecting various gases.
- DHT11 temperature and humidity sensor
- OLED display for visual output
- Breadboard and jumper wires
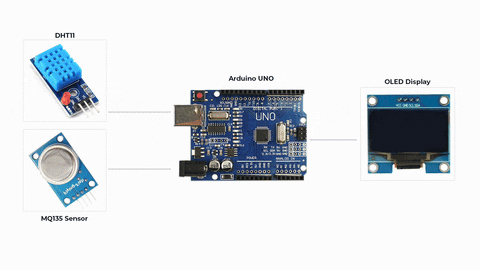
Arduino Air Quality Monitoring System Circuit Diagram
The complete air quality monitoring system project connection will be as follows, with an OLED, DHT11 and MQ135 gas sensor connected to Arduino Uno on a breadboard.

The Arduino is connected to the OLED using the I2C protocol with the help of the SDA and the SCL pins. The MQ135 gas sensor is outputting analog signals, which are sent to the analog input pin A0 of the Arduino. The DHT11 sensor has one digital data output pin, which is connected to the D2 pin of the Arduino.
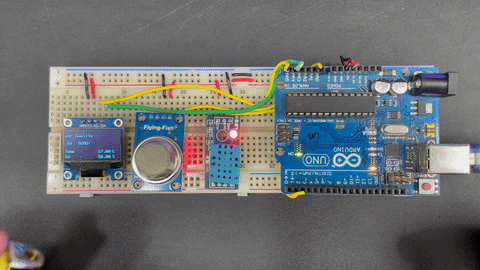
Here’s how the project will look after it is interfaced on a breadboard.

Pin Configuration Table
| Arduino Pin | Connected Component | Wire Color |
| A0 | MQ135 Analog Output | Yellow |
| D2 | DHT11 Data Pin | Blue |
| A4 (SDA) | OLED SDA | Green |
| A5 (SCL) | OLED SCL | White |
| 5V | VCC (All Components) | Red |
| GND | Ground (All Components) | Black |
Air Quality Monitoring Using Arduino Code
This code monitors air quality and displays sensor readings (temperature, humidity, and gas level) on an OLED display. Let's break it down :
#include <SPI.h>
#include <Wire.h>
#include <Adafruit_GFX.h>
#include <Adafruit_SSD1306.h>
#include <dht.h>
These lines include necessary libraries for communication protocols (SPI, Wire), graphics handling (Adafruit_GFX), OLED display control (Adafruit_SSD1306), and the DHT sensor.
#define SCREEN_WIDTH 128
#define SCREEN_HEIGHT 64
#define OLED_RESET 4
Constants are defined for the OLED display's width, height, and reset pin.
Adafruit_SSD1306 display(SCREEN_WIDTH, SCREEN_HEIGHT, &Wire, OLED_RESET);
An object named display of type Adafruit_SSD1306 is created to control the OLED display using the specified width, height, communication (Wire), and reset pin.
#define sensor A0
#define DHT11PIN 2
Constants are defined for the analog pin connected to the gas sensor (sensor) and the pin connected to the DHT11 sensor (DHT11PIN).
int gasLevel = 0;
String quality = "";
dht DHT;
Variables are declared to store gas levels and quality descriptions, and an instance DHT of the DHT sensor is created.
void sendSensor() {
 // Function to read temperature and humidity from the DHT sensor
int readData = DHT.read11(DHT11PIN);
      float h = DHT.humidity;
      float t = DHT.temperature;
      if (isnan(h) || isnan(t)) {
      Serial.println("Failed  to read from DHT sensor!");
        Return;
  }
      display.setTextColor(WHITE);
      display.setTextSize(1);
      display.setFont();
      display.setCursor(0, 43);
      display.println("Temp  :");
     display.setCursor(80, 43);
      display.println(t);
      display.setCursor(114, 43);
      display.println("C");
      display.setCursor(0,  56);
      display.println("RH    :");
      display.setCursor(80, 56);
      display.println(h);
      display.setCursor(114, 56);
      display.println("%");
}
This function is defined to read temperature and humidity data from the DHT sensor and display it on the OLED screen.
void air_sensor() {
gasLevel = analogRead(sensor);
      if(gasLevel<151){
        quality = "  GOOD!";
      }
      else if (gasLevel >151 && gasLevel<200){
        quality =  "  Poor!";
  }
      else if (gasLevel >200 && gasLevel<300){
        quality  = "Very bad!";
  }
        else if (gasLevel >300 && gasLevel<500){
        quality  = "Toxic!";
  }
        else{
        quality = " Toxic";
}
  display.setTextColor(WHITE);
  display.setTextSize(1);
  display.setCursor(1,5);
  display.setFont();
  display.println("Air Quality:");
  display.setTextSize(1);
  display.setCursor(5,23);
  display.println(gasLevel);

  display.setCursor(20,23);
  display.println(quality);
}
This function is defined to read gas levels from the analog pin connected to the gas sensor and determine the air quality based on predefined thresholds. It also displays the gas level and quality on the OLED screen.
void setup() {
 Serial.begin(9600);
  pinMode(sensor,INPUT);
  if(!display.begin(SSD1306_SWITCHCAPVCC, 0x3c)) { // Address  0x3D for 128x64
    Serial.println(F("SSD1306 allocation failed"));
}
  display.clearDisplay();
  display.setTextColor(WHITE);

  display.setTextSize(2);
  display.setCursor(50, 0);
  display.println("Air");
  display.setTextSize(1);
  display.setCursor(23, 20);
  display.println("Quality monitor");
  display.display();
  delay(1200);
  display.clearDisplay();

  display.setTextSize(1.5);
  display.setCursor(20, 20);
  display.println("BY Circuit");
  display.setCursor(20, 40);
  display.println("Digest");
  display.display();
  delay(1000);
  display.clearDisplay();
}
The setup function initialises serial communication, sets the sensor pin as input, and initialises the OLED display. It displays introductory messages on the screen.
void loop() {
display.clearDisplay();
air_sensor();
sendSensor();
display.display();
}
The loop function clears the display, reads the gas sensor and DHT sensor data using the defined functions, and continuously updates the display with the latest readings.
This code essentially initialises the sensors, reads their data, determines air quality based on gas levels, and displays all the information on the OLED screen in a loop.
Working Demo for the Air Quality Monitoring System Project
So, this is the complete working demo of the project. You can see that it shows the temperature and humidity values at the bottom of the OLED. At the top, you can see that the level of toxicity is shown, which goes from good to toxic after gas from the lighter is introduced.
Troubleshooting Common Issues
| Issue | Possible Cause | Solution |
| No sensor reading | Loose connections | Check wiring and connections |
| Erratic readings | Sensor not warmed up | Wait 24-48 hours for MQ135 stabilization |
| Display not working | I2C connection issue | Verify SDA/SCL connections |
| Wrong AQI values | Calibration needed | Perform sensor calibration procedure |
Technical Summary and GitHub Repository
The Technical Summary describes the project concept, components, and use in a lucid way that is easy to understand. It provides you with both a comprehensive and overall understanding of how the system works. Our GitHub Repository has all the code, circuit files, and materials you need to assess, replicate, or modify this project.


Future Enhancements
- Integrate machine learning for predictive analytics
- Detection of multiple gases in addition to other sensors
- Cloud connectivity for storing and analysing data
- Mobile application development for off-site monitoring
- Integrate solar power for out-of-the-box / outdoor installation
Frequently Asked Questions on the Air quality monitoring system using Arduino project
⇥ 1. What is the accuracy of the MQ135 sensor for air quality measurement?
The MQ135 sensor has an accuracy of ±10%, which is reasonably accurate for all general air quality
monitoring. It is not a laboratory-level instrument, but at the same time, it is usable for educational and basic
environmental monitoring.
⇥ 2. How long does the MQ135 sensor take to stabilise?
The MQ135 gas sensor needs a heating time of 24 - 48 hours before readings are accurate and
consistent. Make sure the MQ135 tech has had time to warm up before you read it.
⇥ 3. Can I add more sensors to this air quality monitoring system?
Yes, you can add PM2.5 sensors, CO sensors or any other gas detection modules to the air quality monitoring
system. Just make sure that you have enough power and enough Arduino pins.
⇥ 4. How long does the MQ135 sensor last?
MQ135 sensors last 2-5 years if it is always running. There are many factors of environmental conditions and
frequency of use. Regular calibrations will maintain the accuracy and keep the usage frequency at a level.
⇥ 5. How do I calibrate the air quality monitoring system?
When you calibrate your system, you must first take readings of a clean air baseline (at different
altitudes). Compare the MQ135 readings to readings of reference instruments and establish correction factors in your code to improve accuracy.
⇥ 6. Can this air quality monitoring device be used outdoors?
The basic design is for indoor usage. To use outdoors, include a weatherproof enclosure, temperature compensation, and think about power management for battery use.
Similar Arduino Projects with Circuit Diagram and Code

Arduino Home Automation Projects
Transform your living space into a smart home with Arduino home automation projects. From controlling lights and appliances to monitoring environmental conditions, these DIY projects empower you to build custom solutions tailored to your needs.

Embark on a journey into the Internet of Things (IoT) with Arduino ESP32, NodeMCU, and ESP8266 projects. Create interconnected devices that communicate seamlessly over the internet. Whether it's smart sensing, remote control, or data monitoring, these projects empower you to bring intelligence and connectivity to your everyday surroundings, making your home and environment smarter and more efficient.
Dive into Arduino robotics projects where circuits and code come together to breathe life into machines. Explore creations like line-following robots and gesture-controlled marvels with detailed circuit diagrams and code snippets. Delve into the world of Arduino robotics for an immersive learning experience in hardware and programming
Arduino Projects for Beginners
Travel on an Arduino adventure tailored for beginners, where you'll master fundamental electronics and coding concepts. Engage in hands-on LED blinking, sensor exploration, and craft your initial traffic light simulator, laying the groundwork for coding prowess. Dive into this accessible world of Arduino projects, even if you're a complete beginner, and watch your ideas come to life with every line of code.
Complete Project Code
#include <SPI.h>
#include <Wire.h>
#include <Adafruit_GFX.h>
#include  <Adafruit_SSD1306.h>
#include <dht.h>
#define SCREEN_WIDTH 128 // OLED display width, in pixels
#define  SCREEN_HEIGHT 64 // OLED display height, in pixels
#define OLED_RESET     4  // Reset pin # (or -1 if sharing Arduino reset pin)
Adafruit_SSD1306 display(SCREEN_WIDTH,  SCREEN_HEIGHT, &Wire, OLED_RESET);
#define sensor    A0
#define DHT11PIN 2
int gasLevel  = 0;         //int variable for gas level
String quality ="";
dht DHT;
void sendSensor()
{
  int readData = DHT.read11(DHT11PIN);
  float h = DHT.humidity;
  float t = DHT.temperature;
  if (isnan(h) || isnan(t)) {
  Serial.println("Failed  to read from DHT sensor!");
    return;
  }
  display.setTextColor(WHITE);
  display.setTextSize(1);
  display.setFont();
  display.setCursor(0, 43);
  display.println("Temp  :");
  display.setCursor(80, 43);
  display.println(t);
  display.setCursor(114, 43);
  display.println("C");
  display.setCursor(0,  56);
  display.println("RH    :");
  display.setCursor(80, 56);
  display.println(h);
  display.setCursor(114, 56);
  display.println("%");
}
void air_sensor()
{
  gasLevel = analogRead(sensor);
  if(gasLevel<151){
    quality = "  GOOD!";
  }
  else if (gasLevel >151 && gasLevel<200){
    quality =  "  Poor!";
  }
  else if (gasLevel >200 && gasLevel<300){
    quality  = "Very bad!";
  }
    else if (gasLevel >300 && gasLevel<500){
    quality  = "Toxic!";
  }
    else{
    quality = " Toxic";
}

  display.setTextColor(WHITE);
  display.setTextSize(1);
  display.setCursor(1,5);
  display.setFont();
  display.println("Air Quality:");
  display.setTextSize(1);
  display.setCursor(5,23);
  display.println(gasLevel);

  display.setCursor(20,23);
  display.println(quality);
}
void setup() {
  Serial.begin(9600);
  pinMode(sensor,INPUT);
  if(!display.begin(SSD1306_SWITCHCAPVCC, 0x3c)) { // Address  0x3D for 128x64
    Serial.println(F("SSD1306 allocation failed"));
}
  display.clearDisplay();
  display.setTextColor(WHITE);

  display.setTextSize(2);
  display.setCursor(50, 0);
  display.println("Air");
  display.setTextSize(1);
  display.setCursor(23, 20);
  display.println("Quality monitor");
  display.display();
  delay(1200);
  display.clearDisplay();

  display.setTextSize(1.5);
  display.setCursor(20, 20);
  display.println("BY Circuit");
  display.setCursor(20, 40);
  display.println("Digest");
  display.display();
  delay(1000);
  display.clearDisplay();
}
void loop() {
display.clearDisplay();
air_sensor();
sendSensor();
display.display();
}
