
For many engineers and makers, the journey into electronics and microcontrollers probably started with an Arduino board. From making a simple LED blink to reading sensors , controlling motors, and building our first embedded projects, Arduino has been a familiar starting point for learning and experimenting with electronics.
But the way we build electronics has changed a lot over the years. Today, we are working with Linux, edge AI, computer vision, machine learning, wireless connectivity, and much more. And Arduino is evolving along with it.
This brings us to the Arduino UNO Q, Arduino’s first Single Board Computer (SBC), which combines the familiar Arduino ecosystem with much more computing power. Along with the new hardware, Arduino has also introduced Arduino App Lab and its AI Agent Mode, bringing AI-assisted development into the Arduino workflow.
This project was sponsored by Arduino, who provided the Arduino UNO Q board used in its development. We sincerely thank the Arduino team for their support and for helping us bring this project to life.
In this article, we will take a practical look at the UNO Q, set it up from scratch, explore Arduino App Lab, and try out the new AI Agent Mode to see how it fits into the Arduino development experience.
Arduino UNO Q: The Dual-Brain SBC
At first glance, the Arduino UNO Q might look like another Arduino board, but there is a major difference under the hood. Instead of relying on a single microcontroller, the UNO Q brings together two different processing platforms on the same board.
The first is the Qualcomm Dragonwing™ IQ8 Series SoC, which handles the Linux side of the board and provides the computing power needed for applications such as computer vision, AI, networking, and other resource-intensive tasks. Alongside it is the STM32U585 microcontroller, which takes care of real-time control and the typical microcontroller tasks we are familiar with from Arduino boards.
This combination gives the UNO Q what we can think of as a dual-brain architecture. The Linux processor can handle the heavy computing, while the microcontroller can take care of hardware-level tasks such as reading sensors, controlling motors, and interacting with peripherals.
The interesting part is how Arduino has made these two sides work together, and this is where Arduino App Lab comes in. App Lab provides a common environment where we can work with the Linux side and the microcontroller, while also giving us tools to build and run applications on the UNO Q. It is also where we get to explore some of the newer features of the UNO Q, including its AI Agent Mode.
Arduino UNO Q: A Quick Look at the Hardware
Before moving into the software side, let’s take a quick look at the hardware. The UNO Q keeps the familiar UNO form factor, but packs much more hardware onto the board, including the Qualcomm processor, STM32U585 microcontroller, onboard memory and storage, wireless connectivity, and various interfaces.
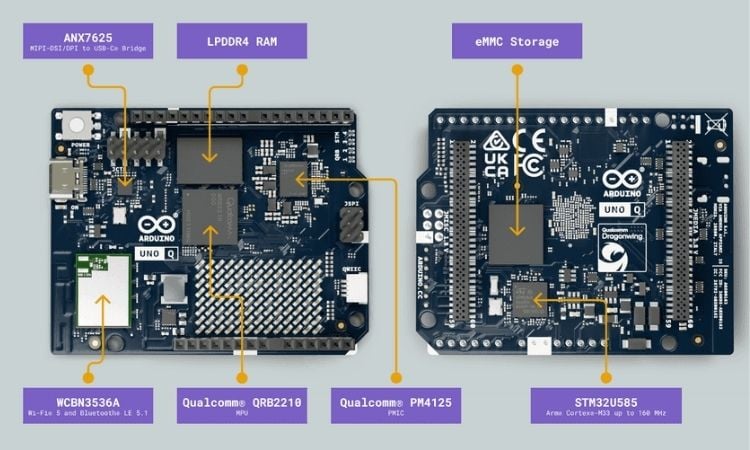
We have already covered the UNO Q hardware, specifications, pinout, and dual-processor architecture in detail in our previous guide. So, instead of repeating the same information here, you can check out our Getting Started with Arduino UNO Q –Beginners Guide for a detailed look at the board and its specifications.
Arduino UNO Q: Working Modes
The Arduino UNO Q has three different modes of operation, and each mode is useful in its own way depending on how you want to develop, test, or run your project. Let’s take a quick look at what each mode does.
1. PC-Hosted Mode
PC-Hosted Mode is probably the easiest way to get started with the UNO Q. You simply connect the board to your laptop using a USB-C data cable, open Arduino App Lab on the laptop, and start working with the board.
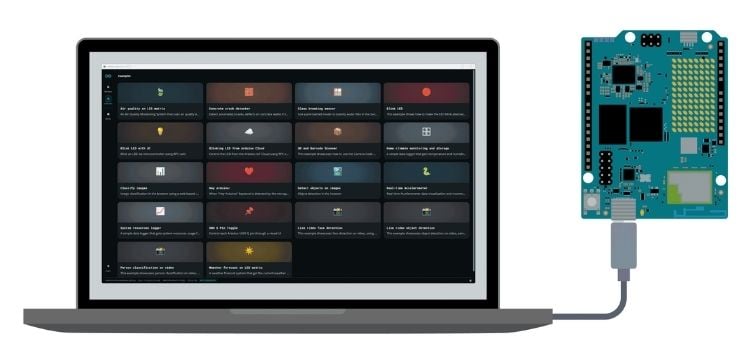
This mode is especially useful when you are a beginner because everything is right in front of you, making development and debugging much easier. It is also the mode used for the initial setup of the board when connecting it to a PC for the first time.
The main limitation is that, in this setup, you don't get the full desktop experience of the Linux side. You work with the Linux environment through the tools and terminal provided by App Lab rather than using the UNO Q like a normal Linux computer.
2. Network Mode
Network Mode is useful when the UNO Q is placed somewhere you cannot easily connect to it with a USB cable. In this case, you connect both the UNO Q and your computer to the same local network. The board can then appear in Arduino App Lab, allowing you to connect to it and work with it remotely.
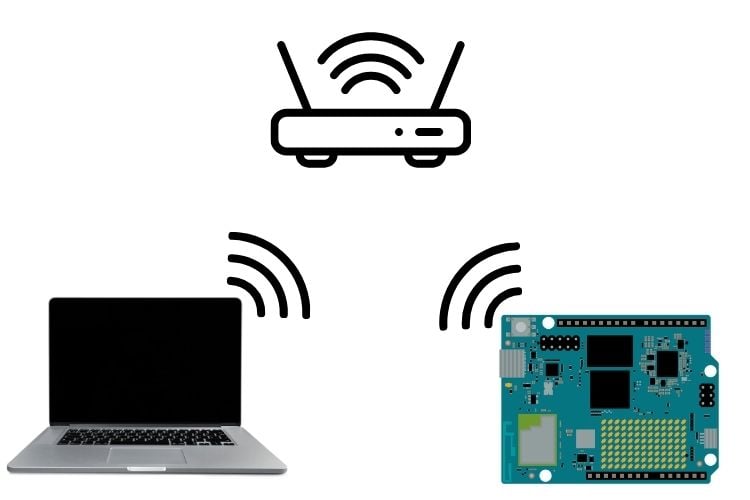
This makes the setup much cleaner, especially when the board is already installed inside a project or placed away from your desk. The main limitation is that it depends on the local network. Arduino uses mDNS for automatic discovery, and some networks, such as guest networks, VPNs, or networks with strict firewall rules, can prevent the board from appearing in App Lab.
3. Standalone Mode
Then we have Standalone Mode, where the UNO Q works much more like a regular computer. The board runs its Debian Linux environment directly, and you can connect a monitor, keyboard, mouse, and other USB peripherals through a USB-C hub or dongle.
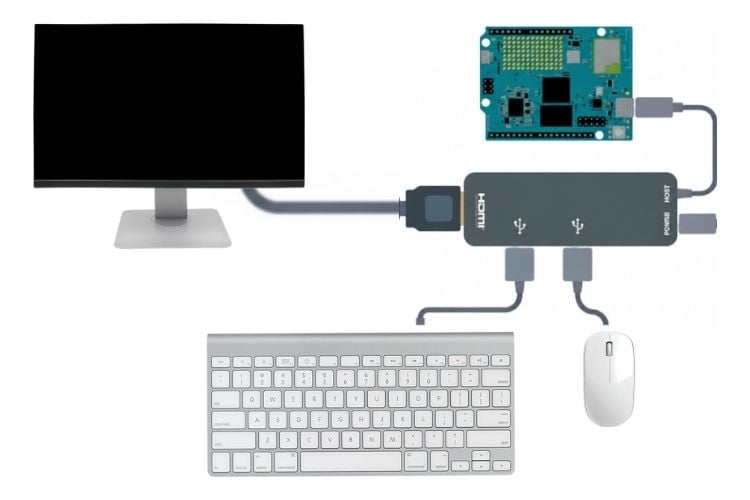
This is the mode to use when you want to work directly on the UNO Q without depending on another computer. You can access the Linux desktop, use the terminal, browse the web, install software, and even open Arduino App Lab directly on the board.
The downside is that the setup needs a few more accessories. A display, keyboard, mouse, and a suitable USB-C hub or dongle with power delivery can make the setup take up quite a bit more space on your desk. Arduino specifically lists a USB-C multiport adapter with external power delivery for the UNO Q setup.
In simple terms PC-Hosted Mode is convenient for getting started and debugging, Network Mode is useful when you want to access the board remotely, and Standalone Mode turns the UNO Q into a more complete Linux computer.
Arduino App Lab
Once the UNO Q is set up, the next thing we need to understand is the Arduino App Lab. This is where Arduino brings the different parts of the UNO Q together and gives us a common environment to develop and run our projects.
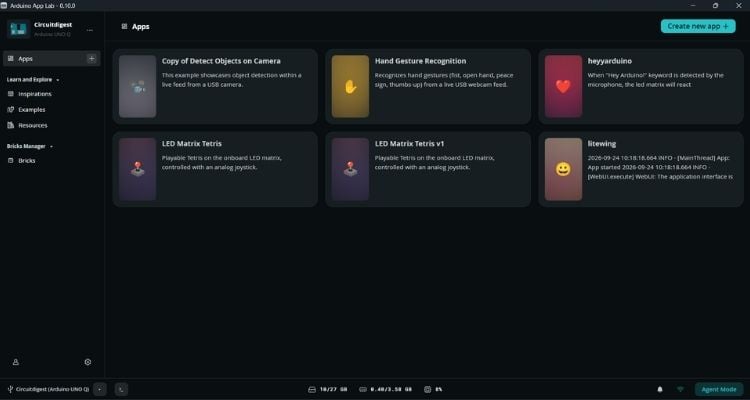
If you have worked with the traditional Arduino IDE before, App Lab may look a little different at first. Instead of working with only an Arduino sketch, an App Lab project can combine the Linux side of the UNO Q with the STM32 microcontroller side.
App Lab also introduces a few new concepts such as Apps, Bricks, and the Bridge. These are important to understand before we start building projects with the UNO Q, so let's look at each of them one by one.
Apps
Unlike the Arduino IDE, where we usually create and work with a sketch, Arduino App Lab uses the term App for a project.
You can think of an App like a folder that contains everything needed for a project. It can contain the different programs and components that work together to build the complete application. For example, an App can include a Python program running on the Linux side, an Arduino sketch running on the STM32 microcontroller, and other components such as Bricks.
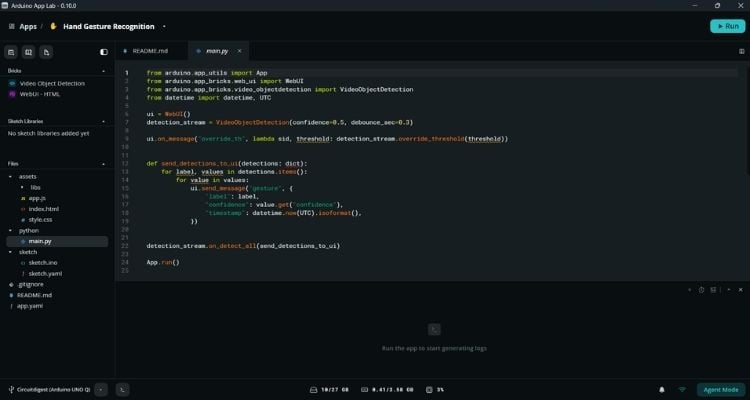
This makes it easier to manage projects where both the Linux processor and the microcontroller need to work together.
For example, imagine we are building a temperature monitoring system. The Arduino sketch can read the temperature sensor through the STM32, while a Python program running on Linux can process the data and display it on a webpage.
Instead of managing these as separate projects, we can keep them together as a single App in the Arduino App Lab.
Bricks
You can think of a Brick as a pre-built component, similar to a library or plugin, that adds a specific function to your App. Instead of writing everything from scratch, we can add the Brick we need and use the functionality it provides.
App Lab provides different Bricks for different purposes, which can make it easier to build applications without having to implement every feature ourselves.
A Real-World Example
Let's take the Web UI Brick as an example.
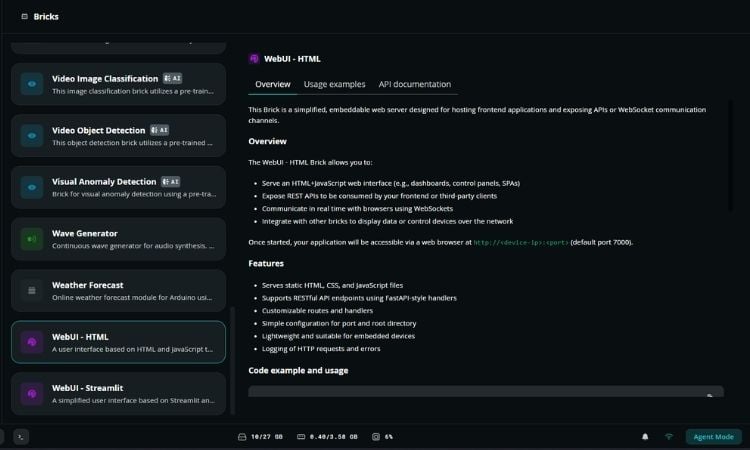
Suppose we are building a project where we want to control an LED from a web interface. Normally, we would need to create the web page, handle the buttons, manage the communication, and write the code needed to connect the interface with our project.
With the Web UI Brick, we can add the Brick to our App and use it to create the web interface for our project. We can then connect the controls from the interface to our own code and use them to control the hardware.
So, instead of writing the complete web interface from scratch, the Brick gives us a ready-made building block that we can use in our project.
This is the basic idea behind Bricks: pick the functionality you need, add it to your App, and combine it with your own code to build the complete project.
The Bridge – Connecting the Two Sides
We have already seen that an App can contain programs running on both the Linux side and the STM32 microcontroller. But how do these two sides communicate with each other? This is where the Bridge comes in.
The Bridge is an RPC (Remote Procedure Call) library that allows the Python program running on the Linux side to communicate with the Arduino sketch running on the STM32 side.
You can think of it like a messenger between the two processors. One side can request a function from the other side, and the result can be sent back.
A Simple Example, Let's say we connect an LED to the STM32 side of the UNO Q, but we want to control it from a Python program running on Linux.
The Python program cannot directly control that GPIO pin because the pin is handled by the STM32 microcontroller. Instead, Python can use the Bridge to send a request to the Arduino sketch.
The flow would look something like this:
Python Program → Bridge → STM32 Arduino Sketch → LED
For example, the Python program can request the Arduino sketch to turn the LED ON. The Arduino side receives that request and performs the required operation.
Similarly, the STM32 can send data back to the Python program. For example, the Arduino sketch could read a sensor and send the sensor value through the Bridge to Python for further processing.
This is what makes the Bridge important in the UNO Q. It allows us to divide the work between the two processors while still making them work together as a single application.
So, if Apps are the project, and Bricks are the ready-made building blocks, the Bridge is the communication link that allows the Linux and MCU sides of the project to talk to each other.
Running an Example App
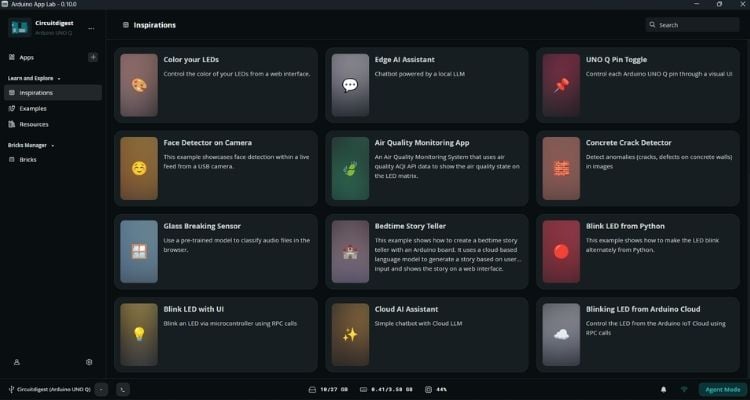
Arduino App Lab has an Inspiration section where we can find complete project ideas built around the UNO Q. These are useful for understanding how different parts of App Lab can be combined to create a complete application.
Let's open the LED Matrix Painter from the Inspiration section and take a look at how the project is built. The Matrix Painter gives us a web-based interface where we can draw patterns on a virtual representation of the UNO Q's LED matrix. We can create frames and animations and then use them with the actual LED matrix on the board.
What makes this example interesting is that it is not just a simple Arduino sketch. It brings together several parts of the UNO Q architecture.
The Python program runs on the Linux side and handles the application logic. This is where the web application and the higher-level operations can be handled.
The Arduino sketch runs on the STM32 microcontroller. The MCU is responsible for controlling the onboard LED matrix, which is the hardware we ultimately want to control.
There is also a Web UI Brick involved in creating the web interface. Instead of building the complete web-server infrastructure from scratch, the Brick provides the functionality needed to create and serve the user interface from the App.
So, the basic workflow of the application looks something like this:
Web Interface → Python Application → Bridge → Arduino Sketch → LED Matrix
When we draw something on the web page, the Python side handles the application logic and communicates with the MCU side. The Arduino sketch then takes care of driving the LED matrix. This is a good example of what we discussed earlier about Apps, Bricks, and the Bridge. All three concepts come together here to create one complete application rather than treating the Linux program and Arduino sketch as separate projects.
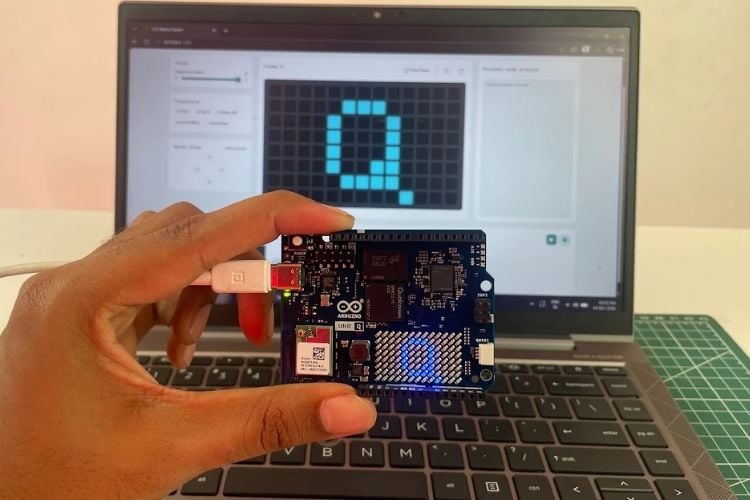
We can also open the individual files inside the App and see how these different parts are implemented. This makes the Matrix Painter a useful example for understanding how a real App Lab project is structured before we start building our own applications.
Exploring the New AI Agent Mode
At the bottom-left corner of Arduino App Lab, we can find the Agent Mode option. This is where we can create and modify Apps by simply describing what we want in a prompt.
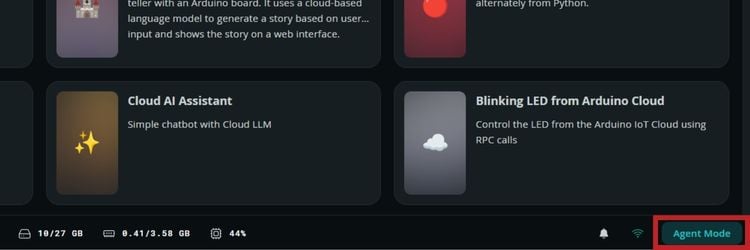
Clicking on Agent Mode takes us to the setup screen. Here, we can choose the AI agent we want to work with. At the moment, Claude Code is available, while Arduino has announced support for OpenAI and Gemini as upcoming options.
We then need to connect the selected AI provider using our own account or the required API credentials. Once the setup is complete, App Lab takes us to the Agent workspace.
This workspace looks a little different from the normal App Lab editor. Instead of starting by writing the code ourselves, we can describe the application we want to build in the prompt. The agent can then work with the App files and make the required changes to build the application.
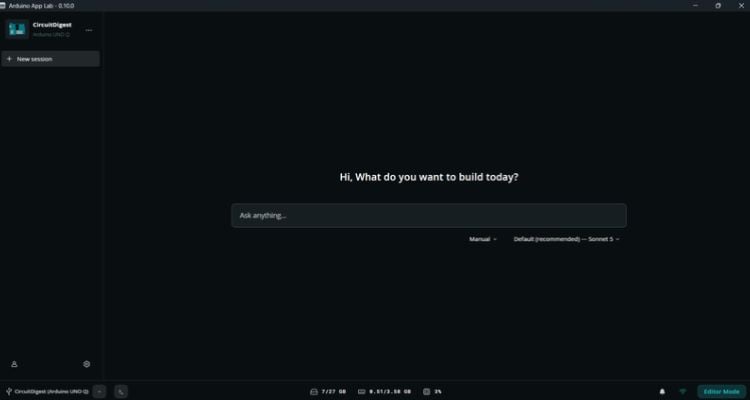
For example, we can describe the hardware we are using and explain what we want the application to do. The agent can then create the required project structure and code. We can continue the conversation and ask it to modify the App or fix problems as we test it.
Trying Agent Mode with a Tetris Game
To see how Agent Mode works in practice, I asked it to create a Tetris game for the UNO Q's onboard LED matrix, with a joystick for controlling the game. I gave the complete requirements through a prompt and let the agent work on the project. It took some time to plan and create the App. Once it was ready, I ran it on the UNO Q, and the Tetris game started appearing on the LED matrix.
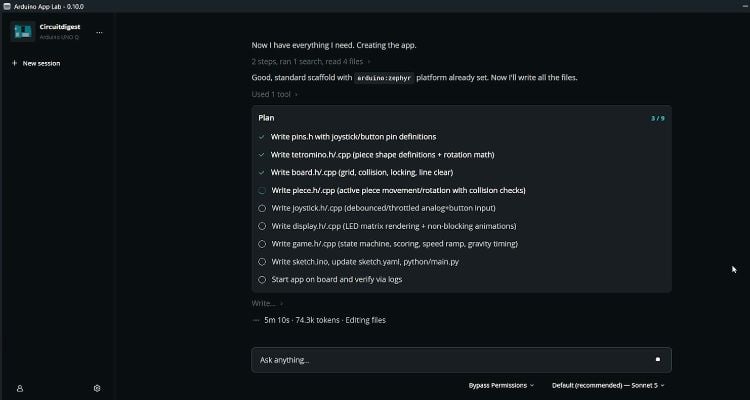
Once it was ready, I ran it on the UNO Q, and the Tetris game started appearing on the LED matrix. I then connected the joystick and noticed that the Tetris blocks were moving even without any input. After checking the code, I found that the joystick's analog values were not defined correctly, which was causing the board to interpret the input incorrectly. Since this was a small hardware-specific issue, I simply corrected the relevant code myself instead of asking Agent Mode to rebuild the project.
I then connected the joystick and noticed that the Tetris blocks were moving even without any input. After checking the code, I found that the joystick's analog values were not defined correctly, which was causing the board to interpret the input incorrectly. Since this was a small hardware-specific issue, I simply corrected the relevant code myself instead of asking Agent Mode to rebuild the project.
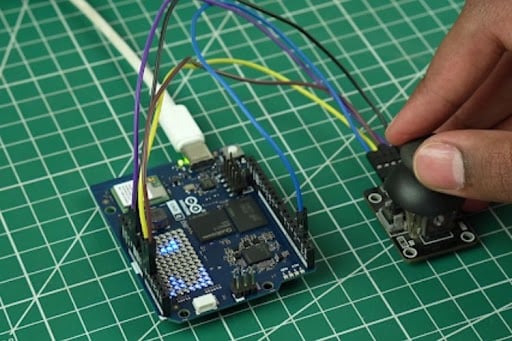
This was a good example of how I found Agent Mode useful in practice. It was able to take an idea and create a working starting point, but the generated App still needed to be tested with the actual hardware. For smaller issues like incorrect pin definitions or input values, manually fixing the code can also be much quicker than running the agent through the whole process again.
Programming the UNO Q with Arduino IDE
Apart from the Arduino App Lab, we can also program the UNO Q using the Arduino IDE, just like a traditional Arduino board. Here, we can write a normal Arduino sketch and program the STM32U585 microcontroller directly, without needing to use the Linux side of the board.
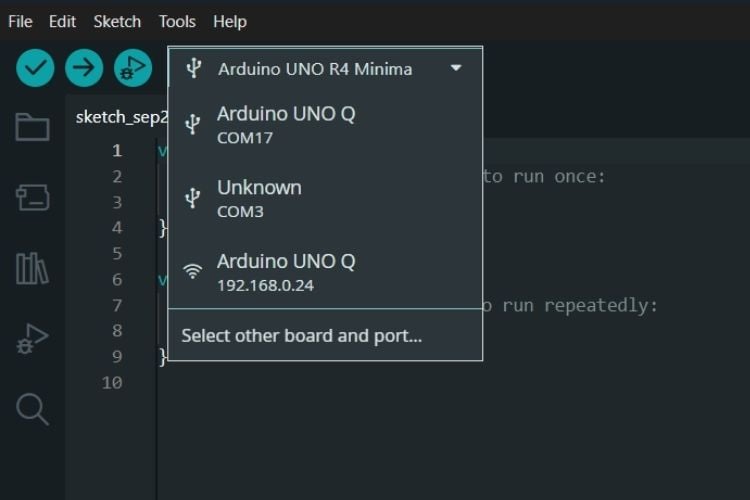
The UNO Q can be connected to the Arduino IDE in two ways. We can connect it directly to the PC using a USB cable or connect to the board over the network when the UNO Q and PC are on the same network. As shown in the image, the Arduino IDE can detect the UNO Q both through a COM port and through its network address.
This gives us a familiar Arduino workflow for projects that only need the MCU, while App Lab can be used when we want to take advantage of the Linux processor and build applications using both sides of the UNO Q.
Conclusion
After spending some time with the Arduino UNO Q, we found that it feels quite different from the Arduino boards we have traditionally worked with. It still has the familiar Arduino side with the STM32 microcontroller, but adding a full Linux system opens up many more possibilities. Arduino App Lab also makes it easier to work with both sides of the board through Apps, Bricks, and the Bridge.
We found the PC-Hosted Mode particularly useful during development. We can move the project between the UNO Q and the PC and continue working from either side. This makes it convenient to edit the code on the PC, test it on the board, and move back and forth during development.
The new Agent Mode was also interesting to explore. We used it to create a Tetris game for the onboard LED matrix with a joystick for input. It managed to create a working starting point, but we still had to test it with the actual hardware and fix a small issue with the joystick input manually. This showed us that Agent Mode can speed up the initial development, but the generated App still needs to be tested and refined.
Overall, the UNO Q feels like a step into a different kind of Arduino development. There is more to learn compared with a traditional Arduino board, but in return we get Linux, Python, web applications, and the familiar Arduino ecosystem on the same board. We have only explored App Lab and Agent Mode so far, and there is still a lot more to test on the UNO Q.

Add a comment
No account needed. Your comment appears once a moderator has reviewed it.