 Anand D
Author

From blinking LEDs to building robots, the Arduino UNO was the development board that made electronics feel possible for students, professionals and a lot of hobby makers around the world. While keeping the familiar idea of Arduino UNO and its form factor the same, they have launched this board called the Arduino UNO Q, which is a more capable variant of the original Arduino UNO. The Q in Uno Q stands for Qualcomm, as Qualcomm acquired Arduino. If you are new to the platform, our library of Arduino projects for beginners and advanced makers is a great place to start.
The Guide covers everything from the Arduino UNO Q specifications and block diagram to a complete Arduino UNO Q face detection using Arduino App Lab. Ideal for anyone, from beginners to experts, deploying Edge AI on devices.
Building on the legacy of simplicity and accessibility, the Arduino UNO Q brings a noticeable leap in performance and connectivity. With upgraded processing power, improved wireless capabilities, and support for modern communication protocols, it is designed to handle more demanding IoT and edge applications without losing the beginner-friendly experience Arduino is known for. Whether it's rapid prototyping, smart device development, or integrating with cloud platforms, the UNO Q aims to bridge the gap between classic microcontroller projects and next-generation connected systems, making it a powerful upgrade for today’s makers and developers.
Table of Contents
- Table of Contents
- What is Arduino UNO Q?
- └ Arduino UNO Q – At a Glance
- Arduino UNO Q Specifications
- └ Arduino UNO Q vs Original Arduino UNO
- Block Diagram
- Connectivity and Communication Protocols
- Components Required
- Arduino UNO Q Face Detection – Step-by-Step Tutorial
- └ Hardware Setup
- └ Software Setup
- └ Loading the Face Detector Brick Example
- └ Running the Face Detection Program
- └ Enabling Run at Boot (Auto-Start)
What is Arduino UNO Q?
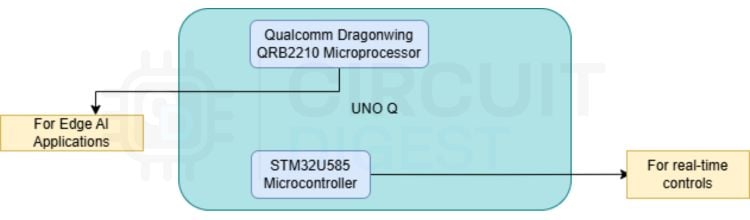
The Arduino UNO Q is a powerful hybrid development board that combines a Linux-based microprocessor with a real-time microcontroller, making it ideal for advanced applications in AI, robotics and IoT. This dual architecture allows users to handle everything from sensor data processing and edge AI inference to motor control and hardware interfacing on a single board. Designed for scalability and ease of use, it empowers both beginners and experienced engineers to build smarter, more connected systems without needing multiple development platforms.
Based on all of this information, anybody exploring the basics of the Arduino UNO Q board for beginners can be assured that their capabilities far exceed those of a traditional microcontroller while enjoying the same simple-to-use programming environment as users of other boards in the Arduino ecosystem via Arduino App Lab and its brick based programming system
Arduino UNO Q – At a Glance
| Feature | Details |
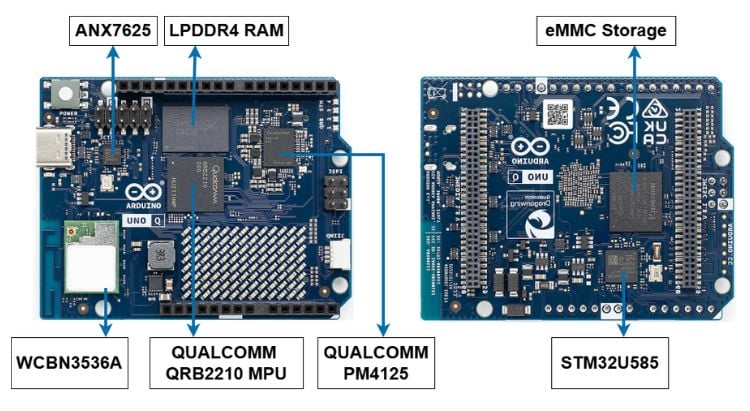
| Main Processor | Qualcomm QRB2210 – Quad-Core ARM Cortex-A53 @ 2 GHz |
| Co-Processor | STM32U585 (Real-Time Microcontroller) |
| RAM | 2 GB or 4 GB LPDDR4 |
| Storage | 16 GB eMMC |
| GPU | Adreno (smartphone-class) |
| Wireless | Wi-Fi 5, BLE 5.1 |
| Power Supply | 5 V / 3 A (USB-C also works for basic use) |
| IDE | Arduino App Lab |
| OS | Linux (on main processor) |
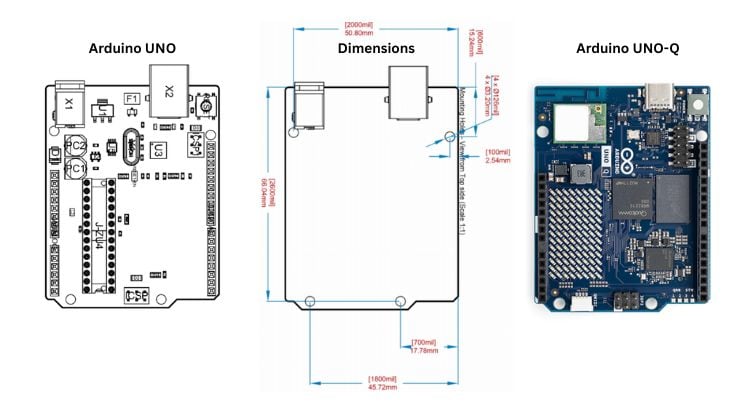
| Form Factor | UNO-compatible (same shield footprint) |
Arduino UNO Q Specifications
Understanding the full Arduino UNO Q specifications is essential before choosing it for a project. Here is a complete breakdown of the board's key components, capabilities, and Arduino UNO Q features:
Arduino UNO Q vs Original Arduino UNO – Key Differences
| Specification | Arduino UNO (Classic) | Arduino UNO Q |
| Processor | ATmega328P (8-bit AVR) | Qualcomm QRB2210 (Quad-Core ARM A53) |
| Clock Speed | 16 MHz | 2 GHz |
| RAM | 2 KB | 2 GB / 4 GB LPDDR4 |
| Storage | 32 KB Flash | 16 GB eMMC |
| Operating System | None (bare metal) | Linux |
| Wi-Fi / Bluetooth | None (add-on required) | Wi-Fi 5 + BLE 5.1 (built-in) |
| GPU | None | Adreno GPU |
| Edge AI Capability | Very limited (TinyML only) | Full support (TensorFlow Lite, OpenCV) |
| IDE | Arduino IDE | Arduino App Lab (brick-based) |
| Form Factor | UNO standard | UNO-compatible (same shield footprint) |
Processor and Memory
It exhibits a Quad Core Arm Cortex A53 based CPU, which is the Qualcomm Dragon Wing QRB2210 microprocessor and an STM-based microcontroller, which is the STM32U585 microcontroller. It comes with 4GB/2GB LPDDR4 RAM variants with 16GB of eMMC memory. The Quad Core ARM – Cortex – A53 processor operates at 2GHz, providing significant computational power. The UNO Q also has an Adreno GPU (similar to the ones seen in smartphones) for handling graphical tasks. Arduino UNO Q requires 5V and 3A for proper functioning, but it still works if it's connected to a Laptop via USB Cable. The Arduino UNO Q power supply requirement is 5 V at 3 A, delivered through the USB-C port.
Real-Time Co-Processor
An STM32U585 microprocessor on the UNO Q will allow for real-time execution of time-critical tasks (reading sensors, driving servos and LEDs), as it provides a physical interface for the Qualcomm processor to communicate with the chip. The Linux environment can then be used to offload hardware-level tasks from the Qualcomm processor, so there is no latency in performing these tasks.
The UNO Q combines high-level computing along with real-time control, enabling complex applications like Edge AI and robotics thanks to its dual processor architecture.
Arduino UNO Q Block Diagram
The Arduino UNO Q block diagram illustrates a clear split between the two processing domains. At the top of the stack is the Qualcomm QRB2210, running Linux to handle many high-level tasks such as networking, AI inference and application logic. Below the QRB2210 is the STM32U585 co-processor, which provides real-time control of peripherals. The two processors communicate with each other via an internal communication bus that allows them to exchange data in real time. The Qualcomm side has both a Wi-Fi 5 and BLE 5.1 radio, while the STM32U585 provides low-latency access to I2C, SPI and UART via GPIO headers.
Arduino App Lab is the IDE used to program Arduino UNO Q. Just connect it to a monitor and start coding, just like the way we use to program a Raspberry PI. It’s an open-source project just like the other Arduino boards, with schematics and design files available for developers.
Arduino UNO Q Connectivity and Communication Protocols
A core part of the Arduino UNO Q features is its rich connectivity suite. Below is a complete overview of supported interfaces and their intended use cases:
| Connectivity | Purpose |
| Type C | Programming, Serial communication, Power |
| WiFi 5 | Internet / IoT connectivity |
| BLE 5.1 | Mobile device communication |
| UART | Device-to-device serial communication |
| SPI | High-speed peripherals (displays, ADCs, etc.) |
| I2C | Sensors & low-speed peripherals |
| Qwiic | Plug-and-play I2C sensors |
Getting Started with Arduino UNO Q
The first-time user, getting started with the Arduino UNO Q, finds it easy because of how simple it really is to use. The following are two different types of usage modes available with this particular board:
∗ Using the SBC (Single Board Computer) Mode: You can connect everything to the Arduino UNO Q (monitor, keyboard, and mouse) just like you would with a Raspberry Pi. The Qualcomm processor is capable of running Linux directly from the chip itself and allows for the user to write and execute their code directly on the board itself.
∗ Using the Laptop-Connected Mode: Connecting the board to your laptop using a USB Type-C cable allows you to access and program your Arduino UNO Q using the Arduino App Lab on that particular PC/Laptop. For the majority of developers and hobbyists, this will be much quicker than using the first option above.
Components Required
| S No | Component | Description |
| 1 | Arduino UNO Q | Acts as the main controller |
| 2 | Type-C to multiport hub | To connect UNO Q, the laptop and peripherals |
| 3 | Web camera | To get a video feed for face detection |
| 4 | Laptop | To access the Arduino App Lab |
How to Program the Arduino UNO Q Using Arduino App Lab
The Arduino App Lab is specifically meant to show how to program the Arduino UNO Q (check out the links to resources below!). Compared to the traditional Arduino IDE, the App Lab offers users the ability to build their programs using a brick-based programming model, using bricks (pre-built function blocks) to handle some of the more difficult processes, such as camera feeds, face detection, and network requests. Even though you’ll build your projects visually by “connecting” bricks together instead of writing the low-level code by yourself, you’ll still have access to a code editor if you prefer to code.
You can download the App Lab for free from the Arduino website for Windows, macOS, and Linux. You can also get the schematics and design files for the UNO Q, which are open-source like the rest of the Arduino platform. This is consistent with Arduino’s long history of open-hardware standards.
Arduino UNO Q Face Detection – Step-by-Step Tutorial
Let’s try to run a face detection program using Arduino UNO Q. Let’s take feed from an external web camera and see how we can feed it into our Arduino UNO Q and run a basic face detection program to see the detected faces. We have made an awesome tutorial on an ESP32 CAM based face recognition. If you’re interested, do check it out and see how ESP32 handles face recognition.
Hardware Setup
We can use the UNO Q in two different configurations:
One, you can use it as a Single Board Computer (SBC) by plugging in your monitor, keyboard and mouse and use it in the same way we use a Raspberry PI as an SBC.
Secondly, you can use your laptop and connect the UNO Q to it using a USB Cable. Make sure you use a USB hub so that you have enough ports to plug in peripheral devices like a webcam.
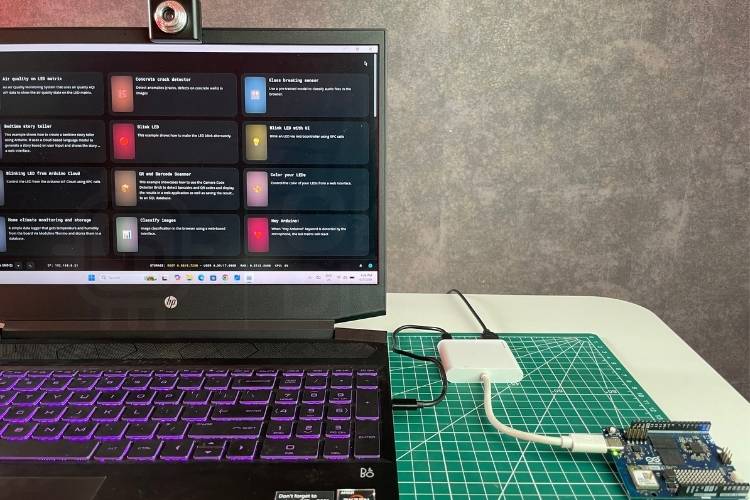
For this tutorial, I’m using the second method. I have the UNO Q connected to a Type-C USB hub, and I have connected my laptop and an external web camera to the USB hub via USB cables. This way, my laptop can communicate with the UNO Q, and the UNO Q can communicate with peripheral devices as well.
Software Setup
Install Arduino App Lab for your operating system, whether Windows, Mac / Linux, from the Official Arduino website.
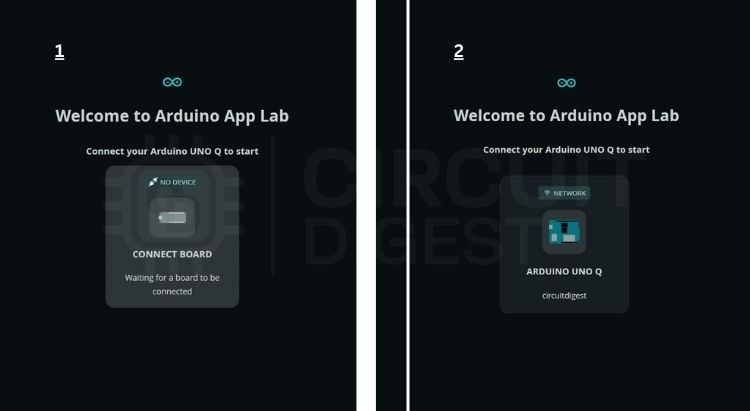
Once you open App Lab, it will say “Board not connected”. Once your UNO Q is connected, it will display your UNO Q on the screen.
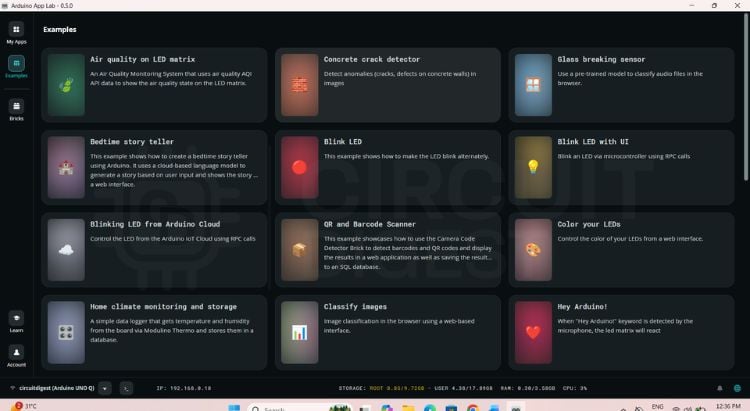
Click on the Board, and you will be taken to the App Lab Examples section, where you can see several Examples that are ready to be used.
Loading the Face Detector Brick Example
Scroll down through the examples and open "Face Detector" on the camera.
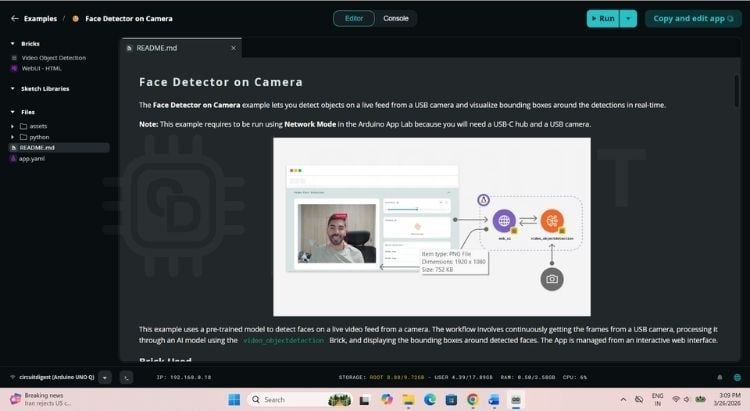
At the top left, you can see it written as "Bricks". For this program, two bricks have been used. These can be treated as ready-to-use building blocks for your application. Without writing code from scratch, we can just deploy the required bricks, and we are good to go.
Running the Face Detection Program
Since we have our hardware setup ready, all we have to do is click on the “Run” option on the top right, and the program will start execution. It will take a couple of seconds for the program to install the required libraries and packages. A new window will open up in your browser with a live web camera feed.
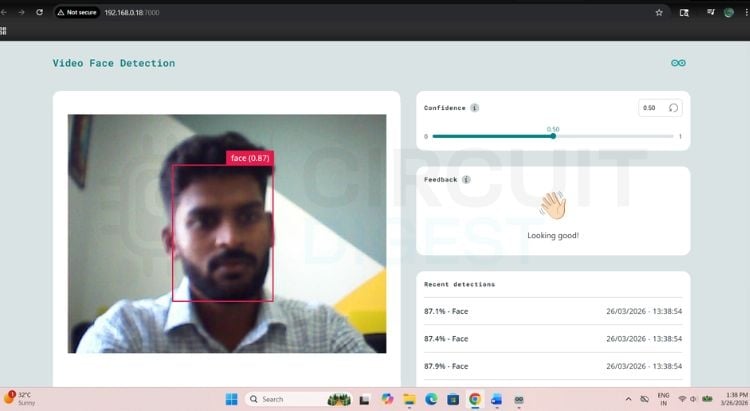
You can see the confidence of the detected faces at the top right of the red colour bounding box. You can even set the confidence value of detections as well, using the slider at the top.
To stop detections, you can return to App Lab and click “Stop”, which will stop the program execution. If you’re interested, you can check out our real-time face recognition tutorial using Raspberry Pi.
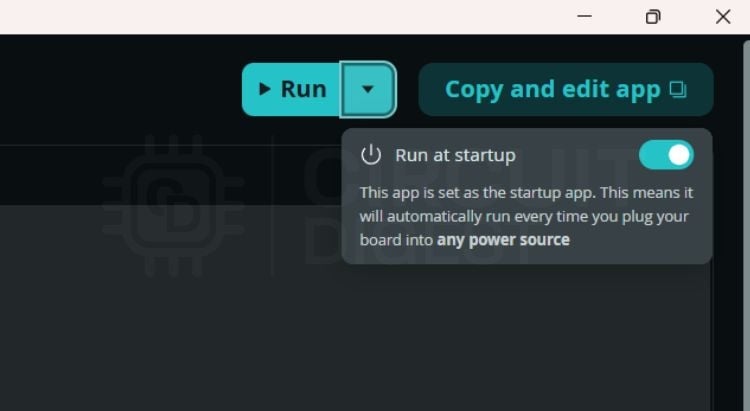
Enabling Run at Boot (Auto-Start)
One of the most useful Arduino UNO Q features in App Lab is the ability to configure a program to run automatically every time the board powers on, without connecting to a laptop. The coolest thing that I like the most in App Lab is that, without using any other code or alterations, you can easily make an App Lab program to run on "BOOT" (whenever you power on your board, it will run automatically). For this, all you have to do is click the small drop-down arrow next to “Run” and toggle on the Run at startup option. That’s it, the UNO Q will execute the program whenever you power it on.
Conclusion
From understanding basic pin configurations and communication protocols to exploring the Arduino UNO Q’s hybrid architecture, this guide teaches how smoothly you can transition from simple electronics projects to more complex, real-world applications. It lowers the barrier to entry for technologies that once required multiple systems, making it an excellent starting point for anyone looking to step into modern embedded development. This guide begins by exploring the Arduino UNO Q’s specifications and its dual-processor architecture.
The face detection that we have done here highlights the true potential of the UNO Q, demonstrating how edge AI can be implemented directly on a compact development board. By combining real-time processing with higher-level computing, users can build intelligent systems that react instantly to their environment. This is just the beginning - whether it’s smart surveillance, human-machine interaction, or automation, the UNO Q provides a solid foundation to experiment, learn, and innovate in the rapidly evolving world of AI and IoT. For those getting started with the Arduino UNO Q, the combination of Arduino App Lab’s simple brick-based interface and the board’s Qualcomm-powered performance makes it a highly compelling platform.
Video Demonstration of Arduino UNO Q
Frequently Asked Questions – Arduino UNO Q
⇥ What does 'Q' stand for in the Arduino UNO Q?
The Q is from Qualcomm. Qualcomm acquired Arduino with the addition of launching the new UNO Q as its lead (flagship) model and equipped it with the Dragon Wing QRB2210 processor, which is part of the same ARM architecture family that is used in Android devices.
⇥ What are the power supply requirements for Arduino UNO Q?
In order to operate at full performance, you must use 5V and 3 Amperes through USB-C. It is recommended that a dedicated USB-C power adapter be utilised to support sustained workloads. The Arduino UNO Q will operate through direct connection to a laptop USB port for lighter types of 'developmental work' with a potential limitation in performance.
⇥ Is Arduino UNO Q beginner-friendly?
Yes. The design of the UNO Q takes into consideration the advanced capabilities of its hardware, but has been created to be equally accessible to beginners. The brick-style development environment used by Arduino App Lab allows beginners to be able to deploy AI and IoT applications with no prior experience in computer programming required.
⇥ Is it possible for an Arduino UNO Q to perform real-time facial identification?
Yes, the built-in Face Detector trial within Arduino App Lab is very helpful in allowing the UNO Q to run the real-time facial identification application via USB web camera, the contents visualised by a web browser as bounding boxes around the face with confidence levels. The Qualcomm Processor with Adreno GPU performed the inference of the model efficiently with no custom programming necessary.
⇥ Where can I locate the Arduino App Lab, and what is it?
The new Arduino App Lab is now the official IDE for the Arduino UNO-Q. This interface allows for a block-style programming mechanism such that pre-built function blocks can take care of complex tasks, such as face identification, connecting to the network, and reading the sensors. When using Arduino App Lab to create a program, you can program the UNO Q to be an autonomous device by programming the program to automatically start when the device boots up, allowing for a true standalone embedded or IoT product.
Projects using OpenCV
We’ve previously used OpenCV to build a variety of exciting computer vision projects. The Circuit Digest team has built and tested the following computer vision projects hands-on:

Social Distancing Detector Using OpenCV and Raspberry Pi
Learn how to create a real-time social distancing detector using OpenCV, Raspberry Pi, and YOLOv3 for accurate people detection and safety monitoring.

Real Life Object Detection using OpenCV – Detecting objects in Live Video
Detect real-life objects in live video using OpenCV and Python with SIFT, ORB, and Haar cascades for real-time computer vision applications.

Face Mask Detection using Raspberry Pi and OpenCV
Build a Raspberry Pi system that detects face masks in real time using OpenCV and TensorFlow, classifying faces as masked or unmasked for smart monitoring.
