
The coronavirus disease (COVID-19) has seriously affected the world and there is no end to it. To limit the spread of the virus, mandatory face-mask rules are now becoming more common in public places around the world. Additionally, many retail stores and other public service providers require customers to wear face masks.
In today’s tutorial, we will learn how we can build our own face mask detection model using Raspberry Pi. This project consists of three phases:
- Data Gathering
- Training the model
- Face Mask Detection
In the first phase, we will collect the images with and without the mask. This dataset consists of 500 images belonging to two classes. In the second phase, we will train the Recognizer for detecting people with and without masks, and in the last phase, we will use the trainer data to classify each face as with a mask or without a mask. We previously used Raspberry Pi for some complex image processing projects like facial landmark detection and Face recognition application.
Components Required
- Raspberry Pi
- Pi Camera Module
Here, we only need RPi 4 and Pi camera module with OpenCV and Tensorflow installed on it. OpenCV is used here for digital image processing. The most common applications of Digital Image Processing are object detection, Face Recognition, and people counter.
Installing OpenCV
Before installing the OpenCV and other dependencies, the Raspberry Pi needs to be fully updated. Use the below commands to update the Raspberry Pi to its latest version:
sudo apt-get update
Then use the following commands to install the required dependencies for installing OpenCV on your Raspberry Pi.
sudo apt-get install libhdf5-dev -y
sudo apt-get install libhdf5-serial-dev –y
sudo apt-get install libatlas-base-dev –y
sudo apt-get install libjasper-dev -y
sudo apt-get install libqtgui4 –y
sudo apt-get install libqt4-test –y
After that, use the below command to install the OpenCV on your Raspberry Pi.
pip3 install opencv-contrib-python==4.1.0.25
Installing imutils: imutils is used to make essential image processing functions such as translation, rotation, resizing, skeletonization, and displaying Matplotlib images easier with OpenCV. Use the below command to install the imutils:
pip3 install imutils
Installing Tensorflow: Use the below commands to install Tensorflow
sudo pip3 install https://github.com/lhelontra/tensorflow-on-arm/releases/download/v2.1.0/tensorflow-2.1.0-cp37-none-linux_armv7l.whl
Use the below command to Install sklearn to Raspberry Pi.
pip3 install sklearn
Programming Raspberry Pi for Face Mask Detection
As mentioned earlier, we are going to complete the Mask Detection project in three-phase. The first phase is data gathering, the second is training the Recognizer, and the third is recognizing the face mask. The project directory contains:
- Dataset: This folder contains the with mask and without mask images
- gather_images.py: It is a simple python script to collect the image of a face.
- training.py: It accepts the input dataset and fine-tunes MobileNetV2 upon it to create our Mask Detector Model (MaskDetector.h5).
- detect_mask.py: This mask detection python code uses the trainer data to classify each face as with mask or without mask.
The Complete project directory can be downloaded from here.
1. Data Gathering
In the first phase of the project, we are going to create a Dataset to store the faces with masks and without masks. gather_image.py is a simple python script that uses OpenCV to collect images of the face. The image Gathering program is explained below:
These two lines of the code accept the system arguments. The first line is for the label name, and the second line is for the number of images that you want to collect. For example, if you want to collect 250 images with a mask, then issue a command: python3 gather_images.py with_mask 250, and for collecting images without mask use: python3 gather_images.py without_mask 250. Where with_mask/without_mask is the image label and 250 is the number of images.
label_name = sys.argv[1]
num_samples = int(sys.argv[2])
Here provide the path for the image directory and image classes, i.e. with mask and without mask.
IMG_SAVE_PATH = 'image_data'
IMG_CLASS_PATH = os.path.join(IMG_SAVE_PATH, label_name)
The lines below create the image directory folder and image classes folders as per the label names.
try:
    os.mkdir(IMG_SAVE_PATH)
except FileExistsError:
    pass
try:
    os.mkdir(IMG_CLASS_PATH)
Then start reading the frames from the video stream and if the frames are equal to the sample number, then stop the loop.
ret, frame = cap.read()
    if not ret:
        continue
    if count == num_samples:
        break
Save all the images on a defined path. All the images will be named according to the count.
save_path = os.path.join(IMG_CLASS_PATH, '{}.jpg'.format(count + 1))
        cv2.imwrite(save_path, frame)
        count += 1
2. Training the Model
Now that we have collected the face samples, we can pass them on to the neural network and start the training process to automatically detect whether a person is wearing a mask or not. So open up the training.py file in mask detector directory, and paste the given code. Then start the training process using the below command:
python3 training.py
Python script for training the Recognizer is explained below:
The training.py script starts with importing the required packages. The next lines after importing the packages are used to initialize the initial learning rate, number of epochs to train for, and batch size.
INIT_LR = 1e-4
EPOCHS = 20
BS = 32
In the next lines, enter the path of the directory where images are saved and initializing the data and label lists.
imagePaths = "dataset"
data = []
labels = []
Now Loop over the imagePaths and load all the images to python script so that we can begin the training. Pre-processing steps include resizing the images to 224×224 pixels, converting them to array format, and using the preprocess_input convenience function to scale the pixel intensities in the input image to the range [-1, 1].
for directory in os.listdir(imagePaths):
        label = os.path.join(imagePaths, directory)
        if not os.path.isdir(label):
                continue
        for item in os.listdir(label):
                if item.startswith("."):
                    continue
                image = load_img(os.path.join(label, item), target_size=(224, 224))
                image = img_to_array(image)
                image = preprocess_input(image)
                data.append(image)
                labels.append(label)
Then in the next lines, perform the one-hot encoding on the labels. One hot encoding is used to represent categorical variables as binary vectors.
lb = LabelBinarizer()
labels = lb.fit_transform(labels)
labels = to_categorical(labels)
Then split the data into training and testing sets. 80% of the data will be used for training and the remaining 20% will be used for testing.
(trainX, testX, trainY, testY) = train_test_split(data, labels,
            test_size=0.20, stratify=labels, random_state=42)
Then Load the MobileNet model with pre-trained ImageNet weights, leaving off the head of the network.
baseModel = MobileNetV2(weights="imagenet", include_top=False,
            input_tensor=Input(shape=(224, 224, 3)))
Now, in the next lines construct the head of the model that will be placed on top of the base model. The AveragePooling2D layer calculates the average output of each feature map in the previous layer. In order to prevent over-feeding, we have a 50% dropout rate.
headModel = baseModel.output
headModel = AveragePooling2D(pool_size=(7, 7))(headModel)
headModel = Flatten(name="flatten")(headModel)
headModel = Dense(128, activation="relu")(headModel)
headModel = Dropout(0.5)(headModel)
headModel = Dense(2, activation="softmax")(headModel)
After constructing the head of the model, compile the model with the Adam optimizer.
opt = Adam(lr=INIT_LR, decay=INIT_LR / EPOCHS)
model.compile(loss="binary_crossentropy", optimizer=opt,
            metrics=["accuracy"])
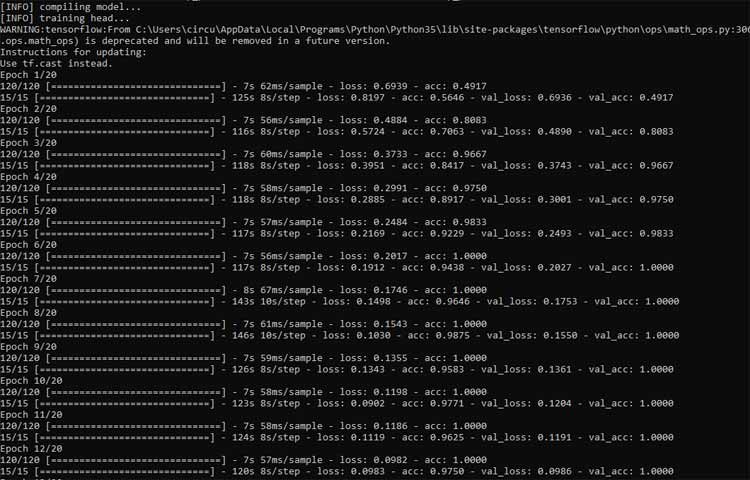
After this, start training the model and once training is finished save the model as “MaskDetector.h5”.
print(classification_report(testY.argmax(axis=1), predIdxs,
            target_names=lb.classes_))
print("[INFO] saving mask detector model...")
model.save("MaskDetector.h5")
3. Face Mask Detection
Now, in the final step of our project, we will use the trainer data to classify each face as with mask or without mask from the live video feed. So, open up the detect_mask.py file in the mask detector directory, and paste the given code. Python script for training the Recognizer is explained below:
Same as the training.py script, this script also starts with importing the required packages. The next lines after importing the packages are used to grab the dimensions of the frame and then construct a blob from it.
(h, w) = frame.shape[:2]
            blob = cv2.dnn.blobFromImage(frame, 1.0, (300, 300),
                        (104.0, 177.0, 123.0))
Then pass the blob through the network and obtain the face detections using the faceNet model.
faceNet.setInput(blob)
            detections = faceNet.forward()
Then loop over the face detections and extract the confidence associated with the detection.
for i in range(0, detections.shape[2]):
                        confidence = detections[0, 0, i, 2]
Filter out the detections whose confidence is less than 0.5. In the next lines, compute the x, y-coordinates of the bounding box for the objects
                        if confidence > 0.5:
                              box = detections[0, 0, i, 3:7] * np.array([w, h, w, h])
                                (startX, startY, endX, endY) = box.astype("int")
                                (startX, startY) = (max(0, startX), max(0, startY))
                                (endX, endY) = (min(w - 1, endX), min(h - 1, endY))
Get the coordinates for face ROI, convert the image to RGB from BGR and then resize it to 224x224, and preprocess it
face = frame[startY:endY, startX:endX]
face = cv2.cvtColor(face, cv2.COLOR_BGR2RGB)
face = cv2.resize(face, (224, 224))
face = img_to_array(face)
face = preprocess_input(face)
faces.append(face)
locs.append((startX, startY, endX, endY))
In next line start the video stream
vs = VideoStream(src=0).start()
time.sleep(2.0)
Then loop over the frames from the video and resize them. Detect the faces in the frame and determine if they are wearing a face mask or not
frame = vs.read()
frame = imutils.resize(frame, width=500)
(locs, preds) = detect_and_predict_mask(frame, faceNet, maskNet)
Then loop over the predictions and compare the predictions for both the labels and display the label and bounding box rectangle on the output frame.
for (box, pred) in zip(locs, preds):
            (startX, startY, endX, endY) = box
            (mask, withoutMask) = pred
            if mask > withoutMask:
                 label = "Mask Detected."
                color = (0, 255, 0)
            else:
                    label = "No Mask Detected"
                   color = (0, 0, 255)
          cv2.putText(frame, label, (startX-50, startY - 10), cv2.FONT_HERSHEY_SIMPLEX,              0.7, color, 2)
          cv2.rectangle(frame, (startX, startY), (endX, endY), color, 2)
Testing the Face Mask Detection
To see real-time COVID-19 face mask detector in action, connect Raspberry Pi Camera module with Pi as shown below:
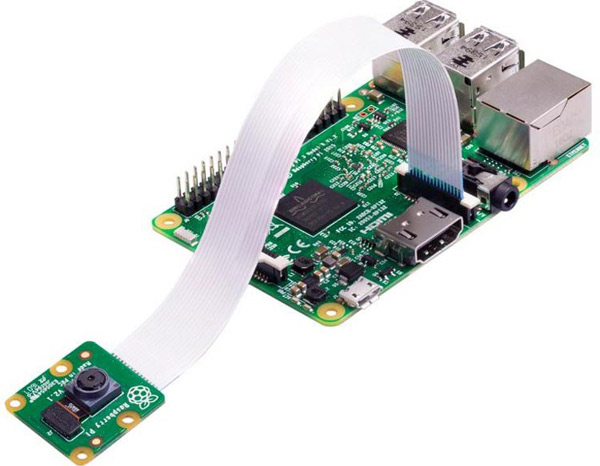
Launch the detect_mask.py script. After a few seconds, you should see your camera view pop-up window. If the mask is detected, you will see a green box with the label ‘Mask Detected’ and a red box with the label ‘No Mask Detected’ if no mask detected.
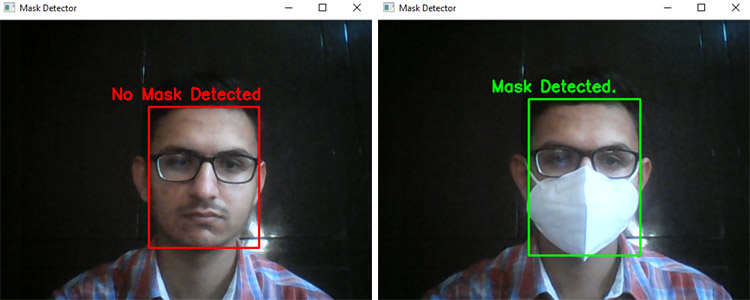
This is how you can build a Face Mask Recognition using Raspberry Pi project. A working video with a complete code can be found at the end of the page.
Complete Project Code
Detect Mask
from tensorflow.keras.applications.mobilenet_v2 import preprocess_input
from tensorflow.keras.preprocessing.image import img_to_array
from tensorflow.keras.models import load_model
from imutils.video import VideoStream
import numpy as np
import imutils
import time
import cv2
import os
def detect_and_predict_mask(frame, faceNet, maskNet):
# grab the dimensions of the frame and then construct a blob
# from it
(h, w) = frame.shape[:2]
blob = cv2.dnn.blobFromImage(frame, 1.0, (300, 300),
(104.0, 177.0, 123.0))
# pass the blob through the network and obtain the face detections
faceNet.setInput(blob)
detections = faceNet.forward()
# initialize our list of faces, their corresponding locations,
# and the list of predictions from our face mask network
faces = []
locs = []
preds = []
# loop over the detections
for i in range(0, detections.shape[2]):
# extract the confidence (i.e., probability) associated with
# the detection
confidence = detections[0, 0, i, 2]
# filter out weak detections by ensuring the confidence is
# greater than the minimum confidence
if confidence > 0.5:
# compute the (x, y)-coordinates of the bounding box for
# the object
box = detections[0, 0, i, 3:7] * np.array([w, h, w, h])
(startX, startY, endX, endY) = box.astype("int")
# ensure the bounding boxes fall within the dimensions of
# the frame
(startX, startY) = (max(0, startX), max(0, startY))
(endX, endY) = (min(w - 1, endX), min(h - 1, endY))
# extract the face ROI, convert it from BGR to RGB channel
# ordering, resize it to 224x224, and preprocess it
face = frame[startY:endY, startX:endX]
face = cv2.cvtColor(face, cv2.COLOR_BGR2RGB)
face = cv2.resize(face, (224, 224))
face = img_to_array(face)
face = preprocess_input(face)
# add the face and bounding boxes to their respective
# lists
faces.append(face)
locs.append((startX, startY, endX, endY))
# only make a predictions if at least one face was detected
if len(faces) > 0:
# for faster inference we'll make batch predictions on *all*
# faces at the same time rather than one-by-one predictions
# in the above `for` loop
faces = np.array(faces, dtype="float32")
preds = maskNet.predict(faces, batch_size=32)
# return a 2-tuple of the face locations and their corresponding
# locations
return (locs, preds)
prototxtPath = "face_detector/deploy.prototxt"
weightsPath =  "face_detector/res10_300x300_ssd_iter_140000.caffemodel"
faceNet = cv2.dnn.readNet(prototxtPath, weightsPath)
# load the face mask detector model from disk
print("[INFO] loading face mask detector model...")
maskNet = load_model("MaskDetector.h5")
# initialize the video stream and allow the camera sensor to warm up
print("[INFO] starting video stream...")
vs = VideoStream(src=0).start()
time.sleep(2.0)
# loop over the frames from the video stream
while True:
# grab the frame from the threaded video stream and resize it
# to have a maximum width of 400 pixels
frame = vs.read()
frame = imutils.resize(frame, width=500)
# detect faces in the frame and determine if they are wearing a
# face mask or not
(locs, preds) = detect_and_predict_mask(frame, faceNet, maskNet)
# loop over the detected face locations and their corresponding
# locations
for (box, pred) in zip(locs, preds):
# unpack the bounding box and predictions
(startX, startY, endX, endY) = box
(mask, withoutMask) = pred
# determine the class label and color we'll use to draw
# the bounding box and text
if mask > withoutMask:
label = "Mask Detected."
color = (0, 255, 0)
else:
label = "No Mask Detected"
color = (0, 0, 255)
# display the label and bounding box rectangle on the output
# frame
cv2.putText(frame, label, (startX-50, startY - 10),
cv2.FONT_HERSHEY_SIMPLEX, 0.7, color, 2)
cv2.rectangle(frame, (startX, startY), (endX, endY), color, 2)
# show the output frame
cv2.imshow("Mask Detector", frame)
key = cv2.waitKey(1) & 0xFF
# if the `q` key was pressed, break from the loop
if key == ord("q"):
break
# do a bit of cleanup
cv2.destroyAllWindows()
vs.stop()

Gather Image
import cv2

import os

import sys

import time

try:

    #used to enter label name i.e. with mask/without mask

    label_name = sys.argv[1]

    #used to enter the number of image you want to collect

    num_samples = int(sys.argv[2])

except:

    print("Arguments missing.")

    exit(-1)

# path to directory where the image will be saved

IMG_SAVE_PATH = 'dataset'

IMG_CLASS_PATH = os.path.join(IMG_SAVE_PATH, label_name)

try:

    os.mkdir(IMG_SAVE_PATH)

except FileExistsError:

    pass

try:

    os.mkdir(IMG_CLASS_PATH)

except FileExistsError:

    print("{} directory already exists.".format(IMG_CLASS_PATH))

    print("All images gathered will be saved along with existing items in this folder")

cap = cv2.VideoCapture(0)

start = False

count = 0

while True:

    ret, frame = cap.read()

    if not ret:

        continue

    if count == num_samples:

        break

 #   cv2.rectangle(frame, (10, 30), (310, 330), (0, 255, 0), 2)

    if start:

      #  roi = frame[100:500, 100:500]

        #time.sleep(1)

        save_path = os.path.join(IMG_CLASS_PATH, '{}.jpg'.format(count + 1))

        cv2.imwrite(save_path, frame)

        count += 1

    font = cv2.FONT_HERSHEY_SIMPLEX

    cv2.putText(frame, "Collecting {}".format(count),

            (5, 10), font, 0.7, (0, 255, 255), 2, cv2.LINE_AA)

    cv2.imshow("Collecting images", frame)

    k = cv2.waitKey(10)

    if k == ord('a'):

        start = not start

    if k == ord('q'):

        break

print("\n{} image(s) saved to {}".format(count, IMG_CLASS_PATH))

cap.release()

cv2.destroyAllWindows()

Tensor Flow

from tensorflow.keras.preprocessing.image import ImageDataGenerator
from tensorflow.keras.applications import MobileNetV2
from tensorflow.keras.layers import AveragePooling2D
from tensorflow.keras.layers import Dropout
from tensorflow.keras.layers import Flatten
from tensorflow.keras.layers import Dense
from tensorflow.keras.layers import Input
from tensorflow.keras.models import Model
from tensorflow.keras.optimizers import Adam
from tensorflow.keras.applications.mobilenet_v2 import preprocess_input
from tensorflow.keras.preprocessing.image import img_to_array
from tensorflow.keras.preprocessing.image import load_img
from tensorflow.keras.utils import to_categorical
from sklearn.preprocessing import LabelBinarizer
from sklearn.model_selection import train_test_split
from sklearn.metrics import classification_report
from imutils import paths
import numpy as np
import os
# initialize the initial learning rate, number of epochs to train for,
# and batch size
INIT_LR = 1e-4
EPOCHS = 20
BS = 32
# grab the list of images in our dataset directory, then initialize
# the list of data (i.e., images) and class images
print("[INFO] loading images...")
#imagePaths = list(paths.list_images(args["dataset"]))
imagePaths = "dataset"
data = []
labels = []
# loop over the image paths
for directory in os.listdir(imagePaths):
        label = os.path.join(imagePaths, directory)
        if not os.path.isdir(label):
                continue
        for item in os.listdir(label):
        # to make sure no hidden files get in our way
                if item.startswith("."):
                    continue
# load the input image (224x224) and preprocess it
                image = load_img(os.path.join(label, item), target_size=(224, 224))
                image = img_to_array(image)
                image = preprocess_input(image)
# update the data and labels lists, respectively
                data.append(image)
                labels.append(label)
# convert the data and labels to NumPy arrays
data = np.array(data, dtype="float32")
labels = np.array(labels)
# perform one-hot encoding on the labels
lb = LabelBinarizer()
labels = lb.fit_transform(labels)
labels = to_categorical(labels)
# partition the data into training and testing splits using 75% of
# the data for training and the remaining 25% for testing
(trainX, testX, trainY, testY) = train_test_split(data, labels,
test_size=0.20, stratify=labels, random_state=42)
# construct the training image generator for data augmentation
aug = ImageDataGenerator(
rotation_range=20,
zoom_range=0.15,
width_shift_range=0.2,
height_shift_range=0.2,
shear_range=0.15,
horizontal_flip=True,
fill_mode="nearest")
# load the MobileNetV2 network, ensuring the head FC layer sets are
# left off
baseModel = MobileNetV2(weights="imagenet", include_top=False,
input_tensor=Input(shape=(224, 224, 3)))
# construct the head of the model that will be placed on top of the
# the base model
headModel = baseModel.output
headModel = AveragePooling2D(pool_size=(7, 7))(headModel)
headModel = Flatten(name="flatten")(headModel)
headModel = Dense(128, activation="relu")(headModel)
headModel = Dropout(0.5)(headModel)
headModel = Dense(2, activation="softmax")(headModel)
# place the head FC model on top of the base model (this will become
# the actual model we will train)
model = Model(inputs=baseModel.input, outputs=headModel)
# loop over all layers in the base model and freeze them so they will
# *not* be updated during the first training process
for layer in baseModel.layers:
layer.trainable = False
# compile our model
print("[INFO] compiling model...")
opt = Adam(lr=INIT_LR, decay=INIT_LR / EPOCHS)
model.compile(loss="binary_crossentropy", optimizer=opt,
metrics=["accuracy"])
# train the head of the network
print("[INFO] training head...")
H = model.fit(
aug.flow(trainX, trainY, batch_size=BS),
steps_per_epoch=len(trainX) // BS,
validation_data=(testX, testY),
validation_steps=len(testX) // BS,
epochs=EPOCHS)
# make predictions on the testing set
print("[INFO] evaluating network...")
predIdxs = model.predict(testX, batch_size=BS)
# for each image in the testing set we need to find the index of the
# label with corresponding largest predicted probability
predIdxs = np.argmax(predIdxs, axis=1)
# show a nicely formatted classification report
print(classification_report(testY.argmax(axis=1), predIdxs,
target_names=lb.classes_))
# serialize the model to disk
print("[INFO] saving mask detector model...")
model.save("MaskDetector.h5")
