
Detection of facial landmarks is the process of detecting various parts on the face such as the Eyebrows, Eyes, Nose, Mouth, and Jaw. There are many applications that use Facial Landmark detection techniques.
Previously we build a Face recognition system using OpenCV, today we will use the same OpenCV with Raspberry Pi for facial landmark detection. A pre-trained facial landmark detector module from the dlib library will be used to detect the location of the key facial structures on the face and python OpenCV will be used to visualize the detected face parts.
Components Required
Hardware Components
- Raspberry Pi 3
- Pi Camera Module
Software and Online Services
- OpenCV
- Dlib
- Python3
Before proceeding with this Raspberry Pi 3 Facial Landmark Detection, first, we need to install OpenCV, imutils, dlib, Numpy, and some other dependencies in this project. OpenCV is used here for digital image processing. The most common applications of Digital Image Processing are object detection, Face Recognition, and people counter.

To learn more about how to interface Pi camera with Raspberry Pi, follow our previous tutorials.
Installing OpenCV in Raspberry Pi
Here OpenCV library will be used for the Raspberry Pi QR scanner. To install the OpenCV, first, update the Raspberry Pi.
sudo apt-get update
Then install the required dependencies for installing OpenCV on your Raspberry Pi.
sudo apt-get install libhdf5-dev -y
sudo apt-get install libhdf5-serial-dev –y
sudo apt-get install libatlas-base-dev –y
sudo apt-get install libjasper-dev -y
sudo apt-get install libqtgui4 –y
sudo apt-get install libqt4-test –y
After that, install the OpenCV in Raspberry Pi using the below command.
pip3 install opencv-contrib-python==4.1.0.25
We previously used OpenCV with Raspberry pi and created a lot of tutorials on it.
- Installing OpenCV on Raspberry Pi using CMake
- Real-Time Face Recognition with Raspberry Pi and OpenCV
- License Plate Recognition using Raspberry Pi and OpenCV
- Crowd Size Estimation Using OpenCV and Raspberry Pi
We have also created a series of OpenCV tutorials starting from the beginner level.
Installing imutils: imutils is used to execute few necessary image processing functions such as translation, rotation, resizing, skeletonization, and displaying Matplotlib images easier with OpenCV. So install imutils using below command:
pip3 install imutils
Installing dlib: dlib is the modern toolkit that contains Machine Learning algorithms and tools for real-world problems. Use the below command to install the dlib.
pip3 install dlib
Installing NumPy: NumPy is the core library for scientific computing that contains a powerful n-dimensional array object, provides tools for integrating C, C++, etc.
Pip3 install numpy
How to Detect the Face Parts using dlib
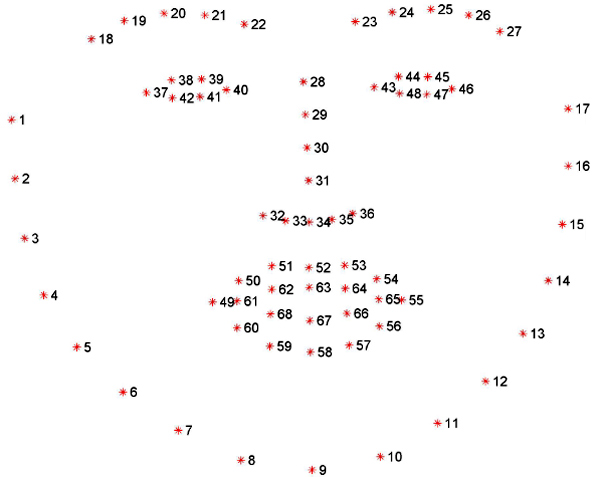
We are going to use the dlib library’s pre-trained facial landmark detector to detect the location of 68 (x, y)-coordinates that map to facial structures on the face. dlib facial landmark predictor is trained on the iBUG 300-W dataset. An image containing the indexes of the 68 coordinates is given below:
Programming the Raspberry Pi for Facial Landmark Detection
Complete python code for Face Parts Recognition with the dlib’s pre-trained facial landmark detector is given at the end of the page. Here we are explaining some important parts of the code for better understanding.
So, as usual, start the code by including all the required libraries.
from imutils import face_utils import numpy as np import argparse import imutils import dlib import cv2 from picamera.array import PiRGBArray from picamera import PiCamera
Then initialize the camera object and set the resolution at (640, 480) and the frame rate at 30 fps
camera = PiCamera()
camera.resolution = (640, 480)
camera.framerate = 30
Now in the next lines, use the argument parser to provide the path to facial landmark predictor.
ap = argparse.ArgumentParser()
ap.add_argument("-p", "--shape-predictor", required=True,
            help="facial landmark predictor path")
args = vars(ap.parse_args())
In the next lines, initialize the HOG-based dlib’s pre-trained face detector and load the pre-trained facial landmark predictor.
detector = dlib.get_frontal_face_detector()
predictor = dlib.shape_predictor(args["shape_predictor"])
Then use the capture_continuous function to start capturing the frames from the Raspberry Pi camera.
for frame in camera.capture_continuous(rawCapture, format="bgr", use_video_port=True):
        image = frame.array
        cv2.imshow("Frame", image)
        key = cv2.waitKey(1) & 0xFF
        rawCapture.truncate(0)
Use the keyboard key ‘S’ to capture a particular frame. Then resize the captured image and convert it to grayscale.
if key == ord("s"):
       image = imutils.resize(image, width=400)
       gray = cv2.cvtColor(image, cv2.COLOR_BGR2GRAY)
Use the detector function of the dlib library to detect the faces in the captured image.
rects = detector(gray, 1)
Take the picture on which face detection was performed, determine the facial landmarks, and convert the 68 points into a NumPy array. Loop over each of the face regions individually.
for (i, rect) in enumerate(rects):
          shape = predictor(gray, rect)
          shape = face_utils.shape_to_np(shape)
Then, take a copy of the original image and use it for the loop to draw the name of the face part on the image. Text color will be red, you can change it to another color by changing the RGB values.
 for (name, (i, j)) in face_utils.FACIAL_LANDMARKS_IDXS.items():
          clone = image.copy()
          cv2.putText(clone, name, (10, 30), cv2.FONT_HERSHEY_SIMPLEX,
                                    0.7, (0, 0, 255), 2)
Now we will loop over the detected face parts and use the OpenCV drawing function to draw circles on these face parts. You can follow this OpenCV Document for more information about the Drawing functions
for (x, y) in shape[i:j]:
               cv2.circle(clone, (x, y), 1, (0, 0, 255), -1)
Now in the next lines, we will extract each face part as a separate image by computing the bounding box of the coordinates of a specific face part. The extracted image will be resized to 250 pixels.
(x, y, w, h) = cv2.boundingRect(np.array([shape[i:j]]))
 roi = image[y:y + h, x:x + w]
 roi = imutils.resize(roi, width=250, inter=cv2.INTER_CUBIC)
Now in the last lines of the code, display the face parts with their names and a separate image of that part. Use the ESC key to change the face region.
cv2.imshow("ROI", roi)
cv2.imshow("Image", clone)
cv2.waitKey(0)
Testing the Face Part Recognizer
To test the project, create a directory and navigate to it using the below commands:
mkdir face-part-detector
cd face-part-detector
Now download the shape_predictor_68_face_landmarks.dat file from this link, and then extract and copy the shape_predictor_68_face_landmarks.dat file inside this library, and then open a new file named detect.py and paste the code given below.
Now launch the python code using the below command:
python3 detect.py --shape-predictor shape_predictor_68_face_landmarks.dat

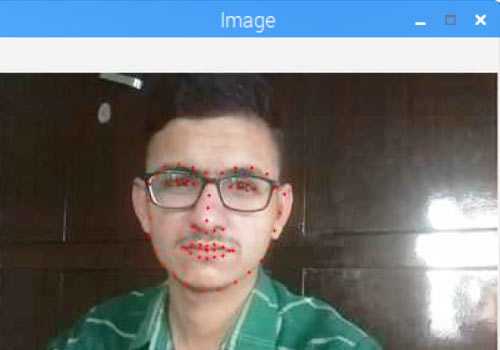
You will see a window showing a live view from your camera. Then press the ‘S’ key to select a frame from the live stream. You will see red dots on your mouth area. Use the ESC key to see the other face parts.
Complete python code and demonstration video are given below.
Complete Project Code
from imutils import face_utils
import numpy as np
import argparse
import imutils
import dlib
import cv2
from picamera.array import PiRGBArray
from picamera import PiCamera
from PIL import Image
camera = PiCamera()
camera.resolution = (640, 480)
camera.framerate = 30
rawCapture = PiRGBArray(camera, size=(640, 480))

# construct the argument parser and parse the arguments
ap = argparse.ArgumentParser()
ap.add_argument("-p", "--shape-predictor", required=True,
help="facial landmark predictor path")
args = vars(ap.parse_args())
detector = dlib.get_frontal_face_detector()
predictor = dlib.shape_predictor(args["shape_predictor"])
for frame in camera.capture_continuous(rawCapture, format="bgr", use_video_port=True):
    image = frame.array
    cv2.imshow("Frame", image)
    key = cv2.waitKey(1) & 0xFF
    rawCapture.truncate(0)
    if key == ord("s"):
       image = imutils.resize(image, width=300)
       gray = cv2.cvtColor(image, cv2.COLOR_BGR2GRAY)
       rects = detector(gray, 1)

# loop over the face detections
       for (i, rect) in enumerate(rects):

# determine the facial landmarks for the face region
          shape = predictor(gray, rect)
          shape = face_utils.shape_to_np(shape)

# loop over the face parts individually
          for (name, (i, j)) in face_utils.FACIAL_LANDMARKS_IDXS.items():

# display the name of the face part on the image
                clone = image.copy()
                cv2.putText(clone, name, (10, 30), cv2.FONT_HERSHEY_SIMPLEX,
0.7, (0, 0, 255), 2)

# Draw Circles on specific face part
                for (x, y) in shape[i:j]:
                       cv2.circle(clone, (x, y), 1, (0, 0, 255), -1)

# extract the ROI of the face region as a separate image
                (x, y, w, h) = cv2.boundingRect(np.array([shape[i:j]]))
                roi = image[y:y + h, x:x + w]
                roi = imutils.resize(roi, width=250, inter=cv2.INTER_CUBIC)

# show the particular face part
                cv2.imshow("ROI", roi)
                cv2.imshow("Image", clone)
                cv2.waitKey(0)

# visualize all facial landmarks
          for (x, y) in shape:
           cv2.circle(image, (x, y), 1, (0, 0, 255), -1)
           cv2.imshow("Image",image)
          cv2.waitKey(0)