

Face recognition is becoming increasingly popular these days. There are numerous project ideas available that we can implement using the face recognition concept, and we at CircuitDigest have already built many ESP32-CAM projects, including an attendance system and a door lock security system using ESP32-CAM. However, face recognition typically requires significant processing power and works better when built using a machine learning model. Which is why in this project, we are going to show you how to build a Face recognition system easily using ESP32CAM and Edge Impulse. practical artificial intelligence projects with source code to help you understand real AI workflows.
Above, you can see the working GIF video of this project. So, without further ado, let's learn how to build exactly the same. I
How to use ESP32CAM for Face Recognitoin?
First, let's understand the overview of the project:
We are going to do a face recognition project.
For demonstration purposes, we have selected three popular persons: Cristiano Ronaldo, Robert Downey Jr., and Elon Musk.
We are going to collect images of these three individuals for the dataset.
We will use Edge Impulse to train the AI.
An Arduino library will be exported from Edge Impulse once the training is successful.
The code will be uploaded to the ESP32-CAM Module.
Finally, we will examine how face recognition works.
Components Required:
The components required for building ESP32CAM Face Recogniton project are listed below,
ESP32-CAM x1
0.91” OLED Display x1
USB to UART Converter module x1
Jumper Wires F-F x Required Quantity
Collecting Dataset for Face Recognition:
For training our AI Model we need data. In our case, we need images of the three individuals that we selected for the dataset. so, there are many possible ways to collect the data. As a Demo project, I am just using the google to collect data, as you can see below

If you like to recognize some actual people, do collect their images. While collecting images remember the below points.
Images need to be appropriate.
Images with no background are suggested; at least try to collect unicolor background images.
The more images you have, the higher the accuracy.
After a quick Google search, I started downloading some suitable images. I planned to collect 30 images for each individual. Finally, I prepared our dataset for training. Now, Let's move to the Edge Impulse side of the project.
Edge Impulse for Face Recognition
Here we will not cover the whole basics of Edge Impulse; instead, we will look at the important configurations. If you are new to Edge Impulse, I suggest visiting our article [Object Detection using ESP32-CAM and Edge Impulse], where all the basics are covered. You can also check out our other interesting edge impulse projects we have built earlier.
Step 1 - Sign In: Sign up for Edge Impulse or if you already have an account Sign in to your account.
Step 2 - New Project: Create a new project in Edge Impulse.
In my case, I have created “Face Recognition” as you can see below in the image:

Step 3 - Data Acquisitin: The next step is to add the data that we already collected. On the left navigation menu, you can find lots of options. By selecting “Data Acquisition,” you will be directed to the page where data uploading, data labeling, and data splitting are done.
You can refer to the image below to know the steps followed to upload the data. Here I show folder uploading. You can also upload individual images. Note that the accepted formats are CBOR, JSON, CSV, WAV, JPG, PNG, AVI, or MP4 files.

Step 4 - Data Labeling: Once all the data is uploaded, you can start labeling the data. By clicking on “Labeling Queue,” you will enter the labeling window. There, you need to draw a bounding box around the face in the image and label it. This process can be quite tedious, but it will soon be completed. Below is a screenshot of the Dataset menu after completely labeling the data. Here, you can see that the train and test splits are in the ratio of 79:21 percent. Generally, an 80:20 split is considered good for training a model.

Step 4 - Creating Impulse: Next, we need to create an impulse. For this, navigate to the “Create Impulse” option in the navigation menu right below “Data Acquisition.” There, you will see multiple options. First, select “Image Data.” Here, 96x96 pixels is ideal. You can increase it if needed, but keep in mind that the inference time will also increase. For the resize mode, choose according to your convenience. I prefer “Fit Longest Axis.”
Next, add the processing block and the learning block. There are not many options for this, at least for now. You can choose like me, as shown in the image below.
Verify the output feature to ensure it meets your requirements. Finally, click “Save Impulse.”

Step 4 - Generating Feature: Now we will generate the feature set of the dataset. Here we can confirm how reliable our dataset is for training.
You can see the option “Image” under the “Create Impulse” menu. By clicking on that, you will see the parameters window where you need to select the color depth for data to generate the features. To reduce the load, we usually select “Grayscale” by default. If you are sure, you can select “RGB.”
Once you select the right color depth, click on “Save parameters.” You will then be directed to the Generate Features window. By clicking the “Generate features” button, the feature explorer will be generated. In this explorer, each color represents each label. If all the balls of the same color are grouped together, we have a labeled dataset with unique features, making it easier for the AI model to differentiate between them. If all the colors are mixed together, as shown in the image below, our output won’t be reliable even after training.

Step 5 - Training: Finally, we are going to train the model now.
Click on the “Object detection” option in the navigation menu. There, you will see the neural network settings. You can choose the default values if you are unaware of the settings. I increased the learning rate to 0.01, leaving the rest as default. You can also adjust the training cycles as per your wish and requirements. Now, click on the "Start training" button.
The training will take some time to complete, so sit back and relax. Once training is completed, you can see the training performance. Specifically, you will be able to see the F1 Score, which defines the accuracy of the trained model. The higher the number, the better the accuracy. In the image below, you can see that I got 68.2%, which is not quite good, but usable. Try to get an accuracy greater than 80%. That should be fine.

Step 5 - Deployment of the trained model: Now let's deploy the model in the ESP32-CAM. First, select the “Deployment” option in the navigation menu. You will see a window where we can configure our deployment. Initially, select the deployment as “Arduino Library.” Next, verify that the correct board is selected. That option is available right above the “Build” button. Choose “Espressif ESP-EYE (ESP32 240MHz).”
Then click the “Build” button. After a few seconds, you will be prompted with a message, as shown in the image below, which explains the steps needed to install the program on the ESP32-CAM. Once you see this prompt message, a ZIP file containing the Arduino Library will start downloading.

Next, let's move to the hardware part of this project, which is the circuit connection.
Circuit for ESP32CAM Face Recognition Project
The circuit connection for this project is simple, involving only three components: ESP32-CAM, 0.91” OLED Display, and FTDI USB to UART Converter Module. Remember, you can even see the output without using the OLED display by using the serial monitor. Consider this only if you are going to use the OLED to display the output.

Above, you can see the circuit connection diagram of our project. Here, a breadboard is used; however, you can use female-to-female jumper wires as I did.

In the above image, I have used 3D prints only for aesthetics and holding the ESP32-CAM and OLED display. It is not necessary for you to replicate the 3D printing work. However, I will be adding those 3D models to the GitHub repo, which you can find below this article.
Next, let's move to the programming part of this project.
Programming ESP32-CAM Module
If you are not sure about programming the ESP32-CAM, you can visit our article that specifically covers the step by step guide to program ESP32-CAM.
As we saw in the last step, you will be notified of the procedure to install the Arduino library on your PC. Let's go through it again.
Open Arduino IDE and go to “Sketch -> Include Library -> Add .ZIP Library...” and select the downloaded ZIP file.
After successfully installing, go to “File -> Examples -> Face_Recognition_inferencing -> esp32 -> esp32_camera,” and the example program will be opened. Note: “Face_Recognition_inferencing” is the name of my project. Yours will be the name of the project created in Edge Impulse.
In the example program, there is only one modification that we need to do, which is commenting out the line #define CAMERA_MODEL_ESP_EYE and uncommenting the line #define CAMERA_MODEL_AI_THINKER at the beginning of the code.
That’s it. Now we can upload the code to the ESP32-CAM. After uploading the code, you can see the inference result in the serial monitor.
However, I would like to add an OLED display to view the results. So, let's see the extra lines to be added to the default code.
Step 1: Adding Necessary Headers and Variables
Add the following code at the top of your sketch, before the void setup () function:
#include <Wire.h>
#include <Adafruit_GFX.h>
#include <Adafruit_SSD1306.h>
// ESP32-CAM doesn't have dedicated i2c pins, so we define our own. Let's choose 15 and 14
#define I2C_SDA 15
#define I2C_SCL 14
TwoWire I2Cbus = TwoWire(0);
// Display defines
#define SCREEN_WIDTH 128
#define SCREEN_HEIGHT 32
#define OLED_RESET -1
#define SCREEN_ADDRESS 0x3C
Adafruit_SSD1306 display(SCREEN_WIDTH, SCREEN_HEIGHT, &I2Cbus, OLED_RESET);
Here, as there are no dedicated I2C pins available on the ESP32-CAM, I will be using the Wire library to configure GPIO14 and GPIO15 as SCL and SDA.
Next, as we are using a 0.91” OLED display, the resolution is set to 128x32.
Step 2: Initializing the OLED Display
Add the following lines in the setup function of the Arduino:
  // Initialize I2C with our defined pins
  I2Cbus.begin(I2C_SDA, I2C_SCL, 100000);
  // SSD1306_SWITCHCAPVCC = generate display voltage from 3.3V internally
  if (!display.begin(SSD1306_SWITCHCAPVCC, SCREEN_ADDRESS)) {
    Serial.printf("SSD1306 OLED display failed to initalize.\nCheck that display SDA is connected to pin %d and SCL connected to pin %d\n", I2C_SDA, I2C_SCL);
    while (true)
      ;
  }
These lines initialize the I2C bus and verify a successful connection between the display and the ESP32-CAM.
Step 3: Adding Display Functions at the Necessary Places
You can modify your code as per your requirements. The following is based on my needs.
First, add these lines at the end of the void setup () function. This lets us know the program is successfully initialized:
  display.clearDisplay();
  display.setCursor(0, 0);
  display.setTextSize(1);
  display.setTextColor(SSD1306_WHITE);
  display.print("Starting continious\n inference in\n 2 seconds...");
  display.display();
  ei_sleep(2000);
  display.clearDisplay();
Next, add “display.clearDisplay();” at the beginning of the void loop() function to refresh the display after each update; otherwise, it will be overwritten.
Another main modification involves displaying the result when an object is detected. If no object is detected, a "No object detected" message will be shown on the display:
#if EI_CLASSIFIER_OBJECT_DETECTION == 1
  ei_printf("Object detection bounding boxes:\r\n");
  bool bb_found = result.bounding_boxes[0].value > 0;
  for (uint32_t i = 0; i < result.bounding_boxes_count; i++) {
    ei_impulse_result_bounding_box_t bb = result.bounding_boxes[i];
    if (bb.value == 0) {
      continue;
    }
    ei_printf("  %s (%f) [ x: %u, y: %u, width: %u, height: %u ]\r\n",
              bb.label,
              bb.value,
              bb.x,
              bb.y,
              bb.width,
              bb.height);
    display.setCursor(0, 16 * i);
    display.setTextSize(2);
    display.setTextColor(SSD1306_WHITE);
    if (strcmp(bb.label, "cristiano ronaldo") == 0) {
      display.print("CR7");
    } else if (strcmp(bb.label, "elon musk") == 0) {
      display.print("Elon");
    } else if (strcmp(bb.label, "robert downey jr") == 0) {
      display.print("RDj");
    }
    display.print("-");
    display.print(int((bb.value) * 100));
    display.print("%");
    display.display();
  }
  if (!bb_found) {
    ei_printf("    No objects found\n");
    display.setCursor(0, 2);
    display.setTextSize(2);
    display.setTextColor(SSD1306_WHITE);
    display.print("No objects  found");
    display.display();
  }
Let's quickly split the above lines for a better explanation:
Check for Object Detection Mode:
The #if EI_CLASSIFIER_OBJECT_DETECTION == 1 directive ensures that this code only runs if object detection is enabled.
Print Bounding Boxes:
The code iterates through the detected objects (bounding boxes) and prints details like label, confidence values, and positions on the serial monitor.
Display Results:
For each detected object, the code displays its label and confidence percentage on the OLED display. Certain labels (like "cristiano ronaldo") are translated into shorthand (like "CR7") for display purposes.
Handle No Detection:
If no objects are detected (bb_found is false), it prints "No objects found" on both the serial monitor and the OLED display.
Finally, upload the modified code to the ESP32-CAM module.

Above, you can see the hardware connected to the PC and the program already uploaded. Note that I am using another programmer to make the setup look simple. You can use any USB-to-UART converter to program the ESP32-CAM.
As no object is detected, the OLED display shows “No object found” as expected. Next, let’s look at the working demo.
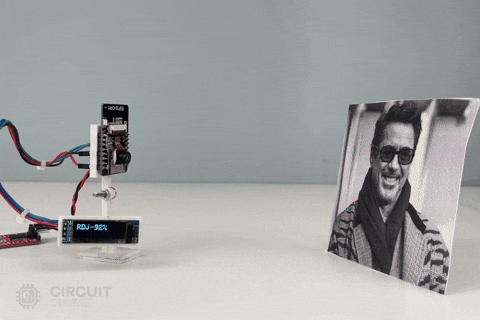
Working Demonstration of Face Recognition using ESP32-CAM Project
Below is a GIF showcasing the face recognition capabilities of the ESP32-CAM project. The system can also detect color images, but for simplicity, I used a black-and-white printout since we have black and white printer with us.
To achieve accurate results, it's crucial to have a high-quality dataset to train the model. Developing a better model often involves a lot of trial and error. While Edge Impulse handles much of the backend work, it currently offers limited customization options. However, Edge Impulse is continuously evolving, and we hope that future updates will enable even more advanced AI in edge projects.
One limitation of the Edge Impulse generated library is the lack of examples or references for combining camera feed acquisition with inference. We are working on addressing this issue and will share any updates on our website.
Some Projects which you might like


Complete Project Code
#include <Wire.h>
#include <Adafruit_GFX.h>
#include <Adafruit_SSD1306.h>
// ESP32-CAM doesn't have dedicated i2c pins, so we define our own. Let's choose 15 and 14
#define I2C_SDA 15
#define I2C_SCL 14
TwoWire I2Cbus = TwoWire(0);
// Display defines
#define SCREEN_WIDTH 128
#define SCREEN_HEIGHT 32
#define OLED_RESET -1
#define SCREEN_ADDRESS 0x3C
Adafruit_SSD1306 display(SCREEN_WIDTH, SCREEN_HEIGHT, &I2Cbus, OLED_RESET);

 // Initialize I2C with our defined pins
  I2Cbus.begin(I2C_SDA, I2C_SCL, 100000);
  // SSD1306_SWITCHCAPVCC = generate display voltage from 3.3V internally
  if (!display.begin(SSD1306_SWITCHCAPVCC, SCREEN_ADDRESS)) {
    Serial.printf("SSD1306 OLED display failed to initalize.\nCheck that display SDA is connected to pin %d and SCL connected to pin %d\n", I2C_SDA, I2C_SCL);
    while (true)
      ;
  }

  display.clearDisplay();
  display.setCursor(0, 0);
  display.setTextSize(1);
  display.setTextColor(SSD1306_WHITE);
  display.print("Starting continious\n inference in\n 2 seconds...");
  display.display();
  ei_sleep(2000);
  display.clearDisplay();

#if EI_CLASSIFIER_OBJECT_DETECTION == 1
  ei_printf("Object detection bounding boxes:\r\n");
  bool bb_found = result.bounding_boxes[0].value > 0;
  for (uint32_t i = 0; i < result.bounding_boxes_count; i++) {
    ei_impulse_result_bounding_box_t bb = result.bounding_boxes[i];
    if (bb.value == 0) {
      continue;
    }
    ei_printf("  %s (%f) [ x: %u, y: %u, width: %u, height: %u ]\r\n",
              bb.label,
              bb.value,
              bb.x,
              bb.y,
              bb.width,
              bb.height);
    display.setCursor(0, 16 * i);
    display.setTextSize(2);
    display.setTextColor(SSD1306_WHITE);
    if (strcmp(bb.label, "cristiano ronaldo") == 0) {
      display.print("CR7");
    } else if (strcmp(bb.label, "elon musk") == 0) {
      display.print("Elon");
    } else if (strcmp(bb.label, "robert downey jr") == 0) {
      display.print("RDj");
    }
    display.print("-");
    display.print(int((bb.value) * 100));
    display.print("%");
    display.display();
  }
  if (!bb_found) {
    ei_printf("    No objects found\n");
    display.setCursor(0, 2);
    display.setTextSize(2);
    display.setTextColor(SSD1306_WHITE);
    display.print("No objects  found");
    display.display();
  }
