

Unlike other ESP Development Boards, the ESP32-CAM has no USB connector to connect it to a computer. This might be confusing for beginners when they try to program this development board for the first time, so in this article lets learn how to program the ESP32-CAM module using the Arduino IDE. Before we start, I assume you know the basics about the ESP32-CAM module, you can also check out our other ESP32-CAM projects that we have build earlier to explore more about this board.
First, let’s go over the necessary pinouts.
ESP32-CAM Pinout
We won't concentrate on all the pins, instead, we will focus on the pins that are used for programming. If you want to learn more about the ESP32-CAM Pinouts and their Descriptions, you can check out our site for a clear explanation.

Above, you can see the pinouts of the ESP32-CAM from the front and back sides for your convenience. Here are the important pins that we need to consider for programing: 5V, 3V3, GND, U0TXD, U0RXD, GPIO0.
5V - Used for powering the ESP32-CAM. Only 5V is accepted.
3V3 - Used for powering the ESP32-CAM. Only 3.3V is accepted.
GND - Negative power supply or it can be defined as common ground.
U0TXD - Transmitter pin of the internal default UART 0 module of the ESP32-CAM
U0RXD - Receiver pin of the internal default UART 0 module of the ESP32-CAM
GPIO0 - A GPIO pin responsible for selecting the mode of operation.
Next, let us know about the booting modes of ESP modules.
Booting Modes in ESP32-CAM
Most of the Espressif microcontrollers like ESP32, ESP8266, etc., have some kind of booting mode. The ESP32-CAM has two booting modes namely the Bootloader mode and the Download mode. When you want to upload a new code to the ESP32-CAM module you should put the module in Download mode, once the code is uploaded you can put the module in Bootloader mode to execute the code that was earlier uploaded to the ESP32-CAM module

In the above image, you can see the operations of the ESP32 in two different modes. In the Download Mode, the program from the computer is uploaded to ESP32 using UART and stored in the flash memory (indicated as a memory card) and in the Bootloader Mode, the code from the flash memory is executed by the ESP32-CAM module.
Switching Between Different Booting Modes in ESP32-CAM:
Now that we know about the two booting modes in ESP32-CAM, let us understand how to switch the ESP32-CAM module into Bootloader Mode and Download Mode.
The ESP32-CAM module enters into different boot modes during power-up based on the status of its GPIO 0 pin. If the GPIO 0 pin is high (connect to 3.3V) during power up the module enters Bootloader Mode and if the pin is low (connected to ground) it enters Download mode.
| System Status | GPIO 0 State | Mode |
| Initializing | HIGH | Bootloader Mode (NORMAL MODE) |
| LOW | Download Mode(PROGRAMMING MODE) | |
| Running | HIGH or LOW | No change |
Above, you can see a simple table that explains the GPIO0 state and the respective mode. One thing I'd like to add is that initializing means at the time of powering up, instead of powering up the board manually every time you can also press the reset button to initialize the board. So every time the reset button is pressed the ESP32-CAM module will initialize and enter either the Bootloader mode or Download mode based on the status of the GPIO 0 pin.
Until now, we have been looking at the ESP32-CAM module and how to put it in different booting modes. But even if the ESP32-CAM mode is in download mode we need a suitable programmer to upload the code from the computer into the ESP32-CAM module.
Compactable Programmers for ESP32-CAM
Programmers are essentially USB to Serial converters in the case of most Espressif microcontrollers. By default, these microcontrollers have UART hardware inside, which is capable of establishing communication. But we don't have a UART interface on our PC, right? So, considering the availability of USB on our PC, there are multiple USB to Serial/UART/TTL converters that can be used as programmers.

Above You can see some of the commonly used USB to Serial Convertors. You can select the one comfortable for you. We are using the FTDI board for the sake of this tutorial.
Components Required
ESP32-CAM x1
USB to Serial Converter x1
BreadBoard x1
Jumper Wire (M-M) x5
Jumper Wire (F-F) x5 [Optional]
Circuit Diagram for Interfacing ESP32-CAM with your PC
Finally, we come to the main part, the circuit diagram. Let's take a deep dive into the connections. Here, I have selected the most common breakout module, the FTDI, specifically the FT232. I am using male-to-male jumper wires for connections. If you do not prefer to use a breadboard, you can use female-to-female jumper wires to make the connections.

Above you can see the circuit diagram for connections between ESP32 CAM and USB to the Serial Converter FTDI module. Suppose the SerialConveroter you use has options to switch between 3.3v and 5v. I prefer to use 3.3V because it is the actual voltage level accepted by ESP32. In the case of using 3.3v, you can connect the Power supply directly to the 3V3 Pin in ESP32-CAM.

ESP32 Board Package Installation
Installing the board library is very straightforward in the newest Arduino IDE 2.x. Let's jump straight into the steps to follow.
1) Open the Arduino IDE 2.x.

2) As the Arduino IDE needs to find the ESP32 package on the internet, we need to provide the location of the ESP32 board package via a link, which you need to enter in the Additional Boards Manager URLs. You can find this under "File -> Preferences -> Settings -> Additional Boards Manager URLs."

3) Below you can see the link to the ESP32 package’s JSON file. Just add that in the Additional Boards Manager URLs, and you are ready to install the board package.
https://raw.githubusercontent.com/espressif/arduino-esp32/gh-pages/package_esp32_index.json

4) In the editor, you can see the icon of the board manager in the left column. By clicking on that, you can open the board manager right away in the editor. There, type “esp32” and you will be able to find the ESP32 by Espressif below the search field.

5) Now select the version and click “install.” You will see a notification about the processing below. Once the installation is completed, you will see the installed message in the Output Panel as shown above.
After the installation is complete, let’s move to the next step, which is uploading the program.
How to Upload Code to ESP32-CAM Module?
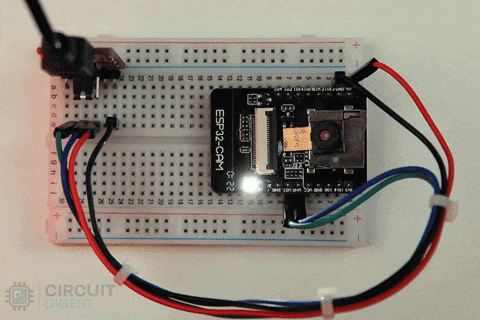
Once after completing all the previous steps now connect the hardware to Your PC and we need to ensure a successful hardware connection. The below image shows how to connect the ESP32 CAM module to your computer.

Checking the Hardware connection:
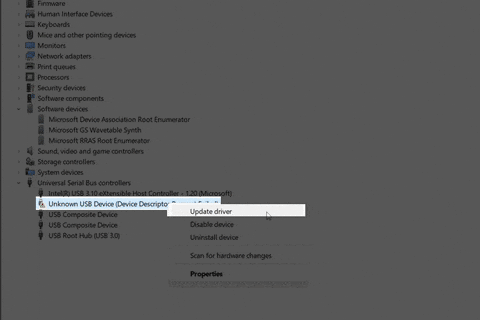
After connecting the USB to the Serial Converter to the PC, open Device Manager and look for the Ports section. If it is available, then there is a connection in the communication port.

You can see the image above for reference. Here, I am able to see a USB Serial Port at COM9. When I opened its properties, it was clear that it is an FTDI USB to Serial Converter that has a successful connection with the PC. If you are unable to see ports, then go to the troubleshooting section below.
Opening Example Program to Upload in ESP32-CAM:
After a successful connection let’s check the ESP32-CAM Progamming using a simple Fade Program.

As above the example program was opened. There is no special reason to select the Fade program, you upload whatever program you need.
A Little Modification in the Program:
In the Program let's change an LED pin from 9 to 4, Because the flash LED which is present in the ESP32-CAM Module is connected to the 4th pin of ESP32.

And we know that performing PWM operation in ESP32’s Any pin is Possible, so only it's possible to use Fade Programe here. So now the program is ready let's upload it in the ESP32-CAM Module.
Board Selection in Arduino IDE:
You can see the option for selection above in the editor. If you hover the mouse over it, you can see the unallocated port named like the port name we saw in the Device Manager, COM9 in my case.

While pressing on the unknown port, you will see an option to select the board you are going to program and the port to which it is connected. For “ESP32-CAM” You can select “AI Thinker ESP32-CAM” Once you complete this, your board is ready to program.
Uploading the Code to ESP32-CAM:
Checking the mode of the module: When you connect the ESP32-CAM to the PC while keeping the GPIO0 pin at LOW, you automatically switch to Download Boot Mode. Let's check that once again now.

After selecting the AI Thinker ESP32-CAM along with its COM port, open the Serial Monitor and set the baud rate to 115200, which is the default baud rate for ESP32 internal ROM executions. Now try to reach out to the reset button and press it once. As shown above, you can see that the ESP32 responds as it is waiting for the download. Of course, that means all is fine.
Uploading the Code: Now, finally, we come to uploading. Click the upload button at the top and wait for the compilation of the program. Once the compilation is done, the program starts uploading, showing the current status in the output window.

Once completed, you can see the Successfully uploaded notification. That’s it, we did it! Above the image, you can see the explained process clearly.
Switching ESP32-CAM to Bootloader Mode from Download Mode
Even after uploading is finished, the ESP32-CAM module will remain in Download Mode. To exit the Download Mode, just remove the wire connection from IO0 from GND and restart the system either using the reset button or by reconnecting the power.

The above image shows the ESP32-CAM module in Normal Mode (Bootloader mode) where our written code will be executed.
Above you can see the result of the uploaded program. You can see the flashlight is controlled using the PWM. Hereby We successfully uploaded the program to ESP32-CAM. For Any Doubts Do Comments.
Now that you know how to program the ESP32-CAM module and upload your own code using the Arduino IDE, you can proceed with building more interesting projects with this module. We have also built a few interesting AI projects using this module like Face mask detection using ESP32, Smart Attendance system using Image recognition etc you can check them out if you wish to build them on your own.
Troubleshooting Methods for Uploading Programs to ESP32-CAM
Here are some Trouble-shooting methods for uploading programs the ESP32-CAM:
1) Ensuring the Connections: Properly check the connections between the ESP32-CAM and the USB to Serial Converter. Ensure that they follow the circuit diagram precisely. Any mistake in the connections may cause trouble during uploading or, worse, result in damage if power pins are wired incorrectly.
2) Verify USB Cable: Make sure you have a good working USB cable with data transfer support. Some cables in the market won't support data transfer facilities.
3) Updating USB Drivers: Check if you have a USB driver installed for the device you are using. The most commonly used USB to Serial Converters are CH340G, CP2101, and FTDI FT232.

In the above image, you can see the names of the drivers listed in Device Manager. So, for easy assistance, I added the download links of the drivers. Using this, you can add them manually, and it's a quick process.
If you prefer to automate the installation process, the latest Windows supports this feature. You can see the whole steps in the image below for easy understanding.
This method is automatic but a time-consuming process but, the manual installation is quicker.
4) Restart Arduino IDE: Sometimes, restarting the Arduino IDE can resolve uploading issues.
5) Press the Reset Button: Press the reset button on the ESP32-CAM module just before uploading the program.
6) Check for Errors: Review the error messages displayed in the Arduino IDE to identify any specific issues with the upload process. You can see the error message while hearing the serial data in the 115200 baud rate.
If you're still experiencing any issues with uploading code to the ESP32-CAM, don't hesitate to reach out to us using the comment section below! We're here to help and resolve any difficulties you may encounter!

Is the code correct to test as the right camera has been used, but still serial monitor doesn't show up the desired output