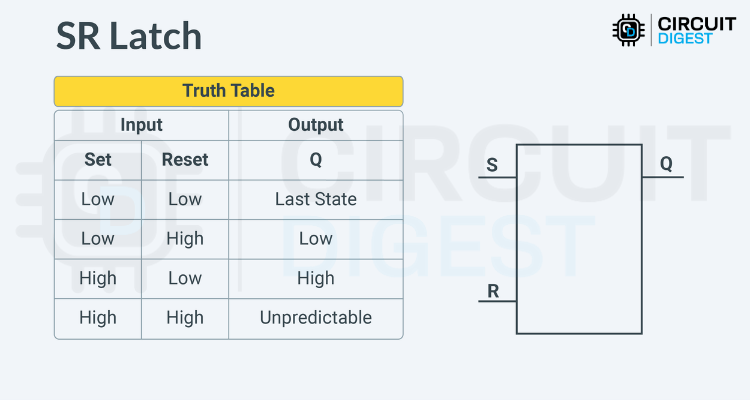
Have you ever heard the word isolation, especially in electronics? As you might guess, isolation is a key factor when it comes to optocouplers. Isolation is sometimes mandatory and sometimes an extra feature in circuits. Optocouplers are used in many electronic devices, from mobile electronics to household electronics.
So, in this article, let's learn more about optocouplers along with their basics, types, working principles, simulation, hardware demonstration, and live application demonstration. For our demo purposes, we will be using the PC817, a commonly used transistor output optocoupler in electronics.
Starting with a brief explanation of the optocoupler, we begin our walkthrough.
Basics of Optocoupler
In the path of Exploring Optocoupler, let's dig deep into answering questions like WHAT, WHERE, WHY, and HOW.
Key Components of Optocouplers:
Input side: infrared LED that converts an electrical signal to light
Output side: photodetector (phototransistor, photodiode, or TRIAC) that converts the light back to an electrical signal
Isolation barrier: the non-conductive material which will provide isolation up to 5000V.
| Component | Function | Voltage Rating |
| IR LED | Signal transmission | 1.2V forward voltage |
| Phototransistor | Signal reception | 80V max collector-emitter |
| Isolation Barrier | Electrical separation | 5000V breakdown |
What is an Optocoupler?
Let's understand the term Optocoupler. It can be separated as OPTO + COUPLER. So, technically, as per the name, it is used as a coupler with the help of some sort of optical technology. In brief, a light source is used as a link between two isolated circuits.
In terms of textual Representation:
An optocoupler, also known as an opto-isolator, is an electronic component that transfers electrical signals between two isolated circuits using light. It typically consists of an LED (light-emitting diode) and a photodetector, such as a phototransistor, housed within a single package. When the LED is energised by an input signal, it emits light that is detected by the photodetector, which then produces an output signal. This optical coupling allows the input and output circuits to remain electrically isolated from each other, protecting against high voltages and electrical noise.”
Here, I would like to add a point that not only optical technology but also electromagnetic induction is used for isolation more commonly.
Where are the optocouplers used?
Commonly, the optocouplers are used in circuits where isolation is required between any two regions.

For example, let’s consider that we are working on a project where an Arduino UNO-like microcontroller needs to control an AC tube light. In this case, the first thing that will come to mind is a Relay module. Of course, we use a relay module, but do you know exactly why we use a relay module when even a TRIAC can be used to do the same work? Yes, it’s isolation. In the case of a TRIAC, there is a chance of higher AC voltage entering the low-power DC network, which, of course, fries the ICs like chips. So, the relay makes a suitable choice. Yet our concern is not about the relay, it’s the optocoupler.
A relay is the first level of protection, and an optocoupler is also used between the microcontroller and the relay coil as a second level of protection. Being an electromechanical component, a relay could wear out over time. In that rare case, the AC power might touch the coil of the electromagnet inside the relay, which once again creates a path for AC to enter the DC network. This is where the optocoupler comes in handy and isolates both networks. The fundamental optocoupler circuit requires proper component selection.
Actually, apart from the relay, some types of Optocouplers can be used to switch a TRIAC directly.
Hope you understand the usage of optocouplers. Next, let's know why optocouplers are still preferred to do the job.
Why are Optocouplers Preferred Over Other Options?
The answer is simple. Unlike other options, there is no chance of electrical bonding between the separated regions even in the event of system failure. The possibility is very rare, such as if the potential is greater than the isolation voltage between the input and output of the optocoupler, which is about 5000 volts for the Optocoupler like PC817. That's why I said it's rare. There is no chance of placing such low-power electronics in such a high-voltage area. So, we trust optocouplers more than others.
Now you should have a clear understanding of optocouplers. Let's move to the interesting part of how it works.
How do Optocouplers Work?
There are numerous ways to understand the Working of the optocoupler. I would like to ask you to compare the wireless Remote with the optocoupler. The PC817 optocoupler's working principle operates through optical coupling. Let's look at it in detail.

In the above illustration, you can see the remote car [Output] setup along with the wireless remote [Input]. Each has a separate power source, so the remote needs to be charged separately, and similarly, the car needs to be charged as well. If neither is charged, there is no chance of driving the car. Even if there is an issue with the car, it won't affect the remote, and vice versa. This is because there is wireless transmission and reception technology in between. The overall working will only be affected if some other RF signal interferes with the existing system. So, that's the point I wanted to deliver. The PC817 optocoupler circuit can be configured
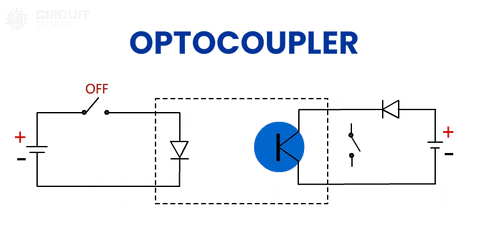
In the Above Animated GIFs, you can see the working of the optocoupler. Like the remote control car, the optocoupler has an LED as an input and a phototransistor as an output. The LED transmits infrared rays, and the phototransistor receives the transmitted infrared waves at its base as a signal, which turns on the transistor. Similar to the remote control car, the functioning of the optocoupler can be disturbed by any external light sources. That’s why the optocoupler is completely sealed to avoid external light interference. Remember, this explanation using the remote car is only for understanding the concept of the Optocoupler.
You might wonder if there is a physical connection between the input and output internally, which may cause any trouble. Ha ha, don't worry; there is a term known as dielectric strength. Usually, the material used to isolate the LED and phototransistor is non-conductive epoxy resin, which has a dielectric strength of Vmax = 20kV/mm. So, let's assume there is a 0.25 mm gap in between, which might require nearly 5000 volts to start conducting.
Hereby, the working of the optocoupler PC817 is completed.
Types of Optocouplers
Optocouplers can generally be classified into three categories: Based on their Input, Output, and Functions. Let's see each category in detail.

Types of Optocouplers Based on Input:
Optocouplers can be categorised based on their input types into two divisions: unidirectional input and bidirectional input, also known as DC input and AC input, respectively. The primary difference lies in the configuration of the LEDs within the optocoupler.
Unidirectional (DC) Input: This type has a single LED that responds to current flowing in one direction only.
Bidirectional (AC) Input: This type features two LEDs connected in opposite directions (one inverted), allowing it to respond to current flowing in either direction, making it suitable for AC input signals.

Types of Optocouplers Based on Output:
Here, the optocoupler can be classified based on the type of Output Device used. Some of the output devices used are Photodiode, Phototransistor, Photodarlington, MOSFET, SCR, and TRIAC.
Optocoupler with Photodiode Output:
In this type, the output is a direct photodiode. This optocoupler is widely used in proximity detection, Rotary encoders, and Photo Interrupter sensors.

The above is the image and symbol of the photo-interrupter sensor used for measuring the speed of rotating motors and in many other applications.
Optocoupler with Phototransistor Output:
Phototransistor output optocouplers are widely used due to their simplicity and low cost. In this type of optocoupler, a phototransistor is integrated at the output, providing an easy way to draw output from the device using a load resistor.

https://components101.com/sites/default/files/component_datasheet/PC817%20Datasheet.pdf
The above is the image and symbol of the PC817, a commonly used optocoupler that has a phototransistor as its output device.
Optocoupler with Photodarlington Output:
Photodarlington output optocouplers are utilised when a higher current transfer ratio (CTR) is required. This type of optocoupler incorporates a Photodarlington transistor pair at the output.

https://www.vishay.com/docs/83617/il221at.pdf
Above, you can see the image and Symbol of IL221AT, an Optocoupler with Photodarlington Output, Low Input Current, High Gain, and Base Connection.
Optocoupler with MOSFET Output:
MOSFET output optocouplers are used in applications that require high-speed and efficient power switching. These optocouplers incorporate a MOSFET at the output, providing several advantages over other types of optocouplers, like High-speed Switching, Efficiency, and immunity to Noise

https://www.farnell.com/datasheets/461023.pdf
In the above image, you can see the TLP222A, which consists of an infrared-emitting diode optically coupled to a photo-MOSFET in a DIP package. It is suitable for use as an on/off control for high current.
Optocoupler with Triac & SCR Output:
Triac & SCR Output optocouplers are known for their requirement in higher power switching and the capability of triggering thyristor and triac on their own. This comes in handy when we need to switch the AC appliance with a Triac directly from a microcontroller.

https://www.farnell.com/datasheets/3929882.pdf
The above is the image and symbol of the MOC301XM/MOC302XM, which contains a GaAs infrared-emitting diode and a light-activated silicon bilateral switch, functioning like a triac. They are designed for interfacing between electronic controls and power TRIACs to control resistive and inductive loads.
Types of Optocouplers Based on Function:
Optocouplers based on Function are designed to perform specific tasks, often integrating multiple Blocks into a single device. There are eight primary types of function-based optocouplers, each tailored for distinct applications. These optocouplers have more complex internals compared to other types due to their specialised nature.
The most common types are
Logic Output Optocouplers (Eg, 4N35)
High Linearity Optocouplers (Eg, IL300)
High-Speed Optocouplers (Eg, 6N137)
Galvanically Isolated Gate Drivers (Eg, ADuM3223)
Optically Isolated Gate Drivers (Eg, HCPL3120)
Optically Isolated Amplifiers (Eg, HCPL-7800A)
Solid State Relays (SSR) (Eg: G3MB-202P-5VDC)
Voltage and Current Sensors (Eg, ACPL_798J)
To know more about these, you can explore its example links nearby.
And this might not be the end of the types of optocouplers. There are still many optocouplers out there, of which the above were our basic considerations. So out of these, let's consider the PC817 as an example optocoupler for our following simulations and practical demonstrations.
Next, let's get introduced to the PC817.
Pinout of PC817 IC

The above image shows the pinout of the PC817, providing a clear explanation of each pin. Below is the pin description of the PC817, explained in the following table:
| Pin No | Pin Name | Description |
| 1 | Anode | Anode Pin of Infrared Light Emitting Diode. |
| 2 | Cathode | Cathode Pin of Infrared Light Emitting Diode. |
| 3 | Emitter | Emitter Pin of the Internal Photo Transistor. |
| 4 | Collector | Collector Pin of the Internal Photo Transistor. |
Let’s look at some of the important specifications of PC817.
Specifications of PC817
Here's the quick specification table for the PC817:

First, let’s look at the input parameters, starting from the anode and cathode sides. Consider it as a simple LED. Like a light-emitting diode, it has a forward voltage (Vf) and forward current (If), as shown above. Using these, we can calculate the appropriate resistor to be used in series with the input side. Make sure you are mindful of polarity because the IR LED inside has a very low reverse voltage of around 6V, which can permanently damage the LED.
The output part, consisting of the emitter and collector, can be considered as a transistor. As a transistor, it has a maximum collector current of 50mA and a higher collector-emitter voltage range of 80V maximum. Another important factor to consider is the frequency, with a typical cutoff frequency of 80kHz. So, it too has its limitations.
Finally, the operating temperature ranges from -30 to +125 ˚C, and storage should be between -55 to +100 ˚C. While soldering, you can reach a maximum of 260˚C for up to 10 seconds on the pins of the PC817. If the conditions exceed these limitations, the PC817 will be damaged internally.
Next, we are moving to the Stimulation of PC817 Optocoupler.
Stimulation of PC817 Optocoupler in Proteus:
In this simulation section, we will delve deeper into the workings of the PC817, starting with a basic simulation of the PC817.
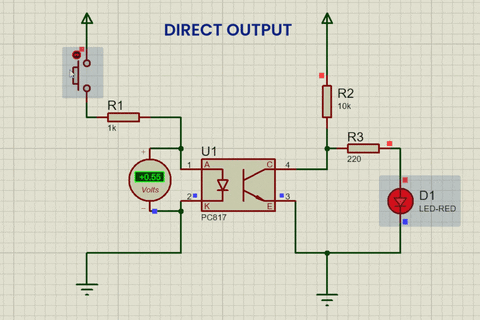
In the above diagram, you can see the direct output method. Here, R1 is the current-limiting resistor for the IR LED inside the PC817, and a button is connected between R1 and the positive power supply. R2 is the load resistor, which allows you to control the voltage gain and frequency response directly by adjusting this resistor. The output is connected directly to the LED via R3, completing the circuit. When the push button is pressed, the output LED turns off.
| Input State | Output State |
| HIGH | LOW |
| LOW | HIGH |
In the above table, you can see the logic state difference between the input and output for the direct method. Now, let’s move to the next method, the inverted output method.
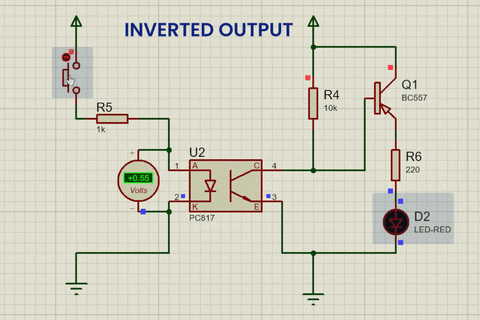
In the inverted method, everything is the same except for Q1, which is a PNP transistor used to invert the output from the optocoupler, ensuring that the output state matches the input state. Below, you can see the output of the inverted method.
| Input State | Output State |
| HIGH | HIGH |
| LOW | LOW |
As the signal is inverted by the PNP transistor Q1, the logic states of the input and output are directly proportional.
Next, we have a bonus simulation of the actual relay module available in the market. Optocoupler relay circuits provide double isolation between microcontrollers and high-power loads.
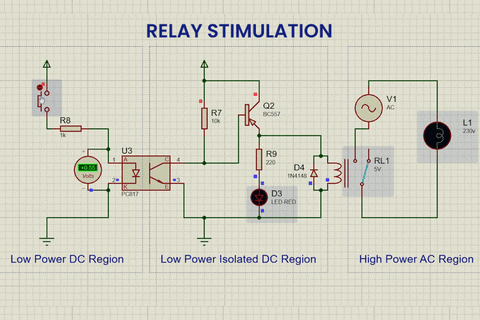
Here, the inverted output from Q2 is connected to one side of the relay coil, and the other side is grounded. A diode is connected in parallel to the relay coil to protect the circuit from reverse EMF, and an LED is also connected in parallel to the output for indication.
At the output, the switch of the AC light bulb is connected to the Normally Open (NO) and Common (COM) terminals of the relay. So, when the push button is pressed, the relay turns on, along with the AC light, as shown in the above GIF.
Essential Components for Relay Control
| Component | Rating | Purpose |
| PC817 | 50mA collector current | Primary isolation |
| Relay coil | 5V/12V, 50-200mA | Mechanical switching |
| Flyback diode | 1N4007 | Coil protection |
| Base resistor | 1kΩ | Current limiting |
| Pull-up resistor | 10kΩ | Logic level setting |
Now, let us move towards the Hardware demonstration of the Optocoupler PC817.
Hardware Demonstration of PC817 Optocoupler:
Below, you can see the hardware demonstration of the PC817 Optocoupler.
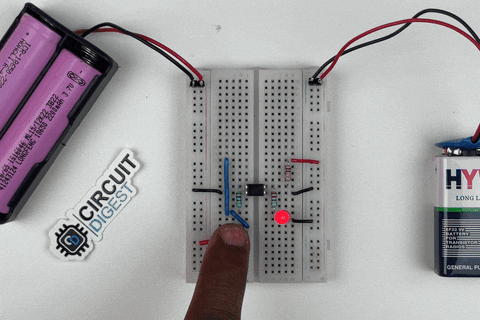
In this hardware demonstration, the direct output method is applied. Choosing different power supplies helps you understand more about how they work. Here, there are two different power supplies, one for the input side and another for the output side. You can see that both sides are perfectly isolated on the breadboard.
You might wonder about taking output directly from the optocoupler by driving the output in a source or sink drive method, which doesn’t invert the signal. Yes, it doesn't invert the signal, but this method is not recommended in the datasheet, even if it requires less current than the maximum collector-emitter current of 50mA. However, if you are confident about your circuit, you can proceed that way.
When you press the button, the LED goes off. This demonstrates the concept of direct output.
Let’s learn more about testing the PC817 Optocoupler.
How to Test an Optocoupler?
Testing an optocoupler is very simple and easier than you might think. There are many ways to do that, which we will discuss next.
Test Circuit for Optocoupler:
This method is preferred for professionals who need to ensure that the component meets its specific requirements and operates correctly within the intended application. However, if you are a hobbyist, you can skip this section and move to our next method, where you only need a multimeter to carry out the process.
You can find the test circuit in the datasheet of the respective optocoupler you selected. In our case, it's the PC817. If you explore its datasheet, you will find two test circuits: one to check response time and another to check frequency response. These two test methods require a function generator and an oscilloscope.

The above is the test circuit for checking the response time of the optocoupler PC817. Here, a square wave of the desired frequency is passed as an input to the anode side of the optocoupler through a current-limiting resistor Rd. The input square wave is verified using the output received between the load resistor Rl and the collector of the optocoupler. This input and output wave is compared simultaneously using a two-channel oscilloscope, and the deflection in response time can be easily found and classified.

The above is the test circuit for checking the frequency response of the optocoupler. As you can see, the hardware setup is the same as above. The only difference is that the input signal’s frequency is adjusted, and you can use the above graph to verify the results. You can adjust the load resistance to set the gain to the required amount. That's how we can check the working using the test circuit provided in the datasheet.
Next, let's look at the easiest and most affordable method.
Using a Multimeter for Testing an Optocoupler:
In this method, the concept is simple: you will consider the input side (anode and cathode) as a diode and the output side (collector and emitter) as a transistor. So, the next step is straightforward. Yes, we keep the multimeter in diode mode and check the optocoupler's input in both forward and reverse bias as follows.

In the illustration above, you will get the following results. In forward bias, you should see a voltage of around 1V with an accepted tolerance of ±0.1V. In reverse bias, you should get no voltage, so "OL" should be displayed on the multimeter, indicating that no current is flowing. This verifies the input infrared LED. If there are any abnormalities, there might be an issue with the LED side.
Next, we need to determine the resistance value to connect to the anode of the optocoupler. You can use a free LED resistance calculator tool to find out the required resistance value. Check the specifications of the optocoupler you are using, or use the data below for the PC817 to fill in the input spaces in the tool. Once you have the value, if you don't have that exact resistor, use a combination of series and parallel resistors to approximate it. A slightly higher value is acceptable.
[Screenshot of the Parameters used in our Online LED resistor Calculator]

In my case, it calculated a 190-ohm resistor, but I am using a 220-ohm resistor, which is close enough. Now, follow these steps:

Forward Bias of the Collector-Emitter of the Optocoupler with Connected Input Power:
Power up the input side of the optocoupler by connecting the calculated resistance in series with the anode and providing 5V. Connect the cathode to the ground.
Set the multimeter to resistance mode. Connect the positive lead to the collector and the negative lead to the emitter. The measured resistance value should be below 100 ohms. In my case, it read 90 ohms. The read resistance is proportional to the power supplied to the infrared LED. For correct calculations, the value should be less than 100 ohms. If it exceeds 100 ohms and moves into the kilo-ohm range, there may be an issue.
Without Powering the Input Side:
This completes the testing process, and you should now understand how to test an optocoupler using a multimeter.
Next, we see a few real-world applications of the Optocoupler.
Application Of Optocoupler:
Let's see some of the applications where optocouplers play a crucial role in our DIY projects for a better understanding of the concept.
Relay Modules - Here, the optocoupler PC817 is widely used for isolating the relay side from the main control circuitry.
AC Light Dimmer using Arduino and TRIAC - This project uses two types of optocouplers: a transistor output optocoupler and a TRIAC output optocoupler. The transistor output optocoupler is used to detect the zero crossing of the AC signal, while the TRIAC output optocoupler is used to drive the TRIAC directly, enabling phase angle control using a microcontroller or other circuitry. This is crucial for applications like dimming AC lights and regulating power to AC equipment.
AC Lights Flashing and Blink Control Circuit Using 555 Timer and TRIAC - Similar to the AC light dimmer project, this application also uses both a transistor and TRIAC output optocouplers. The transistor output optocoupler finds the zero crossing of the AC signal, and the TRIAC output optocoupler drives the TRIAC for precise control, enabling the flashing and blinking of AC lights.
Raspberry Pi Emergency Light with Darkness and AC Power Line Off Detector - In this project, a transistor output optocoupler is used to drive the MOSFET, which controls the brightness of multiple LEDs. This setup ensures that the emergency light activates in the absence of AC power or in low-light conditions, providing reliable illumination.
Design and Build a Compact 3.3V/1.5A SMPS Circuit for Space Constraint Applications - In this application, the PC817 optocoupler provides feedback of the output to the internal SMPS IC in an isolated manner. This isolation is crucial for maintaining the stability and safety of the power supply, especially in space-constrained applications where efficient and compact design is essential.
Conclusion
Optocouplers are designed elements required in modern electronics. These components are well recognised for providing a solid way to achieve electrical isolation and signal transfer. The operation of the PC817 optocoupler illustrates how electrical isolation can be achieved between the distinct voltage domains using optical coupling.
Understanding basic principles and the design principles to operationalise, whether it is a simple optocoupler circuit, a complex optocoupler relay circuit, or an optocoupler circuit project, will establish performance and safety. Regardless of whether they are controlling a simple LED or an automated industrial process, optocouplers are required in a host of applications that require electrical isolation.
As with successful board design, putting an optocoupler circuit diagram into production will depend on proper component selection, having a viable copy of an optocoupler circuit diagram, and being mindful of safety. With sound design principles, we can expect to have reliable circuits using optocouplers for years to come in challenging applications. I hope you understand this article about optocouplers in detail. Visit our site for more projects that use optocouplers and to gain a deeper understanding of their applications.
Frequently Asked Questions: Optocoupler Circuit
⇥ 1. What is the main duty of an optocoupler in circuits?
Optocouplers provide electrical isolation between two circuits while transferring a signal via light. They protect sensitive components from high voltages, noise and ground loops, and they allow for safe operation in mixed-voltage systems.
⇥ 2. What is the difference between the PC817 optocoupler and other models?
PC817 has a 50-600% current transfer ratio phototransistor output, 3μs response time, and 5000V isolation. It has a faster switching speed but lower current gain compared to high-sensitivity types.
⇥ 3. What is the resistor value for the input circuit of PC817?
For a 5V supply, employ a 190-220Ω resistor to restrict LED current to 15-20mA. Compute using: R = (Vsupply - 1.2V) / 0.02A. Larger supply voltages require larger resistors proportionally.
⇥ 4. Are optocouplers suitable for AC signal isolation?
Yes, back-to-back LED bidirectional optocouplers can handle AC signals. Photo-TRIAC output types, such as MOC3021, drive AC loads directly, whereas conventional types need special circuitry for AC applications.
⇥ 5. What is the difference between optocoupler relay circuits and direct switching?
An optocoupler relay provides double isolation with optical isolation and mechanical relay contacts. Optocoupler direct switching has a faster response time but has limited current handling versus relay-based systems.
⇥ 6. How do you test optocoupler is working properly?
Place the multimeter into diode mode, and measure the LED-it should show a forward resistance of about 1.2 and infinite reverse resistance. For the output switch the LED on, and measure the resistance between the collector and emitter. It should show less than 100 Ohms with the LED on, and more than 1 MΩ when the LED is off.
⇥ 7. What are typical uses for an optocoupler?
Typical candidates for these include relay modules, AC dimmer circuits, motor speed controllers, feedback isolation in SMPS, and interface circuits for microcontrollers. Snuggly fitting the finest circuits from Arduino to mains voltage control applications.
Practical Projects Using Optocouplers
This Optocoupler has been featured in many of our practical projects—check out the references below to learn more.
AC Light Dimmer using Arduino and TRIAC
So in this tutorial, we will learn about an AC lamp dimmer using Arduino and a TRIAC. Here, a TRIAC is used to switch the AC lamp, as this is a Power electronic fast switching device which is best suited for these applications.
Zero-Crossing Detector Circuit
A zero-crossing detector can be designed using various methods, including transistors, operational amplifiers, or optocoupler ICs. In this article, we will use an op-amp to build a zero-crossing detector circuit, and as mentioned previously, the op-amp will work as a comparator here.