
This guide shows you how to build a motion detection system that sends instant WhatsApp alerts using the compact XIAO-ESP32 development board. When the IR sensor detects movement, the board immediately transmits a notification to your phone through the CircuitDigest Cloud platform. This wireless approach eliminates the need for GSM hardware or SIM cards, relying entirely on WiFi connectivity and secure API communication.
The XIAO-ESP32 is remarkably small yet powerful, featuring built-in WiFi and Bluetooth capabilities. Its compact form factor makes it ideal for discreet security installations or portable monitoring devices. Despite its tiny size, it delivers enough processing power to handle sensor readings, network communication, and API requests without external assistance. Similar WhatsApp alert examples using ESP32 and Raspberry Pi Pico are also available for reference.
In this project, you will wire an IR motion sensor to the XIAO-ESP32, configure the cloud API credentials, write the detection firmware, and deploy a complete intrusion alert system. The entire setup communicates over standard WiFi networks, making installation simple and maintenance-free. If you're interested in exploring more exciting projects with ESP32, check out our collection of ESP32 Projects. You can also learn how to Send SMS Alerts Using Seeed Studio XIAO ESP32 for alternative notification methods.
Table of Contents
- System Architecture and Operation
- Components and Materials
- Wiring Schematic
- Building the Hardware
- Setting Up Cloud Access
- WhatsApp Message Templates
- API Request Structure
- Payload Configuration Examples
- Understanding the Source Code
- Uploading the Source Code
- Deployment and Testing Results
- Github Repository
System Architecture and Operation
The XIAO-ESP32 continuously monitors the IR sensor's digital output pin for state changes. When motion is detected, the sensor drives its output low, signaling the microcontroller. The board then establishes a secure HTTPS connection to CircuitDigest Cloud and transmits a POST request containing the alert details.
CircuitDigest Cloud acts as an intermediary between your device and WhatsApp's messaging infrastructure. Upon receiving your request, the platform validates your API key, confirms that the recipient phone number has been verified and approved, retrieves the specified message template, and populates it with your sensor data. The formatted notification then gets delivered through official WhatsApp channels to ensure compliance and reliability. To explore more innovative builds and tutorials, visit our complete Electronics Projects section.
The entire process follows this sequence:
- XIAO-ESP32 detects motion and constructs an HTTPS request with template ID and event details
- Cloud platform authenticates credentials and verifies recipient authorization
- Template engine merges sensor data with message format and delivers to WhatsApp instantly
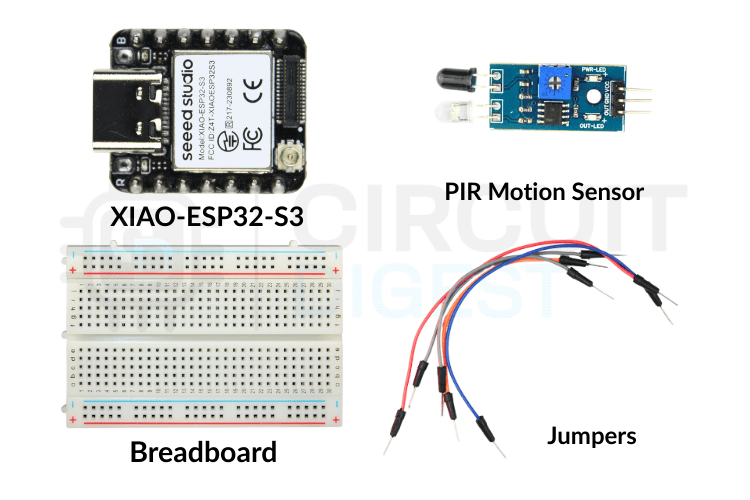
Components and Materials
This project requires only a handful of inexpensive components that are widely available from electronics suppliers. The XIAO-ESP32's small footprint allows for compact enclosures, while the IR sensor provides reliable motion detection up to several meters away.
Component list:
- XIAO-ESP32-S3 Development Board
- IR Motion Sensor Module
- Breadboard or Prototyping Board
- Jumper Wires
- USB Cable
No additional WiFi modules, cellular hardware, or external processors are needed. The XIAO-ESP32 handles all wireless communication internally, while the IR sensor operates as a simple digital input. For more projects using IR sensors, explore our IR Sensor Projects collection.
Wiring Schematic
The connection diagram below illustrates how to interface the IR sensor with the ESP32. Since both components operate on different voltage levels, pay attention to the power supply connections to avoid damaging either device.

Pin Connections:
The table below shows the pin connections of the IR Sensor and Xiao-ESP32-S3 development board.
| IR Sensor | XIAO-ESP32-S3 |
| VCC | 3.3V |
| GND | GND |
| OUT | GPIO D2 |
Most IR sensor modules include onboard voltage regulators that accept 5V input, but some operate directly on 3.3V. Verify your specific sensor's voltage requirements before connecting power. The XIAO-ESP32 uses 3.3V logic levels, which is compatible with most IR sensor outputs. The sensor's digital output pin sends a high signal when motion is detected and returns low after a preset delay. Adjust the sensor's sensitivity and delay potentiometers according to your application. Higher sensitivity increases detection range but may trigger false alerts from small movements. The delay setting controls how long the output remains high after detecting motion.
Building the Hardware
The image below displays a completed prototype assembly. Note the minimal number of connections and the compact overall size. The XIAO-ESP32's tiny dimensions allow the entire system to fit inside small enclosures for discreet installation.
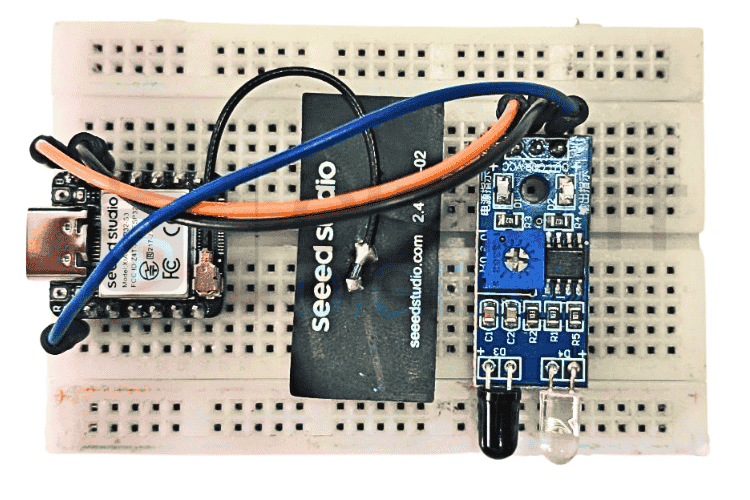
Position the IR sensor to face the area you want to monitor. The sensor's field of view typically spans 110 to 120 degrees horizontally, with detection ranges between 3 and 7 meters depending on the model. Avoid aiming the sensor at heat sources, windows with direct sunlight, or moving curtains, as these can cause false triggers.
Setting Up Cloud Access
To enable WhatsApp notifications, you must first generate authentication credentials from the CircuitDigest Cloud dashboard and register your recipient phone numbers. The following walkthrough guides you through each required step.
Step 1: Log in to Dashboard
Open CircuitDigest Cloud in your browser and click the Login button. Provide your account credentials to access the dashboard. If you are new to the platform, use the Register link to create a free account first.

Step 2: Open API Configuration
After logging in successfully, find the Account button at the top right of the interface. Click it to expand the menu, then select API Key from the available options. This takes you to the credential management section.

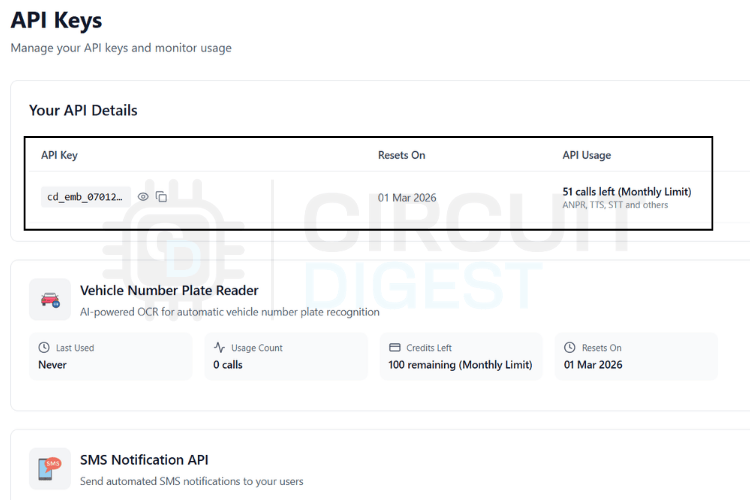
Step 3: Generate API Credentials
Click the generation button to create a new API key for your project. The platform assigns you a complimentary usage quota that refreshes monthly. Copy the generated key to a safe location immediately, as you will need to embed it in your firmware code. Treat this key like a password and never expose it publicly.
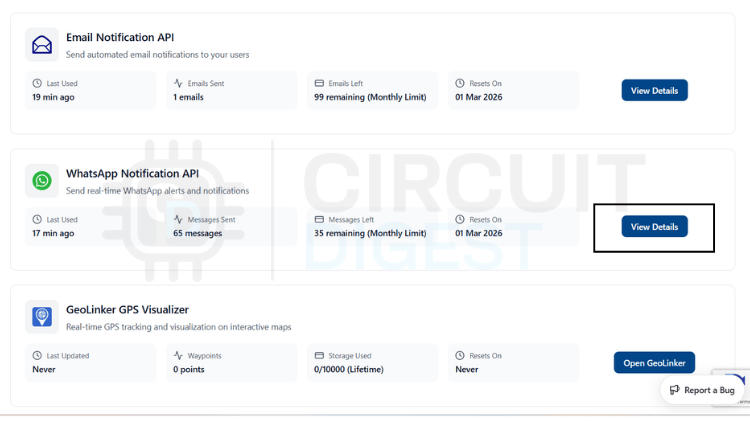
Step 4: Navigate to WhatsApp Configuration
Scroll through the dashboard until you locate the WhatsApp Notification API section. Click View Details to reveal the configuration options. This panel provides access to recipient management, template selection, and delivery settings.
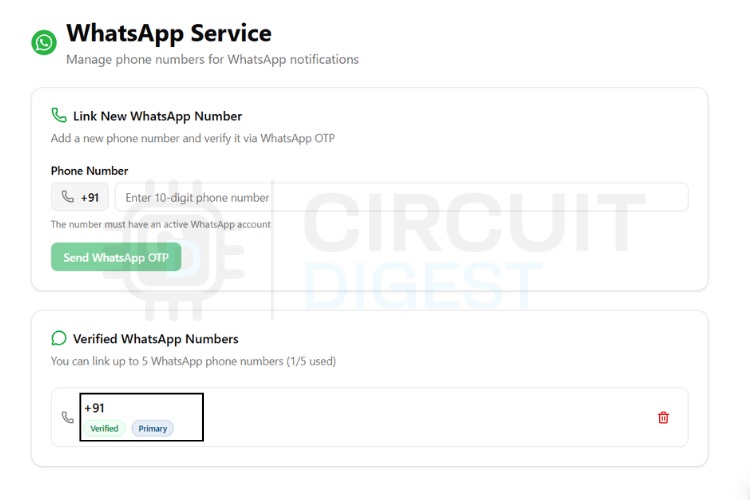
Step 5: Add Recipient Numbers
Select the Link Phone Number function to register recipients. The platform allows up to 5 distinct phone numbers for notification delivery. Each number requires verification before it can receive messages from your devices.
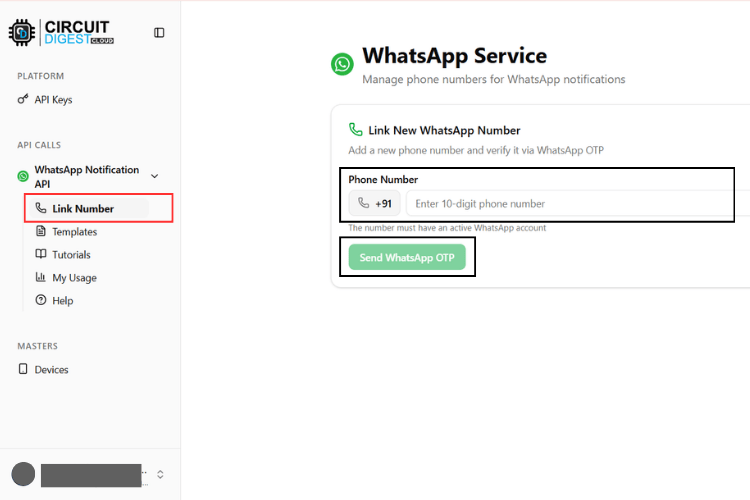
Step 6: Complete Verification
Type the phone number, including the country code, and request verification. CircuitDigest Cloud transmits a one-time code to that number. Enter the received code to complete verification. Once verified, the number becomes active and authorized to receive alerts from your XIAO-ESP32 motion detector.
WhatsApp Message Templates
CircuitDigest Cloud provides pre-configured message templates that comply with WhatsApp's business communication policies. Instead of manually composing message text in your code, you select a template identifier and supply variable values that fill the placeholders dynamically.
Templates use {#var#} notation to mark positions where your data should appear. The platform automatically substitutes these markers with actual values before transmitting to WhatsApp. The table below catalogs all available templates:
| Template ID | Category | Message Format |
| system_error_diagnostics | System Error | A diagnostic issue has been reported by {#var#}. Error type: {#var#}. Error detail: {#var#}. Location: {#var#}. Please inspect the system. |
| critical_event_alert | Critical Alert | High priority alert from {#var#}. Event type: {#var#}. Recorded value: {#var#}. Location: {#var#}. Immediate attention required. |
| threshold_violation_alert | Threshold Violation | A monitored parameter exceeded limits on {#var#}. Parameter: {#var#}. Measured value: {#var#}. Configured limit: {#var#}. Location: {#var#}. |
| operational_status_update | Status Update | Status update from {#var#}. Current status: {#var#}. Detail: {#var#}. Location: {#var#}. No action required unless unexpected. |
| command_execution_confirmation | Command Confirm | {#var#} processed a command. Command: {#var#}. Result: {#var#}. Location: {#var#}. |
| location_movement_update | Movement Alert | Update from {#var#}. Movement status: {#var#}. Current location: {#var#}. Recorded at: {#var#}. |
| service_reminder_notification | Service Reminder | Service reminder for {#var#}. Service type: {#var#}. Usage detail: {#var#}. Recommended service date: {#var#}. |
| responsible_contact_information | Contact Info | For alerts from {#var#}, contact {#var#}. Phone: {#var#}. Department or location: {#var#}. |
For motion detection alerts, the location_movement_update template offers an ideal structure. It includes fields for movement status, location, and timestamp, making your notifications informative and actionable.
API Request Structure
All WhatsApp messages from your XIAO-ESP32 use the same request format regardless of which template you choose. The firmware only needs to modify two elements: the template_id value and the contents of the variables object. This consistency simplifies code maintenance and reduces debugging effort.
Consider the JSON payload as a standardized container. The structure remains constant while the data changes based on sensor readings and device state. CircuitDigest Cloud parses this JSON, extracts your values, and merges them into the selected template before delivery.
Basic Format Template
Use this skeleton structure for all templates. The field names are mandatory and case-sensitive.
String payload =
 "{"
   "\"phone_number\":\"YOUR_NUMBER\","
   "\"template_id\":\"YOUR_TEMPLATE_ID\","
   "\"variables\":{"
     "\"device_name\":\"YOUR_DEVICE\","
     "\"var1\":\"VALUE1\","
     "\"var2\":\"VALUE2\","
     "\"var3\":\"VALUE3\","
     "\"var4\":\"VALUE4\""
   "}"
 "}";
Parameter Definitions
- phone_number - Destination WhatsApp number with country code prefix
- template_id - Identifies which pre-approved template to use
- variables - Object containing dynamic data that populates template placeholders
- device_name, var1-4 - Custom labels you assign based on template requirements
Variable names can be modified to improve code readability. For motion detection, you might use movement_status, detected_location, or timestamp instead of generic var1, var2, etc. The platform maps these to template placeholders sequentially.
Data Processing Pipeline
When the XIAO-ESP32 sends this JSON through HTTPS POST, CircuitDigest Cloud executes these steps:
- Authenticates the API key against your account
- Loads the template matching your template_id
- Substitutes {#var#} markers with your variable values in sequence
- Delivers the composed message to the verified recipient via WhatsApp
Your code never assembles the final message text. The template engine handles formatting, ensuring professional and consistent notifications across all your devices.
Payload Configuration Examples
The examples below illustrate different payload configurations for various scenarios. Treat these as formatting guides only. Replace placeholder values with real data from your sensors and application logic.
Motion Detection Notification
Template: location_movement_update
Ideal for security systems and intrusion detection applications.
{
 "phone_number": "919876543210",
 "template_id": "location_movement_update",
 "variables": {
   "device_name": "XIAO-ESP32 Security Sensor",
   "movement_status": "Motion Detected",
   "location": "Front Door",
   "timestamp": "2025-02-11 14:35:22"
 }
}
Critical Security Alert
Template: critical_event_alert
Used when immediate action is required for unauthorized access.
{
 "phone_number": "919876543210",
 "template_id": "critical_event_alert",
 "variables": {
   "device_name": "XIAO Motion Monitor",
   "event_type": "Unauthorized Entry",
   "recorded_value": "Motion Detected",
   "location": "Secure Area"
 }
}
System Activity Log
Template: operational_status_update
Suitable for routine status reports or non-critical notifications.
{
 "phone_number": "919876543210",
 "template_id": "operational_status_update",
 "variables": {
   "device_name": "XIAO Surveillance Node",
   "status": "Active - Monitoring",
   "detail": "No motion detected",
   "location": "Perimeter Zone"
 }
}
These examples demonstrate format only. Customize field values to accurately represent your deployment environment and monitoring objectives. Clear, descriptive messages help recipients understand the situation and respond appropriately.
Understanding the Source Code
Before diving into the complete code listing, examine the program's operational flow. The XIAO-ESP32 monitors the IR sensor's digital output continuously. When motion triggers the sensor, the board captures the event, constructs an API request with relevant details, and transmits it to CircuitDigest Cloud. A cooldown mechanism prevents notification spam by enforcing a minimum delay between consecutive alerts.
The firmware starts by including essential libraries for network connectivity:
#include <WiFi.h>
#include <WiFiClientSecure.h>
WiFi.h manages wireless network operations, while WiFiClientSecure.h provides SSL/TLS encryption for secure API communication.
Pin definitions establish the hardware interface:
#define IR_PIN D0The IR sensor's output connects to D0, configured as a digital input that reads low when motion is detected.
Cooldown configuration prevents alert flooding:
#define COOLDOWN_MS 15000This sets a 15-second interval between alerts. Adjust this value based on your monitoring requirements. Shorter intervals provide faster updates but may generate excessive messages in high-traffic areas.
Network and API credentials follow:
const char* ssid = "YOUR_WiFi_SSID";
const char* password = "YOUR_WiFi_PASSWORD";
const char* apiKey = "YOUR_API_KEY";
Substitute your actual WiFi credentials and the API key from CircuitDigest Cloud.
Server connection parameters define the HTTPS endpoint:
const char* host = "www.circuitdigest.cloud";const int httpsPort = 443;
The secure client object handles encrypted connections:
WiFiClientSecure client;Timestamp tracking enables cooldown enforcement:
unsigned long lastSentTime = 0;The setup() function executes once at power-on. It initializes serial debugging, configures the IR pin as input, an establishes WiFi connectivity:
Serial.begin(115200);
pinMode(IR_PIN, INPUT);
WiFi.begin(ssid, password);
Serial.print("Connecting WiFi");
while (WiFi.status() != WL_CONNECTED) {
 delay(300);
 Serial.print(".");
}
Serial.println("\nWiFi Connected");
client.setInsecure();
The code blocks until the WiFi connection succeeds, ensuring network availability before entering the monitoring loop. The client.setInsecure() call disables SSL certificate verification, which is acceptable only for testing purposes.
The loop() function continuously polls the IR sensor:
int motionState = digitalRead(IR_PIN);
unsigned long now = millis();
When motion is detected, the sensor output goes low. The firmware checks this state and the cooldown timer:
if (motionState == LOW) {
 Serial.println("Motion Detected");
 if (now - lastSentTime > COOLDOWN_MS) {
   Serial.println("Sending WhatsApp Alert");
   sendWhatsApp();
   lastSentTime = now;
 }
}
If both conditions are true, the code invokes the sendWhatsApp() function and updates the timestamp to activate the cooldown period.
The sendWhatsApp() function manages all cloud communication. It begins by establishing a secure connection:
if (!client.connect(host, httpsPort)) {
 Serial.println("HTTPS connection failed");
 return;
}
Next, it builds the JSON payload with template selection and motion event details:
String payload =
 "{"
 "\"phone_number\":\"919876543210\","
 "\"template_id\":\"threshold_violation_alert\","
 "\"variables\":{"
   "\"device_name\":\"Living Room Motion Node\","
   "\"parameter\":\"Motion\","
   "\"measured_value\":\"Motion Detected\","
   "\"limit\":\"N/A\","
   "\"location\":\"Living Room\""
 "}"
 "}";
This payload uses the threshold_violation_alert template, which is appropriate for motion detection events. You can customize the device_name and location fields to match your installation.
The function transmits HTTP headers followed by the payload:
client.println("POST /api/v1/whatsapp/send HTTP/1.1");
client.println("Host: www.circuitdigest.cloud");
client.println("Authorization: " + String(apiKey));
client.println("Content-Type: application/json");
client.print("Content-Length: ");
client.println(payload.length());
client.println();
client.println(payload);
After sending the request, the code waits for server acknowledgment:
while (client.connected()) {
 String line = client.readStringUntil('\n');
 if (line == "\r") break;
}
Serial.println(client.readString());
client.stop();
The server's response is printed to the serial monitor for debugging purposes, and the connection is closed.
This architecture provides reliable motion detection with controlled notification frequency. The code remains straightforward and easily modifiable for different sensors or alert conditions. The 500ms delay at the end of each loop iteration ensures the sensor is polled twice per second, providing responsive detection without excessive processing overhead.
Uploading the Source Code
Complete these steps to install development tools, prepare the sketch, and program your XIAO-ESP32 board.
Install Development Environment
Download Arduino IDE from the official Arduino website if not already installed. Launch the IDE, open File → Preferences, and add the Seeed Studio board manager URL to the Additional Boards Manager URLs field. Then navigate to Tools --> Board --> Boards Manager, search for "Seeed XIAO", and install the package for ESP32-based XIAO boards.
Configure Credentials
Open the firmware sketch and locate the configuration variables. Replace YOUR_WIFI_SSID with your network SSID, YOUR_WiFi_PASSWORD with the WiFi password, and YOUR_API_KEY with your CircuitDigest Cloud key. Update the phone number in the payload section to match your verified recipient number, including country code.
Board Selection
Connect the XIAO-ESP32 to your computer via USB-C cable. From the Tools menu, select Board --> Seeed XIAO ESP32C3 or Seeed XIAO ESP32S3, depending on your specific board variant. Choose the appropriate COM port from Tools --> Port.
Program and Test
Click Upload to compile and flash the firmware. Monitor the upload progress and wait for completion. Open Serial Monitor (Tools --> Serial Monitor) and set the baud rate to 115200. Confirm that the WiFi connects successfully. Trigger the IR sensor by moving in front of it to verify that WhatsApp notifications arrive correctly.
Deployment and Testing Results
After uploading the firmware and applying power, the XIAO-ESP32 connects to your WiFi network and enters monitoring mode. The serial console displays connection status and IR sensor state. When motion occurs within the sensor's detection range, the board immediately processes the event and sends the notification request to CircuitDigest Cloud.
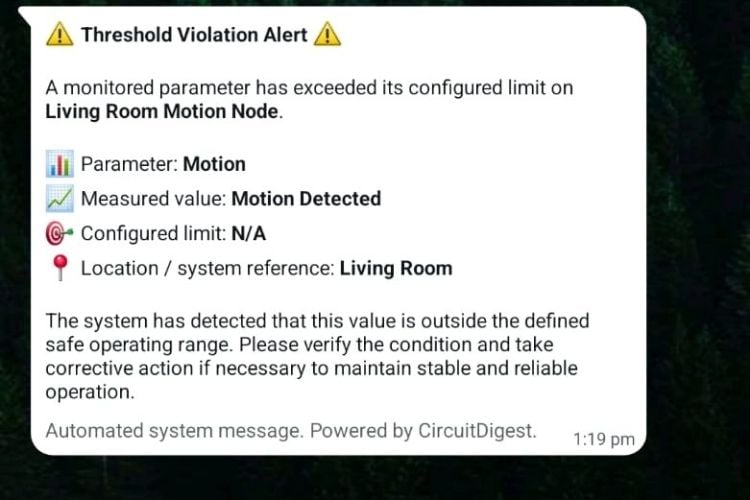
The animation above demonstrates the system in operation. Notice the IR sensor detecting movement and the corresponding WhatsApp message appearing on the mobile device within seconds. The notification includes device identification, movement status, location, and a timestamp. After sending an alert, the system observes the cooldown period before allowing another message, preventing notification floods during continuous activity.
You can observe real-time sensor activity through the serial monitor. Successful API transactions display server response codes, while any authentication or connectivity issues appear immediately in the log. This debugging output helps identify and resolve configuration problems quickly. For more innovative projects like this, visit our Microcontroller Projects section.
Looking to expand your IoT capabilities? CircuitDigest Cloud offers a comprehensive suite of tools. Send automated emails through the Email Notification API, dispatch SMS messages via the SMS Notification API, recognize vehicle license plates with the Vehicle Number Plate Reader, and visualize GPS coordinates using the GeoLinker-GPS Visualizer API. Fully compatible with ESP32, Arduino, Raspberry Pi, and other platforms, all your IoT needs are available in a single integrated solution.
Github Repository
If you want the project files, wiring diagrams, sample videos or ready-made examples stored cleanly in this GitHub repository.


Relevant Projects using ESP32
These ESP32-based projects demonstrate adding advanced features to embedded systems, including real-time GPS tracking with geofencing and text-to-speech capabilities using both online AI services and fully offline speech synthesis for IoT and smart device applications.
Build a GPS Tracker with Seeed Studio XIAO ESP32-S3 and Geofencing
A low-cost GPS tracking system built with Seeed Studio XIAO ESP32-S3 that sends real-time location data over Wi-Fi, supports geofencing with SMS alerts, buffers data offline, and visualizes routes on a cloud-based map without using GSM modules.

Build an ESP32 Text-to-Speech Using Wit.ai
An ESP32-based text-to-speech project that uses the Wit.ai cloud AI service to convert text into natural-sounding speech, stream audio over Wi-Fi, and play it through an I2S amplifier and speaker for voice-enabled IoT applications.

Build an ESP32 Text to Speech Offline System
A fully offline ESP32 text-to-speech system using the Talkie library that converts predefined text into spoken audio via the DAC pin, amplified with a PAM8403 module, enabling reliable voice alerts and feedback without any internet connection.
Complete Project Code
#include <WiFi.h>
#include <WiFiClientSecure.h>
#define IR_PIN D0
#define COOLDOWN_MS 15000
const char* ssid     = "YOUR_WiFi_SSID";
const char* password = "YOUR_WiFi_PASSWORD";
const char* apiKey   = "YPUR_API_KEY";
const char* host = "www.circuitdigest.cloud";
const int httpsPort = 443;
WiFiClientSecure client;
unsigned long lastSentTime = 0;
void sendWhatsApp()
{
if (!client.connect(host, httpsPort)) {
  Serial.println("HTTPS connection failed");
  return;
}
String payload =
  "{"
  "\"phone_number\":\"919876543210\","
  "\"template_id\":\"threshold_violation_alert\","
  "\"variables\":{"
    "\"device_name\":\"Living Room Motion Node\","
    "\"parameter\":\"Motion\","
    "\"measured_value\":\"Motion Detected\","
    "\"limit\":\"N/A\","
    "\"location\":\"Living Room\""
  "}"
  "}";
client.println("POST /api/v1/whatsapp/send HTTP/1.1");
client.println("Host: www.circuitdigest.cloud");
client.println("Authorization: " + String(apiKey));
client.println("Content-Type: application/json");
client.print("Content-Length: ");
client.println(payload.length());
client.println();
client.println(payload);
while (client.connected()) {
  String line = client.readStringUntil('\n');
  if (line == "\r") break;
}
Serial.println(client.readString());
client.stop();
}
void setup()
{
Serial.begin(115200);
pinMode(IR_PIN, INPUT);
WiFi.begin(ssid, password);
Serial.print("Connecting WiFi");
while (WiFi.status() != WL_CONNECTED) {
  delay(300);
  Serial.print(".");
}
Serial.println("\nWiFi Connected");
client.setInsecure();   // acceptable only for testing
}
void loop()
{
int motionState = digitalRead(IR_PIN);
unsigned long now = millis();
if (motionState == LOW) {
  Serial.println("Motion Detected");
  if (now - lastSentTime > COOLDOWN_MS) {
    Serial.println("Sending WhatsApp Alert");
    sendWhatsApp();
    lastSentTime = now;
  }
} else {
  Serial.println("No Motion");
}
delay(500);
}
