
This ESP32 WhatsApp notification project shows how to send real-time WhatsApp alerts directly from an ESP32 using WiFi and the CircuitDigest Cloud WhatsApp API. The ESP32 reads sensor data, checks for a defined condition such as high temperature or motion detection, and immediately pushes a WhatsApp alert to your phone. And the best part is, you do not need a WhatsApp API subscription or GSM module or a SIM card to do this. Similar WhatsApp alert projects are also available using Arduino Uno R4 and XIAO ESP32S3, following the same API workflow.
The idea behind this tutorial is to help engineers and makers to quickly and easily send WhatsApp messages from ESP32. For the sake of demonstration, we have connected a DHT11 sensor to the ESP32 to read and send the temperature and humidity values as a WhatsApp alert message. But you can use it for any project as you see fit. The tutorial uses the WhatsApp API service that we have built here using CircuitDigest.cloud. If you are looking for more alert notifications from ESP32, check out Email notification from ESP32 and send text message from ESP32 tutorial, all of which are built and serviced by CircuitDigest Cloud. For more tutorials, explore our collection of ESP32 projects.
Table of Contents
How Does the ESP32 WhatsApp Alert Message Work?
The ESP32 uses its built-in WiFi to communicate with CircuitDigest Cloud WhatsApp API and send WhatsApp notifications whenever a sensor condition is triggered. The device doesn't connect directly to WhatsApp servers. Instead, it sends a secure API request to the CircuitDigest cloud platform, which verifies your account, formats the message using a pre-approved template, and delivers it to pre-registered recipient numbers. Also note that you can send WhatsApp message alerts to a maximum of 5 numbers and a total of 100 messages per month. This process keeps the ESP32 WhatsApp alert system simple, secure, and, more importantly, free for everyone to use. To put it short
- ESP32 connects to WiFi and sends an HTTPS POST request with phone number, template ID, and alert variables
- CircuitDigest Cloud validates the API key and allows delivery only to verified and approved recipient numbers
- The platform formats the template and delivers the final alert instantly to WhatsApp
- You can send a WhatsApp message to a maximum of 5 numbers and a total of 100 messages per month per user.
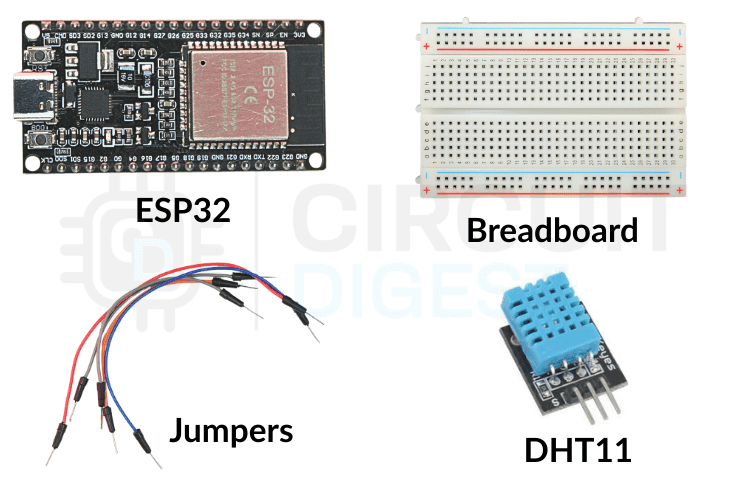
Components Required to Build the ESP32 WhatsApp Notification System
This ESP32 WhatsApp Notification project uses a small set of basic hardware components to keep the setup simple and easy to replicate. The ESP32 handles WiFi communication and API requests, while the DHT11 sensor provides temperature data that triggers the WhatsApp alert. If you want to learn more about using the DHT11 sensor with ESP32, check out our tutorial on the ESP32 webserver for temperature and humidity measurement using the DHT11 sensor.
- ESP32 Development Board
- DHT11 Temperature Sensor
- Breadboard
- USB Cable for power and programming
Circuit Diagram: Connecting DHT11 to ESP32 for WhatsApp Notifications
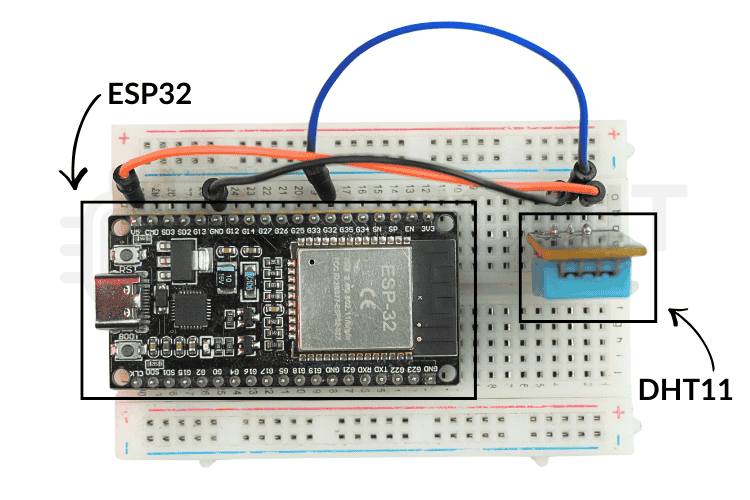
Refer to the circuit diagram below for the complete wiring layout. This minimal wiring reduces hardware complexity, making it easy to demo the ESP32 WhatsApp alert system.

The table below shows the connection of the DHT11 to the ESP32 Development Board
| DHT11 | ESP32 |
| VCC | 5V |
| GND | GND |
| DATA | GPIO 23 |
Once the connections are done, your hardware should look like something as shown in the image below. Again, you can connect any sensor of your choice to read its value, and the ESP32 sends a WhatsApp message; we are using DHT11 only for the sake of this demo.
How to Generate Your API Key on CircuitDigest Cloud
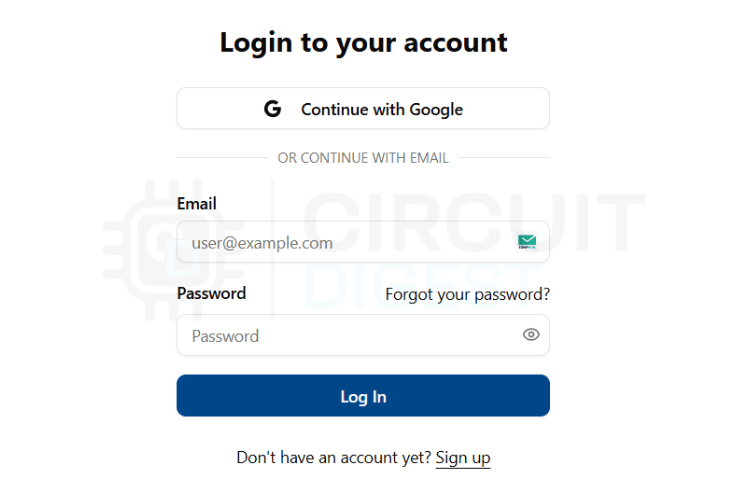
Step 1⇒ Log In or Register
Open CircuitDigest Cloud in your browser and click the Login button. Enter your credentials to sign in. If you do not have an account, create one using the Register option.
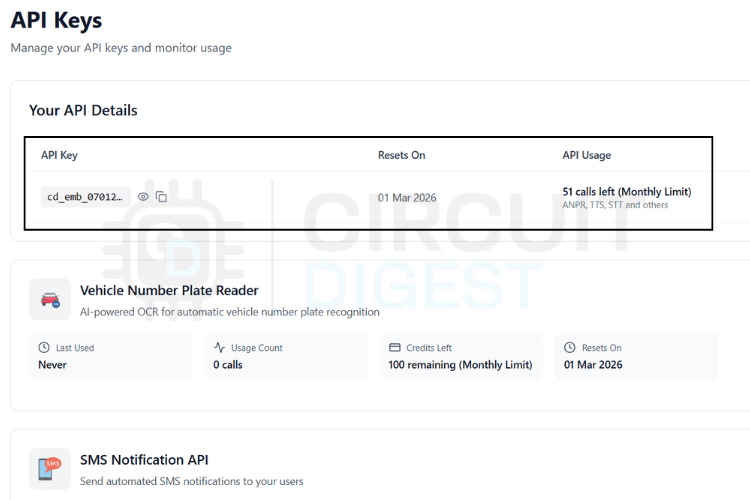
Step 2⇒ Navigate to API Key Management
After logging in, click the Account button at the top right corner. Select API Key from the dropdown menu. The system opens the API key management page.

Step 3⇒ Generate and Copy Your API Key
Generate a new API key. The platform assigns a free usage limit and allows renewal after expiry. Copy this key because you will paste it into your ESP32 code.
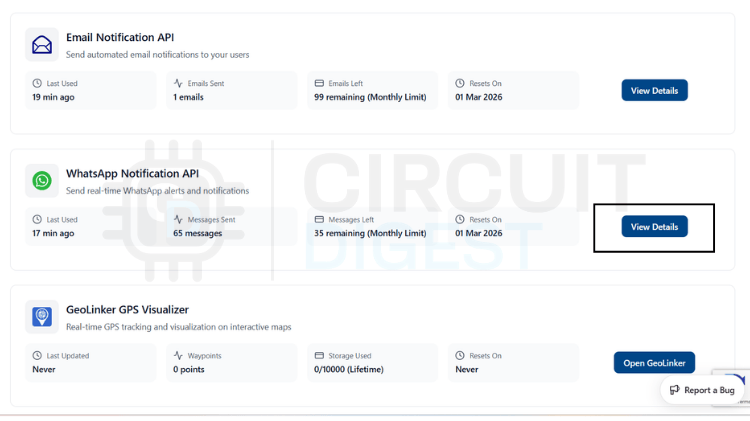
Step 4⇒ Open the WhatsApp Notification API Section
Scroll down to the WhatsApp Notification API section and click View Details. This section contains all controls related to WhatsApp alert delivery.
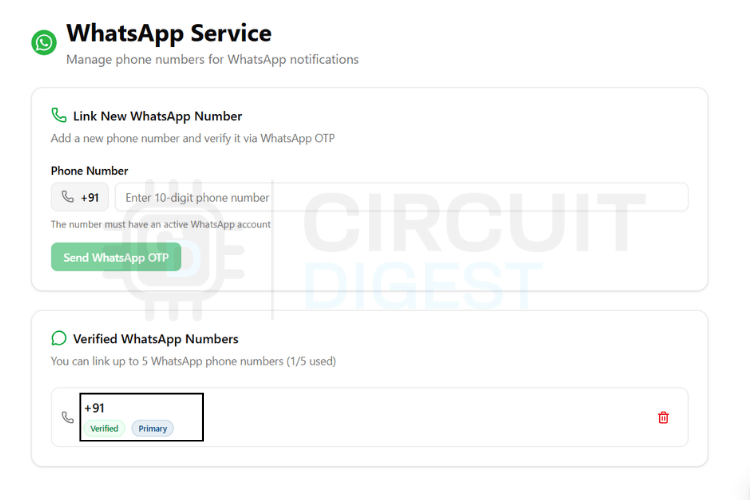
Step 5⇒ Open the Link Phone Number option. Add the phone numbers that should receive alerts from your device. You can register up to 4 verified phone numbers.
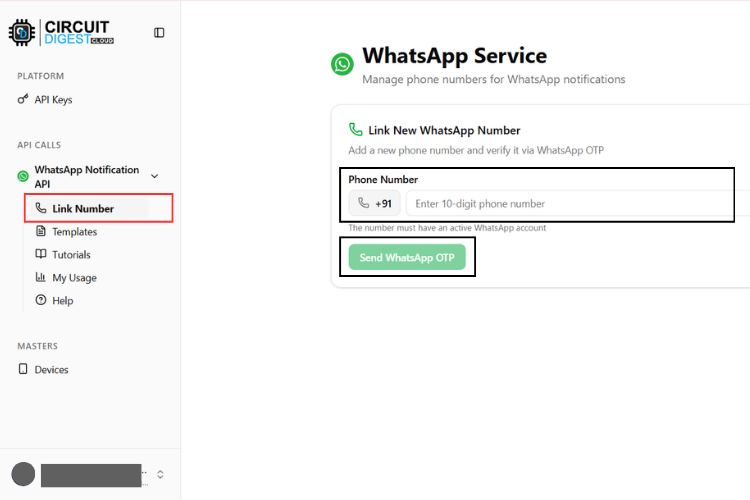
Step 6⇒ Enter the selected number and request verification. The system sends a one-time code to confirm ownership. After verification, the number appears in your approved list and becomes ready to receive a WhatsApp alert from your ESP32.
Available WhatsApp Message Templates on CircuitDigest Cloud
CircuitDigest Cloud provides a set of pre-approved WhatsApp alert templates that you can use directly with your ESP32 WhatsApp notification system. These templates follow WhatsApp's messaging guidelines and ensure reliable delivery without manual alert formatting. Instead of writing full text inside the firmware, you simply select a template ID and pass variable values such as device name, temperature, or location. The platform automatically inserts these values into the final alert before sending it to the recipient.
Each template targets a specific alert use case like temperature warnings, system errors, motion detection, or maintenance reminders. Choose the template that best matches your application and include its ID in your API request.
| Template ID | Template Type | Message |
| system_error_diagnostics | System Error Notification | A diagnostic issue has been reported by {#var#}. Error type: {#var#}. Error detail: {#var#}. Location: {#var#}. Please inspect the system. |
| critical_event_alert | Critical Event Alert | High priority alert from {#var#}. Event type: {#var#}. Recorded value: {#var#}. Location: {#var#}. Immediate attention required. |
| threshold_violation_alert | Threshold Violation Alert | A monitored parameter exceeded limits on {#var#}. Parameter: {#var#}. Measured value: {#var#}. Configured limit: {#var#}. Location: {#var#}. |
| operational_status_update | Operational Status Update | Status update from {#var#}. Current status: {#var#}. Detail: {#var#}. Location: {#var#}. No action required unless unexpected. |
| command_execution_confirmation | Command Execution Confirmation | {#var#} processed a command. Command: {#var#}. Result: {#var#}. Location: {#var#}. |
| location_movement_update | Location / Movement Update | Update from {#var#}. Movement status: {#var#}. Current location: {#var#}. Recorded at: {#var#}. |
| service_reminder_notification | Scheduled Service Reminder | Service reminder for {#var#}. Service type: {#var#}. Usage detail: {#var#}. Recommended service date: {#var#}. |
| responsible_contact_information | Contact Information | For alerts from {#var#}, contact {#var#}. Phone: {#var#}. Department or location: {#var#}. |
Each WhatsApp template uses placeholders written as {#var#}. These placeholders act as dynamic fields that your firmware fills at runtime. You do not modify the alert text itself. Instead, you send values inside the variables object of the JSON payload. The system maps each value to the template placeholders in order and automatically generates a clean, readable WhatsApp alert. For example, if you send a temperature alert using threshold_violation_alert, you pass values such as device name, parameter, measured value, limit, and location. CircuitDigest Cloud inserts these values into the predefined template and delivers the formatted alert instantly to the user.
Standard JSON Payload Format for ESP32 WhatsApp Messages
Every WhatsApp alert sent from your ESP32 follows the same HTTPS request format. You do not need separate functions for each template. You only change two things: the template_id and the values inside the variables object. Everything else remains identical. This approach keeps the firmware simple, reduces bugs, and makes the code reusable across different sensors and projects.
Think of the payload as a container. The structure stays fixed, while the data changes dynamically based on your sensor readings. For example, one project may send temperature values, while another sends motion status or battery level. The CircuitDigest Cloud platform reads your JSON, inserts the variable values into the selected template, and delivers the final WhatsApp alert automatically.
Standard JSON Format
Use this structure for all templates. Do not modify the field names.
String payload =
"{"
"\"phone_number\":\"YOUR_NUMBER\","
"\"template_id\":\"YOUR_TEMPLATE_ID\","
"\"variables\":{"
"\"device_name\":\"YOUR_DEVICE\","
"\"var1\":\"VALUE1\","
"\"var2\":\"VALUE2\","
"\"var3\":\"VALUE3\","
"\"var4\":\"VALUE4\""
"}}";
Field Explanation
- phone_number - recipient WhatsApp number with country code
- template_id - selects which alert format to use
- variables - dynamic values inserted into the template
- device_name / var1 / var2 / var3 / var4 - any sensor data or text you want to send
You can rename variables based on the template requirements, such as parameter, measured_value, or location. The platform maps them automatically.
Example Payloads (Reference Only)
These examples demonstrate format only. Replace all values with your real sensor data.
Temperature Alert from DHT11
"template_id":"threshold_violation_alert"Used when the temperature crosses a limit.
Motion Detection from PIR
"template_id":"critical_event_alert"Used for intrusion or emergency alerts.
Device Online or Offline Status
"template_id":"operational_status_update"Used to notify system status changes.
Maintenance or Service Reminder
"template_id":"service_reminder_notification"Used for scheduled service alerts.
Before You Build the Payload
Treat the examples only as a guide to understand the format. Do not copy the values as they are. Replace them with your own sensor readings or device data. You can send temperature, distance, motion status, voltage, battery level, or any other value that your project generates. The ESP32 sends a notification to the smartphone, and simply places whatever you send into the selected template.
Keep things simple while building the payload. Select the correct template_id and keep the JSON format valid. Once these two are correct, the alert will be delivered without issues. Everything else, including variable names and values, remains completely under your control.
ESP32 WhatsApp Notification - Firmware Walkthrough and Code Explanation
The sketch starts by loading the required libraries. These libraries handle WiFi communication, secure HTTPS requests, and sensor data reading.
#include <WiFi.h>
#include <WiFiClientSecure.h>
#include <DHT.h>
WiFi.h manages internet connectivity, WiFiClientSecure.h enables HTTPS communication with the cloud server, and DHT.h simplifies communication with the DHT11 sensor so you can read temperature using simple function calls.
Next, the code defines the GPIO pin and sensor type. Using macros makes the program easier to modify later and avoids hardcoding values throughout the sketch.
#define DHTPIN 23
#define DHTTYPE DHT11
The cooldown value is defined to prevent alert flooding. Without this delay, the ESP32 would send alerts continuously when the temperature stays high.
#define COOLDOWN_MS 15000WiFi credentials and API details come next. These values allow the board to connect to the internet and authenticate requests with the WhatsApp API.
const char* ssid = "YOUR_WIFI";
const char* password = "YOUR_PASS";
const char* apiKey = "YOUR_API_KEY";
The DHT sensor object is then created. This object provides built-in functions to read temperature easily.
DHT dht(DHTPIN, DHTTYPE);A secure client object is initialized to send HTTPS requests. All communication with the cloud server uses this client.
WiFiClientSecure client;A timer variable stores the last alert time. The program uses this value to calculate the cooldown interval.
unsigned long lastSent = 0;The setup() function runs only once when the board powers on. It starts serial communication for debugging, initializes the sensor, and connects the ESP32 to WiFi. The program waits until the connection succeeds before moving forward, which ensures that alerts never fail due to a missing internet connection.
Serial.begin(115200);dht.begin();
WiFi.begin(ssid, password);
while (WiFi.status() != WL_CONNECTED);
Inside the main loop, the ESP32 reads the current temperature repeatedly. This continuous reading allows the device to respond immediately when the threshold is crossed.
float temperature = dht.readTemperature();The program then checks whether the temperature exceeds the defined limit. If the condition becomes true and the cooldown period has passed, the device prepares to send an alert.
if (temperature >= 30 && millis() - lastSent > COOLDOWN_MS)When triggered, the firmware calls the WhatsApp sending function. This function handles the entire API communication process.
sendWhatsApp(temperature);Inside that function, the ESP32 first connects securely to the CircuitDigest Cloud server.
client.connect("www.circuitdigest.cloud", 443);Next, the code builds the JSON payload. This payload includes the phone number, template ID, and dynamic sensor values that will appear in the WhatsApp alert.
String payload =
 "{"
 "\"phone_number\":\"919876543210\","  //Enter registered Mobile number
 "\"template_id\":\"threshold_violation_alert\","
 "\"variables\":{"
   "\"device_name\":\"Living Room Temp Node\","
   "\"parameter\":\"Temperature\","
   "\"measured_value\":\"" + tempString + "\","
   "\"limit\":\"30°C\","
   "\"location\":\"Living Room\""
 "}"
 "}";
The program then sends the HTTP headers followed by the JSON body. These lines form the actual API request.
client.println("POST /api/v1/whatsapp/send HTTP/1.1");
client.println("Authorization: " + String(apiKey));
client.println(payload);
After sending the request, the client waits for the server's response and closes the connection. This step confirms whether the alert was delivered successfully.
Finally, the firmware stores the current time to restart the cooldown timer. This prevents multiple alerts for the same event.
lastSent = millis();The entire workflow stays simple and reliable. The ESP32 reads the sensor, checks the condition, sends an alert only when necessary, and repeats the cycle. This clean structure keeps the project easy to understand, easy to maintain, and suitable for any other sensor or alert type.
How to Upload the ESP32 WhatsApp Notification Code
Install the required tools and upload the firmware to the ESP32 before testing the alert system. These steps prepare the board, flash the program, and verify that everything works correctly.
- Install required libraries and board support: Open Arduino IDE and install the ESP32 board package from Boards Manager. Then install the DHT sensor library from Library Manager so the sketch can read temperature data.
- Configure the project: Connect the ESP32 using a USB cable, open the sketch, and update your WiFi name, password, API key, and recipient phone number inside the code.
- Select the board and upload: Choose your ESP32 model from Tools --> Board, select the correct Port, and click Upload to compile and flash the firmware into the board.
- Verify operation: Open Serial Monitor (115200 baud) to confirm WiFi connection. Trigger the sensor threshold and check that the WhatsApp alert is delivered automatically.
Results: ESP32 WhatsApp Alert System in Action
After uploading the firmware and powering the ESP32, the ESP32 WhatsApp alert system starts connecting to WiFi and begins reading temperature values from the DHT11 sensor continuously. You can monitor the live readings and connection status in the Serial Monitor. When the temperature crosses the defined threshold, the ESP32 immediately prepares the payload and sends a secure request to CircuitDigest Cloud, which then delivers the WhatsApp alert to the registered phone number.
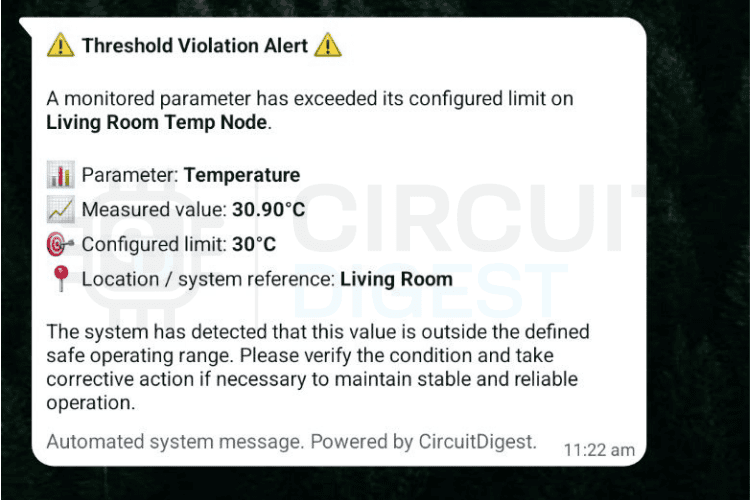
This ESP32 WhatsApp alert system can be adapted for a wide range of IoT applications,cold-chain monitoring, server room temperature alerts, soil moisture irrigation triggers, or home security motion detection. In the demonstration shown above, you can see the temperature increasing near the sensor and the alert triggering as soon as the limit is reached. The ESP32 sends a WhatsApp alert that appears instantly with the device name, measured value, and location details. After sending one alert, the system waits for the cooldown period and then continues monitoring without spamming alerts. This notification system can be adapted for various applications. Explore more creative ideas in our electronics projects collection.
Need more features for your IoT projects? CircuitDigest Cloud has you covered. Automate emails with the Email Notification API, send SMS messages using the SMS Notification API, identify vehicle plates through the Vehicle Number Plate Reader, and display location data with the GeoLinker-GPS Visualizer API. Compatible with ESP32, Arduino, Raspberry Pi, and more, everything you need in one platform.
ESP32 WhatsApp Alert System GitHub Repository
If you want the project files, wiring diagrams, sample videos or ready-made examples, the complete source code for this ESP32 WhatsApp notification system is available on GitHub.


Frequently Asked Questions - ESP32 WhatsApp Notification
⇥ Is it possible for ESP32 to send WhatsApp messages without using a SIM card?
You can send messages via WhatsApp by using the HTTPS request sent from your ESP32 using the WiFi capabilities of the device. This requests the WhatsApp API on the CircuitDigest cloud platform to send the message to the number associated with your WhatsApp account. A SIM card, GSM module (such as SIM800L), or a paid-for WhatsApp Business account is NOT required. The only two requirements for using the CircuitDigest WhatsApp API service that can be accessed from your ESP32 are: A free CircuitDigest Cloud account to generate an API key, and Access to WiFi.
⇥ Will any ESP32 device work for this WhatsApp notification project?
Any of the ESP32s that have WiFi capability will work, including but not limited to the standard ESP32 DevKit V1, ESP32-S3, ESP32-C3, and XIAO ESP32S3. This code uses standard Arduino libraries for WiFi (WiFi.h), WiFi Client over SSL (WiFiClientSecure.h), and DHT (DHT.h), which are compatible with all of these ESP32 boards. When uploading your code, be sure that you have selected the correct board type in the Arduino IDE under the Tools => Board menu.
⇥ Do I need to have a WhatsApp Business API account or subscription to use this?
No. CircuitDigest handles all of the WhatsApp Business API integration on the CircuitDigest cloud service side. You will only need to create a free CircuitDigest account and generate an API Key. CircuitDigest uses message templates validated by Meta to ensure compliant delivery of your messages. You are NOT charged for WhatsApp Business access separately.
⇥ Why is my ESP32 unable to send WhatsApp messages if it has a WiFi connection?
The reasons for this could be as follows: 1. You may be using an invalid/expired API key – regenerate it from the CircuitDigest cloud dashboard; 2. You may be attempting to send a message to an unverified recipient phone number – verify this from the Link Phone Number section of your cloud account. 3. You may have sent a malformed JSON payload – check the validity of your JSON payload before sending; 4. You may not have reached the required temperature threshold – try lowering your temperature threshold temporarily to see if that helps; 5. You need to wait for your cooldown timer to finish – this is usually 15 seconds. To check for any specific error messages returned from the server, open the Serial Monitor using a 115200 baud rate.
⇥ Can I use a different sensor than the DHT11 with my ESP32 WhatsApp notification system?
Yes. The DHT11 is intended only to demonstrate how the system will work and is not required. You can use any sensors that are supported by the ESP32, including but not limited to: a PIR motion detector, a soil moisture probe, an HC-SR04 ultrasonic sensor, an MQ-2 gas sensor, any other analog/digital input devices/boards, etc. To use these sensors you will simply need to get the sensor value and provide that sensor value as an input variable in the JSON payload you send to sendWhatsApp() (both the sendWhatsApp() function call and the API request will stay the same).
⇥ What does the COOLDOWN_MS timer mean, and why is it significant?
The variable COOLDOWN_MS (default: 15000 ms=15 seconds) is used to allow a minimum delay between 2 messages sent out via WhatsApp by the ESP32. Without COOLDOWN_MS, as long as there is a condition triggered in the sensor, the ESP32 will send another WhatsApp message each time through its loop, thereby using up your 100 messages per month in a matter of seconds, so you need to set the value based on how long you can wait before having an additional message sent to you e.g., you may set it at 300000ms(5 minutes) if you want to monitor the temperature.
⇥ How do I confirm a telephone number for receiving WhatsApp notifications from the ESP32?
Sign in to your CircuitDigest Cloud account, and go to WhatsApp Notification API → Link Phone Number. Type in the phone number along with its international dialling code, and click on Send Verification Code. Follow the instructions provided when you receive the OTP on that phone number and type it into the verification box. After entering the OTP, your phone number will be added to the approved list of recipients for your ESP32, making you eligible to receive alerts from your ESP32 immediately.
Related Temperature Sensor Projects
Hands-on IoT projects demonstrating DHT11 temperature and humidity sensing with Arduino and ESP32, including basic interfacing and building web servers to monitor sensor data and control LEDs remotely.

Interfacing DHT11 Humidity & Temperature Sensor with Arduino
Learn how to interface the DHT11 temperature and humidity sensor with Arduino. Covers pinout, working principle, circuit diagram, 1-wire protocol, and example code.

ESP32-Based Webserver for Temperature and Humidity Measurement using DHT11 Sensor
Build an ESP32-based web server to monitor temperature and humidity using the DHT11 sensor. View live readings on a webpage and send email alerts via IFTTT.

IoT Weather Station using NodeMCU
In this project, we will measure humidity, temperature, and Pressure parameters and display them on the web server, which makes it an IoT-based Weather Station where the weather conditions can be monitored from anywhere using the Internet.
Complete Project Code
#include <WiFi.h>
#include <WiFiClientSecure.h>
#include <DHT.h>
#define DHTPIN 32
#define DHTTYPE DHT11
#define TEMP_LIMIT 30
#define COOLDOWN_MS 15000
const char* ssid     = "YOUR_WiFi_SSID";
const char* password = "YOUR_WiFi_PASSWORD";
const char* apiKey   = "YOUR_API_KEY";
const char* host = "www.circuitdigest.cloud";
const int httpsPort = 443;
DHT dht(DHTPIN, DHTTYPE);
WiFiClientSecure client;
unsigned long lastSentTime = 0;
void sendWhatsApp(float temperature)
{
if (!client.connect(host, httpsPort)) {
  Serial.println("HTTPS connection failed");
  return;
}
String tempString = String(temperature) + "°C";
String payload =
"{"
"\"phone_number\":\"919876543210\","  //Enter registered Mobile number
"\"template_id\":\"threshold_violation_alert\","
"\"variables\":{"
  "\"device_name\":\"Living Room Temp Node\","
  "\"parameter\":\"Temperature\","
  "\"measured_value\":\"" + tempString + "\","
  "\"limit\":\"30°C\","
  "\"location\":\"Living Room\""
"}"
"}";
client.println("POST /api/v1/whatsapp/send HTTP/1.1");
client.println("Host: www.circuitdigest.cloud");
client.println("Authorization: " + String(apiKey));
client.println("Content-Type: application/json");
client.print("Content-Length: ");
client.println(payload.length());
client.println();
client.println(payload);
while (client.connected()) {
  String line = client.readStringUntil('\n');
  if (line == "\r") break;
}
Serial.println(client.readString());
client.stop();
}
void setup()
{
Serial.begin(115200);
dht.begin();
WiFi.begin(ssid, password);
Serial.print("Connecting WiFi");
while (WiFi.status() != WL_CONNECTED) {
  delay(300);
  Serial.print(".");
}
Serial.println("\nWiFi Connected");
client.setInsecure();   // for testing only
}
void loop()
{
float temperature = dht.readTemperature();
unsigned long now = millis();
Serial.print("Temperature: ");
Serial.println(temperature);
if (!isnan(temperature) &&
    temperature >= TEMP_LIMIT &&
    now - lastSentTime > COOLDOWN_MS)
{
  Serial.println("Threshold reached → Sending WhatsApp");
  sendWhatsApp(temperature);
  lastSentTime = now;
}
delay(2000);
}
