
In this tutorial, you will learn how to send WhatsApp messages from Arduino UNO R4 WiFi using the CircuitDigest Cloud Whastapp API. Instead of using a GSM module, SIM card, or complex WhatsApp Business API setup, this method allows your Arduino to send alerts over WiFi using a simple HTTPS request. This makes it much easier and more cost-effective to add real-time WhatsApp notifications to your Arduino projects. By the end of this tutorial, you will have a fully working Arduino WhatsApp alert system sending instant proximity notifications to your phone.
To demonstrate how it works, we will connect an HC-SR04 ultrasonic sensor to the Arduino UNO R4 WiFi (because we will need wifi for this project, the normal Arduino UNO R3 or nano will not work). Whenever an object comes closer than a defined distance, the Arduino sends the measured value to CircuitDigest Cloud. The cloud platform then handles message formatting, template management, and WhatsApp delivery. In short, your Arduino only needs to send sensor data, and CircuitDigest Cloud takes care of the rest. By the end of this tutorial, you will have a fully working proximity alert system that sends WhatsApp notifications instantly to your registered phone number. You can also explore WhatsApp alert implementations using ESP32 and Raspberry Pi Pico for WiFi-based setups. For more projects using Arduino boards, explore our comprehensive collection of Arduino projects and discover additional microcontroller projects for various platforms.
Table of Contents
- How the Arduino Sends WhatsApp Alerts
- Required Components
- Circuit Diagram
- └ Connection Details
- └ Methods Comparison
- Hardware Assembly
- Generating API Key on CircuitDigest Cloud
- Alert Templates
- Templates Payload Structure
- Example Payload Formats
- Source Code Explanation
- Programming the Arduino
- Testing and Results
How the Arduino Sends WhatsApp Alerts
The overall process for this Arduino WhatsApp notification system is straightforward. The Arduino reads data from a sensor, checks if a condition is met, and then sends that data to CircuitDigest Cloud. The cloud platform takes care of converting that data into a properly formatted WhatsApp message and delivering it to your phone.
Step-by-Step: How an Arduino WhatsApp Message Is Sent
- The Arduino UNO R4 WiFi connects to your local WiFi network.
- The ultrasonic sensor continuously measures distance.
- When the measured distance crosses the defined threshold (for example, an object comes closer than 20 cm), the Arduino prepares a small JSON message.
- This JSON message contains your phone number, a template ID, and the sensor value.
- The Arduino sends this data securely to CircuitDigest Cloud using an HTTPS POST request.
- CircuitDigest Cloud verifies your API key and confirms that the recipient number is registered.
- The platform inserts your sensor value into a pre-approved WhatsApp template.
- The formatted Arduino WhatsApp alert is then delivered instantly to WhatsApp.
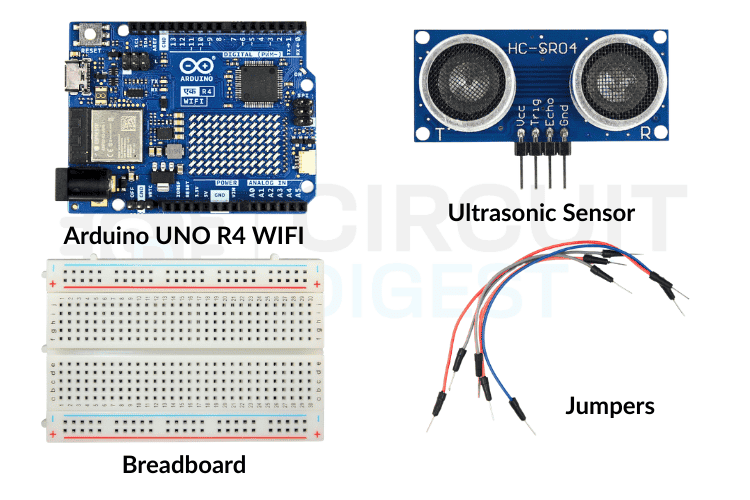
Required Components
This Arduino WhatsApp alert system uses minimal, widely available hardware that is readily available and simple to connect. The HC-SR04 ultrasonic sensor provides accurate distance measurements up to several meters, making it suitable for Arduino to send notifications to smartphone applications like proximity detection, parking assistance, or intrusion alerts.
Hardware List:
- Arduino UNO R4 WiFi Development Board
- HC-SR04 Ultrasonic Distance Sensor
- Breadboard
- Jumper Wires
- USB Cable
Circuit Diagram to Connect HC-SR04 with Arduino UNO R4
The wiring for this Arduino WhatsApp alert project is straightforward and requires only four connections between the Arduino UNO R4 and the ultrasonic sensor. Review the circuit diagram below to understand the complete layout before making physical connections.

Connection Details:
The table below shows the connection between the Ultrasonic Sensor and the Arduino UNO R4
| Ultrasonic Sensor | Arduino UNO R4 |
| VCC | 5V |
| GND | GND |
| TRIG | Digital Pin 9 |
| ECHO | Digital Pin 10 |
The ultrasonic sensor operates on 5V logic, which matches the Arduino UNO R4's digital pin output levels. The TRIG pin receives a brief pulse from the Arduino to initiate a measurement, while the ECHO pin returns a signal whose duration corresponds to the measured distance. Ensure all connections are secure before powering the board.
Arduino WhatsApp Notification Methods – Comparison
| Method | Hardware Needed | Complexity |
| CircuitDigest Cloud API (this tutorial) | Arduino UNO R4 WiFi only | Low - simple HTTPS POST |
| GSM Module (SIM800L/SIM868) | Arduino + GSM module + SIM card | High- AT commands, SIM management |
| Official WhatsApp Business API | Server + WiFi-enabled MCU | Very high- Meta verification, webhooks |
Hardware Assembly
The image below shows the assembled Arduino WhatsApp alert system prototype on a breadboard.
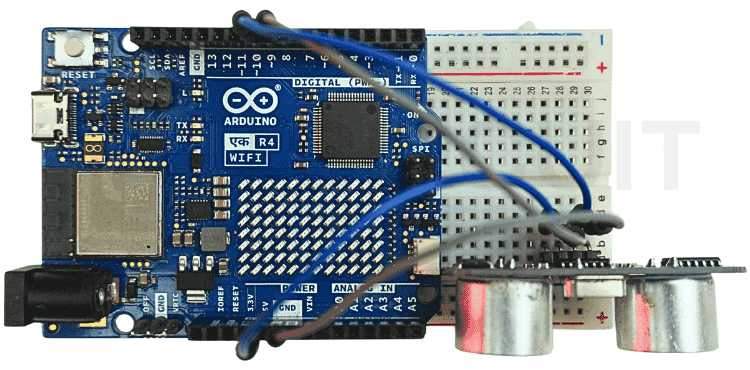
Mount the sensor at a height and angle appropriate for your Arduino send WhatsApp alert application. For proximity alerts, position it facing the monitored area with minimal obstructions. The sensor's effective range extends from approximately 2cm to 400cm, though accuracy decreases beyond 3 meters. Avoid placing the sensor near sound-absorbing materials that might interfere with ultrasonic reflections.
Generating API Key on CircuitDigest Cloud
Before the Arduino can send a WhatsApp alert, you need to generate an API key from CircuitDigest Cloud and register the recipient phone numbers. Follow the step-by-step instructions below to complete the setup process.
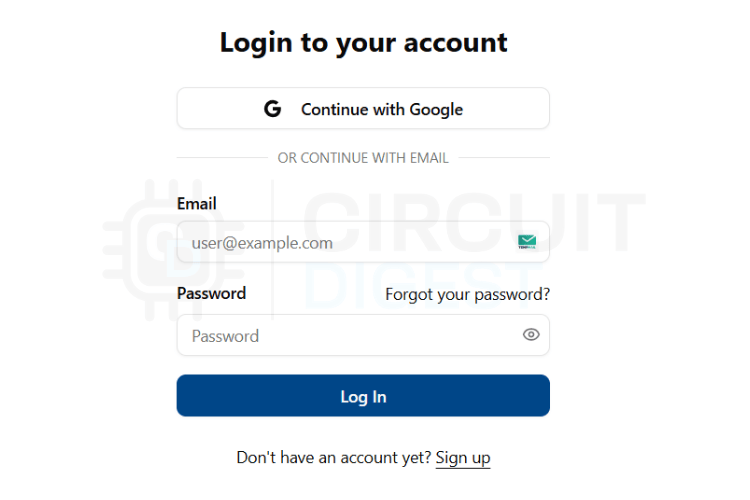
Step 1⇒ Log In to CircuitDigest Cloud
Navigate to CircuitDigest Cloud in your web browser. Click the Login button and enter your account credentials. New users should select the Register option to create an account first.
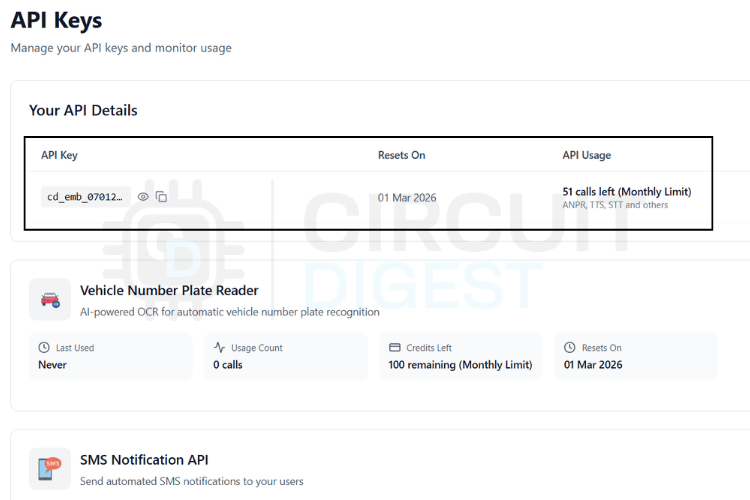
Step 2⇒ Navigate to API Settings
Once logged in, locate the Account button in the upper right corner of the dashboard. Click it to reveal a dropdown menu, then select API Key. This opens the API key management interface, where you can generate and manage your authentication credentials.

Step 3⇒ Generate and Copy Your API Key
Click the button to generate a new API key. The system provides a free usage quota that renews periodically. Copy this key immediately and store it securely, as you will need to paste it into your Arduino sketch. Never share your API key publicly or commit it to version control systems.
Step 4⇒ Open WhatsApp Notification Settings
Scroll down to locate the WhatsApp Notification API section in the dashboard. Click View Details to expand the configuration panel. This area contains all controls related to recipient management and alert templates.

Step 5⇒ Register Recipient Phone Numbers
Click the Link Phone Number option to add recipient numbers. You can register up to 5 different phone numbers for receiving notifications. Each number must be verified before it can receive an alert from your device.
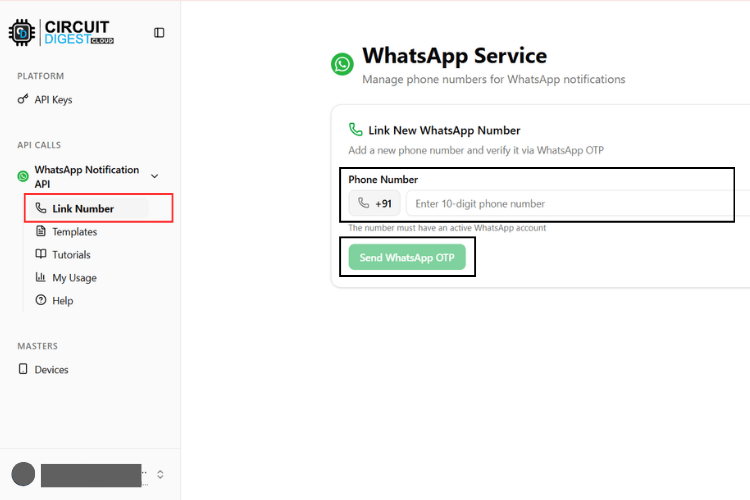
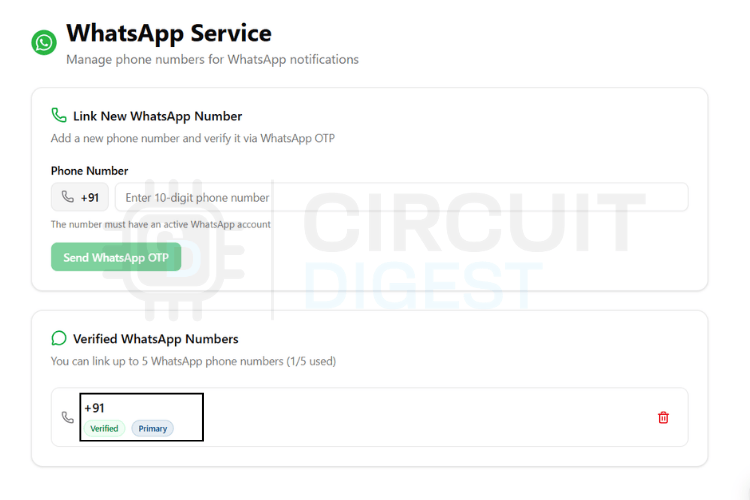
Step 6⇒ Verify Phone Number Ownership
Enter the phone number with the country code and request verification. CircuitDigest Cloud sends a one-time verification code to confirm that you own the number. After entering the code successfully, the number appears in your approved list and becomes eligible to receive WhatsApp alerts from your Arduino project.
Alert Templates
CircuitDigest Cloud offers several pre-approved WhatsApp templates designed for different IoT notification scenarios. These templates comply with WhatsApp's business messaging guidelines and ensure reliable delivery. Rather than constructing alert text manually in your code, you simply select a template ID and provide the variable values that populate the placeholders.
Each template contains placeholders written as {#var#} that get replaced with your sensor data at runtime. The table below lists all available templates with their identifiers and alert formats.
| Template ID | Category | Message Format |
| system_error_diagnostics | System Error | A diagnostic issue has been reported by {#var#}. Error type: {#var#}. Error detail: {#var#}. Location: {#var#}. Please inspect the system. |
| critical_event_alert | Critical Alert | High priority alert from {#var#}. Event type: {#var#}. Recorded value: {#var#}. Location: {#var#}. Immediate attention required. |
| threshold_violation_alert | Threshold Violation | A monitored parameter exceeded limits on {#var#}. Parameter: {#var#}. Measured value: {#var#}. Configured limit: {#var#}. Location: {#var#}. |
| operational_status_update | Status Update | Status update from {#var#}. Current status: {#var#}. Detail: {#var#}. Location: {#var#}. No action required unless unexpected. |
| command_execution_confirmation | Command Confirm | {#var#} processed a command. Command: {#var#}. Result: {#var#}. Location: {#var#}. |
| location_movement_update | Movement Alert | Update from {#var#}. Movement status: {#var#}. Current location: {#var#}. Recorded at: {#var#}. |
| service_reminder_notification | Service Reminder | Service reminder for {#var#}. Service type: {#var#}. Usage detail: {#var#}. Recommended service date: {#var#}. |
| responsible_contact_information | Contact Info | For alerts from {#var#}, contact {#var#}. Phone: {#var#}. Department or location: {#var#}. |
The placeholders in each template get replaced with actual sensor values when you send the API request. For proximity detection using an ultrasonic sensor, the critical_event_alert template works well as it emphasizes urgency and includes fields for event type, measured value, and location.
Templates Payload Structure
Every Arduino WhatsApp message sent through CircuitDigest Cloud uses the same HTTPS request structure. You do not need to write different code for each template. The only changes required are the template_id field and the values inside the variables object.
Think of the JSON payload as a form with fixed field names but dynamic content. The CircuitDigest Cloud platform reads your submitted data, identifies which template you selected, and automatically inserts your variable values into the corresponding placeholders before delivering the alert.
Standard JSON Structure
The following code block shows the basic structure. Do not modify the field names, as the API requires them.
String payload =
"{"
"\"phone_number\":\"YOUR_NUMBER\","
"\"template_id\":\"YOUR_TEMPLATE_ID\","
"\"variables\":{"
"\"device_name\":\"YOUR_DEVICE\","
"\"var1\":\"VALUE1\","
"\"var2\":\"VALUE2\","
"\"var3\":\"VALUE3\","
"\"var4\":\"VALUE4\""
"}}";
Field Descriptions
- YOUR_NUMBER - The recipient WhatsApp number, including country code (e.g., 919876543210 for India)
- YOUR_TEMPLATE_ID - Specifies which alert template to use from the available options
- variables - Contains the dynamic values that populate the template placeholders
- device_name / var1 / var2 / var3 / var4 - Sensor readings or descriptive text from your application
You can rename the variable fields to match your template requirements. For example, use parameter, measured_value, or location for clarity. The platform automatically maps them to the template's placeholder positions in order.
Example Payload Formats
The following examples show three different payload configurations for common Arduino WhatsApp notification use cases. These are reference examples only. Replace all values with your actual sensor data and device information.
Proximity Detection Alert
Template: critical_event_alert
Used when an object enters the detection zone, and immediate notification is required.
{
 "phone_number": "919876543210",
 "template_id": "critical_event_alert",
 "variables": {
   "device_name": "Arduino R4 Proximity Sensor",
   "event_type": "Intrusion Detected",
   "recorded_value": "15 cm",
   "location": "Main Entrance"
 }
}
Distance Threshold Violation
Template: threshold_violation_alert
Used when the measured distance crosses a predefined safety limit.
{
 "phone_number": "919876543210",
 "template_id": "threshold_violation_alert",
 "variables": {
   "device_name": "Arduino R4 Distance Monitor",
   "parameter": "Distance",
   "measured_value": "12 cm",
   "limit": "20 cm",
   "location": "Parking Zone"
 }
}
System Status Update
Template: operational_status_update
Used for routine status reports or non-urgent notifications.
{
 "phone_number": "919876543210",
 "template_id": "operational_status_update",
 "variables": {
   "device_name": "Arduino R4 Sensor Node",
   "status": "Active",
   "detail": "All systems operational",
   "location": "Lab Area"
 }
}
Remember that these examples show format only. Customize the values to reflect your actual application requirements and sensor readings. The system will accept any text content you provide, so make your alert clear and informative.
Source Code Explanation
Before reviewing the complete sketch, here is the operational logic of this Arduino WhatsApp alert system. The Arduino continuously measures distance using the ultrasonic sensor, compares the reading against a configured threshold, and triggers a WhatsApp alert when an object comes too close. A cooldown timer prevents alert flooding by enforcing a minimum interval between consecutive alerts.
The sketch begins by including the necessary libraries for WiFi connectivity and HTTPS communication:
#include <WiFiS3.h>
#include <WiFiSSLClient.h>
WiFiS3.h provides network connectivity functions specific to the Arduino UNO R4 WiFi, while WiFiSSLClient.h enables secure HTTPS communication with the cloud server.
Next, the code defines the GPIO pins connected to the ultrasonic sensor:
#define TRIG_PIN 9
#define ECHO_PIN 10
The distance threshold and cooldown period are defined as constants for easy modification:
#define DISTANCE_LIMIT 20
#define COOLDOWN_MS 20000
The program sets alerts to trigger when the distance falls below 20 centimeters, with a 20-second cooldown between messages. Adjust these values based on your specific application needs.
WiFi credentials and API configuration follow:
const char* ssid = "YOUR_WIFI";
const char* password = "YOUR_PASS";
const char* apiKey = "YOUR_API_KEY";
Replace these placeholder strings with your actual network name, password, and the API key obtained from CircuitDigest Cloud.
A secure WiFi client object handles encrypted communication:
WiFiSSLClient client;The program maintains a timestamp to track the last alert:
unsigned long lastSent = 0;The setup() function executes once at startup. It initializes serial communication for debugging, configures the ultrasonic sensor pins, and establishes WiFi connectivity:
Serial.begin(115200);
pinMode(TRIG_PIN, OUTPUT);
pinMode(ECHO_PIN, INPUT);
WiFi.begin(ssid, password);
while (WiFi.status() != WL_CONNECTED);
The program waits in a loop until the WiFi connection succeeds before proceeding to the main monitoring loop.
Inside the loop() function, the Arduino repeatedly measures distance by triggering an ultrasonic pulse and timing the echo return:
digitalWrite(TRIG_PIN, LOW);
delayMicroseconds(2);
digitalWrite(TRIG_PIN, HIGH);
delayMicroseconds(10);
digitalWrite(TRIG_PIN, LOW);
long duration = pulseIn(ECHO_PIN, HIGH);
float distance = duration * 0.034 / 2;
The pulseIn() function measures how long the echo pin remains high. This duration gets converted to distance in centimeters using the speed of sound (0.034 cm/microsecond) divided by two for the round trip.
The program then checks if the measured distance violates the threshold and whether enough time has elapsed since the last alert:
if (distance < DISTANCE_LIMIT && millis() - lastSent > COOLDOWN_MS)When both conditions are satisfied, the code calls the sendWhatsApp() function with the measured distance value. The Arduino only sends an Arduino WhatsApp message when two conditions are both true: the measured distance is below the threshold AND the cooldown period has elapsed since the last alert.
The sendWhatsApp() function handles all API communication. It first establishes a secure connection to the CircuitDigest Cloud server:
client.connect("www.circuitdigest.cloud", 443);Next, it constructs the JSON payload with the template ID and variable values:
 String payload =
   "{"
     "\"phone_number\":\"919876543210\","
     "\"template_id\":\"threshold_violation_alert\","
     "\"variables\":{"
       "\"device_name\":\"UNO R4 Ultrasonic Node\","
       "\"parameter\":\"Distance\","
       "\"measured_value\":\"" + distanceStr + "\","
       "\"limit\":\"10cm\","
       "\"location\":\"Entrance\""
     "}"
   "}";
Notice how the measured distance value gets inserted dynamically using String concatenation. The rest of the payload contains static configuration.
The function then sends the HTTP headers followed by the JSON body:
client.println("POST /api/v1/whatsapp/send HTTP/1.1");
client.println("Host: www.circuitdigest.cloud");
client.println("Authorization: " + String(apiKey));
client.println("Content-Type: application/json");
client.print("Content-Length: ");
client.println(payload.length());
client.println();
client.println(payload);
After transmission, the code waits for the server response and displays it via serial for debugging purposes:
while (client.connected())
{
 String line = client.readStringUntil('\n');
 if (line == "\r")
   break;
}
Serial.println(client.readString());
client.stop();
Finally, the program updates the timestamp to reset the cooldown timer:
lastSent = millis();This comprehensive workflow ensures reliable distance monitoring with controlled notification frequency. The architecture remains simple, maintainable, and easily adaptable to other sensor types or alert conditions.
Programming the Arduino
Follow these steps to install the required tools, configure the sketch, and upload the Arduino WhatsApp notification firmware.
Install Arduino IDE and Board Support
Download and install the latest Arduino IDE from the official website if you haven't already. Open the IDE, navigate to Tools --> Board --> Boards Manager, search for "Arduino UNO R4", and install the board package. This adds support for the R4 WiFi variant.
Configure Network and API Settings
Open the sketch file and locate the configuration section near the top. Replace YOUR_WIFI with your network name, YOUR_PASS with the WiFi password, and YOUR_API_KEY with the key you generated from CircuitDigest Cloud. Update the phone number in the payload to match your verified recipient number with the country code.
Select Board and Port
Connect your Arduino UNO R4 WiFi to your computer using the USB-C cable. From the Tools menu, select Board → Arduino UNO R4 WiFi. Then choose the correct port where your board appears. The IDE should automatically detect it.
Upload and Verify
Click the Upload button to compile and flash the firmware. Wait for the upload to complete successfully. Open Serial Monitor (Tools → Serial Monitor) and set the baud rate to 115200. You should see the WiFi connection status and distance readings. Place an object within the threshold distance to trigger a test alert.
Testing and Results
After successfully uploading the firmware and powering the Arduino, the Arduino WhatsApp alert system initializes WiFi connectivity and begins continuous distance monitoring. The Serial Monitor displays real-time measurements and connection status. When an object approaches closer than the configured threshold, the Arduino immediately formats the API request and transmits it to CircuitDigest Cloud.
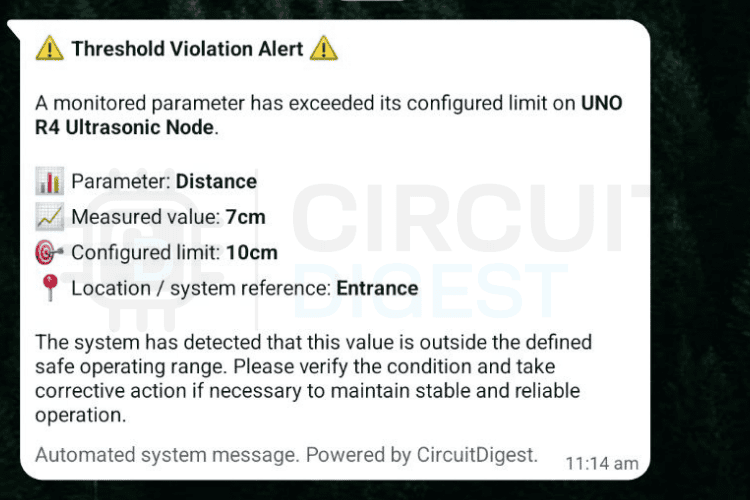
The demonstration above shows the sensor detecting an approaching object and the corresponding Arduino send whatsapp notification arriving on the mobile device. The message includes the device name, event description, measured distance, and location information as configured in the payload. After sending an alert, the system respects the cooldown period before allowing another notification, preventing excessive messages during sustained proximity events.
Want to expand your IoT capabilities? CircuitDigest Cloud offers additional services you can integrate into your projects. Send emails automatically with the Email Notification API, deliver SMS alerts using the SMS Notification API, recognize vehicle license plates with the Vehicle Number Plate Reader, and visualize GPS tracking data through the GeoLinker-GPS Visualizer API. These tools work with all popular platforms, ESP32, Arduino, Raspberry Pi, and more, so you can build smarter, connected projects without switching ecosystems.
Github Repository
If you want the project files, wiring diagrams, sample videos or ready-made examples stored cleanly in this GitHub repository.


Frequently Asked Questions
⇥ What is the CircuitDigest Cloud WhatsApp API used for?
CircuitDigest Cloud WhatsApp API offers an IoT notification service at no charge and provides microcontrollers, including Arduino UNO R4 WiFi, ESP32, or Raspberry Pi Pico W, with the ability to send WhatsApp messages through HTTPS POST requests. In addition to sending the messages, the CircuitDigest Cloud provides management for WhatsApp Business API authentication, ensuring that templates used by the business comply with WhatsApp's guidelines, and providing confirmation of the delivery of WhatsApp messages. Thus, developers simply provide the CircuitDigest Cloud with structured JSON-formatted data.
⇥ What is the maximum number of WhatsApp messages I can send each month with CircuitDigest Cloud?
Under its free plan, an individual can send a maximum of 100 WhatsApp Messages per month. Each user can send messages only to a maximum of five pre-verified phone numbers, and in order for any of those five numbers to receive a notification from an Arduino device, each recipient must verify their telephone number through an OTP before they will receive messages sent from the Arduino through the CircuitDigest Cloud.
⇥ What are the WiFi Libraries Required for Sending WhatsApp Messages from Arduino UNO R4?
You will need two libraries: the WiFiS3.h library provides you with wifi connection capability (this is proprietary to the Arduino UNO R4 WiFi & the Renesas RA4M1 chipset), and the WiFiSSLClient.h library provides you with secure HTTPS communication capability between your Arduino and CircuitDigest's servers.
⇥ How can I use CircuitDigest Cloud instead of the WhatsApp Business API?
To use the WhatsApp Business API, you must complete a Meta verification process, set up a webhook server, and create pre-validated message templates. This can be very cumbersome and cause issues for hobbyist IoT projects. The CircuitDigest Cloud simplifies everything for you. The only thing the Arduino needs to do is make a simple HTTPS POST call with a JSON payload; the CircuitDigest Cloud will automatically handle the authentication, compliance, and delivery to WhatsApp.
⇥ What is the cooldown period in the Arduino WhatsApp alert system?
A cooldown period is a period of time (20 seconds by default) that the Arduino must wait before sending another WhatsApp alert after sending the first alert. This prevents multiple alerts from being sent when the same proximity event is sustained, and it helps to conserve the monthly quota of messages that can be sent via the API.
⇥ How does the HC-SR04 ultrasonic rangefinder work?
When the TRIG pin receives a HIGH signal for 10 microseconds, the HC-SR04 generates a short burst of sound at an ultrasonic frequency of 40 kHz (this is an approximate frequency). The ECHO pin will remain HIGH for the total amount of time it takes for the sound to make a complete round trip (to the object and back to the HC-SR04). The following formula can be used to calculate distance in centimetres: duration × 0.034 ÷ 2.
⇥ Can I use this Arduino WhatsApp notification system for home security?
The system requires you to install the HC-SR04 sensor at a door or entryway, after which you must select a suitable distance limit. The Arduino system will send you an immediate WhatsApp notification when someone enters the protected area. You can also adapt the project to use a PIR motion sensor, a door reed switch or any other digital or analog sensor instead of the ultrasonic module.
Relevant Arduino UNO-Based Projects
Simple IoT projects using Arduino to build a smart home system, send SMS alerts through the internet, and monitor crowd levels remotely using sensors and online connectivity.

Smart Home Using Arduino Uno R4 WiFi
A smart home automation project using Arduino Uno R4 WiFi to monitor temperature, humidity, light, and gas levels, with real-time alerts, automatic lighting, and remote control through the Blynk app for improved home safety and convenience.

How to Send SMS with Arduino UNO R4 via Internet?
A simple Arduino UNO R4 WiFi project that sends SMS alerts over the internet using a free cloud API, without requiring a GSM module, making it ideal for IoT notifications, security alerts, and automation systems.

Crowd Monitoring Device with Arduino UNO R4 and IoT Cloud
An IoT-based crowd monitoring system using Arduino UNO R4 WiFi that counts people entering and exiting an area with IR sensors, displays the count on an LED matrix, and updates real-time data to the Arduino Cloud for remote monitoring.
Complete Project Code
#include <WiFiS3.h>
#include <WiFiSSLClient.h>
#define TRIG_PIN 9
#define ECHO_PIN 10
#define DIST_LIMIT 10
#define COOLDOWN_MS 15000
const char* ssid     = "YOUR_WiFi_SSID";
const char* password = "YOUR_WiFi_PASSWORD";
const char* apiKey   = "YOUR_API_KEY";
const char* host = "www.circuitdigest.cloud";
const int httpsPort = 443;
WiFiSSLClient client;
unsigned long lastSentTime = 0;
long measureDistance()
{
 digitalWrite(TRIG_PIN, LOW);
 delayMicroseconds(2);
 digitalWrite(TRIG_PIN, HIGH);
 delayMicroseconds(10);
 digitalWrite(TRIG_PIN, LOW);
 long duration = pulseIn(ECHO_PIN, HIGH);
 long distance = duration * 0.034 / 2;
 return distance;
}
void sendAlert(long distance)
{
 if (!client.connect(host, httpsPort)) {
   Serial.println("TLS failed");
   return;
 }
 String distanceStr = String(distance) + "cm";
 String payload =
   "{"
     "\"phone_number\":\"919876543210\","
     "\"template_id\":\"threshold_violation_alert\","
     "\"variables\":{"
       "\"device_name\":\"UNO R4 Ultrasonic Node\","
       "\"parameter\":\"Distance\","
       "\"measured_value\":\"" + distanceStr + "\","
       "\"limit\":\"10cm\","
       "\"location\":\"Entrance\""
     "}"
   "}";
 client.println("POST /api/v1/whatsapp/send HTTP/1.1");
 client.println("Host: www.circuitdigest.cloud");
 client.println("Authorization: " + String(apiKey));
 client.println("Content-Type: application/json");
 client.print("Content-Length: ");
 client.println(payload.length());
 client.println();
 client.println(payload);
 while (client.connected()) {
   String line = client.readStringUntil('\n');
   if (line == "\r") break;
 }
 Serial.println(client.readString());
 client.stop();
}
void setup()
{
 Serial.begin(115200);
 pinMode(TRIG_PIN, OUTPUT);
 pinMode(ECHO_PIN, INPUT);
 WiFi.begin(ssid, password);
 Serial.print("Connecting WiFi");
 while (WiFi.status() != WL_CONNECTED) {
   delay(300);
   Serial.print(".");
 }
 Serial.println("\nWiFi Connected");
}
void loop()
{
 long distance = measureDistance();
 unsigned long now = millis();
 Serial.print("Distance: ");
 Serial.print(distance);
 Serial.println(" cm");
 if (distance > 0 &&
     distance <= DIST_LIMIT &&
     now - lastSentTime > COOLDOWN_MS)
 {
   Serial.println("Threshold reached → Sending WhatsApp");
   sendAlert(distance);
   lastSentTime = now;
 }
 delay(500);
}
