
This project shows how to send instant WhatsApp alerts from a Raspberry Pi Pico W using WiFi and CircuitDigest Cloud WhatsApp API. The Pico W reads data from a rain sensor and, when moisture is detected, sends a notification directly to your WhatsApp. No GSM module, SIM card, or cellular hardware is required and everything works over a secure HTTPS request. The same WhatsApp notification approach is demonstrated using ESP32 and Arduino Uno R4 boards as well.
Because the system runs entirely on WiFi, the hardware remains simple, compact, and cost-effective. Instead of monitoring dashboards or apps, you receive rain alerts instantly in WhatsApp like a normal chat message. In this tutorial, you will connect the rain sensor, generate an API key, upload the firmware using Arduino IDE, and build a complete WiFi-based WhatsApp alert system. For more tutorials, explore our collection of Raspberry Pi Pico projects and tutorials.
Table of Contents
How Does it Send a WhatsApp Alert?
The Raspberry Pi Pico does not communicate directly with WhatsApp servers. Instead, it sends a secure HTTPS request to CircuitDigest Cloud containing your phone number, template ID, and alert data. The cloud platform authenticates the API key, inserts your data into a pre-approved template, and delivers the final message to your verified WhatsApp number. To put it short
- The Pico W connects to WiFi and monitors the rain sensor.
- When rain is detected, it sends an HTTPS POST request with the template ID and alert variables.
- CircuitDigest Cloud validates the API key and ensures the recipient number is verified.
- The platform formats the template and delivers the alert instantly to WhatsApp.
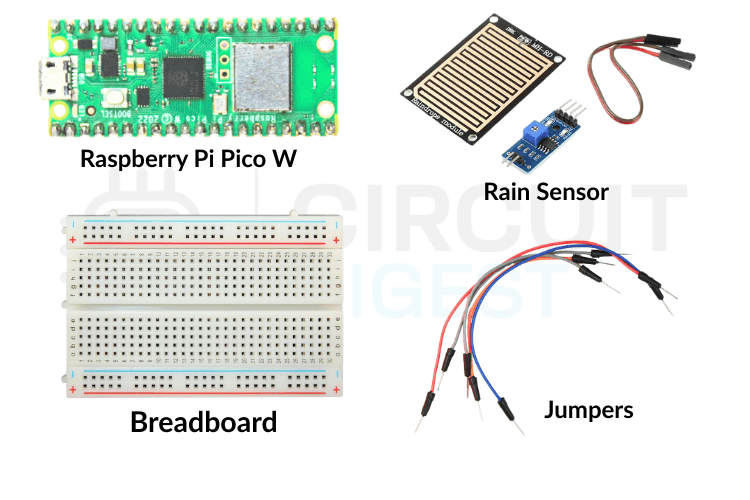
Components Used to Send WhatsApp Alert
This project requires a minimal set of basic hardware components to keep the assembly straightforward and easy to reproduce. This WiFi-based approach is common in modern microcontroller projects, eliminating the need for costly cellular hardware.
- Raspberry Pi Pico W Development Board
- Rain Sensor Module
- Breadboard
- Micro USB Cable
- Jumper Wires
Circuit Diagram to Connect Rain Sensor with Pi Pico
Refer to the circuit diagram below for the complete wiring layout. The Raspberry Pi Pico WhatsApp messaging system reads the digital signal directly from the rain sensor and sends alerts through the internet using the CircuitDigest Cloud WhatsApp API. This minimal wiring reduces hardware complexity and improves reliability.

The table below shows the connection between the Raspberry Pi Pico and the Rain Sensor
| Rain Sensor | Pico W |
| VCC | 3.3V |
| GND | GND |
| DO (Digital Out) | GPIO 16 |
Once these three connections are complete, the hardware side of the project is ready. The rain sensor module typically includes an onboard comparator and sensitivity adjustment potentiometer, so no additional pull-up resistors are needed.
Hardware Setup to Send WhatsApp Alert
The hardware setup demonstrates how clean and compact this Raspberry Pi Pico WhatsApp alert system looks in practice.
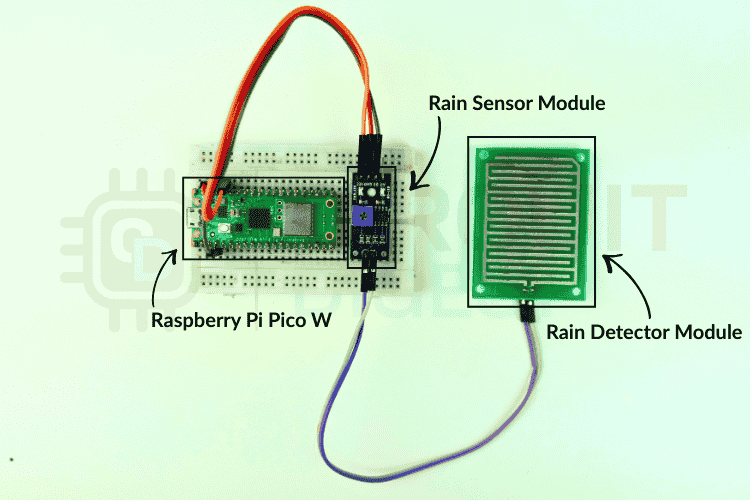
The rain sensor features two main components: a detection pad that senses moisture and a control board that processes the signal. The digital output pin goes HIGH when no rain is detected and LOW when moisture is present, making it perfect for binary alert triggers.
Generating API Key
To send WhatsApp alerts, you must generate a valid API key from the CircuitDigest Cloud dashboard. Log in to your account, open the API section, and create a new key for the WhatsApp service. The CircuitDigest dashboard also allows you to link your recipient numbers and confirm them before sending alerts, which ensures that alert reach only approved contacts.
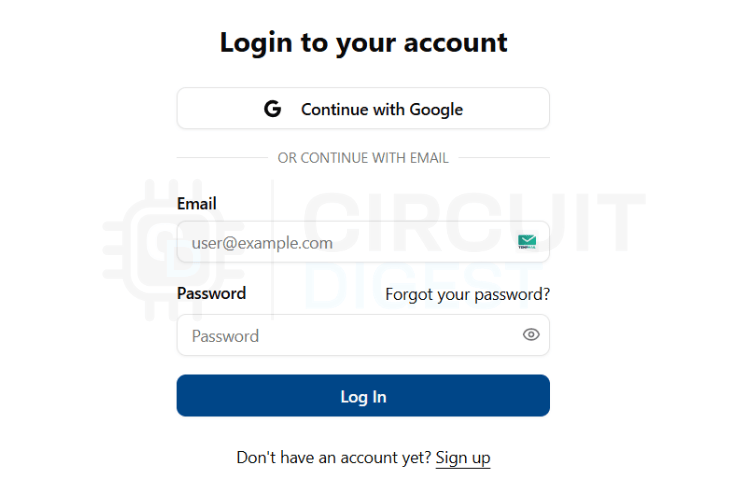
Step 1: Open CircuitDigest Cloud in your browser and click the Login button. Enter your credentials to sign in. If you do not have an account, create one using the Register option.
Step 2: After logging in, click the Account button at the top right corner. Select API Key from the dropdown menu. The system opens the API key management page.
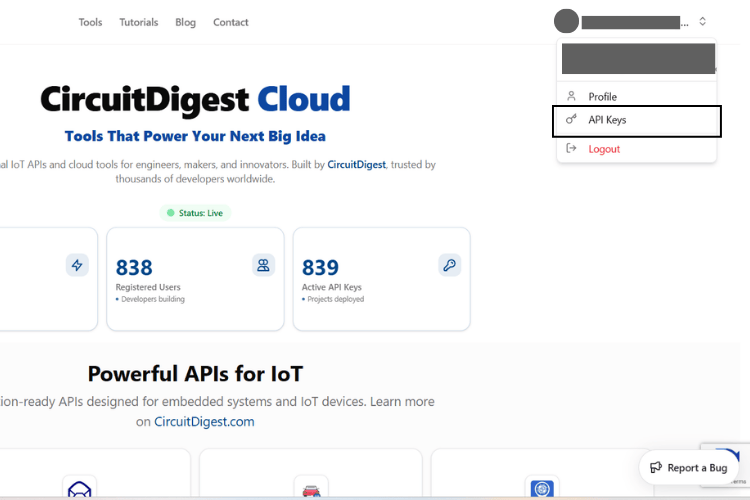
Step 3: Generate a new API key. The platform assigns a free usage limit and allows renewal after expiry. Copy this key because you will paste it into your Pico W code.
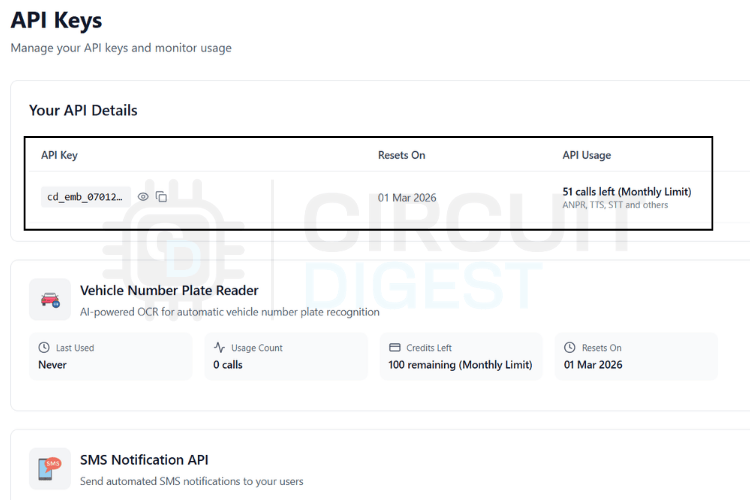
Step 4: Scroll down to the WhatsApp Notification API section and click View Details. This section contains all controls related to WhatsApp alert delivery.

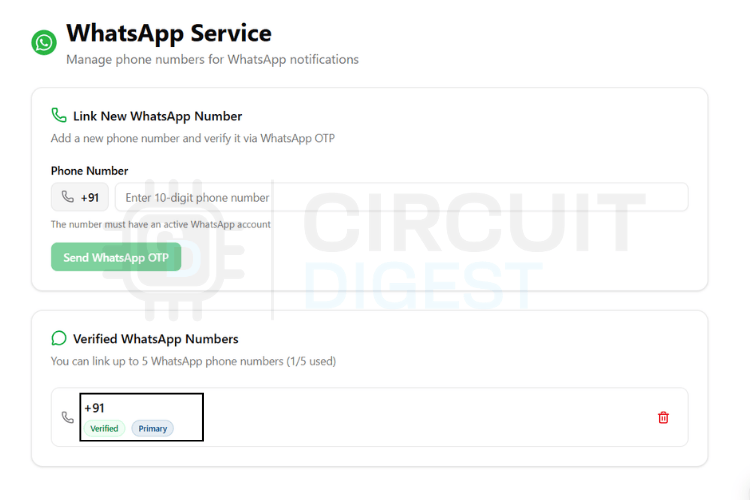
Step 5: Open the Link Phone Number option. Add the phone numbers that should receive alerts from your device. You can register up to 5 trusted numbers for notifications.
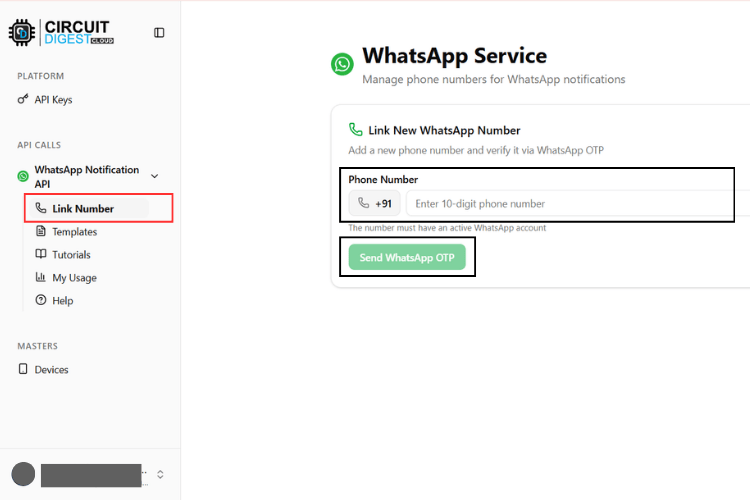
Step 6: Enter the selected number and request verification. The system sends a one-time code to confirm ownership. After verification, the number appears in your approved list and becomes ready to receive a WhatsApp alert from your Pico W.
WhatsApp Templates of CircuitDigest Cloud
CircuitDigest Cloud provides a set of pre-approved WhatsApp alert templates that you can use directly with your Raspberry Pi Pico WhatsApp notification system. These templates follow WhatsApp's messaging guidelines and ensure reliable delivery without manual alert formatting. Instead of writing full text inside the firmware, you simply select a template ID and pass variable values such as device name, event type, or location. The platform automatically inserts these values into the final alert before sending it to the recipient.
Each template targets a specific alert use case like environmental warnings, system errors, motion detection, or maintenance reminders. Choose the template that best matches your application and include its ID in your API request.
| Template ID | Category | Message Format |
| system_error_diagnostics | System Error | A diagnostic issue has been reported by {#var#}. Error type: {#var#}. Error detail: {#var#}. Location: {#var#}. Please inspect the system. |
| critical_event_alert | Critical Alert | High priority alert from {#var#}. Event type: {#var#}. Recorded value: {#var#}. Location: {#var#}. Immediate attention required. |
| threshold_violation_alert | Threshold Violation | A monitored parameter exceeded limits on {#var#}. Parameter: {#var#}. Measured value: {#var#}. Configured limit: {#var#}. Location: {#var#}. |
| operational_status_update | Status Update | Status update from {#var#}. Current status: {#var#}. Detail: {#var#}. Location: {#var#}. No action required unless unexpected. |
| command_execution_confirmation | Command Confirm | {#var#} processed a command. Command: {#var#}. Result: {#var#}. Location: {#var#}. |
| location_movement_update | Movement Alert | Update from {#var#}. Movement status: {#var#}. Current location: {#var#}. Recorded at: {#var#}. |
| service_reminder_notification | Service Reminder | Service reminder for {#var#}. Service type: {#var#}. Usage detail: {#var#}. Recommended service date: {#var#}. |
| responsible_contact_information | Contact Info | For alerts from {#var#}, contact {#var#}. Phone: {#var#}. Department or location: {#var#}. |
Each WhatsApp template uses placeholders written as {#var#}. These placeholders act as dynamic fields that your firmware fills at runtime. You do not modify the alert text itself. Instead, you send values inside the variables object of the JSON payload. The system maps each value to the template placeholders in order and automatically generates a clean, readable WhatsApp alert. For example, if you send a rain detection alert using critical_event_alert with your Raspberry Pi Pico, you pass values such as device name, event type, status, and location. CircuitDigest Cloud inserts these values into the predefined template and delivers the formatted alert instantly to the user.
Templates Payload Structure
Every WhatsApp alert sent from your Raspberry Pi Pico follows the same HTTPS request format. You do not need separate functions for each template. You only change two things: the template_id and the values inside the variables object. Everything else remains identical. This approach keeps the firmware simple, reduces bugs, and makes the code reusable across different sensors and projects.
Think of the payload as a container. The structure stays fixed, while the data changes dynamically based on your sensor readings. For example, one project may send rain status, while another sends temperature values or motion detection. The CircuitDigest Cloud platform reads your JSON, inserts the variable values into the selected template, and delivers the final WhatsApp alert automatically.
Standard JSON Format
Use this structure for all templates. Do not modify the field names.
String payload =
"{"
"\"phone_number\":\"YOUR_NUMBER\","
"\"template_id\":\"YOUR_TEMPLATE_ID\","
"\"variables\":{"
"\"device_name\":\"YOUR_DEVICE\","
"\"var1\":\"VALUE1\","
"\"var2\":\"VALUE2\","
"\"var3\":\"VALUE3\","
"\"var4\":\"VALUE4\""
"}}";
Field Explanation:
- phone_number - recipient WhatsApp number with country code
- template_id - selects which alert format to use
- variables - dynamic values inserted into the template
- device_name / var1 / var2 / var3 / var4 - any sensor data or text you want to send
You can rename variables based on the template requirements, such as event_type, status, or location. The platform maps them automatically.
How It Works Internally
The Pico W sends this JSON through an HTTPS POST request. CircuitDigest Cloud receives the request, validates your API key, reads the template_id, and loads the corresponding WhatsApp template. The system then replaces each {#var#} placeholder with the values you provided and sends the final formatted alert to the user.
You do not build the alert text manually. The template handles formatting. Your firmware only supplies data.
Example Payloads (Reference Only)
These examples demonstrate format only. Replace all values with your real sensor data.
Rain Detection Alert:
"template_id":"critical_event_alert"Used when rain is detected by the sensor.
System Status Update:
"template_id":"operational_status_update"Used to notify weather monitoring status changes.
Maintenance or Service Reminder:
"template_id":"service_reminder_notification"Used for scheduled maintenance alerts.
Before You Build the Payload
Treat the examples only as a guide to understand the format. Do not copy the values as they are. Replace them with your own sensor readings or device data. You can send rain status, moisture level, sensor state, or any other value that your project generates. The system simply places whatever you send into the selected template.
Keep things simple while building the payload. Select the correct template_id and keep the JSON format valid. Once these two are correct, the alert will be delivered without issues. Everything else, including variable names and values, remains completely under your control.
Firmware Working and Code Explanation
Before diving into the complete sketch, understand the overall logic of the program. The Raspberry Pi Pico connects to a WiFi network, reads the digital signal from the rain sensor, and checks whether rain has been detected. When the sensor detects moisture, the device sends a WhatsApp alert through CircuitDigest Cloud using a secure HTTPS request. The program then waits for a short cooldown period to avoid repeated alerts and continues monitoring the sensor.
The sketch starts by loading the required libraries. These libraries handle WiFi communication and secure HTTPS requests.
#include <WiFi.h>
#include <WiFiClientSecure.h>
WiFi.h manages internet connectivity, and WiFiClientSecure.h enables HTTPS communication with the cloud server for secure alert transmission.
Next, the code defines the GPIO pin for the rain sensor. Using macros makes the program easier to modify later and avoids hardcoding values throughout the sketch.
#define RAIN_PIN 16The cooldown value is defined to prevent alert flooding. Without this delay, the Pico W would send alerts continuously while the rain continues.
#define COOLDOWN_MS 30000WiFi credentials and API details come next. These values allow the board to connect to the internet and authenticate requests with the WhatsApp API.
const char* ssid = "YOUR_WIFI";
const char* password = "YOUR_PASS";
const char* apiKey = "YOUR_API_KEY";
A secure client object is initialized to send HTTPS requests. All communication with the cloud server uses this client.
WiFiClientSecure client;A timer variable stores the last alert time. The program uses this value to calculate the cooldown interval.
unsigned long lastSent = 0;The setup() function runs only once when the board powers on. It starts serial communication for debugging, configures the sensor pin as input, and connects the Pico W to WiFi. The program waits until the connection succeeds before moving forward, which ensures that alerts never fail due to a missing internet connection.
Serial.begin(115200);
pinMode(RAIN_PIN, INPUT);
WiFi.begin(ssid, password);
while (WiFi.status() != WL_CONNECTED);
Inside the main loop, the Pico W reads the digital signal from the rain sensor repeatedly. This continuous reading allows the device to respond immediately when rain is detected.
int rainStatus = digitalRead(RAIN_PIN);The program then checks whether rain has been detected. The sensor output is LOW when moisture is present. If the condition becomes true and the cooldown period has passed, the device prepares to send an alert.
if (rainStatus == LOW && millis() - lastSent > COOLDOWN_MS)When triggered, the firmware calls the WhatsApp sending function. This function handles the entire API communication process.
sendWhatsApp();Inside that function, the Pico W first connects securely to the CircuitDigest Cloud server.
client.connect("www.circuitdigest.cloud", 443);Next, the code builds the JSON payload. This payload includes the phone number, template ID, and dynamic sensor status that will appear in the WhatsApp alert.
String payload =
"{"
 "\"phone_number\":\"919876543210\","
 "\"template_id\":\"threshold_violation_alert\","
 "\"variables\":{"
  "\"device_name\":\"Rain Monitoring Node\","
   "\"parameter\":\"Rain Status\","
   "\"measured_value\":\"Rain Detected\","
   "\"limit\":\"Dry Condition\","
   "\"location\":\"Terrace\""
 "}"
"}";
The program then sends the HTTP headers followed by the JSON body. These lines form the actual API request.
client.println("POST /api/v1/whatsapp/send HTTP/1.1");
client.println("Authorization: " + String(apiKey));
client.println(payload);
After sending the request, the client waits for the server's response and closes the connection. This step confirms whether the alert was delivered successfully.
Finally, the firmware stores the current time to restart the cooldown timer. This prevents multiple alerts for the same rain event.
lastSent = millis();In short, the entire workflow stays simple and reliable. The Pico W reads the sensor, checks the condition, sends an alert only when necessary, and repeats the cycle. This clean structure keeps the project easy to understand, easy to maintain, and suitable for any other sensor or alert type.
Uploading the Code
Install the required tools and upload the firmware to the Raspberry Pi Pico before testing the alert system. These steps prepare the board, flash the program, and verify that everything works correctly.
- Install required board support: Open Arduino IDE and install the Raspberry Pi Pico/RP2040 board package from Boards Manager. Search for "Raspberry Pi Pico" and install the official package by Earle F. Philhower, III.
- Configure the project: Connect the Pico W using a Micro USB cable while holding the BOOTSEL button, open the sketch, and update your WiFi name, password, API key, and recipient phone number inside the code.
- Select the board and upload: Choose "Raspberry Pi Pico W" from Tools --> Board, select the correct Port, and click Upload to compile and flash the firmware into the board.
- Verify operation: Open Serial Monitor (115200 baud) to confirm WiFi connection. Test the rain sensor by applying water to the detection pad and check that the WhatsApp alert is delivered automatically.
Implementation Results
After uploading the firmware and powering the Raspberry Pi Pico W, the system starts connecting to WiFi and begins monitoring the rain sensor continuously. You can observe the live sensor status and connection details in the Serial Monitor. When moisture is detected on the sensor pad, the Pico W immediately prepares the payload and sends a secure request to CircuitDigest Cloud, which then delivers the WhatsApp alert to the registered phone number.
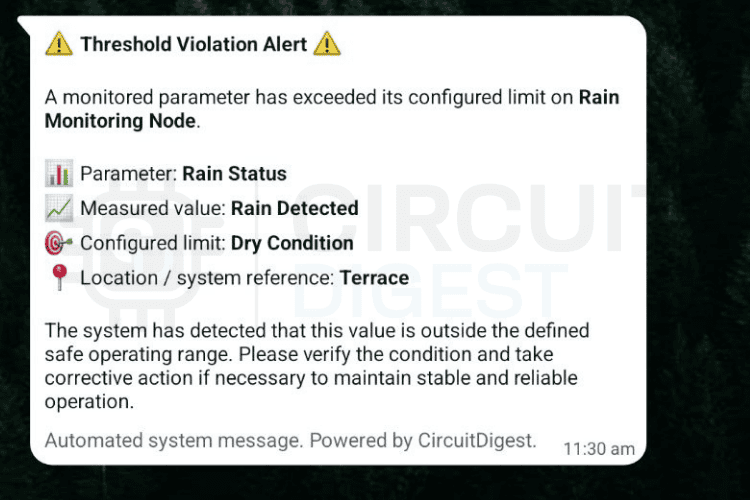
In the demonstration, you can see water being applied to the rain sensor and the alert triggering as soon as moisture is detected. The Raspberry Pi Pico sends a notification to your smartphone that appears instantly on WhatsApp with the device name, event type, status, and location details. After sending one alert, the system waits for the cooldown period and then continues monitoring without spamming messages. This rain detection system showcases practical applications of IoT technology. Discover more innovative ideas in our electronics projects collection.
Need more features for your IoT builds? CircuitDigest Cloud has you covered with additional APIs. Automate emails with the Email Notification API, send SMS messages via the SMS Notification API, identify vehicles using the Vehicle Number Plate Reader, and display GPS coordinates with the GeoLinker-GPS Visualizer API. Compatible with ESP32, Arduino, Raspberry Pi, and more, all in one platform.
Github Repository
If you want the project files, wiring diagrams, sample videos or ready-made examples stored cleanly in this GitHub repository.


Relevant Projects Using Raspberry Pi Pico
Projects showing how to use Raspberry Pi Pico boards for practical embedded tasks like GPS tracking, driving an OLED display, and integrating a real-time clock module for accurate timekeeping.
Build a Real-Time GPS Tracker with Raspberry Pi Pico & SIM800L GSM Module
A real-time cellular GPS tracking project built with Raspberry Pi Pico, SIM800L GSM, and Neo-6M GPS module, capable of sending live location data to the cloud, visualising routes on a map, and safely buffering data during network outages for reliable IoT tracking applications.

How to Interface Raspberry Pi Pico W with OLED Display using MicroPython?
A basic project demonstrating how to interface an OLED display with Raspberry Pi Pico W using MicroPython and I2C, covering wiring, driver setup, and examples like text display, shapes, and simple animations.

Interfacing the RTC Module with Raspberry Pi Pico
A practical Raspberry Pi Pico project demonstrating how to interface the high-accuracy DS3231 RTC module using I²C, display time, date, and temperature on an I²C LCD, and build a reliable timekeeping system suitable for clocks, schedulers, and automation applications.
Complete Project Code
#include <WiFi.h>
#include <WiFiClientSecure.h>
#define RAIN_PIN 2
#define COOLDOWN_MS 15000   // 15 seconds
const char* ssid     = "YOUR_WiFi_SSID";
const char* password = "YOUR_WiFi_PASSWORD";
const char* apiKey   = "YOUR_API_KEY";
const char* host = "www.circuitdigest.cloud";
const int httpsPort = 443;
WiFiClientSecure client;
unsigned long lastSentTime = 0;
void sendAlert()
{
 if (!client.connect(host, httpsPort)) {
   Serial.println("TLS failed");
   return;
 }
 String payload =
   "{"
     "\"phone_number\":\"919876543210\","
     "\"template_id\":\"threshold_violation_alert\","
     "\"variables\":{"
       "\"device_name\":\"Rain Monitoring Node\","
       "\"parameter\":\"Rain Status\","
       "\"measured_value\":\"Rain Detected\","
       "\"limit\":\"Dry Condition\","
       "\"location\":\"Terrace\""
     "}"
   "}";
 client.println("POST /api/v1/whatsapp/send HTTP/1.1");
 client.println("Host: www.circuitdigest.cloud");
 client.println("Authorization: " + String(apiKey));
 client.println("Content-Type: application/json");
 client.print("Content-Length: ");
 client.println(payload.length());
 client.println();
 client.println(payload);
 while (client.connected()) {
   String line = client.readStringUntil('\n');
   if (line == "\r") break;
 }
 Serial.println(client.readString());
 client.stop();
}
void setup()
{
 Serial.begin(115200);
 pinMode(RAIN_PIN, INPUT);
 WiFi.begin(ssid, password);
 Serial.print("Connecting WiFi");
 while (WiFi.status() != WL_CONNECTED) {
   delay(300);
   Serial.print(".");
 }
 Serial.println("\nWiFi OK");
 client.setInsecure();   // testing only
}
void loop()
{
 int state = digitalRead(RAIN_PIN);
 unsigned long now = millis();
 // LOW = Rain detected
 if (state == LOW)
 {
   if (now - lastSentTime > COOLDOWN_MS)
   {
     Serial.println("Rain detected → sending alert");
     sendAlert();
     lastSentTime = now;
   }
 }
 delay(100);
}
