
Ever wished your Arduino could send you an SMS alert when something important happens—like an intruder detected by your DIY security system, or a gas leak in your kitchen? With just an Arduino UNO R4 and a few lines of code, you can make that happen—no expensive GSM module required.
In this tutorial, I’ll show you how to send SMS using Arduino UNO R4 and the free CircuitDigest Cloud SMS API. It’s perfect for adding instant mobile alerts to your IoT Projects and Arduino projects. Whether it’s fire detection, motion sensing, or home automation, this setup has you covered. Best of all, the API is completely free to use for up to 100 SMS per month and currently supports Indian mobile numbers—more than enough for most hobby and DIY electronics projects.
Note: The CircuitDigest SMS API is a free service designed to support the electronics and maker community. It enables hobbyists, students, and developers to easily send SMS alerts from their projects—perfect for prototyping and testing IoT devices. While this guide focuses on Arduino UNO R4, the API is fully compatible with NodeMCU, ESP32, Raspberry Pi, and virtually any SoC or SoM module capable of connecting to the internet. Learn by building real-world circuits through practical electronics projects for all skill levels.
Table of Contents
Components Required
To make Arduino send a text message to your phone without using a GSM module, you don’t need a lot of fancy equipment. The hardware requirement is minimal, cost-efficient, and easily available in the electronic component market. The required components are listed below; make a note of them.
- Arduino UNO R4 WiFi development board.
- USB to Micro USB-B data cable.
- 12V DC adaptor with male barrel jack plug / 5V DC USB-B adaptor
- Personal computer installed with Arduino IDE
Once you have these components in hand, then you are in one step ahead in making the Arduino send SMS via the internet.
Hardware setup of the SMS sending Arduino
In the image below, you can see the actual hardware setup of our project, which looks much simpler.
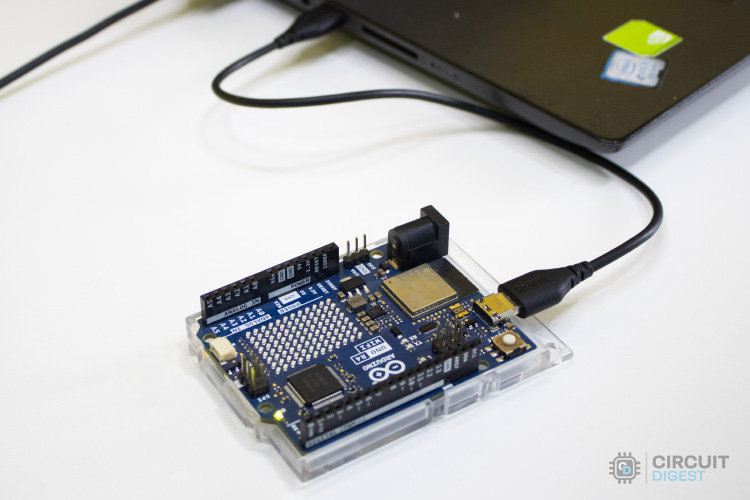
Here I directly connect the Arduino UNO R4 WiFi board through a USB cable, which it consumes power from the PC, this setup is essential for programming the Arduino board from Arduino IDE.
After programming the Arduino board, we can either power it from the PC USB port or use external power adaptors.
Installing the Required Board Libraries in Arduino IDE
Before you start coding in Arduino IDE to give life to the brain-dead Arduino UNO R4 WiFi board. We need to make sure that the Arduino UNO R4 WiFi board's necessary libraries and board support packages are installed in the Arduino IDE. These libraries are essential for the Arduino IDE to get to know about the hardware and communicate with it.
I assume you already have exposure to the Arduino IDE. So, I jump straight in to show and tell you how to install these libraries in the Arduino IDE.
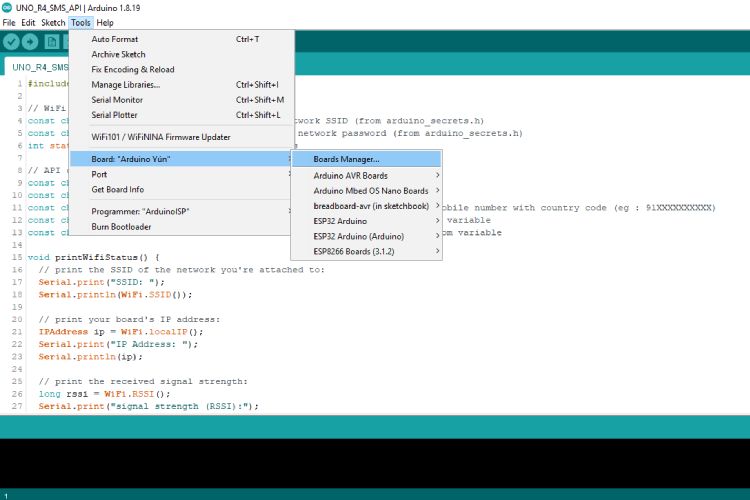
STEP 1: First, open up the Arduino IDE software, then click on the “Tools” option, then click “Board” -> “Board Manager”
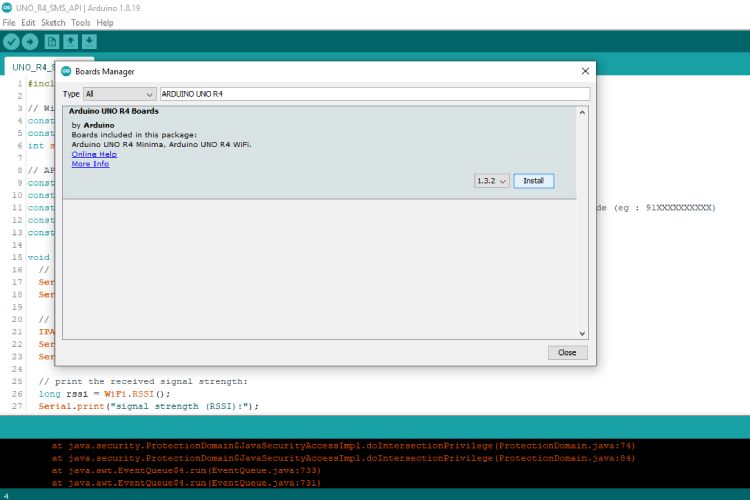
STEP 2: After clicking the “Board Manager” option, it prompts you to search for the required board library. In the search field, search for “Arduino UNO R4 WiFi”; it will list out Arduino UNO R4 boards. Later, click on the “Install” option to install that board support package.
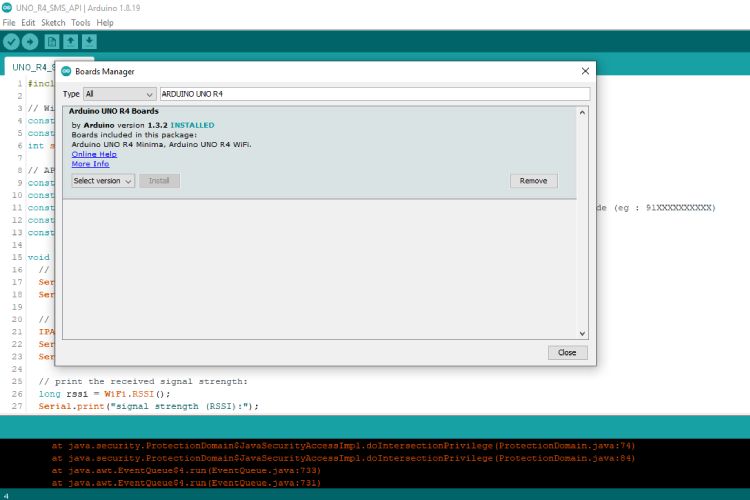
STEP 3: After installation gets completed successfully, it will show you “Arduino UNO R4 Boards” installed as shown in the below image.
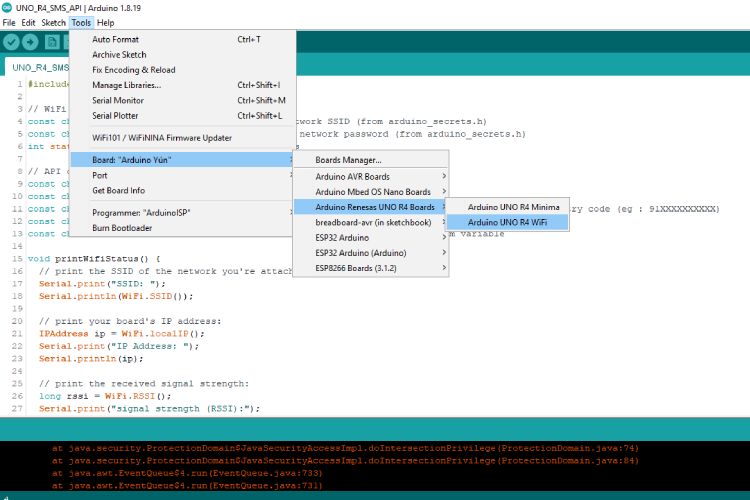
STEP 4: After installation, go to the home page, click on the “Tools” option followed by “Boards” -> “Arduino Renesas UNO R4 Board” -> “Arduino UNO R4 WiFi” to verify that it appears on the “Board” option and select that board for later programming purposes.
Ok, now the Arduino IDE setup process is over. Next, we are going to discuss how to generate the SMS API from Circuit Digest Cloud.
Generating API Key
Before moving on to the coding part, we first want to generate a valid SMS API from the Circuit Digest Cloud SMS service provider, so that we can make our ESP32 send SMS by utilizing the power of the internet.
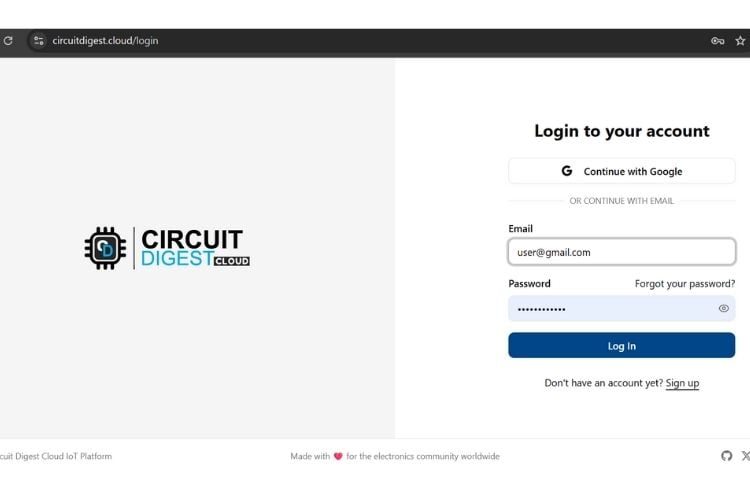
STEP 1: Visit our Circuit Digest Cloud website “https://www.circuitdigest.cloud/”. Then click on the login button. It will redirect you to the login page, there you just enter your login credentials. If you don’t have an account, create a new one using the Register Page.
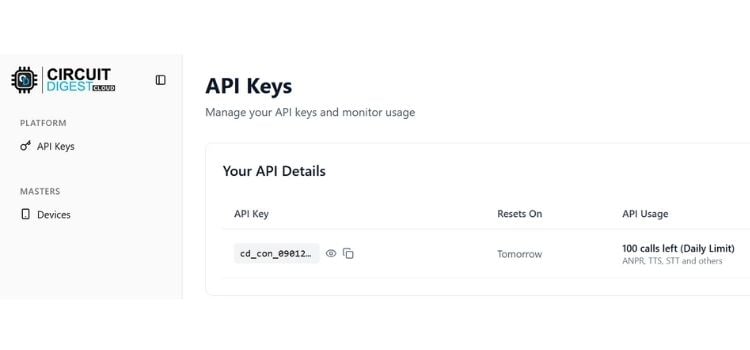
STEP 2: After logging in, you will find the “Account” button in the top-right corner. Click on it to view a dropdown menu with options such as Profile, API Key, and Logout. Select API Key, and you will be redirected to the API key generation page.

STEP 3: On the API Key generating page, a new API key will be generated with a limit of 100 SMS per month. Even after Expiry, you can renew it for free of cost.
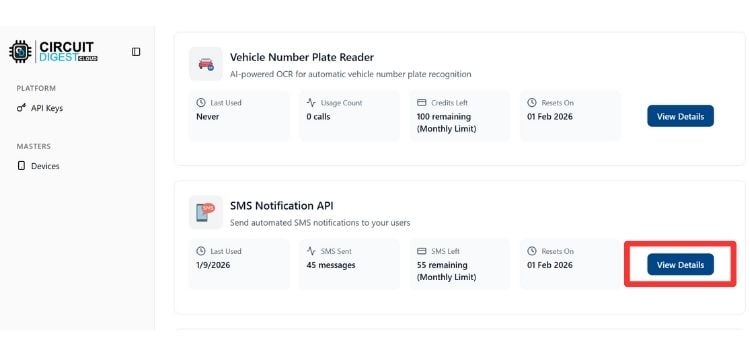
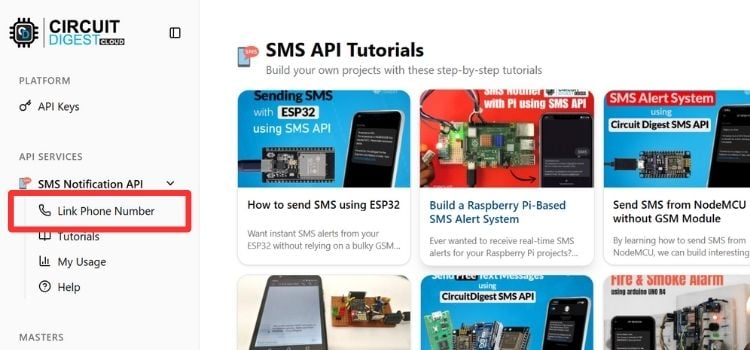
STEP 4: After that, scroll down the webpage until you find the SMS Notification API section. Click on "View Details" to proceed.
Step 5: In the SMS Notification API tab, you will find the "Link Phone Number" option. Click on it to link a phone number for sending SMS notifications.
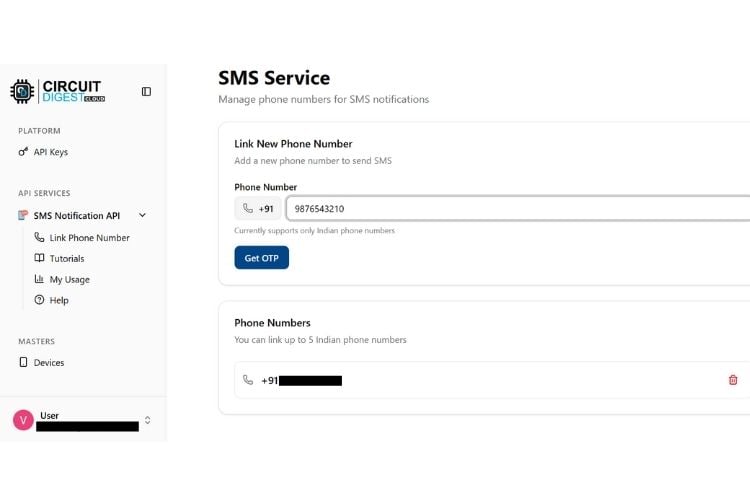
STEP 6: Enter the phone number you want to link and click the "Get OTP" button. You will receive an OTP on the entered number enter the OTP to verify the phone number. Once verified, you can also view the list of linked phone numbers here.
Prebuilt SMS Template of Circuit Digest Cloud
Now, here we are going to know about predefined SMS templates and how to choose one that suits our specific application.
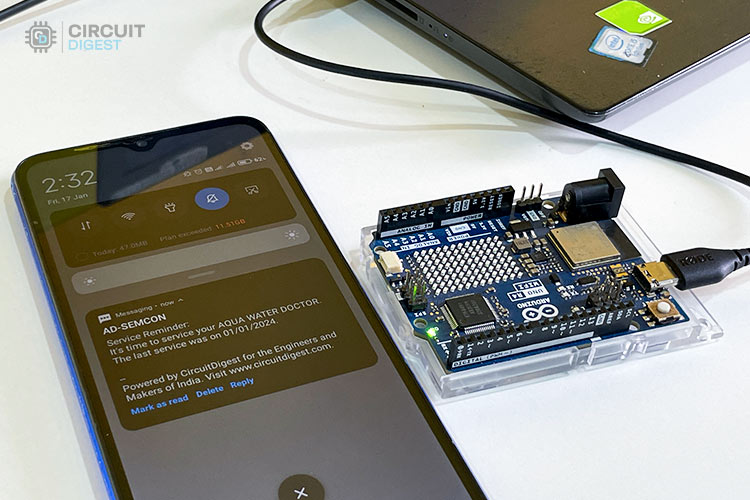
I decided to use the “Service Reminder” SMS template for our project, whose template ID is 106. So I noted the template ID number and decided to assign “AQUA WATER DOCTOR” and “01/01/2024” to the #var# variables.
So the incoming SMS will look like this
| It’s time to service your AQUA WATER DOCTOR. Last service was on 01/01/2024. -- Powered by CircuitDigest for the Engineers and Makers of India. Visit www.circuitdigest.com. |
That’s all, we now learned about how to generate the free SMS API key from the Circuit Digest cloud platform. Next, we are going to dive into the coding part.
Arduino code to send SMS via Internet
Overview of the code
Basically, this code connects an Arduino UNO R4 WiFi board to an existing WiFi network using credentials. Later it sends an HTTP POST request to the Circuit Digest SMS API, which includes the user's phone number and SMS details in the JSON format. It then waits for the server’s response code to know whether the SMS was sent successfully or not via the serial monitor.
Header File
#include "WiFiS3.h"This header file is essential for enabling the WiFi connection on the Arduino UNO R4 WiFi Board. It includes necessary functions and definitions to interact with WiFi modules like connecting to a WiFi network, checking the WiFi status, and sending HTTP requests over the internet, etc…
Global Variables
// WiFi credentials
const char *ssid = "Semicon Media";   // Your network SSID (from arduino_secrets.h)
const char *password = "cracksen1605";   // Your network password (from arduino_secrets.h)
int status = WL_IDLE_STATUS; // Connection status
// API credentials and SMS details
const char* apiKey = "XXXXXXXX";       // Replace with your API key
const char* templateID = "106";           // Replace with your template ID
const char* mobileNumber = "XXXXXXXXXXX"; // Replace with the recipient's mobile number with country code (eg : 91XXXXXXXXXX)
const char* var1 = "AQUA WATER DOCTOR";         // Replace with your custom variable
const char* var2 = "01/01/2024";                  // Replace with your custom variable
This global variable section defines the necessary credentials for connecting to a WiFi network and SMS API access. It stores wifi credentials as well as the API Key, SMS template ID, recipient mobile number, and custom variables (var1 and var2) for sending personalized SMS messages through API.
printWiFiStatus() Function
void printWifiStatus() {
 // print the SSID of the network you're attached to:
 Serial.print("SSID: ");
 Serial.println(WiFi.SSID());
 // print your board's IP address:
 IPAddress ip = WiFi.localIP();
 Serial.print("IP Address: ");
 Serial.println(ip);
 // print the received signal strength:
 long rssi = WiFi.RSSI();
 Serial.print("signal strength (RSSI):");
 Serial.print(rssi);
 Serial.println(" dBm");
}
This function is used to print the WiFi connection details in the serial monitor. It prints the SSID of the connected network, the device’s local IP address, and signal strength in the decibels. This function is helpful for debugging, especially if the code is not working properly as we expected.
sendSMS() Function
void sendSMS() {
 if (WiFi.status() == WL_CONNECTED) {
   WiFiClient client; // Initialize WiFi client

   String apiUrl = "/api/v1/send_sms?ID=" + String(templateID);
   Serial.print("Connecting to server...");
   if (client.connect("www.circuitdigest.cloud", 80)) { // Connect to the server
     Serial.println("connected!");
     // Create the HTTP POST request
     String payload = "{\"mobiles\":\"" + String(mobileNumber) +
                      "\",\"var1\":\"" + String(var1) +
                      "\",\"var2\":\"" + String(var2) + "\"}";
     // Send HTTP request headers
     client.println("POST " + apiUrl + " HTTP/1.1");
     client.println("Host: www.circuitdigest.cloud");
     client.println("Authorization: " + String(apiKey));
     client.println("Content-Type: application/json");
     client.println("Content-Length: " + String(payload.length()));
     client.println(); // End of headers
     client.println(payload); // Send the JSON payload
     // Wait for the response
     int responseCode = -1; // Variable to store HTTP response code
     while (client.connected() || client.available()) {
       if (client.available()) {
         String line = client.readStringUntil('\n'); // Read a line from the response
         Serial.println(line); // Print the response line (for debugging)
         // Check for the HTTP response code
         if (line.startsWith("HTTP/")) {
           responseCode = line.substring(9, 12).toInt(); // Extract response code (e.g., 200, 404)
           Serial.print("HTTP Response Code: ");
           Serial.println(responseCode);
         }
         // Stop reading headers once we reach an empty line
         if (line == "\r") {
           break;
         }
       }
     }

     // Check response
     if (responseCode == 200) {
       Serial.println("SMS sent successfully!");
     } else {
       Serial.print("Failed to send SMS. Error code: ");
       Serial.println(responseCode);
     }


     client.stop(); // Disconnect from the server
   } else {
     Serial.println("Connection to server failed!");
   }
 } else {
   Serial.println("WiFi not connected!");
 }
}
The “sendSMS()” function first checks whether the WiFi is connected, then creates a WiFi client to establish a connection with the server. It constructs an HTTP POST request with necessary headers and JSON payload containing the SMS details. After sending the request, it waits for the server’s response code to determine the SMS sent status.
setup() function
void setup() {
 //Initialize serial and wait for port to open:
 Serial.begin(9600);
 while (!Serial) {
   ; // wait for serial port to connect. Needed for native USB port only
 }

 // check for the WiFi module:
 if (WiFi.status() == WL_NO_MODULE) {
   Serial.println("Communication with WiFi module failed!");
   // don't continue
   while (true);
 }

 String fv = WiFi.firmwareVersion();
 if (fv < WIFI_FIRMWARE_LATEST_VERSION) {
   Serial.println("Please upgrade the firmware");
 }

 // attempt to connect to WiFi network:
 while (status != WL_CONNECTED) {
   Serial.print("Attempting to connect to SSID: ");
   Serial.println(ssid);
   // Connect to WPA/WPA2 network. Change this line if using open or WEP network:
   status = WiFi.begin(ssid, password);

   // wait 1 seconds for connection:
   delay(1000);
 }
 printWifiStatus();

 // Send the SMS
 sendSMS();
}
This function is considered as the entry point of the program execution. This function first initializes the serial monitor at a baud rate of 9600 for debugging purposes. Later it checks for whether the Wi-Fi module is connected properly, if not, it will enter into an infinite loop. If the firmware is outdated, it prompts the user to upgrade it.
After making the successful communication with the wifi module, it makes the Arduino connect to the wifi network using WiFi credentials. Once connected, it calls the “printWiFiStatus()” function to print connection details and calls the “sendSMS()” function to send SMS to the right phone number.
loop() function
void loop() {
 // Nothing to do in the loop
}
It is a loop() function, which starts to execute after the setup() execution is finished. Here the loop() function is empty. But however, if you want to uplift this project by adding new functionality, definitely you will need this loop() function.
That’s all, I hope you understand this code very well. Let's compile and dump those binary to your Arduino UNO R4 WiFi board to turn it into a functional one.
Sending SMS with Arduino Using the Reset Button
Finally, we make Arduino send text messages via the Internet without the need of expensive GSM modules. As I previously mentioned the above program makes Arduino send only one SMS during reset, after that it gets stuck on an infinite loop. However, we can able to send SMS whenever we want by just pressing the reset button.
Below you can able to see our actual hardware setup, which sends SMS to my phone after pressing the reset button of Arduino.
You will be able to see the SMS sent status in the serial monitor of our Arduino IDE.
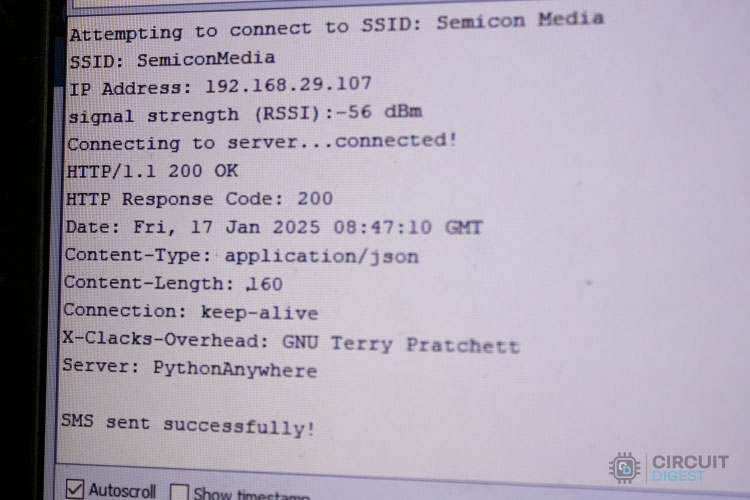
That’s all, now we are able to send SMS to your phone by simply pressing the Push button (Reset button). But you can further improve this project by sending an SMS when a fire sensor or security system gets triggered.
GitHub Repository with Code and Circuit


Projects using Circuit Digest API
Circuit Digest offers a variety of APIs that can be integrated into projects involving microcontrollers like Arduino, ESP32, and many more.

How to Send SMS from NodeMCU without Using GSM Module?
Learn how to send SMS alerts from NodeMCU ESP8266 without a GSM module using the Circuit Digest Cloud API. This step-by-step guide covers hardware setup, API integration, and Arduino code.
GPS Visualizer to Upload Data and Visualize GPS Maps for Arduino, ESP32 & other Embedded Devices
Learn how to create a GPS Visualizer for IoT-based GPS tracking projects. This guide covers real-time location tracking, data visualization, and integration with Circuit Digest Cloud API.

How to scan QR Codes using ESP32-CAM module?
Learn how to implement a Number Plate Recognition API for low-power embedded SoC boards. This guide covers API integration, image processing, and real-time license plate detection using Circuit Digest Cloud.
Complete Project Code
//Arduino UNO R4 code to send SMS using the CircuitDigest Cloud API service
#include "WiFiS3.h"
// WiFi credentials
const char *ssid = "Semicon Media";   // Your network SSID (from arduino_secrets.h)
const char *password = "cracksen1605";   // Your network password (from arduino_secrets.h)
int status = WL_IDLE_STATUS; // Connection status
// API credentials and SMS details
const char* apiKey = "XXXXXXXX";       // Replace with your API key
const char* templateID = "106";           // Replace with your template ID
const char* mobileNumber = "XXXXXXXXXXX"; // Replace with the recipient's mobile number with country code (eg : 91XXXXXXXXXX)
const char* var1 = "AQUA WATER DOCTOR";         // Replace with your custom variable
const char* var2 = "01/01/2024";                  // Replace with your custom variable
void printWifiStatus() {
 // print the SSID of the network you're attached to:
 Serial.print("SSID: ");
 Serial.println(WiFi.SSID());
 // print your board's IP address:
 IPAddress ip = WiFi.localIP();
 Serial.print("IP Address: ");
 Serial.println(ip);
 // print the received signal strength:
 long rssi = WiFi.RSSI();
 Serial.print("signal strength (RSSI):");
 Serial.print(rssi);
 Serial.println(" dBm");
}

void sendSMS() {
 if (WiFi.status() == WL_CONNECTED) {
   WiFiClient client; // Initialize WiFi client

   String apiUrl = "/api/v1/send_sms?ID=" + String(templateID);
   Serial.print("Connecting to server...");
   if (client.connect("www.circuitdigest.cloud", 80)) { // Connect to the server
     Serial.println("connected!");
     // Create the HTTP POST request
     String payload = "{\"mobiles\":\"" + String(mobileNumber) +
                      "\",\"var1\":\"" + String(var1) +
                      "\",\"var2\":\"" + String(var2) + "\"}";
     // Send HTTP request headers
     client.println("POST " + apiUrl + " HTTP/1.1");
     client.println("Host: www.circuitdigest.cloud");
     client.println("Authorization: " + String(apiKey));
     client.println("Content-Type: application/json");
     client.println("Content-Length: " + String(payload.length()));
     client.println(); // End of headers
     client.println(payload); // Send the JSON payload
     // Wait for the response
     int responseCode = -1; // Variable to store HTTP response code
     while (client.connected() || client.available()) {
       if (client.available()) {
         String line = client.readStringUntil('\n'); // Read a line from the response
         Serial.println(line); // Print the response line (for debugging)
         // Check for the HTTP response code
         if (line.startsWith("HTTP/")) {
           responseCode = line.substring(9, 12).toInt(); // Extract response code (e.g., 200, 404)
           Serial.print("HTTP Response Code: ");
           Serial.println(responseCode);
         }
         // Stop reading headers once we reach an empty line
         if (line == "\r") {
           break;
         }
       }
     }

     // Check response
     if (responseCode == 200) {
       Serial.println("SMS sent successfully!");
     } else {
       Serial.print("Failed to send SMS. Error code: ");
       Serial.println(responseCode);
     }


     client.stop(); // Disconnect from the server
   } else {
     Serial.println("Connection to server failed!");
   }
 } else {
   Serial.println("WiFi not connected!");
 }
}

void setup() {
 //Initialize serial and wait for port to open:
 Serial.begin(9600);
 while (!Serial) {
   ; // wait for serial port to connect. Needed for native USB port only
 }

 // check for the WiFi module:
 if (WiFi.status() == WL_NO_MODULE) {
   Serial.println("Communication with WiFi module failed!");
   // don't continue
   while (true);
 }

 String fv = WiFi.firmwareVersion();
 if (fv < WIFI_FIRMWARE_LATEST_VERSION) {
   Serial.println("Please upgrade the firmware");
 }

 // attempt to connect to WiFi network:
 while (status != WL_CONNECTED) {
   Serial.print("Attempting to connect to SSID: ");
   Serial.println(ssid);
   // Connect to WPA/WPA2 network. Change this line if using open or WEP network:
   status = WiFi.begin(ssid, password);

   // wait 1 seconds for connection:
   delay(1000);
 }
 printWifiStatus();

 // Send the SMS
 sendSMS();
}
void loop() {
 // Nothing to do in the loop
}
