 Vedhathiri
Author
This project involves creating your own GPS tracker using the Xiao-ESP32-S3 microcontroller. Usually, making a GPS tracker needs extra parts like a SIM card, a GSM module, and other communication tools to send location data to a phone or computer. Building a GPS tracker with Seeed Studio XIAO has never been easier. But that’s not an issue anymore. At Circuit Digest, we have developed an effective solution called the GeoLinker. With this, the microcontroller can send its current GPS coordinates directly to the GeoLinker server, where the location can be shown and tracked on a map. The best part? GeoLinker is free to use, making it a great tool for students, hobbyists, and engineers who want to build and test their GPS projects without the cost and complexity of GSM modules. This comprehensive guide shows you how to create a fully functional GPS tracker using Seeed Studio XIAO ESP32-S3 with advanced features like geofencing and SMS alerts—no SIM card or expensive GSM module required. In Circuit Digest, we already built the Simple GPS Tracker using ESP32 and the Raspberry Pi Pico GPS tracker. Then what makes this project special? There is an addition of a feature which makes this GPS tracker system more efficient. Want to know what it is? The additional feature is a geofence with SMS triggering. Let's dive in and explore the project…
Table of Contents
- What is a GPS Tracker with XIAO ESP32-S3?
- └ Key Features
- How the GPS Tracker with XIAO ESP32-S3 System Works
- Components Required
- Circuit Diagram
- └ Pin Configuration and Connection Details
- Real-Time Hardware Connection
- GeoLinker Setup and API Configuration
- Source Code Explanation
- Working Demo
- GitHub Repository
What is a GPS Tracker with XIAO ESP32-S3?
Using the GPS tracker with XIAO ESP32-S3, we're able to track the location of our devices and pets via WiFi without having to purchase any cell phone service plans. The XIAO ESP32-S3 is a compact and powerful microcontroller from Seeed Studio that interfaces with the Neo-6M GPS module. This allows the GPS location data to be sent directly over your Wi-Fi from the XIAO ESP32-S3 to the Cloud Servers.
Key Features of the XIAO ESP32-S3 GPS Tracker
✓ No Cellular Service Required - Save money by not having to purchase cell phone service.
✓ Geofencing Technology - Automatically detects if you leave designated areas and notifies you
✓ SMS Notifications - Not only does it notify you if a geofence is crossed, but it tells you exactly where the device was when it crossed the geofence's boundary.
✓ Offline Location Storage - When WiFi is unavailable, the location will be buffered. When WiFi is restored, the buffered location will automatically sync with the Cloud Service.
✓ Real-Time Mapping - Use the GeoLinker to track your devices on interactive maps.
✓ Free Service - All new users of the GeoLinker receive a free service for 10,000 records of location history.
How the GPS Tracker with XIAO ESP32-S3 System Works
The GPS tracker using Seeed Studio XIAO ESP32-S3 offers several advantages over traditional GSM-based trackers.
![]()
Step-by-Step System Operation
1. GPS Signal Collection: The Neo-6M GPS Module acquires the GPS satellite signals and then determines the precise latitude and longitude coordinates.
2. Data Processing: The XIAO ESP32-S3 Microcontroller processes the GPS information via a Serial Communication Channel (UART) operating at 9600 Baud.
3. Wifi transmission: The ESP32-S3 transmits the GPS Coordinates to the GeoLinker Cloud every 15 seconds (setting adjustable on the ESP32-S3).
4. Online Data Archive: The GeoLinker Cloud keeps a full history of Movements by storing every point with its respective timestamp.
5. Geofence Monitoring: The Haversine formula calculates the distance from the defined Home Position to the current location at all times.
6. Alerts Notifications: Should the Device cross the set 50-Meter boundary (adjustable), an SMS will be sent from the Circuit Digest Cloud SMS API.
7. Data Buffering Offline: In the event there is a disconnection from the Wi-Fi network, the ESP32-S3 will maintain its GPS data within a data buffer.
8. Data Synchronisation: On reconnection of the Internet connection, buffered data will be uploaded first. Subsequent 'real-time' data uploads will follow.
If you’d like to work on similar ideas, take a look at our other ESP32 projects.
Components Required for the GPS Tracker
Hardware Required
When building your GPS tracker with XIAO ESP32-S3, component quality matters.
| S.No | Components | Quantity | Details |
| 1. | Xiao-ESP32-S3 | 1 | Main microcontroller used for processing, Wi-Fi connectivity, and sending GPS data to the cloud. |
| 2. | Neo-6m Module | 1 | Receives satellite signals and provides real-time latitude and longitude coordinates. |
| 3. | Breadboard | 1 | Used to prototype the circuit without soldering. |
| 4. | Connecting Wires | Required Amount | To establish connections between the ESP32-S3 and GPS module. |
| 5. | External GPS Antenna | 1 | Connects to the NEO-6M module to ensure strong and stable GPS satellite reception |
Software Required
Arduino IDE
- Required Libraries:
GeoLinker Library (for cloud communication)
TinyGPSPlus Library (for GPS data parsing)
WiFiClientSecure Library (for HTTPS connections)
Circuit Diagram for the GPS Tracker
Now, let’s examine the circuit diagram in detail to understand how each component is connected and how the overall system operates. Complete circuit connections for building a GPS tracker with XIAO ESP32-S3.
![]()
The circuit shows that a Neo-6M module is connected to the ESP32-S3 for receiving the GPS data. The GPS module gets powered by the 5V and ground pins of the ESP32-S3. For the serial communication, the module’s TX pin is connected to the ESP32-S3’s RX pin, and the module's RX pin is connected to the ESP32-S3’s TX pin, enabling the proper data transfer. An external patch antenna is connected to the module to ensure reliable GPS signal reception. The circuit design for this GPS tracker using Seeed Studio XIAO ESP32-S3 follows a straightforward architecture.
Pin Configuration and Connection Details
| Neo-6M GPS Module Pin | XIAO ESP32-S3 Pin | Connection Type | Notes |
| VCC | 5V | Power Supply | Neo-6M requires 3.3V-5V; XIAO provides stable 5V output |
| GND | GND | Ground Reference | Common ground essential for reliable communication |
| TX (Transmit) | GPIO 44 (RX) | Serial Data (GPS → ESP32) | Transmits NMEA sentences at 9600 baud rate |
| RX (Receive) | GPIO 43 (TX) | Serial Data (ESP32 → GPS) | Optional: for sending configuration commands to GPS |
Real-Time Hardware Connection of GPS Tracker
The real-time hardware connection of the GPS tracker demonstrates how all components come together to form the complete working system
![]()
This shows the real-time setup of the Neo-6M module connected to the ESP32-S3 controller. As you see, the external antenna is connected to the module to receive the GPS signal. This is the overall setup of the system.
Setting Up GeoLinker Cloud Platform for GPS Tracking
Like most CircuitDigest Cloud APIs, GeoLinker also requires an API key for authorisation. Follow the steps below to receive your free API key for your ESP32 GPS navigation project.
Go to the official CircuitDigest Cloud website at https://circuitdigest.cloud. and in the top right corner, click Sign in.
If you are new to CircuitDigest Cloud, you need to register a new account by following the steps below.
Registering a New Account in Circuit Digest Cloud
⇒ Step 1:
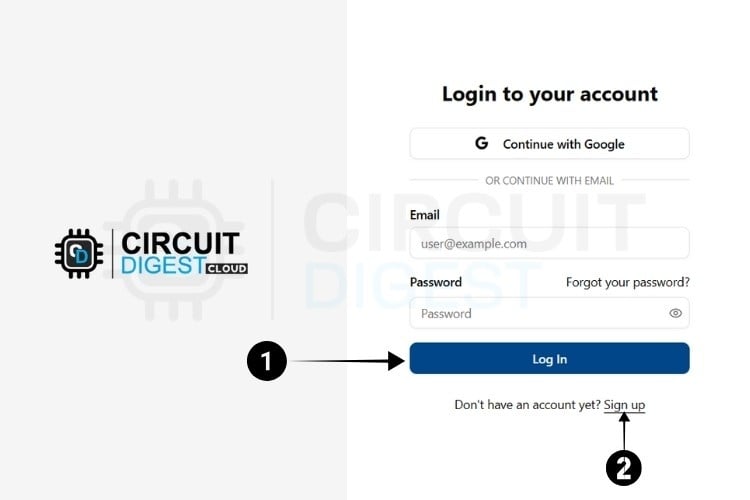
Visit the Circuit Digest. Cloud Home Page. Click the "Login" button located at the bottom, which redirects to the login page.
⇒ Step 2:
If you already have an account, log in using your existing credentials. If not, go to the registration page to create an account by filling in the required details. Once completed, click "Register Now" to sign up.
⇒ Step 3:
After registering, use your email ID and password to log in on the login page. Once logged in, click on "My Account" at the top right corner, where you click the API Keys from the Dropdown options.
The next step is to generate the API Key.

Generating API Key
⇒ Step 4: You will be directed to a page where you can generate your API Key.
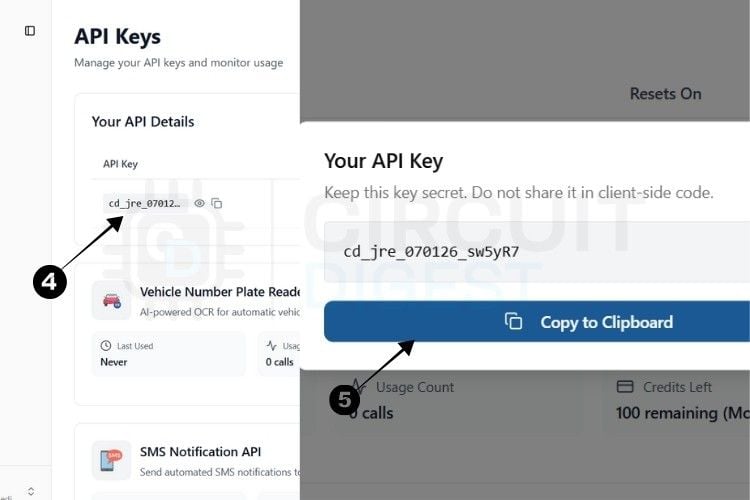
⇒ Step 5: By pressing the copy icon near the API Key, your key gets instantly copied to the clipboard.
Currently, there is a usage limit of 100 requests per API key for both the SMS and ANPR APIs and 10,000 data points for GPS tracking. Once you reach this limit, you can generate another key, which provides an additional 100 uses.
This usage limit is in place to prevent server overload.
With this, we are ready to move to hardware.
*Note: A 10-second rate limit applies to all API calls, allowing one request every 10 seconds.
Source Code Explanation for GPS Tracker
The code initialises the Xiao ESP32-S3, configures the Neo-6M GPS module, and sets up the GeoLinker API for sending location data over Wi-Fi. The setup() function establishes GPS communication, loads Wi-Fi credentials, and prepares the GeoLinker service with the update interval and offline storage. The main loop continuously reads GPS coordinates, uploads valid data to the cloud, and checks if the device has crossed the predefined geofence radius. When a geofence breach is detected, the sendSMS() function sends an alert message using the Circuit Digest SMS API. The code also calculates distance using the Haversine formula and handles Wi-Fi failures by storing data temporarily.
Complete Arduino Code Breakdown
The firmware for this GPS tracker using Seeed Studio XIAO ESP32-S3 integrates multiple libraries and implements sophisticated geofencing logic.
#include <GeoLinker.h>
#include <TinyGPSPlus.h>
#include <WiFiClientSecure.h>
HardwareSerial gpsSerial(1);
#define GPS_RX 44
#define GPS_TX 43
#define GPS_BAUD 9600
These libraries handle cloud communication, GPS data decoding, and secure HTTPS.Serial1 is configured for the Neo-6M GPS module using pins 44 (RX) and 43 (TX) at a baud rate of 9600.
These constants define the Wi-Fi credentials and GeoLinker configuration for your GPS tracker with XIAO ESP32-S3
const char* ssid = "Yourname";
const char* password = "yourpassword";
const char* apiKey = "youruniqueapikey";
const char* deviceID = "ESP-32_Tracker";
const uint16_t updateInterval = 15;
const bool enableOfflineStorage = true;
This section sets up Wi-Fi credentials and API details needed for uploading GPS data to the GeoLinker cloud. The ESP32 sends one update every 15 seconds and stores data offline when the WiFi is unavailable.
const float homeLat = 11.011160;
const float homeLon = 77.013080;
bool alertSent = false;
double distanceBetween(double lat1, double lon1, double lat2, double lon2) {
 double R = 6371000;
 double dLat = radians(lat2 - lat1);
 double dLon = radians(lon2 - lon1);
...}
The home coordinates define the geofence center.
The distanceBetween() function uses the Haversine formula to calculate the distance between the tracker and the set geofence area
SMS Alert Function with Circuit Digest Cloud API
void sendSMS(float latitude, float longitude) {
 WiFiClientSecure client;
 client.setInsecure();
 HTTPClient http;
 String apiUrl = "https://www.circuitdigest.cloud/api/v1/send_sms?ID=" + String(templateID);
 http.begin(client, apiUrl);
 http.addHeader("Authorization", apiKey);
 http.addHeader("Content-Type", "application/json");
 String payload = "{\"mobiles\":\"" + String(mobileNumber) +
                  "\",\"var1\":\"ESP32\",\"var2\":\"" +
                  String(latitude, 6) + "," + String(longitude, 6) + "\"}";
 http.POST(payload);
}
When the GPS tracker with XIAO ESP32-S3 device crosses the fence, this function sends an SMS alert through the Circuit Digest Cloud SMS API with the current GPS location.
uint8_t status = geo.loop();
while (gpsSerial.available()) gps.encode(gpsSerial.read());
if (gps.location.isUpdated()) {
 float latitude = gps.location.lat();
 float longitude = gps.location.lng();
 double dist = distanceBetween(homeLat, homeLon, latitude, longitude);
 if (dist > 50 && !alertSent) {
   sendSMS(latitude, longitude);
   alertSent = true;
 }
 if (dist <= 50 && alertSent) alertSent = false;
}
The GeoLinker loop handles data upload and offline buffering automatically.
When new GPS data arrives, the distance is calculated.
- If distance > 50 m, an SMS alert is sent.
- When the tracker returns inside the boundary, the alert resets.
Ok, now we just upload the code and see how the system works.
Code Optimisation and Customisation
You can custom-design your firmware for your GPS tracker using Seeed Studio XIAO ESP32 S3 for other purposes.
- Update Interval - To balance the tradeoff between accuracy and data usage: change the variable updateInterval (range between 1 – 60 seconds), by changing it to suit your needs.
- Geofence Radius - Adapt your geofence radius for your specific monitoring needs. (10 – 5000 meters)
- Multiple Geofences - You can monitor multiple geofences by setting up an array of coordinates or locations from which to calculate the appropriate geofencing area.
- Speed Alerts - To create speed warning alerts, add GPS.speed.kmph() condition statements.
- Battery Monitoring - Have a battery monitor check to determine the status of the battery, and, if necessary, notify when it is low on power.
Working Demo of a Real-time GPS Tracker
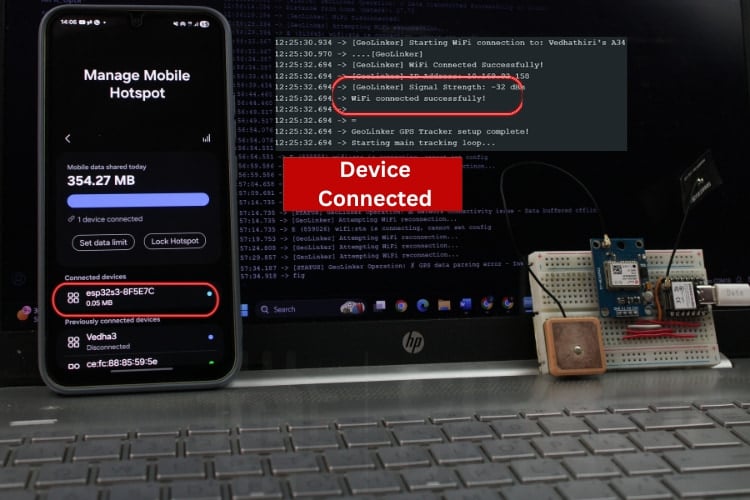
I used my phone’s hotspot as the internet source. After powering the system through the PC’s USB port, I enabled the mobile Wi-Fi hotspot, and the ESP32-S3 connected to it instantly.
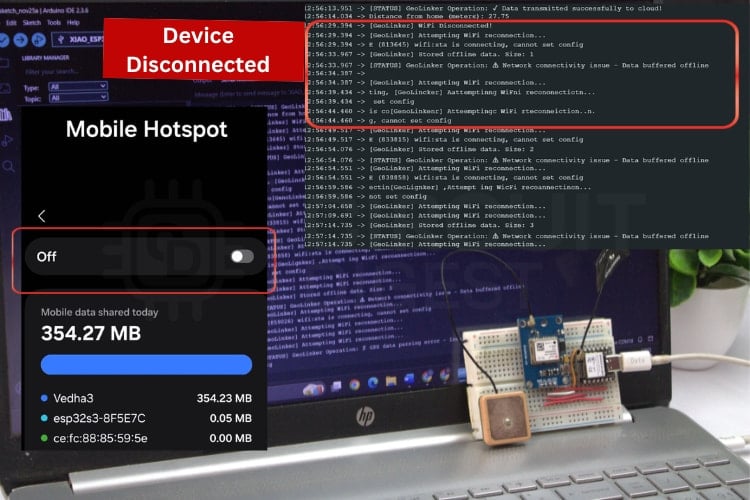
If the network connection is lost, the data is stored locally, and no information is lost. Once the network is back, the data saved locally will be sent to the cloud server, and any new data will be uploaded to the cloud after that.
Now let's move from the office and see how the map works. The image below shows the smooth start of the GPS tracking system. The data will be seen in a map. Every 15 seconds, the data was pushed.
![]()
In this system, we have added the geofence feature. I had already given specific coordinates, like home or office locations, which are included in the code. I also shared the boundary range. If the system moves outside this range, the SMS API from Circuit Digest will send a text message to the number provided in the Circuit Digest cloud. This message includes the current latitude and longitude of the system. Once the system returns to the boundary range, the geo-fence is reset. So, if the system goes out of range again, another alert text message will be sent to the number.
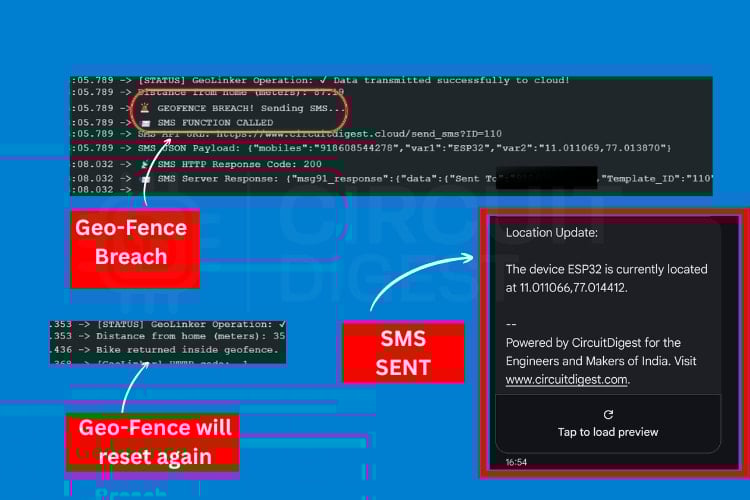
The above shows the real-time testing of the geo-fence breach. The GPS crossed the boundary range, so the system automatically triggered the SMS system and sent the current coordinates to the specified number, which is shown in the image. And once the system enters the boundary, the geofence is reset.
We have reached our office after a long travel. Let’s look at the map and see where we travelled.

The real-time data of the map, which shows the area that we covered
The above shows the real-time map, which shows how far we travelled from the starting point and the area we covered.
Real-World Applications
» Vehicle & Fleet Management: The incorporation of these real-time tracking capabilities, along with the geofencing alerts and routing history, will lead to a considerable improvement in dispatch and route planning.
» Asset Protection: You will be able to watch through a camera, expensive equipment and be informed through SMS if someone is moving them without your permission. The small size of the equipment makes it possible to hide easily.
» Child Safety: You will know where the kids are, receive a notification when they step out of a specified area, and keep the data for daily use.
» Elderly Monitoring: Caregivers will be up to date by being alerted if an elderly person with dementia or limited mobility has accessed a danger zone, and the ability to locally cache data is a protection against data loss.
» Pet Tracking: A geofencing alerting system and routing history, together with a weatherproof collar attachment, will enable you to quickly find lost pets.
GitHub Repository and Source Files
Access the complete source code, circuit diagrams, and documentation for this GPS tracker with Seeed Studio XIAO project:


We built a low-cost and fully functional GPS tracker using Seeed Studio Xiao ESP32-S3. The system transfers the real-time data, which can be monitored easily by Geolinker. One of the new features that is different from other previous projects is geofencing and SMS triggering. These features make the project useful for real-life applications such as vehicle monitoring, asset tracking. Overall, the project demonstrates how cloud-based APIs can simplify IoT development by removing the need for costly GSM-based hardware. The combination of Wi-Fi-enabled tracking, offline reliability, route visualisation, and SMS alerts makes this GPS tracker an effective, flexible, and practical solution for a wide range of location-based applications. For engineers and makers interested in expanding their IoT expertise beyond this GPS tracker with XIAO ESP32-S3, explore our extensive collection of IOT projects we’ve created. There’s plenty to learn and get inspired by.
Frequently Asked Questions (FAQ)
⇥ 1. What is the main purpose of the GPS tracker project?
The main purpose of the project is to build a simple and low-cost GPS tracker that can be accessed by anyone and can be replicated by anyone, so they can use it in their day-to-day life.
⇥ 2. Why does this tracker not require a SIM card or GSM module?
It's because the ESP32-S3 directly uses the Wi-Fi network connection.
⇥ 3. What happens if the Wi-Fi connection is lost?
The tracker has an offline data storage feature. When Wi-Fi is unavailable, it temporarily stores the GPS points locally and automatically uploads them once the connection is restored.
⇥ 4. What is geofencing in this project?
Geofencing allows you to set a virtual boundary (example: 50 m or 5 km radius).
If the tracker crosses this boundary, the system triggers an SMS alert to the specified mobile number.
⇥ 5. Can this tracker be used for real-life applications?
Yes. It is suitable for:
- Real-time Vehicle tracking
- Asset monitoring
⇥ 6. Can the update interval be changed?
Yes, the data update time can be adjusted according to your requirements.
⇥ 7. What is the maximum distance from the GPS tracker to the Wi-Fi access point?
In general, the range of an ESP32-S3 using Wi-Fi is approximately 50 to 100 meters when both devices are in line of sight; it will generally extend from 20 to 40 meters through walls and/or other types of obstructions. When tracking a vehicle, the ability to connect to a hot spot created by a cell phone allows for tracking of a vehicle wherever there is a cellular signal. If the installation is permanent, there are Wi-Fi range extenders that will provide coverage for as far as several hundred meters.
⇥ 8. Is it possible to track several devices with a single GeoLinker account?
The answer is yes; however, you must assign a unique device ID to each GPS tracker within the code you write for that device. Once complete, all your devices will be shown on a single GeoLinker map interface with different colour codes for the track of each device. The history of all devices can be reviewed, routes can be compared, and multiple geofences can be managed. It is important to know that all devices utilise the same quota of 10K data points as allocated by your API key.
Other Location Tracking Projects You Can Try
Similar projects that also use GPS and microcontrollers to track location and show the data on a map.

How to Use the GPS module with the STM32F103C8 to Get Location Coordinates
In this tutorial, we interface a GPS module with an STM32-based STM32F103C8 microcontroller to find the location coordinates and display them on a 16x2 LCD display.
In this DIY tutorial, build an IoT-based GPS Location tracker using the NEO-6M GPS Module. This Location Tracker Board consists of a NodeMCU, OLED Display Module, NEO-6M GPS Module, and 3.7 to 6V booster circuit. Perfect for location tracking and asset tracking.
Arduino-based Vehicle Tracker using GPS and GSM
This Vehicle Tracking System can be used for Accident Detection Alert System, Soldier Tracking System and many more, by just making a few changes in hardware and software.
Complete Project Code
#include <GeoLinker.h>
#include <TinyGPSPlus.h>
#include <WiFiClientSecure.h>
void sendSMS(float latitude, float longitude);
// ==================================================================
//                    HARDWARE CONFIGURATION
// ==================================================================
// GPS Serial Communication Setup
HardwareSerial gpsSerial(1);  // Using Serial1 for GPS communication
#define GPS_RX 44            // GPIO43 connected to GPS module TX pin
#define GPS_TX 43             // GPIO44 connected to GPS module RX pin
// GPS Communication Settings
#define GPS_BAUD 9600         // Standard NMEA GPS baud rate (9600 bps)
// ==================================================================
//                    NETWORK CONFIGURATION
// ==================================================================
// WiFi Network Credentials
const char* ssid = "Yourname";       // Your WiFi network name (SSID)
const char* password = "yourpassword";
// ==================================================================
//                   GEOLINKER CONFIGURATION
// ==================================================================
// API Authentication
const char* apiKey = "youruniqueapikey";    // Your unique GeoLinker API key
const char* deviceID = "ESP-32_Tracker";
const char* templateID = "110";
const char* mobileNumber = "yournumber";
// Data Transmission Settings
const uint16_t updateInterval = 15;       // How often to send data (seconds)
const bool enableOfflineStorage = true; // Store data when offline
const uint8_t offlineBufferLimit = 20;  // Maximum offline records to store
                                      // Keep minimal for MCUs with limited RAM
// Connection Management
const bool enableAutoReconnect = true;  // Automatically reconnect to WiFi
                                      // Note: Only applies to WiFi, ignored with GSM
// Timezone Configuration
const int8_t timeOffsetHours = 5;       // Timezone hours offset from UTC
const int8_t timeOffsetMinutes = 30;
const float homeLat = 11.011160;
const float homeLon =77.013080;
bool alertSent = false;
   // Timezone minutes offset from UTC
                                     // Example: IST = UTC+5:30
// Create GeoLinker instance
GeoLinker geo;
TinyGPSPlus gps;

// ==================================================================
//                    INITIALIZATION SETUP
// ==================================================================
// Calculate distance between two coordinates (in meters)
double distanceBetween(double lat1, double lon1, double lat2, double lon2) {
 double R = 6371000; // Earth radius in meters
 double dLat = radians(lat2 - lat1);
 double dLon = radians(lon2 - lon1);
 double a = sin(dLat/2) * sin(dLat/2) +
            cos(radians(lat1)) * cos(radians(lat2)) *
            sin(dLon/2) * sin(dLon/2);
 double c = 2 * atan2(sqrt(a), sqrt(1-a));
 return R * c;
}
void sendSMS(float latitude, float longitude) {
 Serial.println(" SMS FUNCTION CALLED");
 WiFiClientSecure client;
 client.setInsecure();  // Disable certificate check
 HTTPClient http;
 String apiUrl = "https://www.circuitdigest.cloud/api/v1/send_sms?ID=" + String(templateID);
 Serial.print("SMS API URL: ");
 Serial.println(apiUrl);
 http.begin(client, apiUrl);
 http.addHeader("Authorization", apiKey);
 http.addHeader("Content-Type", "application/json");
 // JSON template
String payload = "{\"mobiles\":\"" + String(mobileNumber) +
                "\",\"var1\":\"ESP32" +
                "\",\"var2\":\"" + String(latitude, 6) + "," + String(longitude, 6) + "\"}";

 Serial.print("SMS JSON Payload: ");
 Serial.println(payload);
 int code = http.POST(payload);
 Serial.print(" SMS HTTP Response Code: ");
 Serial.println(code);
 String response = http.getString();
 Serial.print(" SMS Server Response: ");
 Serial.println(response);
 http.end();
}
void setup() {
// Initialize serial communication for debugging
Serial.begin(115200);
delay(1000);  // Allow serial to initialize
Serial.println("Starting GeoLinker GPS Tracker...");
// Initialize GPS serial communication with custom pins
gpsSerial.begin(GPS_BAUD, SERIAL_8N1, GPS_RX, GPS_TX);
Serial.println("GPS Serial initialized on pins 16(RX) and 17(TX)");
// ==================================================================
//                   GEOLINKER LIBRARY SETUP
// ==================================================================
// Initialize GeoLinker with GPS serial interface
geo.begin(gpsSerial);
Serial.println("GeoLinker library initialized");
// Configure API authentication
geo.setApiKey(apiKey);
Serial.println("API key configured");
// Set unique device identifier
geo.setDeviceID(deviceID);
Serial.println("Device ID set");
// Configure data transmission interval
geo.setUpdateInterval_seconds(updateInterval);
Serial.print("Update interval set to ");
Serial.print(updateInterval);
Serial.println(" seconds");
// Set debug verbosity level
// Options: DEBUG_NONE, DEBUG_BASIC, DEBUG_VERBOSE
geo.setDebugLevel(DEBUG_BASIC);
Serial.println("Debug level set to BASIC");
// Enable offline data storage capability
geo.enableOfflineStorage(enableOfflineStorage);
if(enableOfflineStorage) {
  Serial.println("Offline storage enabled");
}
// Enable automatic WiFi reconnection
geo.enableAutoReconnect(enableAutoReconnect);
if(enableAutoReconnect) {
  Serial.println("Auto-reconnect enabled");
}
// Set maximum offline buffer size (important for memory management)
geo.setOfflineBufferLimit(offlineBufferLimit);
Serial.print("Offline buffer limit set to ");
Serial.print(offlineBufferLimit);
Serial.println(" records");
// Configure timezone offset for accurate timestamps
geo.setTimeOffset(timeOffsetHours, timeOffsetMinutes);
Serial.print("Timezone offset set to UTC+");
Serial.print(timeOffsetHours);
Serial.print(":");
Serial.println(timeOffsetMinutes);
// ==================================================================
//                    NETWORK CONNECTION SETUP
// ==================================================================
geo.setNetworkMode(GEOLINKER_WIFI);
Serial.println("Network mode set to WiFi");
// Set WiFi network credentials
geo.setWiFiCredentials(ssid, password);
Serial.println("WiFi credentials configured");
// Attempt WiFi connection
Serial.print("Connecting to WiFi network: ");
Serial.println(ssid);
if (!geo.connectToWiFi()) {
  Serial.println("ERROR: WiFi connection failed!");
  Serial.println("Device will continue with offline storage mode");
} else {
  Serial.println("WiFi connected successfully!");
}
Serial.println("\n" + String("=").substring(0,50));
Serial.println("GeoLinker GPS Tracker setup complete!");
Serial.println("Starting main tracking loop...");
Serial.println(String("=").substring(0,50) + "\n");
}
// ==================================================================
//                   MAIN PROGRAM LOOP
// ==================================================================
void loop() {
uint8_t status = geo.loop();

if (status > 0) {
  Serial.print("[STATUS] GeoLinker Operation: ");

  switch(status) {
    case STATUS_SENT:
      Serial.println("✓ Data transmitted successfully to cloud!");
      break;
    case STATUS_GPS_ERROR:
      Serial.println("✗ GPS module connection error - Check wiring!");
      break;
    case STATUS_NETWORK_ERROR:
      Serial.println(" Network connectivity issue - Data buffered offline");
      break;
    case STATUS_BAD_REQUEST_ERROR:
      Serial.println(" Server rejected request - Check API key and data format");
      break;
    case STATUS_PARSE_ERROR:
      Serial.println(" GPS data parsing error - Invalid NMEA format");
      break;
    case STATUS_INTERNAL_SERVER_ERROR:
      Serial.println(" GeoLinker server internal error - Try again later");
      break;
    default:
      Serial.print("? Unknown status code: ");
      Serial.println(status);
      break;
  }
}
while (gpsSerial.available() > 0) {
 gps.encode(gpsSerial.read());
}
if (gps.location.isUpdated()) {
float latitude = gps.location.lat();
float longitude = gps.location.lng();
double dist = distanceBetween(homeLat, homeLon, latitude, longitude);
Serial.print("Distance from home (meters): ");
Serial.println(dist);
if (dist > 50 && !alertSent) {
   Serial.println(" GEOFENCE BREACH! Sending SMS...");
   sendSMS(latitude, longitude);
   alertSent = true;
}
if (dist <= 50 && alertSent) {
   Serial.println("Bike returned inside geofence.");
   alertSent = false;
}
   }

delay(100);
}
Comments
I like the description! You didn't save the SIM card and the subscription, it's in your phone, because you can forward it through it!
Hi Vedhathiri - I love the project, exactly what I've been looking for. What is the max number of data points the XIAO ESP32-S3 can save when it is offline? Can you point me to a code example of incorporating an SD card to expand the number of stored locations? Thank you for a great project!
Chris

I have tried to create GPS Tracker without wifi it use SIM 4G module and It make battery run out quickly. That is real problem not like this tutorial.
You can tried it!