
ESP32 text to speech becomes a really helpful feature that can turn an embedded project from good to really useful. Whether you're building a handheld device, automation panel, safety monitor, or educational tool, implementing text to speech in ESP32 makes your project more accessible and user-friendly. Over time, we’ve tried many different ways to do this. Our Arduino-based Text-to-Speech converter showed how much you can do with a simple microcontroller, and later projects like the Raspberry Pi Speaking Alarm Clock and using Google’s voice keyboard for speech-to-text helped us learn more about advanced audio features.
All of those projects were fun, but they also showed a big problem: most Text-to-Speech solutions rely on cloud services. That means you can have internet delays, reliability problems, and setup issues, none of which are great when you need your system to work anywhere and anytime. That's why we decided to build a solution that doesn't need the cloud. In this tutorial, we’ll show you how to create an ESP32 text to speech offline. With the Talkie library and its Linear Predictive Coding (LPC) audio format, the ESP32 can directly convert text into speech using its DAC pin. Adding a PAM8403 amplifier and a small speaker gives you a complete, self-contained TTS system. Traditional text to speech using ESP32 solutions often depend on cloud services, causing internet delays, reliability issues, and connectivity requirements.
In the next sections, we’ll go through the whole process: connecting the hardware, setting up the vocabulary, processing sentences, and customising or expanding the speech options using the ESP32 text to speech library. By the end of the tutorial, you’ll understand exactly how the system works and how to add offline speech to your own embedded projects, whether for alerts, automation, instructional tools, or fully standalone interactive devices.
Table of Contents
ESP32 Text to Speech Demo Video
How the ESP32 Text to Speech Offline System Works
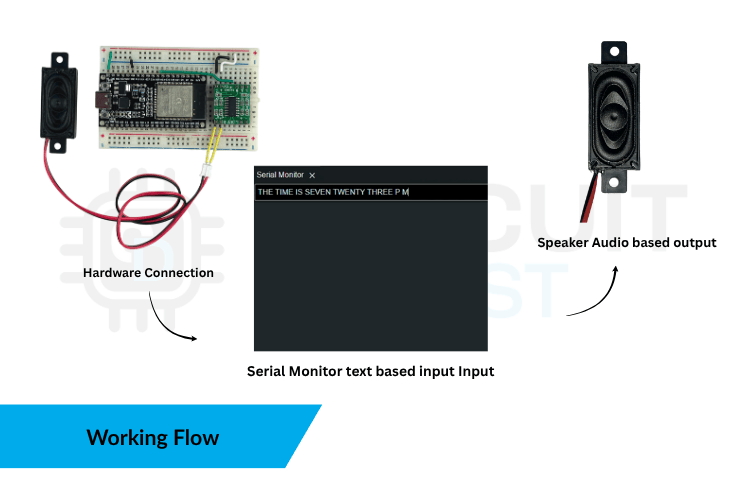
The ESP32 text to speech offline system to retrieve a sentence from the Serial Monitor, split it into individual words, check each word against a list of known words, and then speak them aloud as they are read. It's like a small, offline text-to-speech system built into the ESP32, which converts written text into spoken words immediately, without requiring the internet or other services.
We used a library called Talkie, which is a simple text-to-speech tool made for low-memory devices. Talkie saves voice sounds in LPC format. It is a type of compressed audio that can store hundreds of English words. This format was used in older speech machines because it uses very little memory. That same efficiency works well with the ESP32, allowing it to produce spoken words directly from its DAC pin without any extra hardware. This ESP32 text to speech offline architecture ensures rapid response times and reliable operation in environments without network access, making it perfect for industrial automation, educational devices, and standalone embedded systems.
The generated audio signal is sent through one of its DAC pins. Since this is a low-power analog signal, it's sent to the PAM8403 amplifier, which boosts the signal enough to drive a regular speaker. This creates a small, Text-to-Speech system that doesn’t need an internet connection or a lot of processing power. These types of TTS systems are great for spoken alerts, status messages, and instructional feedback. Because everything runs locally, the ESP32 Text-to-Speech system responds quickly and works reliably even in places where there's no internet or limited network access.
Audio Signal Processing Flow
The following is the processing flow for audio signals during text to speech in ESP32:
∗ Text Input: The user enters a sentence through a Serial Monitor
∗ Word Parsing: The ESP32 parses the sentence into separate words
∗ Vocabulary Matching: Each word is matched against the LPC data arrays
∗ DAC Output: Each matched LPC frame generates analog audio on GPIO25
∗ Amplification: The PAM8403 module amplifies the signal for output to a speaker
∗ Audio Playback: A speaker plays back an intelligible speech output
Key Features of the ESP32 Offline Text-to-Speech Converter
⇒Fully Offline Speech Output
All the processing happens directly on the ESP32, so you don’t need an internet connection or any external services. The system responds quickly and remains dependable even when there’s no network available.
⇒Very Simple Hardware Requirements
The setup only includes an ESP32, a small PAM8403 amplifier, and a standard speaker. There are no complex audio processors or complicated circuits involved; this makes the design easy to assemble and budget-friendly.
⇒Lightweight LPC Speech Engine
The Talkie library uses LPC encoding, which keeps the speech data small and simple to handle. The audio quality isn’t high-fidelity, but it’s clear for alerts, instructions, or short messages.
⇒Easy to Add More Words
If you want the system to say more, you simply add the new LPC entries to the vocabulary file. As long as the LPC data is present, the ESP32 can pronounce it without needing any changes to the code.
⇒Beginner-Friendly Setup
The wiring is simple, and the code is easy to follow. Someone with basic experience in Arduino or ESP32 can set this up quickly and make small adjustments without much difficulty.
⇒Good for Alerts and Simple Automation
This system is ideal for projects that need spoken notifications or quick audio feedback, such as alarms, control panels, educational tools, or other small speech-based embedded devices.
| Feature | Description | Benefit |
| Fully Offline Operation | All processing occurs on ESP32; no internet required | Fast response, reliable in remote locations |
| Minimal Hardware | ESP32 + PAM8403 amplifier + speaker | Budget-friendly, easy assembly |
| LPC Audio Engine | Lightweight speech synthesis using Talkie library | Low memory usage, clear audio for alerts |
| Expandable Vocabulary | Add new words via LPC data arrays | Customizable for specific applications |
| Beginner-Friendly | Simple wiring, well-documented code | Quick setup, easy modifications |
| Ideal for Automation | Perfect for alerts, notifications, status messages | Enhanced user experience |
Required Components to Build a Text-to-Speech Converter Using ESP32
Building this ESP32 text to speech offline system requires minimal, affordable components available at any electronics store.
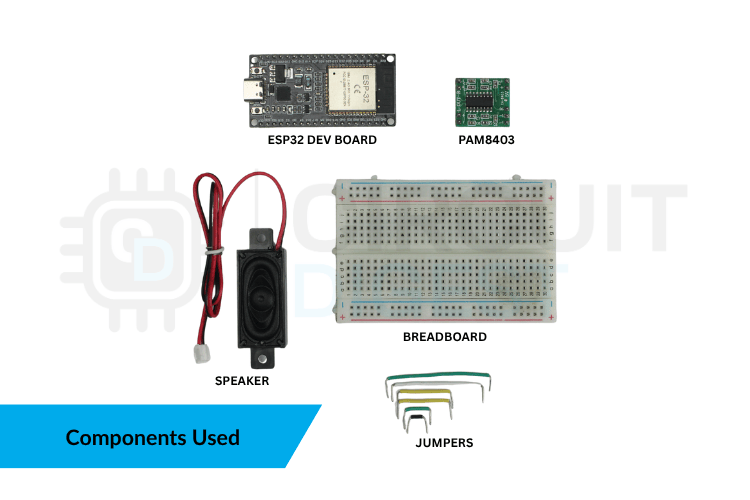
| Component | Quantity | Role in ESP32 Text to Speech | Specifications |
| ESP32 Development Board | 1 | Main controller running Talkie TTS library | Dual DAC pins (GPIO25, GPIO26) |
| PAM8403 Audio Amplifier | 1 | Amplifies DAC audio output signal | 5V operation, 3W per channel |
| Speaker | 1 | Produces audible speech output | 4-8 ohms impedance |
| Breadboard | 1 | Rapid prototyping platform | 830 tie-points recommended |
| Jumper Wires | Several | Electrical connections | Male-to-male, male-to-female |
| USB Cable | 1 | Code upload and power supply | Micro-USB or USB-C (per board) |
As you can see, the components required are very minimal, and most of them can be easily purchased at a very affordable cost from any electronics market.
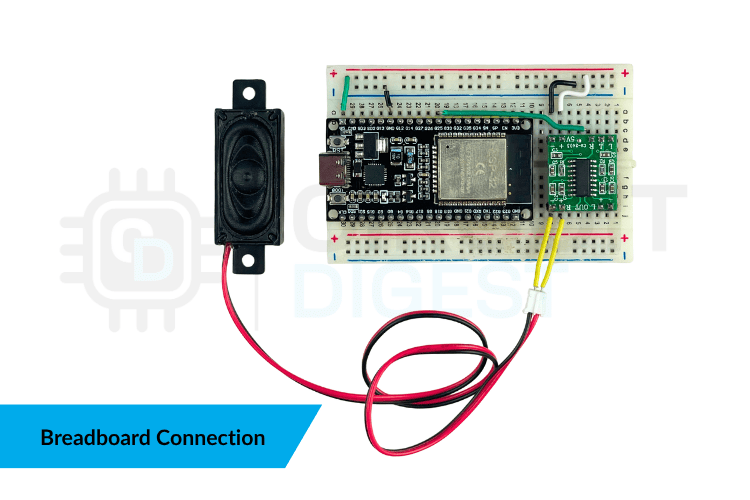
ESP32 to PAM8403 Circuit Connections
For the ESP32 text to speech, we need to use a PAM8403 audio amplifier and a speaker, as mentioned earlier. The connection diagram below shows how to connect your PAM8403 audio amplifier module to the ESP32.

The ESP32 includes two DAC pins (GPIO25 and GPIO26). For this project, we use GPIO25 to output the audio signal.
ESP32 to PAM8403 Amplifier
The table below mentions the pin connections with the ESP32 and the PAM8403 amplifier module. Follow this wiring table for proper text to speech using ESP32 implementation:
| ESP32 Pin | PAM8403 Pin | Signal Description |
| GPIO25 | R (Audio In Right) | Audio signal (DAC output) |
| 5V | VCC | Powers the amplifier module |
| GND | GND | Common ground between both boards |
GPIO25 gives the analog waveform generated by the LPC speech engine. The PAM8403 then boosts this signal to a regular speech level.
PAM8403 to Speaker
The table below gives the pin connection to PAM8403 with the speaker.
The breadboard connection is given below.
| PAM8403 Pin | Speaker |
| R+ | Speaker + |
| R− | Speaker − |
ESP32 Text to Speech Library: Complete Code Guide
On the software side, we’ll use the Arduino IDE along with the Talkie library to read text from the Serial Monitor and convert it into audio output. The full source code for this project is provided at the end of the tutorial, but in this section, we’ll focus on the key parts of the code so you can understand how the system works without getting lost in the complete listing.
Including Libraries
#include <Talkie.h>
#include "Vocab_US_Large.h"
Talkie is the main library that handles the LPC audio. It includes functions for reading LPC frames, decoding them, and generating the final sound wave through the GPIO DAC pin.
You can download the Talkie library here on GitHub: https://github.com/ArminJo/Talkie
"Vocab_US_Large.h" is the vocabulary file that contains predefined LPC speech arrays.
Initialising the Talkie Object
Talkie voice;The voice object acts as the playback engine. Every time you call the function, voice.say(...), the ESP32 gives a sequence of LPC frames as output representing spoken words.
Word Mapping Structure
The WordMap structure creates a simple dictionary linking a text keyword (the word you type) to a specific LPC array containing that word’s audio data.
struct WordMap {
 const char* text;
 const unsigned char* lpc;
};
For example:
{"ONE", sp2_ONE},Means, when you type "ONE", the system extracts the LPC data stored in sp2_ONE.
This mapping is important because the library does not process text into phonemes on its own. It only uses the predefined LPC arrays.
The Dictionary Array
WordMap words[] = {
   {"ZERO", sp2_ZERO},
   ...
};
This array includes all the words your system can speak, which is the main part of the ESP32's text-to-speech feature. If you write a word that isn't in this list, the ESP32 will mention that it can't speak that word.
The array can get pretty big, and adding more words makes your ESP32 text-to-speech library better and more useful for actual projects. When you type "ONE," the ESP32 text to speech system extracts data from sp2_ONE. The ESP32 TTS library doesn't generate phonemes dynamically—it only plays predefined LPC arrays.
Word Lookup and Playback Function
This function performs case-insensitive matching for text to speech using ESP32.
void speakWord(const char* w) {
for (int i = 0; i < wordCount; i++) {
if (strcasecmp(w, words[i].text) == 0) {
voice.say(words[i].lpc);
return;
}
}
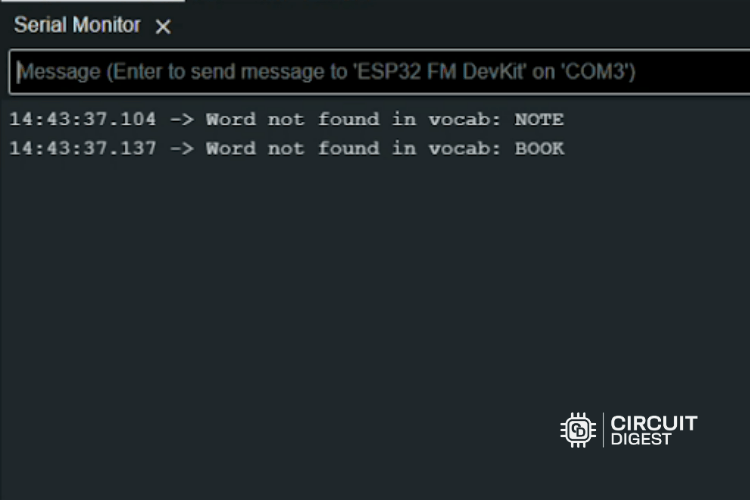
Serial.print("Word not found in vocab: ");
Serial.println(w);
}This function compares your input word with each entry in the dictionary, and it ignores the uppercase and lowercase letters. If there's a match, it uses the voice.say() function to play the LPC audio.
If there's no match, it shows a warning message. This helps you identify any missing words in the vocabulary.
Serial Input Handling
In the setup() function:
Serial.begin(9600);
Serial.println("Type your sentence in capital letters...");
The ESP32 waits for user input through the Serial Monitor.
Sentence Parsing Logic
In the loop() function:
String line = Serial.readStringUntil('\n');
line.trim();
line.toUpperCase();
This reads a full sentence, removes extra spaces, and converts it to uppercase to match the dictionary format.
The sentence is processed one character at a time:
for (int i = 0; i <= line.length(); i++) {
 if (i == line.length() || line[i] == ' ') {
   String w = line.substring(start, i);
   speakWord(w.c_str());
   start = i + 1;
 }
}
Whenever a space or the end of the string is found, it takes the current word and plays it back. This way, the ESP32 says each word of the sentence one at a time. When found, it extracts the current word and plays it back using the ESP32 text to speech library, creating natural sentence flow.
Testing ESP32 Text-to-Speech Output
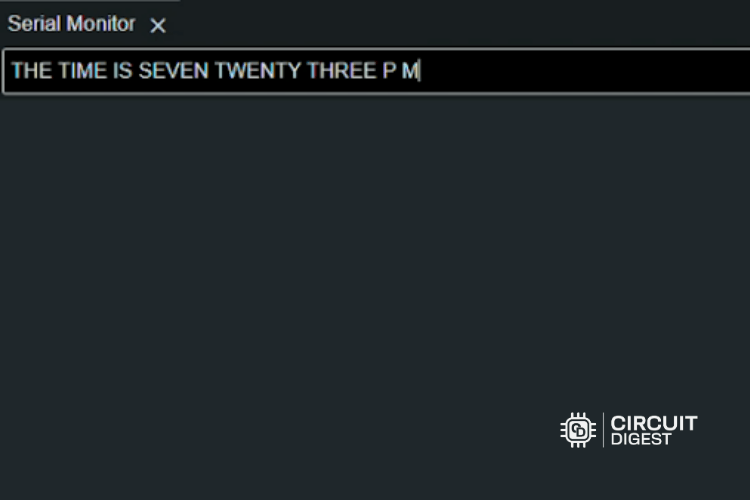
After uploading the code, open the Serial Monitor and set the baud rate to 9600. Type a sentence such as:
START MACHINE
CHECK TEMPERATURE
POWER ALERT
Then press enter.
The ESP32 reads the whole sentence, splits it into separate words, and tries to pronounce each one using the vocabulary mapping system. If a word is in the dictionary, you’ll hear it clearly through the speaker as part of the ESP32’s text-to-speech process. If a word isn’t found, the Serial Monitor shows “Word not found in vocab,” helping you spot any missing words in your vocabulary set and update your ESP32 text-to-speech library as needed.
Troubleshooting Issues
| Issue | Possible Cause | Solution |
| No audio output | Loose connections or incorrect wiring | Verify GPIO25 to PAM8403 connection; check power supply |
| Distorted sound | Speaker impedance mismatch or amplifier overload | Use 4-8 ohm speaker; reduce volume on PAM8403 |
| Words not recognized | Word not in vocabulary dictionary | Add LPC data for missing words or use alternatives |
| Robotic voice quality | LPC format limitation | Normal for LPC; prioritizes memory efficiency over quality |
Frequently Asked Questions: ESP32 Text to Speech
⇥ 1. Can this system speak any word I want?
No, the system can only speak words that already have LPC data in the vocabulary file. The Talkie library doesn't create speech on the fly; it just plays pre-recorded speech frames from memory. You can add more words only if the LPC arrays are available, which is usual for an ESP32 Text-to-Speech system. If a word isn't in the file, the ESP32 can't make up the speech on its own.
⇥ 2. Why does the voice sound robotic?
The Talkie library uses Linear Predictive Coding (LPC), a speech compression technique that was first used in older digital communication systems. LPC is suitable for smaller devices, but it often produces a sound that feels artificial or robotic. This is common in the ESP32 TTS library; saving memory is more important than achieving a very natural voice.
⇥ 3. Can I connect directly to the speaker without the amplifier?
Technically, the ESP32 DAC pin can produce audio, but the volume will be hushed, and connecting it directly might overload or harm the DAC pin. So, you need to use a PAM8403 module to get the output safely and reliably in any ESP32 text-to-speech projects.
⇥ 4. Which DAC pins can be used?
The ESP32 has two pins that can be used for DAC: GPIO25 and GPIO26. Both of these pins can produce analog audio signals. In this tutorial, we're using GPIO25 for consistency, but if your setup needs a different pin configuration, you can use GPIO26 instead.
⇥ 5. Does this work with ESP8266?
The ESP8266 is compatible with the Talkie library. The library was originally designed to work with ESP32 boards, but the ESP8266 boards may also support it efficiently.
⇥ 6. Can I use a larger speaker?
Yes. The PAM8403 amplifier can power many small to medium speakers that usually have a resistance between 4 and 8 ohms. If you're using bigger speakers, they might need more power, so make sure your wiring and power source are suitable when you're setting up.
Conclusion: Building Practical ESP32 Text to Speech Systems
This extensive tutorial illustrates how the ESP32 text to speech , along with the Talkie library and LPC audio file format, provides simple yet effective voice output capabilities. The ESP32 text to speech system does not rely on cloud services, allowing for speech closure, whether total or partial, in environments with limited memory or poorly connected conditions. While using the ESP32 TTS library may sound robotic, offline functionality and low memory usage help to ensure usage wherever audio feedback in real-time is desired. Whether an alert system, learning tool, or automation panel is your goal, text to speech using ESP32 provides maximum value in user experience with embedded projects.
This project shows that the ESP32 can generate audio from pre-recorded LPC data and a simple software library. By using the Talkie library, the device becomes a practical Text-to-Speech solution for small projects and systems, delivering a voice output without needing a cloud-based speech synthesis. The entire setup stays small, affordable, and fully self-contained. Since it uses minimal hardware and doesn’t require an internet connection, it works well even in remote or industrial settings.
This tutorial was created by the CircuitDigest engineering team. Our experts focus on creating practical, hands-on tutorials that help makers and engineers master Raspberry Pi projects, Arduino projects, ESP32 projects and IoT development projects.
I hope you liked this article and learned something new from it. If you have any doubts, you can ask in the comments below or use our CircuitDigest forum for a detailed discussion.
GitHub Repository
If you want the project files, wiring diagrams, and sample videos, these are stored cleanly in this GitHub repository.


Similar Voice-Based Projects
These projects explain different TTS options and show how voice commands can be used to control devices using Arduino and ESP32.
 Converters available for Raspberry Pi - eSpeak, Festival, Google TTS, Pico and PYTTSX3")
There are many free and paid Text-to-Speech applications, such as Cepstral and eSpeak. So we compare different open-source TTS applications by installing them on a Raspberry Pi.

Building a Voice-Controlled Home Automation System with Arduino
Voice-controlled home Automation Using Arduino is an exciting project that aims to automate home appliances with the power of voice commands. In this project, voice instructions will be recognised, and text-to-speech conversion will be performed using an Android app.

ESP32 Offline Voice Recognition Using Edge Impulse
Build an ESP32 speech recognition offline system with Edge Impulse. Create your own ESP32 voice assistant using an INMP441 microphone for hands-free control.
Complete Project Code
/*
* Project Title: ESP32 based Text to Speech offline converter
*/
#include <Talkie.h>
#include "Vocab_US_Large.h"  // Include the vocab you want
Talkie voice;
// Minimal mapping: text → LPC array
struct WordMap {
 const char* text;
 const unsigned char* lpc;
};
// Only include words actually in your LPC vocab
WordMap words[] = {
   {"ZERO", sp2_ZERO},
   {"ONE", sp2_ONE},
   {"TWO", sp2_TWO},
   {"THREE", sp2_THREE},
   {"FOUR", sp2_FOUR},
   {"FIVE", sp2_FIVE},
   {"SIX", sp2_SIX},
   {"SEVEN", sp2_SEVEN},
   {"EIGHT", sp2_EIGHT},
   {"NINE", sp2_NINE},
   {"TEN", sp2_TEN},
   {"ELEVEN", sp2_ELEVEN},
   {"TWELVE", sp2_TWELVE},
   {"TWENTY", sp2_TWENTY},
   {"HUNDRED", sp2_HUNDRED},
   {"THOUSAND", sp2_THOUSAND},
   {"THIR", sp2_THIR_},
   {"FIF", sp2_FIF_},
   {"TEEN", sp2__TEEN},
   // Letters
   {"A", sp2_A},
   {"B", sp2_B},
   {"C", sp2_C},
   {"D", sp2_D},
   {"E", sp2_E},
   {"F", sp2_F},
   {"G", sp2_G},
   {"H", sp2_H},
   {"I", sp2_I},
   {"J", sp2_J},
   {"K", sp2_K},
   {"L", sp2_L},
   {"M", sp2_M},
   {"N", sp2_N},
   {"O", sp2_O},
   {"P", sp2_P},
   {"Q", sp2_Q},
   {"R", sp2_R},
   {"S", sp2_S},
   {"T", sp2_T},
   {"U", sp2_U},
   {"V", sp2_V},
   {"W", sp2_W},
   {"X", sp2_X},
   {"Y", sp2_Y},
   {"Z", sp2_Z},
   // Phonetic alphabet
   {"ALPHA", sp2_ALPHA},
   {"BRAVO", sp2_BRAVO},
   {"CHARLIE", sp2_CHARLIE},
   {"DELTA", sp2_DELTA},
   {"ECHO", sp2_ECHO},
   {"FOXTROT", sp2_FOXTROT},
   {"GOLF", sp2_GOLF},
   {"HENRY", sp2_HENRY},
   {"INDIA", sp2_INDIA},
   {"JULIET", sp2_JULIET},
   {"KILO", sp2_KILO},
   {"LIMA", sp2_LIMA},
   {"MIKE", sp2_MIKE},
   {"NOVEMBER", sp2_NOVEMBER},
   {"OSCAR", sp2_OSCAR},
   {"PAPA", sp2_PAPA},
   {"QUEBEC", sp2_QUEBEC},
   {"ROMEO", sp2_ROMEO},
   {"SIERRA", sp2_SIERRA},
   {"TANGO", sp2_TANGO},
   {"UNIFORM", sp2_UNIFORM},
   {"VICTOR", sp2_VICTOR},
   {"WHISKY", sp2_WHISKY},
   {"XRAY", sp2_XRAY},
   {"YANKEE", sp2_YANKEE},
   {"ZULU", sp2_ZULU},
   // Common words
   {"THE", sp2_THE},
   {"WATTS", sp2_WATTS},
   {"METER", sp2_METER},
   {"DANGER", sp2_DANGER},
   {"PRESSURE", sp2_PRESSURE},
   {"CHANGE", sp2_CHANGE},
   {"MINUS", sp2_MINUS},
   {"NOT", sp2_NOT},
   {"START", sp2_START},
   {"LINE", sp2_LINE},
   {"OFF", sp2_OFF},
   {"TIME", sp2_TIME},
   {"AUTOMATIC", sp2_AUTOMATIC},
   {"WEIGHT", sp2_WEIGHT},
   {"SMOKE", sp2_SMOKE},
   {"ABORT", sp2_ABORT},
   {"CALL", sp2_CALL},
   {"CYCLE", sp2_CYCLE},
   {"DISPLAY", sp2_DISPLAY},
   {"EQUAL", sp2_EQUAL},
   {"FAST", sp2_FAST},
   {"ABOUT", sp2_ABOUT},
   {"GO", sp2_GO},
   {"INCH", sp2_INCH},
   {"LOW", sp2_LOW},
   {"MOTOR", sp2_MOTOR},
   {"OPEN", sp2_OPEN},
   {"PERCENT", sp2_PERCENT},
   {"PROBE", sp2_PROBE},
   {"READY", sp2_READY},
   {"SET", sp2_SET},
   {"SPEED", sp2_SPEED},
   {"UNDER", sp2_UNDER},
   {"OPERATOR", sp2_OPERATOR},
   {"AMPS", sp2_AMPS},
   {"MEGA", sp2_MEGA},
   {"PICO", sp2_PICO},
   {"FIRE", sp2_FIRE},
   {"POWER", sp2_POWER},
   {"COMPLETE", sp2_COMPLETE},
   {"REPAIR", sp2_REPAIR},
   {"TEMPERATURE", sp2_TEMPERATURE},
   {"STOP", sp2_STOP},
   {"MACHINE", sp2_MACHINE},
   {"ON", sp2_ON},
   {"CONTROL", sp2_CONTROL},
   {"ELECTRICIAN", sp2_ELECTRICIAN},
   {"AT", sp2_AT},
   {"RED", sp2_RED},
   {"ALL", sp2_ALL},
   {"CANCEL", sp2_CANCEL},
   {"PHASE", sp2_PHASE},
   {"NOR", sp2_NOR},
   {"EXIT", sp2_EXIT},
   {"FLOW", sp2_FLOW},
   {"GAUGE", sp2_GAUGE},
   {"GREEN", sp2_GREEN},
   {"INSPECTOR", sp2_INSPECTOR},
   {"MANUAL", sp2_MANUAL},
   {"MOVE", sp2_MOVE},
   {"OVER", sp2_OVER},
   {"PLUS", sp2_PLUS},
   {"PULL", sp2_PULL},
   {"REPEAT", sp2_REPEAT},
   {"SHUT", sp2_SHUT},
   {"TEST", sp2_TEST},
   {"VOLTS", sp2_VOLTS},
   {"GALLONS", sp2_GALLONS},
   {"HERTZ", sp2_HERTZ},
   {"MICRO", sp2_MICRO},
   {"OHMS", sp2_OHMS},
   {"AREA", sp2_AREA},
   {"AND", sp2_AND},
   {"CIRCUIT", sp2_CIRCUIT},
   {"CONNECT", sp2_CONNECT},
   {"SECONDS", sp2_SECONDS},
   {"UNIT", sp2_UNIT},
   {"TIMER", sp2_TIMER},
   {"UP", sp2_UP},
   {"IS", sp2_IS},
   {"ALERT", sp2_ALERT},
   {"ADJUST", sp2_ADJUST},
   {"BETWEEN", sp2_BETWEEN},
   {"MINUTES", sp2_MINUTES},
   {"BUTTON", sp2_BUTTON},
   {"CLOCK", sp2_CLOCK},
   {"DEVICE", sp2_DEVICE},
   {"EAST", sp2_EAST},
   {"FAIL", sp2_FAIL},
   {"FREQUENCY", sp2_FREQUENCY},
   {"GATE", sp2_GATE},
   {"HIGH", sp2_HIGH},
   {"INTRUDER", sp2_INTRUDER},
   {"MEASURE", sp2_MEASURE},
   {"NORTH", sp2_NORTH},
   {"PASS", sp2_PASS},
   {"POSITION", sp2_POSITION},
   {"PUSH", sp2_PUSH},
   {"RIGHT", sp2_RIGHT},
   {"SLOW", sp2_SLOW},
   {"TOOL", sp2_TOOL},
   {"WEST", sp2_WEST},
   {"FARAD", sp2_FARAD},
   {"MILLI", sp2_MILLI},
   {"CAUTION", sp2_CAUTION},
   {"LIGHT", sp2_LIGHT},
   {"CHECK", sp2_CHECK},
   {"DEGREES", sp2_DEGREES},
   {"SERVICE", sp2_SERVICE},
   {"SWITCH", sp2_SWITCH},
   {"VALVE", sp2_VALVE},
   {"VAL", sp2_VAL},
   {"NUMBER", sp2_NUMBER},
   {"OUT", sp2_OUT},
   {"POINT", sp2_POINT},
   {"BREAK", sp2_BREAK},
   {"HOURS", sp2_HOURS},
   {"CALIBRATE", sp2_CALIBRATE},
   {"CRANE", sp2_CRANE},
   {"DIRECTION", sp2_DIRECTION},
   {"ENTER", sp2_ENTER},
   {"FEET", sp2_FEET},
   {"FROM", sp2_FROM},
   {"GAP", sp2_GAP},
   {"HOLD", sp2_HOLD},
   {"LEFT", sp2_LEFT},
   {"MILL", sp2_MILL},
   {"UH", sp2_UH},
   {"PAST", sp2_PAST},
   {"PRESS", sp2_PRESS},
   {"RANGE", sp2_RANGE},
   {"SAFE", sp2_SAFE},
   {"SOUTH", sp2_SOUTH},
   {"TURN", sp2_TURN},
   {"YELLOW", sp2_YELLOW},
   {"YELLOW", sp2_YELLOW},
};
const int wordCount = sizeof(words) / sizeof(words[0]);
void speakWord(const char* w) {
 for (int i = 0; i < wordCount; i++) {
   if (strcasecmp(w, words[i].text) == 0) {
     voice.say(words[i].lpc);
     return;
   }
 }
 Serial.print("Word not found in vocab: ");
 Serial.println(w);
}
void setup() {
 Serial.begin(9600);
 Serial.println("Type your sentence in capital letters. Example: HELLO WORLD");
}
void loop() {
 if (Serial.available() > 0) {
   String line = Serial.readStringUntil('\n');
   line.trim();
   line.toUpperCase();
   // Split sentence into words
   int start = 0;
   for (int i = 0; i <= line.length(); i++) {
     if (i == line.length() || line[i] == ' ') {
       String w = line.substring(start, i);
       speakWord(w.c_str());
       start = i + 1;
     }
   }
 }
}
