

“Good morning. It’s 7:00 a.m. The weather in Malibu is 72 degrees with scattered clouds. The surf conditions are fair with waist-to-shoulder high lines. High tide will be at 10:52 a.m”. Every time I hear this voice of Jarvis in the movie Iron Man it sends me chills down my spine. I am sure just like me many would have dreamt of living a life as sophisticated as Tony Stark. But sadly we have not advanced with technology for a miniature Arc reactor or an AI as smart as JARVIS. But it is possible to replace our boring morning alarm clocks with the one that is similar to Jarvis using a Raspberry Pi. At the end of this project, we will create a very basic GUI using which we can set an alarm and when the alarm goes on we will have a voice which tells us the current time and day with some pre-defined text. Sounds cool right!! So let us build one.
Materials Needed
- Raspberry Pi
- 3.5” TFT LCD Screen
- Speaker
- AUX cable
- Internet Connection
Pre-Requisites
It is assumed that your Raspberry Pi is already flashed with an operating system and is able to connect to the internet. If not, follow the Getting started with Raspberry Pi tutorial before proceeding. Here we are using Rasbian Jessie installed Raspberry Pi 3.
It is also assumed that you have access to your pi either through terminal windows or through other application using which you can write and execute python programs and use the terminal window.
You might also want to check out how to interface 3.5” TFT LCD with Raspberry Pi since we will be using it in this project.
Install TTS Engine (Espeak) for Raspberry Pi
As the project title states we are going to build a speaking clock. In order to make your Pi speak we need a Text To speech (TTS) Engine. There are so many options to select from, but for the sake of simplicity I have select the Espeak Engine. To install Espeak on your Pi simply run the following command on your terminal
sudo apt-get install espeak
sudo apt-get install espeak python-espeak
Creating GUI for Raspberry Pi Speaking Alarm Clock
For this project we need to develop a GUI that represents an alarm clock so that the user can view the current time and also set the alarm. There are lots of options to develop a GUI using Python, but the most popular and versatile one is the PyQt4, so we will use that to develop our GUI. In the below few headings we discuss how to use PyQt4 to design your own GUI’s, but if you are not interested you can directly skip down to “Program for Speaking Alarm Clock” heading.
Installing PyQt4 with Qt designer on your Windows Machine
Since we are designing a GUI we will first start our programming on our laptop (windows/Linux) and then port this python script to work on our Pi. Since PyQt4 has a very good portability most developers do this since the development is easy and faster in a laptop then actually doing it on a Raspberry Pi.
I have installed python and PQt packages on my windows machine; if you are not interested in this you can develop your GUI on your raspberry pi itself by simply skipping this step. To install PQt on windows download this exe file and during the installation procedure make sure you have checked the Qt designer software since we will be using it for our project.
Installing PyQt on Pi/Linux/MAC machines
To install PyQt on Linux machine simply run the following line on your command terminal
sudo apt-get install python-qt4
Designing the GUI using Qt Designer
One noticeable advantage of using PyQt4 for your GUI designs is that it has Qt designer software. This software can be used to create button, displays, texts and other graphics by simply dragging things into screen and placing them wherever required. This saves us a lot of time since we don’t have to manually feed in the size and position of the objects on our screen. I have installed Qt designer along with Python and PyQt4 on my windows laptop using the exe file as discussed in above paragraph. After installing open your Qt Designer and you will get this screen.

On the left side you can find layout, spacers, buttons and other items which you can simply use by dragging it into your window. You can also customize the objects as required using the windows on the right. I have used a 7-segment LCD display, a button, a text line and set time object to create the UI for our alarm clock. After using layouts to place all the objects in the required place and size my window looked something like this below
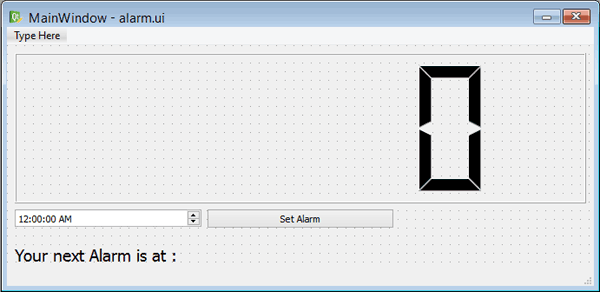
Once your GUI is ready you can save your design as a .ui file. Later, anytime when you wish to make changes to your GUI you can simply open this file and do the changes without having to scroll up and down in your program. The .ui file for speaking clock can be downloaded if you wish to make any changes to this design. Once you are satisfied with the GUI design you can export it as a python code from where you can begin your python programming.
I know many things here would have bounced over your head, but it is not possible to explain how to use the Qt4 library in a single tutorial. You can refer to sentdex PyQt4 tutorial series to know more on how to use PyQt4 and Qt designer software.
Python Program for Raspberry Pi Speaking Alarm Clock
The complete python code for this project is given at the end of this page. You can directly run it on your Raspberry pi to get output, but further below I have explained the program into small snippets so that you can understand how the program works.
Almost half of the code is already written for us by the Qt designer software, this code has then information about the type, style, size and position of the objects that are on top of our screen. Now all that we have to do is provide purpose and function for these objects.
The 7-segment display is used to show the current time. The set-time object is used to select the alarm time and the button “set alarm” should be clicked to set the alarm on the selected time. The text line at the bottom shows when the alarm is set and other useful information. Apart from that we also have to play voice alarm when the alarm is set and triggered.
For our program we need the PyQt4 for designing the GUI and espeak to play voice alarm and time package strftime to read the current time from Pi. So we import all the three packages using the below line of code.
from PyQt4 import QtCore, QtGui #PyQt4 is used for designing the GUI
from espeak import espeak #text to speech sonversion
from time import strftime # To get time from Raspberry pi
Next we have a chunk a codes which was obtained from the Qt designer, these codes will consist of the position and size of the widgets that we have placed on the screen. We have edited the code a little to assign purpose to the widget. First on the 7-segment LCD widget we have to display the current time, this can be done by using the strftime method which will give us the current time that’s running on Pi. We can then display this time on the LCD as shown below.
self.Time_LCD = QtGui.QLCDNumber(self.centralwidget)
self.Time_LCD.setObjectName(_fromUtf8("Time_LCD"))
 self.Time_LCD.setDigitCount(8)
 self.Time_LCD.display(strftime("%H"+":"+"%M"+":"+"%S")) #get time from Pi and display it
 self.gridLayout.addWidget(self.Time_LCD, 1, 0, 1, 3)
Next we have a button pressed button, when this button is pressed we have to set the alarm. So we use a method called button_pressed. Whenever this button is pressed the function button_pressed will be called.
self.pushButton = QtGui.QPushButton(self.centralwidget)
        self.pushButton.setObjectName(_fromUtf8("pushButton"))
        self.pushButton.clicked.connect(self.button_pressed) #when button pressed call the button pressed function
        self.gridLayout.addWidget(self.pushButton, 2, 1, 1, 1)
        MainWindow.setCentralWidget(self.centralwidget)
The button_pressed function is shown below. Here we read the values of hour and minutes from the set time widget. This information will be in form of string, so it can be trimmed to get the value of hour and minutes and stored in the variable alarm_h and alarm_m. Once we have the value of minute and hour we can use this to compare it with current minutes and hour.
Finally after the set time is read we also display a text using the string variable message. This message will be displayed as a label text.
def button_pressed(self): #when set alarm button is pressed
        print("Button Pressed")
        alarm_time = str(self.Set_Time.time())

        self.alarm_h = int(alarm_time[19:21]) #value of hour is sotred in index value 19 and 20
        self.alarm_m = int (alarm_time[23:25]) #value of minute is sotred in index value 23 and 24

        message = "Alarm is set at " + str(self.alarm_h) + " hours " + str(self.alarm_m) + " minutes"
        self.label.setText(_translate("MainWindow", message, None)) #display the message on GUI screen
        espeak.synth (message) #speak the message through audio jack
We also give a voice alert stating that the alarm was set for so and so time by using the espeak method. This method just speaks any text passed to it via the audio jack. Here the string in the variable message is read out
espeak.synth (message) #speak the message through audio jack
Finally we need one more method, that compares the current time with set time and when both match it has to notify the user through speech. For this purpose we have the time function in our code, it compares the current_h with alarm_h and current_m with alarm_m. When both match it triggers the alarm by speaking the text stored in the variable message1. You can customise the variable message1 if you wish to make the clock speak something else; right now it will wish you good morning along with the current time and day.
  def Time(self): #Function to compare current time with set time
        self.Time_LCD.display(strftime("%H"+":"+"%M"+":"+"%S"))
        self.current_h = int (strftime("%H"))
        self.current_m = int (strftime("%M"))

        if (self.current_h == self.alarm_h) and (self.current_m == self.alarm_m) and ((int(strftime("%S"))%15) == 0): #if the both time match
            print("ALARM ON!!!!!")

            message1 = " The time is " + str(self.alarm_h) + " : " + str(self.alarm_m) + " on " + strftime("%A")
            message = "Sir, Good morning.. This is your wake up Alarm." + message1

            self.label.setText(_translate("MainWindow",message1, None)) #display the message on GUI screen
            espeak.synth (message) #speak the message through audio jack
            time.sleep(1)
Hardware Set-up for Raspberry Pi Alarm Clock
The Hardware set-up for this project is pretty simple. We are using just using a 3.5” TFT LCD screen with our PI. To set up the display you can follow the Interfacing Pi with 3.5” LCD tutorial. Once your interfacing is complete you should be able to use the stylus and navigate through the OS of raspberry pi. In order to play the sound you need to have a speaker, I have connected by portable speaker to pi through AUX cable. Once everything is set and the program is launched my set-up looked like this below.
Working of Pi based Speaking Alarm Clock
Prepare the hardware as shown above and then make sure you have installed PyQt4 and Espeak on your Pi. Then use then python code given below, just paste it in the python IDLE and run the program. It will launch the GUI window as shown below
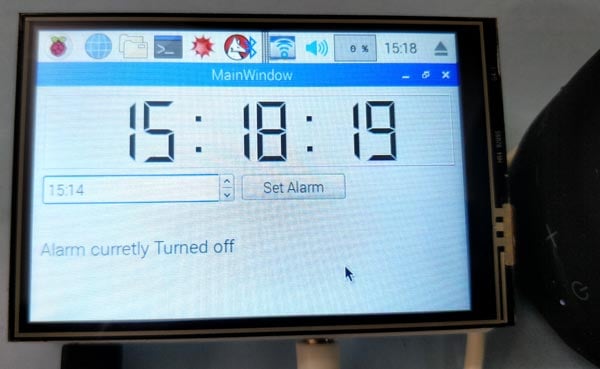
It shows the current time and also provides a text box to set the alarm. Use your stylus to set the alarm time and press on set alarm button. This will give you a voice message stating that the alarm is set. Now just wait till the current time shown on the 7-seg display is equal to the alarm time. When its equal the alarm is triggered, this will again give a voice message with current time and day. This alarm will repeat four times before the minute value changes. The complete working of the project can be found at the video link given below.
This is just a base for the project and you can easily build on top of by adding snooze and stop button. Also, customize the voice message based on your preference or based on location and what not? Let me know what you have in mind. Hope you understood the tutorial and enjoyed building it. If you have any problem please feel free to drop them on the comment section or use the forums for other technical quires.
Complete Project Code
# Speaking alarm clock using Raspberry Pi

#Connect 3.5" LCD and speaker though AUX and run the program with PyQt4 and espeak packages

# Program by: B.Aswinth Raj

# Website: circuitdigest.com

#

# GUI code was created using Qt Designer

import sys

import time
from PyQt4 import QtCore, QtGui #PyQt4 is used for designing the GUI

from espeak import espeak #text to speech sonversion

from time import strftime # To get time from Raspberry pi
#Code from Qt Designer

try:

    _fromUtf8 = QtCore.QString.fromUtf8

except AttributeError:

    def _fromUtf8(s):

        return s
try:

    _encoding = QtGui.QApplication.UnicodeUTF8

    def _translate(context, text, disambig):

        return QtGui.QApplication.translate(context, text, disambig, _encoding)

except AttributeError:

    def _translate(context, text, disambig):

        return QtGui.QApplication.translate(context, text, disambig)
class Ui_MainWindow(object):

    def setupUi(self, MainWindow):
        self.alarm_h = 0

        self.alarm_m = 0


        MainWindow.setObjectName(_fromUtf8("MainWindow"))

        MainWindow.resize(676, 439)


        self.centralwidget = QtGui.QWidget(MainWindow)

        self.centralwidget.setObjectName(_fromUtf8("centralwidget"))

        self.gridLayout = QtGui.QGridLayout(self.centralwidget)

        self.gridLayout.setObjectName(_fromUtf8("gridLayout"))

        self.label = QtGui.QLabel(self.centralwidget)


        font = QtGui.QFont()

        font.setPointSize(14)

        self.label.setFont(font)

        self.label.setObjectName(_fromUtf8("label"))

        self.gridLayout.addWidget(self.label, 3, 0, 1, 1)


        self.Time_LCD = QtGui.QLCDNumber(self.centralwidget)

        self.Time_LCD.setObjectName(_fromUtf8("Time_LCD"))

        self.Time_LCD.setDigitCount(8)

        self.Time_LCD.display(strftime("%H"+":"+"%M"+":"+"%S")) #get time from Pi and display it

        self.gridLayout.addWidget(self.Time_LCD, 1, 0, 1, 3)
        self.timer = QtCore.QTimer(MainWindow)

        self.timer.timeout.connect(self.Time)

        self.timer.start(1000)


        current_time = QtCore.QTime()

        self.Set_Time = QtGui.QTimeEdit(self.centralwidget)

        self.Set_Time.setObjectName(_fromUtf8("Set_Time"))

        self.Set_Time.setTime(current_time.currentTime())

        self.gridLayout.addWidget(self.Set_Time, 2, 0, 1, 1)


        self.pushButton = QtGui.QPushButton(self.centralwidget)

        self.pushButton.setObjectName(_fromUtf8("pushButton"))

        self.pushButton.clicked.connect(self.button_pressed)

        self.gridLayout.addWidget(self.pushButton, 2, 1, 1, 1)

        MainWindow.setCentralWidget(self.centralwidget)


        self.menubar = QtGui.QMenuBar(MainWindow)

        self.menubar.setGeometry(QtCore.QRect(0, 0, 676, 21))

        self.menubar.setObjectName(_fromUtf8("menubar"))

        MainWindow.setMenuBar(self.menubar)


        self.statusbar = QtGui.QStatusBar(MainWindow)

        self.statusbar.setObjectName(_fromUtf8("statusbar"))

        MainWindow.setStatusBar(self.statusbar)
        self.retranslateUi(MainWindow)

        QtCore.QMetaObject.connectSlotsByName(MainWindow)
#End of code from Qt Designer


    def retranslateUi(self, MainWindow): #update the GUI window

        print("Dispay Re-translated")

        MainWindow.setWindowTitle(_translate("MainWindow", "MainWindow", None))

        self.label.setText(_translate("MainWindow", "Alarm curretly Turned off", None))

        self.pushButton.setText(_translate("MainWindow", "Set Alarm", None))


    def Time(self): #Function to compare current time with set time

        self.Time_LCD.display(strftime("%H"+":"+"%M"+":"+"%S"))

        self.current_h = int (strftime("%H"))

        self.current_m = int (strftime("%M"))
        if (self.current_h == self.alarm_h) and (self.current_m == self.alarm_m) and ((int(strftime("%S"))%15) == 0): #if the both time match

            print("ALARM ON!!!!!")


            message1 = " The time is " + str(self.alarm_h) + " : " + str(self.alarm_m) + " on " + strftime("%A")

            message = "Sir, Good morning.. This is your wake up Alarm." + message1


            self.label.setText(_translate("MainWindow",message1, None)) #display the message on GUI screen

            espeak.synth (message) #speak the message through audio jack

            time.sleep(1)


    def button_pressed(self): #when set alarm button is pressed

        print("Button Pressed")

        alarm_time = str(self.Set_Time.time())


        self.alarm_h = int(alarm_time[19:21]) #value of hour is sotred in index value 19 and 20

        self.alarm_m = int (alarm_time[23:25]) #value of minute is sotred in index value 23 and 24
        message = "Alarm is set at " + str(self.alarm_h) + " hours " + str(self.alarm_m) + " minutes"

        self.label.setText(_translate("MainWindow", message, None)) #display the message on GUI screen

        espeak.synth (message) #speak the message through audio jack


if __name__ == "__main__": #main function


    app = QtGui.QApplication(sys.argv)

    MainWindow = QtGui.QMainWindow()

    ui = Ui_MainWindow()

    ui.setupUi(MainWindow)

    MainWindow.show()

    sys.exit(app.exec_())
Comments
self.alarm_h = int(alarm_time[19:21]) #value of hour is sorted in index value of 19 and 20
ValueError: invalid literal for int() with base 10: '2,'
Can you help me what part am I doinig wrong? I didn't changed your code. I only added some mp3 play line which I guess doesn't effect the code.
I have tried to do this a couple of times and keep getting stuck.
There appear to be massive jumps in the tutorial that are assuming we already know how to do things.
Examples:
* how to use PyQt4 here - from the command line? What command?
* The same for espeak, time, strftime - you introduce the time strftime package with no indication of how it is used here
* Where do we put the "chunk a codes"?
* How do we use the strftime method?
Is there no way of just setting this up so it works with code that you have set up with a step by step explanation (including the actual commands) of how to implement this on the Raspberry Pi... ?
Hi, I did do few jumps trying to keep the article as small as possible. Sorry if it stops you people from actually trying it. The probelm is with the lib. that you are importing inside you python script. Mostly likely you have not added these packages eariler whcih throws an error
import sys
import time
from PyQt4 import QtCore, QtGui #PyQt4 is used for designing the GUI
from espeak import espeak #text to speech sonversion
from time import strftime # To get time from Raspberry pi
Try to use these line in your shell window to check if they throw any error, if yes please install the respective packge. If you still face problems please post them here
Hi,
I'm very intereste in this projet. Is it possible to add an MP3 player as an alarm option
Hi
I keep getting this messeg when I want to launch te program and I don't no why. I am useing it on a Pi4
Thanks for your help
Best regards
Akos


First of all, I want to really thanks to you for your very detailed tutorial.
I was following your tutorial, and I got a problem. In my pi, when I activate the alarm python code, the clock number left to the "Set Alarm" seems to be shown with AM/PM. When I choose PM, the alarm goes well. It has no problem at all. However when I choose AM, the alarm doesn't set. And I get a error message on terminal window which is :
File "alarm.py", line 124, in button_pressed