

Raspberry Pi is an ARM cortex based board designed for Electronic Engineers and Hobbyists. It’s a single board computer working on low power. With the processing speed and memory, Raspberry Pi can be used for performing different functions at a time, like a normal PC, and hence it is called Mini Computer in your palm.
Because it has an ARMv7 processor, it can run the full range of ARM GNU/Linux distributions as well as Microsoft Windows 10, we will discuss about that later. ARM architecture is very influential in modern electronics. We are using the ARM architecture based processors and controllers everywhere. For example we are using ARM CORTEX processors in our mobiles, iPods and computers etc.
Pi is an amazing tool for realizing ‘Internet of Things’. In this session we will discuss the hardware and software requirements for Pi and setting up the Operating System for the first run of PI.
There are different types of Raspberry Pi boards in the market now, with Raspberry Pi 2 Model B being the most popular. Raspberry Pi 3 Model B has also been launched; it is almost similar to RPi 2, with some advance feature like on board Wi-Fi and Bluetooth connectivity, more powerful CPU etc. We will discuss few characteristics of “Raspberry Pi 2 B” now.
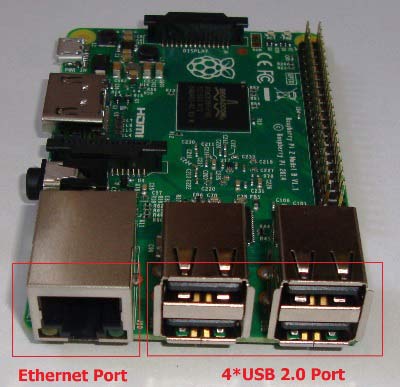
Raspbeery Pi has four USB 2.0 ports. These ports can be connected to any USB devices, like mouse and keyboard. With the first start itself, we need mouse and keyboard, we will discuss it later. The four USB ports are shown the figure.
Raspbeery Pi 2 has one Ethernet port. This port is for internet connectivity to the RASPBEERY PI 2. This Ethernet port can also be used to transfer data between PI2 and your PC.
It has a 3.5mm jack port for connecting headphones, in case of playing music from PI.
PI has a single HDMI port for connecting a LCD/LED screen. The graphics provided by the chip is fairly good.
There is a micro USB port on the board; we provide power for the complete board through this port. If there are any fluctuations in voltage provided at this port, the board will not work properly.
Instead of connecting an LCD screen we can connect a 3inch to 7inch touch display. We have inbuilt port for connecting a touch display. We have a similar port for connecting a camera to the module; the camera module can be connected to PI without any additional attachments.

There are GPIO (General Purpose Input Output) pins and a couple power ground terminals. We can program there GPIO pins for any use. Few of these pins also perform special functions, we will discuss them later.
Hardware Requirements:
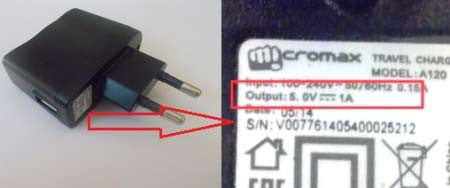
1. Power supply - As said earlier we will power the Raspberry Pi board by Micro USB port present on the board. Under normal operations the PI board needs a 5V, 1000mA (or 1A) power source. The voltage and current requirements are important here. Any power source higher than 5V will damage the board permanently and for voltages lower than 4.8V, the board will not function.
Here I am using a 5V, 1000mA mobile phone charger for powering up my PI. Remember the minimum current rating for normal operation of PI board.

For connecting the micro USB power, you need a good quality cable. If you do not power the board from a good USB cable, no matter what the power source, you will always have power shortage on the board. You need a good quality USB cable as shown in figure.
For higher operations of PI, you need a power source which could deliver at least 2000mA or 2A. So if you don’t have a power source of such kind, don’t drive the PI by lower rated power source, its better get a new one.
But if you have two adapters which can provide each, you can connect one adapter output to the micro USB, and the second one to the USB 2.0 port, they both can share the load. Here I have a 0.7A or 700mA adapter which I connect to one of 4 USB ports on the chip.

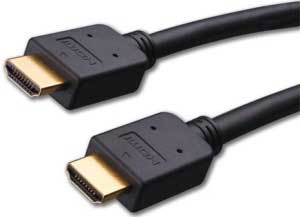
2. You need a LCD or LED screen, you can use your old PC screen as a Raspberry Pi screen. After choosing your screen, you have to look whether the screen supports HDMI inputs or not. If your screen has a HDMI port then you just need to get a male to male HDMI cable as shown in figure.
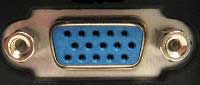
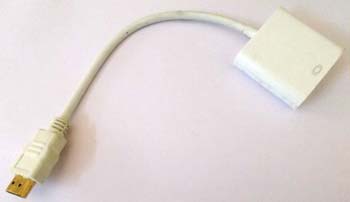
If your screen does not support HDMI like mine, then your screen must have VGA support as shown in figure. You need a HDMI to VGA converter; you can buy this at any electronic store. This device converts HDMI from PI to VGA output. So we can interface a VGA monitor to a PI. The device is shown in figure.
3.You need a Mouse and Keyboard, make sure they are USB driven type or you won’t be able to connect it to PI, since PI only has USB ports.
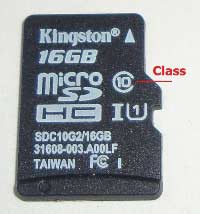
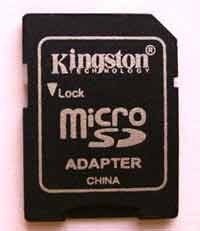
4. You need a Micro SD card (Memory card) and a SD Card Reader (or Adapter) to connect SD card to PC (or laptop). The SD card must be of 8GB or higher. If not, you won’t be able to install the OS (Operating System) on to the PI easily. And also the Class of SD card should be equal or higher than 4, for better speed. “Speed Class” represents the writing speed like class 10 means 10 MB/second.
Now we have all the basic Hardwares, need to Getting Started with Raspberry Pi, and we will now discuss the Software Requirement.
Software Requirements:
First we need the OS (Operating System) for the PI, which can be downloaded from Downloads section of Raspberry Pi website:
https://www.raspberrypi.org/downloads/
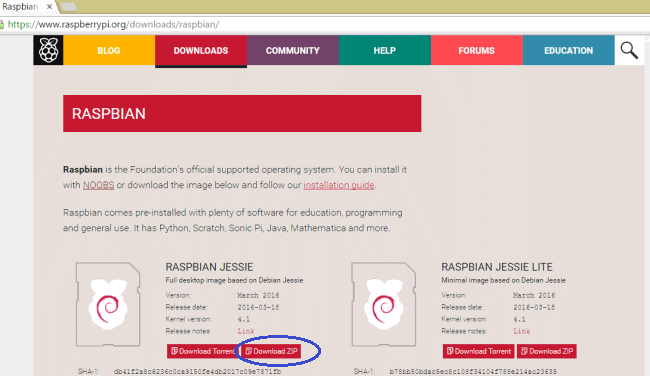
It will show you all the supporting OS for the RASPBEERY PI 2. You can download and install any OS on Pi which is listed there. We are going to download official supported Operating System for Raspberry Pi, which is “Raspbian”. Click on “RASPBIAN”, and download the Full desktop image of Raspbian Jessie. Extract the Rasbian image from the Zip file, using any Zip file extractor like Winrar or Winzip.
We also need a Image writer software for installing the OS on to the Micro SD card. We have used “win32diskimager” to write the image on Micro SD card, which can be downloaded from below link:
https://sourceforge.net/projects/win32diskimager/
Once the download completes, install the software, you will see an icon on the Desktop Screen after installation.
Get started with Raspberry Pi: Steps
Now, we have all the software and hard ware required to get started with the RASPBEERY PI 2.
To install OS on to a SD card follow below steps:
1. UNZIP the ‘Raspbian Jessie’ (OS ZIP file we downloaded from raspberry website) on to the desktop; you will see an Image icon upon extraction on the screen as shown below. Make sure you have at least 5 GB free disk space on ‘C’ drive of your PC. The extraction file size would be greater than 3GB.
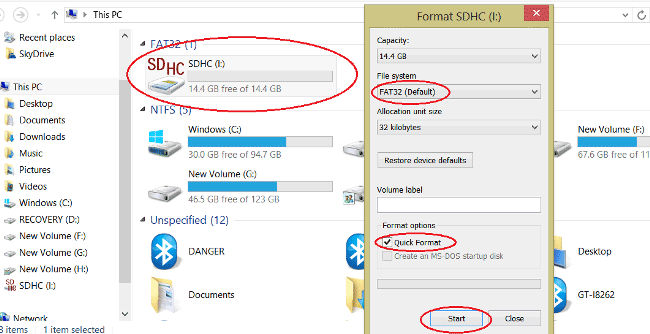
2. Insert the SD card into the USB card reader or Card Adapter. Plug the card reader to the PC. You must see the card on the screen as shown below.
3. Format the card drive by Right click on it and select Format. Select File system as ‘FAT32’ and tick on ‘Quick Format’. Finally click on ‘Start’ button to Format the drive.
4. After formatting, run the “win32diskimager” application, which we have downloaded as explained previously.
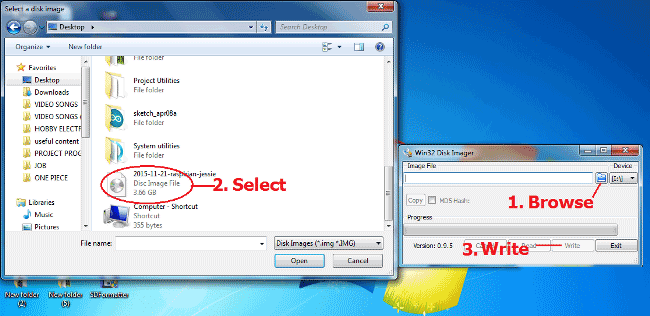
5. Choose the SD card drive, browse for the Raspbian OS image file (which is extracted on the screen) and Click on ’WRITE’ icon, to start writing the extracted OS file on to the SD card. This is shown in below figure.
6. After completion of writing, safely remove the SD card from the reader.
Now we have SD card with Raspbian OS installed on it and having all the equipment required to Get Started with Raspberry PI 2. In the next session we will have the first look at the “PI” OS and we will talk about configuring the BIOS of Raspberry Pi.

Hi!
I want to just give thanks for this article. I'm entering a few hours ago into the "Raspberry World"...probably i'll try it myself and buy one.
Thanks again!
Pichana III