
 Converter")
Text-to-speech or TTS system converts normal text into Speech. This tech enables the system to speak out the text in a human voice. There are many examples of Text to Speech conversions like the announcements at public transport, the customer care calls, voice assistants in your smartphones, or the navigation menu of any machine. You can even find the TTS in Microsoft Word where you set it to speak out the text written in the document.
Today in this tutorial, we will learn how to make Text To Speech converter using Arduino. We previously used TTS with Raspberry pi in speaking Alarm clock and also converted speech into text in raspberry pi by using Google voice keyboard.
The first step in TTS is pre-processing or normalization. This step involves the conversion of the symbols, numbers and abbreviations into words that can be read by the machines like ‘?’ will be converted into “question mark”.
The second step involves the conversion of normalized text into phonemes or phonetic transcripts. The phonemes are the small parts of spoken words i.e. these are the sounds that make sentences. This step is really essential so that machine can speak the words as humans do.
The last step is the synthesis of phonemes into spoken voice. This step can be achieved by different methods like by recording the human voice for different words/phrases or by generating basic sound frequencies and pile them up as phonemes or by copying human speaking mechanism.
Required Components
- Arduino board
- A speaker
- An Amplifier Circuit
- Regulated Power Supply
- Connecting Wires
Circuit Diagram
Here in this Text to Speech converter, we’ve used an amplifier circuit to reduce the noise and get a clear sound. The amplifier circuit is made by using the IC LM386. Circuit diagram for it is shown below:
A 100K pot is used to adjust the sound. Adjust it to get a clear sound. If you have any confusion about this circuit then check out LM386 Based Audio Amplifier Circuit. If you don’t have the exact value of resistors and capacitors then use the close value ones.
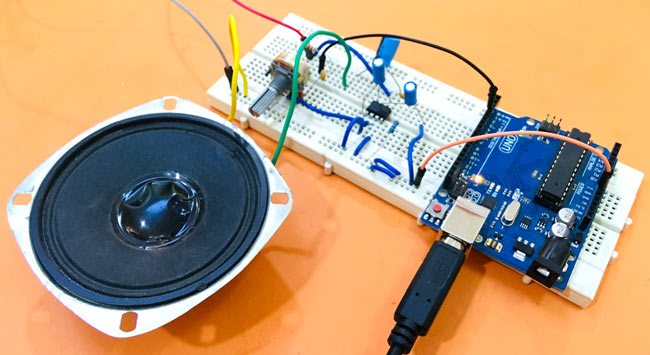
Connecting Speaker to Arduino
The connections are super easy once you make the amplifier circuit.
 Converter")
Connect the power supply to the amplifier circuit and connect the digital pin 3 of your Arduino to 10K resistor and connect the ground of Arduino to ground of the circuit. Now connect the speaker by connecting its negative terminal to ground and positive terminal to the 220µF capacitor and connect the power supply.
Programming Arduino for TTS (Text To Speech)
The program for this Arduino based TTS is also very easy as the library is available for this. This library is called as Talkie and it can be added by library manager. To add the library, go to Sketch->Include Library->Mange Libraries.
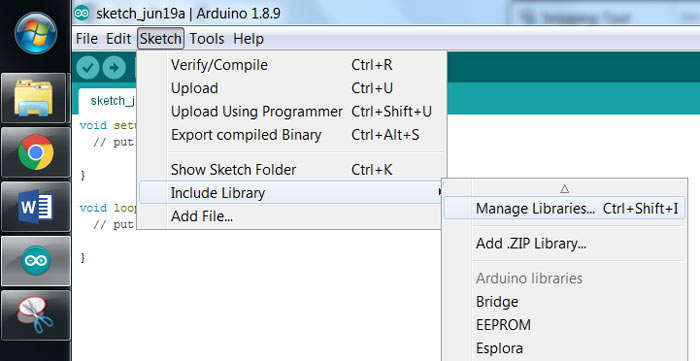
Now the Library Manager will be on your screen. In the search bar type Talkie and click on the install button. The library will get installed.
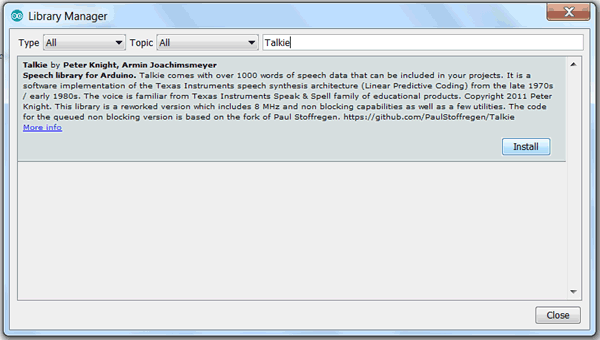
This library is very handy and it has over 1000 words and commands. It has several examples, you can try them all but here we are using a simple code to explain the working.
You can also try other commands given in library. To get those commands, go to the Documents\Arduino\libraries\Talkie\src and then open the header files and get several commands that can be used for different alerts. There are many other TTS libraries like jscrane TTS library, google TTS library etc. You can also try them out.
So let's start coding. Firstly include some header files. Talkie.h is used to initialize this library and set the Digital pin 3 of Arduino as output pin. The Vocab_US_Large.h is used to use the alerts we are using and Vocab_Special.h is used to use the pause we are using.
#include "Talkie.h"
#include "Vocab_US_Large.h"
#include "Vocab_Special.h"
Now define an object ‘value’ to use the commands:
Talkie voice;
Here the same message will be repeated in the speaker so keep the setup function empty and put the commands in loop function. The first command voice.say(spPAUSE2) is to take a short pause while repeating the alert message. And the next commands are just simple words that imply: DANGER DANGER STORM IN THE NORTH.
void setup() {
}
void loop() {
    voice.say(spPAUSE2);
    voice.say(sp2_DANGER);
    voice.say(sp2_DANGER);
    voice.say(sp3_STORM);
    voice.say(sp3_IN);
    voice.say(sp3_THE);
    voice.say(sp3_NORTH);
}
Finally upload the code in the Arduino and connect the power supply to it. As soon as you power up the circuit you will start hearing the alerts! If you don’t get a clear sound then try adjusting the knob of pot or check if the Arduino is getting proper power supply and make sure that the GND of Arduino is connected to ground of the circuit.
Check the complete code with a demonstration Video are given below.
Complete Project Code
#include "Talkie.h"

#include "Vocab_US_Large.h"

#include "Vocab_Special.h"
Talkie voice;
void setup() {

}

void loop() {

    voice.say(spPAUSE2);

    voice.say(sp2_DANGER);

    voice.say(sp2_DANGER);

    voice.say(sp3_STORM);

    voice.say(sp3_IN);

    voice.say(sp3_THE);

    voice.say(sp3_NORTH);

}

can you give us a list of the full components?
and the values of resistors and capacitors that are used?
thnks,