

Voice recognition is becoming an essential part of the Internet of Things (IoT), allowing us to control, monitor, and interact with devices hands-free. At its core, ESP32 speech to text works by capturing audio through a microphone, processing it, and converting it into text that devices can understand. This text is then used to trigger commands, just like how Alexa or Google Assistant responds to your voice. Interestingly, ESP32 offline voice recognition systems often use a mix of edge and cloud computing, with some processing done directly on the device and the rest handled in the cloud. If you're interested in building projects that can locate where a sound is coming from, check out this detailed guide on detecting the direction of sound using Arduino. For automation enthusiasts, the Smart Desk Bot project demonstrates how to create a voice-controlled desk assistant using IoT and AI features.
That brings us to today’s project, where we’ll build a mini yet expandable ESP32 voice assistant using Edge Impulse, with the ESP32 as the main microcontroller. The goal of ESP32 speech recognition offline is to keep it simple while still leaving room for future upgrades. So, without any further delay, let’s dive right in!
Table of Contents
ESP32 Voice Recognition Project Reference
| Component | Specification | Purpose |
| Microcontroller | ESP32 (240 MHz) | Main processing unit for offline voice recognition |
| Microphone Module | INMP441 MEMS | High-precision audio capture |
| ML Platform | Edge Impulse | Training ESP32 speech recognition model |
| Sample Rate | 16 kHz | Audio sampling frequency |
| Recognition Type | Offline/On-device | No internet required for operation |
ESP32 Voice Recognition Project Overview: Building Your ESP32 Voice Assistant
The main objective of this project is to achieve ESP32 speech recognition offline. While most projects on the internet rely on third-party APIs like Google TTS, here we’re taking a different approach using Edge Impulse. Instead of cloud-based solutions, we're implementing an ESP32 voice recognition module using Edge Impulse for on-device machine learning. In fact, you could even use TensorFlow Lite directly if you’d like, though it’s a bit more complex; we’ll cover that in another article. For now, let’s focus on the Edge Impulse method. This approach ensures your ESP32 voice assistant works independently without internet connectivity, making it ideal for privacy-conscious applications and remote IoT deployments.
Key Features of This ESP32 Speech-to-Text System:
✓ Fully offline operation - No cloud dependency for ESP32 offline voice recognition
✓ Low latency response - On-device processing ensures quick recognition
✓ Customizable wake word - Train your ESP32 voice assistant with custom commands
✓ Expandable architecture - Easy to add more voice commands
✓ Privacy-focused - Audio never leaves your device
✓ Cost-effective solution - Uses affordable ESP32 hardware
You can also learn how to make your microcontroller speak with this Arduino-based Text-to-Speech Converter project, which converts written text into audible speech.
ESP32 Voice Recognition Workflow - Step by Step
In this setup, most of the heavy lifting is done by Edge Impulse, which handles the machine learning side of things. Apart from that, our tasks mainly involve collecting the dataset and assembling the circuit.
Building an ESP32 speech recognition offline system involves six streamlined steps:
- Collect the dataset
- Train the model in Edge Impulse
- Export it as an Arduino library from Edge Impulse
- Assemble the circuit
- Do a bit of code modification and upload it to the ESP32
- Test everything in real time
Now, let’s move into the actual project, starting with collecting the dataset.
How to Collect a Dataset for ESP32 Speech Recognition Offline Training
Successful ESP32 offline voice recognition starts with quality training data. There are various methods available to collect a dataset that impacts your ESP32 voice recognition module's accuracy. The easiest way is to use open-source datasets. It really depends on the type or category of dataset you need. For common projects, it’s usually easy to find what you’re looking for, and there are plenty of options available. There are two primary approaches: using pre-existing open-source datasets or creating custom recordings tailored to your specific ESP32 voice assistant application.
Best Open-Source Datasets for ESP32 Speech to Text Projects
For rapid prototyping of your ESP32 speech recognition offline system, these curated datasets provide excellent starting points:
- Google Speech Commands Dataset – Great for keyword spotting like "on", "off", "yes", "no".
- Mozilla Common Voice – Open-source multilingual speech dataset.
- Kaggle Datasets – A Huge variety of image, audio, and text datasets.
- Open Images Dataset – By Google, a massive dataset.
- Hugging Face Datasets – Ready-to-use datasets for NLP, speech, and vision.
Of course, there are many more options out there, but I just mentioned the most common ones. With that said, here’s the dataset I used in this project:
Dataset I used in this project: Google’s Speech Command Dataset V2
Another method is to collect data yourself by manually recording short clips (1–3 seconds) of the required audio in multiple voices, tones, and speeds. The more data you collect, the better your training results will be. For specialised ESP32 voice assistant applications, custom recording ensures optimal performance. Explore the DigiKey Voice-Activated Office Assistant to see how to integrate speech recognition with office automation.
Training Your ESP32 Voice Recognition Module in Edge Impulse
Once you have collected your dataset for training, we can proceed to the Edge Impulse side. Edge Impulse provides a powerful platform for training ESP32 speech recognition offline models.
Below you can see the step-by-step instructions, from creating a new project to exporting the trained model as an Arduino library. This step-by-step guide walks you through creating, training, and deploying your custom ESP32 voice assistant model.
⇒ Step 1:Create Your Edge Impulse Account for ESP32 Speech to Text
Searching for Edge Impulse in Google [1] gives you the site link at the top [2]. Clicking on that link takes you to the home page of Edge Impulse. This is where you'll develop your ESP32 voice recognition module intelligence.
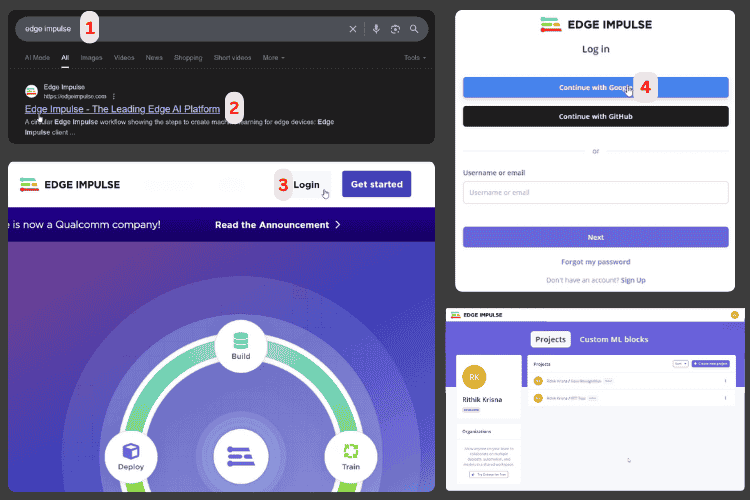
Here, click the Login [3] button in the top-right corner. For convenience, I chose the Continue with Google [4] option. After completing the necessary steps, you should reach the main page of Edge Impulse.
⇒ Step 2: Initialise Your ESP32 Voice Recognition Project
On the home page of Edge Impulse, click the Create New Project button [5] in the top-right corner. To begin configuring your ESP32 speech recognition offline system.
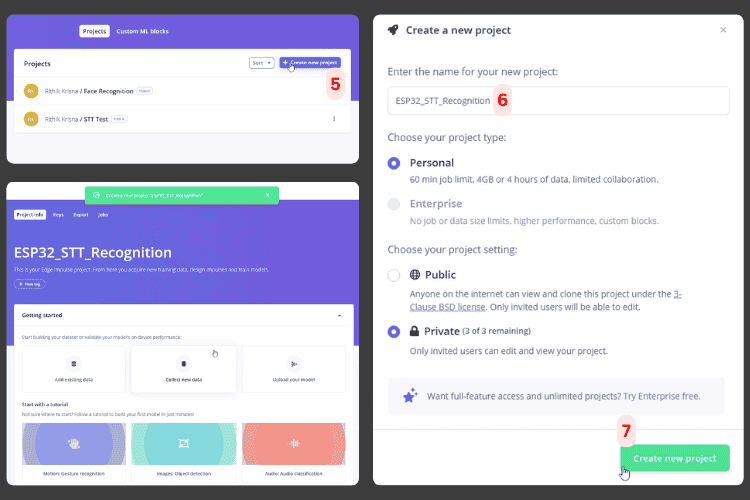
Enter a name for your project [6]. This name will follow through until the final Arduino library export. The project type will default to Personal, and the setting will default to Private. Finally, click Create New Project [7].
After successful project creation, you’ll see the project’s home page.
⇒ Step 3: Configure ESP32 Target Device for Voice Recognition
In the project page, the first thing to do is configure the target device and application budget. Proper device configuration ensures optimal performance for your ESP32 speech to text model.

In the top-right corner, you’ll see the Target: Cortex-M4F 80 MHz button [8]. Clicking on it opens the configuration menu. The first step is selecting the target device [9]. From the dropdown menu, choose Espressif ESP-EYE (ESP32 240 MHz) [10] to optimise for ESP32 offline voice recognition. Finally, click the Save button [11] at the bottom-right to confirm ESP32 voice recognition module configuration.
⇒ Step 4: Upload Training Data for ESP32 Speech Recognition Offline
Now, let’s move to the next step in the workflow: data acquisition [12] of the ESP32 voice assistant.
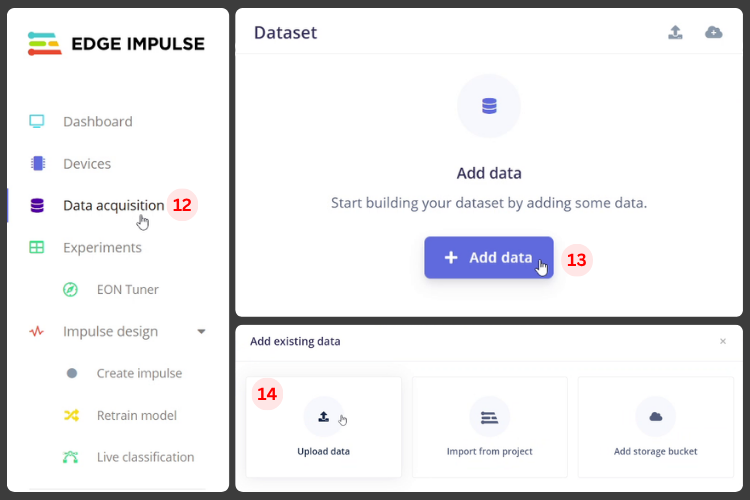
Click the Add Data [13] button. This opens three options: Upload Data, Import from Project, and Add Storage Bucket. This interface allows bulk upload of audio files for your ESP32 speech to text training.
Here, click Upload Data [14].
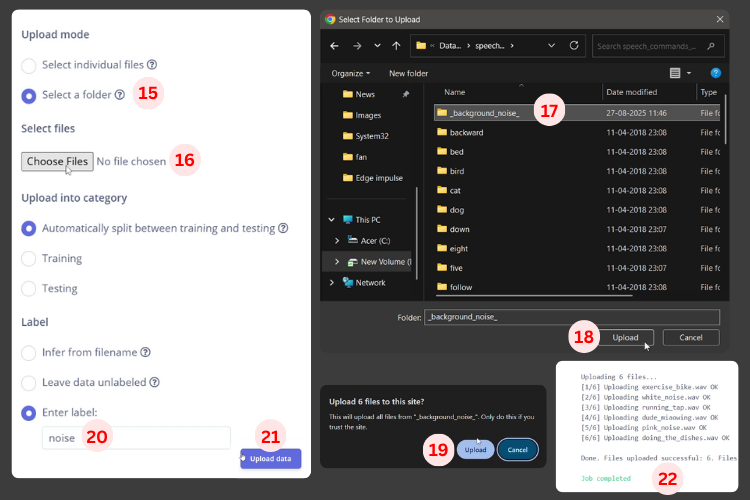
A new menu will appear with some options. Since I had properly saved the dataset in individual folders, I used the Select Your Folder [15] option. Next, I chose the folder using Select Files [16][17][18]. After selecting the folder, a message will show the number of files selected. Critical step: Label each dataset appropriately [20] (e.g., "noise", "marvin", "on", "off") for accurate ESP32 voice recognition module training. Then click Upload [19] to complete the data acquisition for your ESP32 speech recognition offline model.
The most important step here is labelling the data. Since I uploaded datasets individually, I labelled them right away to save effort later. In the label option, I selected noise [20] for the noise dataset. Finally, click Upload [21], and the data will be added successfully [22].
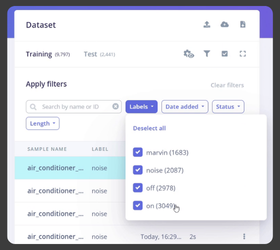
Similarly, I added data for Marvin, off, and on, as shown in the image above. In this ESP32 offline voice recognition project, we've added datasets for: noise (background audio), Marvin (wake word), off, and on (control commands).
⇒ Step 5: Design Neural Network Architecture for ESP32 Voice Assistant
On the left panel, you’ll see Impulse Design. Under this, click Create Impulse [23]. Here, select the Processing Block [24] and Learning Block [25], then click Save Impulse [26] your ESP32 speech recognition offline model, then click Save Impulse [26]. Don’t worry too much about the options; the default ones work fine.
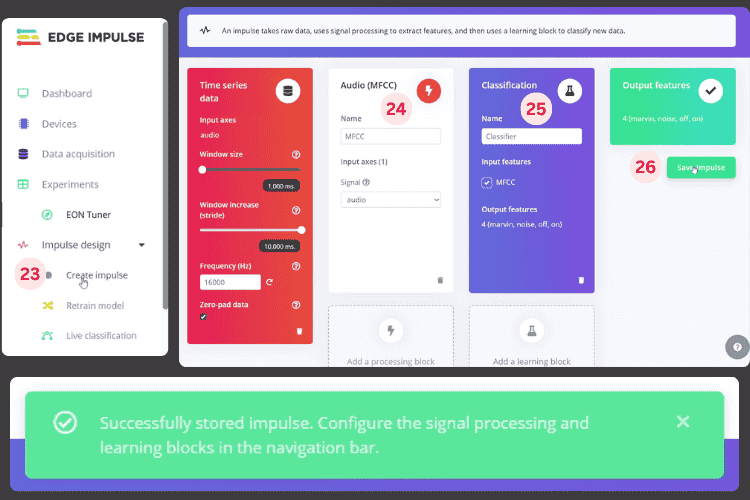
After saving, you’ll get a notification confirming that the impulse was saved successfully.
⇒ Step 6: Generate Features for ESP32 Speech Recognition Offline Model
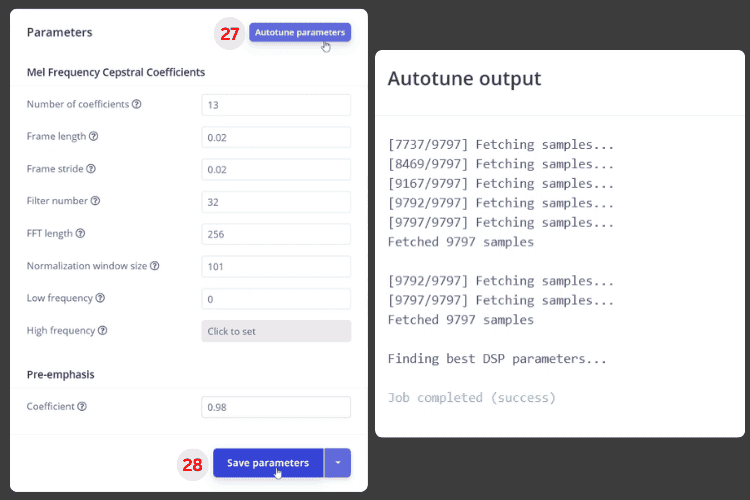
After saving the impulse, you’ll be prompted with the Parameters menu. Here, the Autotune Parameters [27] option comes in handy to automatically optimise settings for your ESP32 voice recognition module. Click it, wait a while, and then click Save Parameters [28].
Now, click Generate Features [29]. In the image below, you can see how the dataset is represented with different colours. The more distinct and separated the colour clusters, the better the results will be.
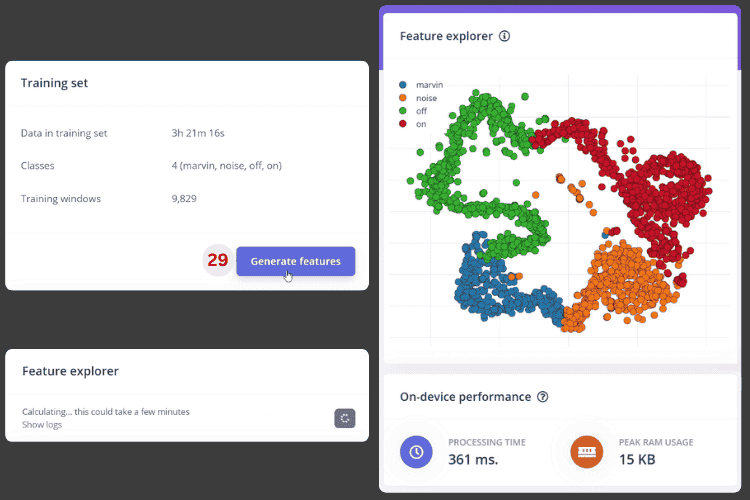
In my case, the clusters were a little close together, so the separation wasn’t very strong. The colour-coded clusters represent different voice commands in your ESP32 offline voice recognition system. Well-separated clusters (distinct colours with minimal overlap) indicate strong training data quality and predict higher accuracy for your ESP32 voice recognition module.
⇒ Step 7: Train Your ESP32 Voice Recognition Module Neural Network
Next, you’ll be taken to the Neural Network Settings page. Here you can adjust parameters like Training Cycles [30], Learning Rate, etc, to optimise your ESP32 speech recognition offline model performance. Most of the default settings work fine.

I kept the default settings and clicked Save & Train [31]. Now sit back, it will take some time, depending on the size of your dataset. Once complete, you’ll see the model’s training performance.
⇒ Step 8: Validate ESP32 Speech to Text Model Accuracy
In the Test Model window, simply click the Classify All [32] button. This runs the test to automatically evaluate your ESP32 voice recognition module against reserved test data. This validation step provides unbiased accuracy metrics for your ESP32 speech recognition offline system.
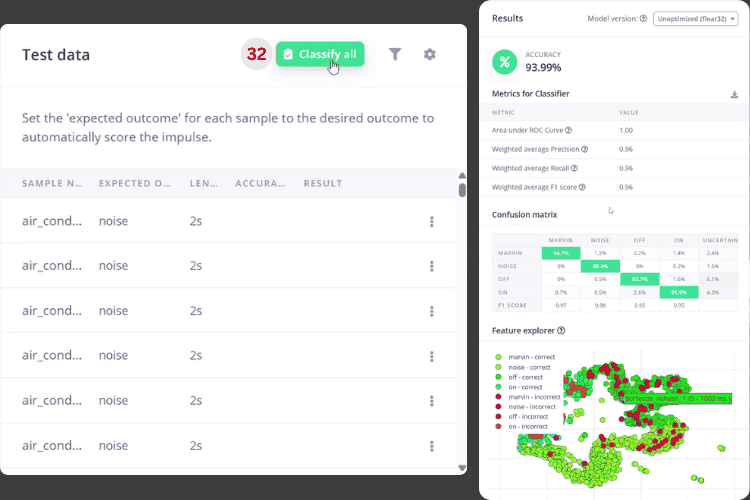
As you can see, my results were acceptable, so I moved on to deployment. For production ESP32 voice assistant applications, aim for 90%+ accuracy. Scores above 85% are acceptable for prototype and development purposes.
⇒ Step 9: Deploy ESP32 Speech Recognition Offline Model as Arduino Library
Go to the Deployment window. In the search bar [33], type Arduino Library [34]. Then click the Build [35] button to start compiling your ESP32 voice recognition module into an Arduino-compatible library.
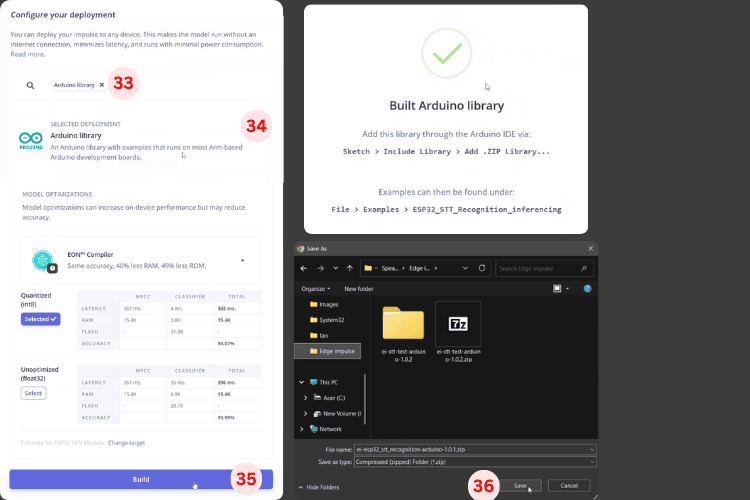
Once the build finishes, you’ll be prompted to save the library [36]. The library will be downloaded as a .zip file.
⇒ Step 10: Install Library and Configure ESP32 Voice Assistant Code
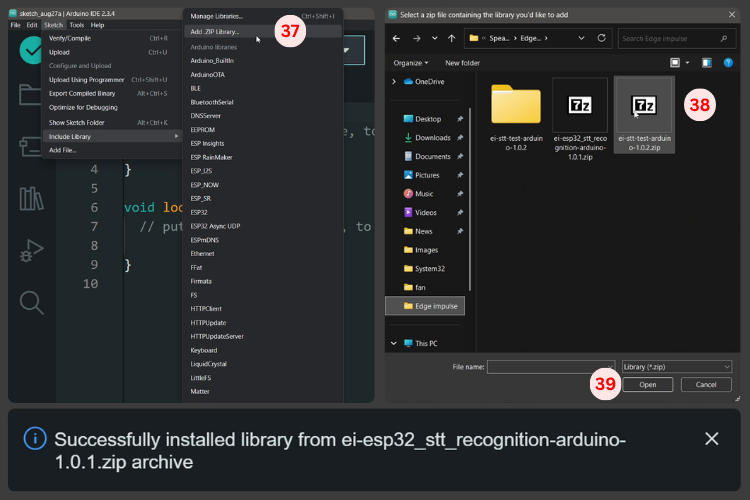
Open the Arduino IDE and go to Sketch → Include Library → Add .ZIP Library [37]. Select the downloaded library [38] and click Open [39] to install the ESP32 voice recognition module framework.
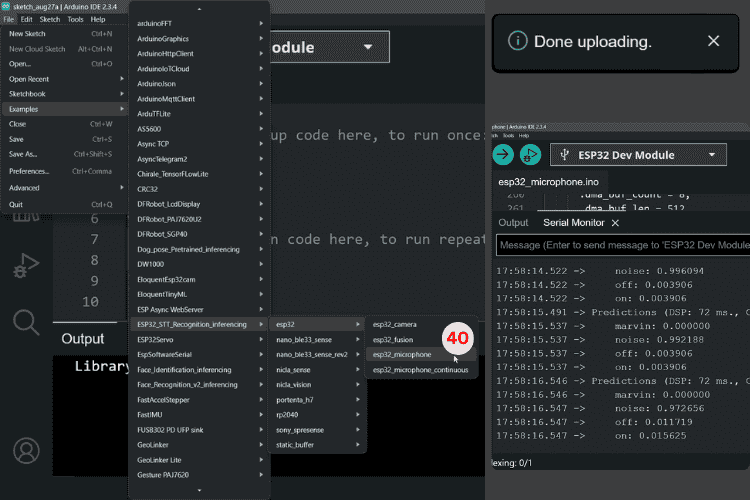
Now, go to File → Examples → [Your Project Name]_Inferencing → esp32 → esp32_microphone to open the example program [40]. This is the code you’ll upload to the ESP32 board. This pre-configured sketch provides a complete starting point for your ESP32 voice assistant, including audio capture, preprocessing, and inference code optimised for ESP32 speech to text.
Now, let’s move on to the hardware!
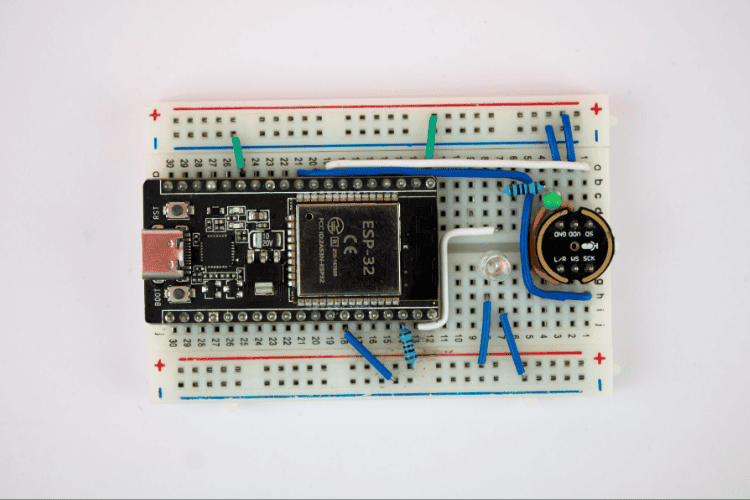
ESP32 Voice Assistant Hardware Setup: Wiring Your ESP32 Voice Recognition Module
The hardware setup for this ESP32 speech recognition offline project is straightforward, requiring minimal components. The circuit consists of two LEDs, one microphone, and the main ESP32 module. Below is the circuit diagram that needs to be implemented. This setup creates a fully functional ESP32 voice assistant capable of wake word detection and command execution.
Required Components for ESP32 Voice Recognition Module
| Component | Quantity | Function |
| ESP32 Development Board | 1 | Main processor for ESP32 offline voice recognition |
| INMP441 MEMS Microphone | 1 | High-precision audio input for ESP32 speech to text |
| LED (Indicator) | 1 | Visual feedback for wake word detection |
| LED (Control) | 1 | Controllable output via voice commands |
| Resistors (220Ω) | 2 | Current limiting for LEDs |
| Breadboard & Jumper Wires | As needed | Prototyping connections |

INMP441 Microphone Module Pinout for ESP32 Speech to Text
There are two LEDs used here, each serving a separate purpose. One is an indicator LED [23] for wake-word detection and voice recognition status. The other is a control LED [GPIO22], which can be turned on or off via commands. The INMP441 MEMS microphone uses I²S (Inter-IC Sound) protocol for high-quality audio transmission to your ESP32 voice assistant. Two LEDs provide essential visual feedback for your ESP32 speech recognition offline system. Proper pin connections are critical for reliable ESP32 offline voice recognition:
The main component is a microphone module: the INMP441 MEMS High-Precision Omnidirectional Microphone Module. This module has six pins:
- L/R [3V3]
- WS [25]
- SCK [26]
- SD [33]
- VDD [3V3]
- GND [GND]
That’s all for the circuit.
After a successful connection, it will look like this:
I used a slightly different approach in the actual hardware to make it minimalistic and simple. The circuit diagram is for reference and was made to guide you.
Remember:
The default I²S pins in the Arduino library downloaded from Edge Impulse are:
- L/R [3V3]
- WS [32]
- SCK [26]
- SD [33]
- VDD [3V3]
- GND [GND]
Using these default pins allows the example program to work without any code modification. The circuit above shows pins for our modified code, but changing the pins is easy if you want to adapt it.
INMP441 to ESP32 Pin Connections for Voice Recognition Module
| INMP441 Pin | ESP32 GPIO | Signal Description |
| L/R | 3V3 | Channel selection (3.3V = Right channel) |
| WS (Word Select) | GPIO 25 | Left/Right clock for I²S audio |
| SCK (Serial Clock) | GPIO 26 | Bit clock for audio data |
| SD (Serial Data) | GPIO 33 | Audio data input to ESP32 |
| VDD | 3V3 | Power supply (3.3V) |
| GND | GND | Ground reference |
ESP32 Speech to Text Code Implementation: Programming Your ESP32 Voice Recognition Module
Testing the Example Code for ESP32 Offline Voice Recognition
Before diving into advanced features, test the base functionality of your ESP32 voice assistant using the Edge Impulse example program.
Files → Examples → “[Name of your project]”_ Inferencing → esp32 → esp32_microphone[40]. This raw example allows you to test the model in real time with your hardware.
In the code, you’ll find the following snippet. You can use it to adjust your circuit accordingly or modify the pins in the code to make it work. This raw example demonstrates real-time ESP32 speech to text inference. The Serial Monitor displays confidence levels for each trained word, showing how your ESP32 offline voice recognition model interprets audio input.
 i2s_pin_config_t pin_config = {
     .bck_io_num = 26,    // IIS_SCLK
     .ws_io_num = 32,     // IIS_LCLK
     .data_out_num = -1,  // IIS_DSIN
     .data_in_num = 33,   // IIS_DOUT
 };
You can see live inference in the Serial Monitor, which displays the confidence level for each trained word. This flexibility allows you to adapt the ESP32 voice recognition module to your specific pin layout.
Using this confidence level, you can make modifications in the code to add more advanced features.
Modified Code for the ESP32 Voice Control Project
The example code was modified to include features like wake word detection, LED control, and more. Let’s go through the code in simple terms.
Overview
This code is for an advanced voice-controlled LED system using the ESP32 with Edge Impulse machine learning for wake word detection ("marvin") and command recognition ("on"/"off"). The system uses dual confidence thresholds and provides comprehensive visual feedback. The enhanced code transforms the basic example into a production-ready ESP32 speech recognition offline system with wake word detection, command processing, and visual feedback. Let's explore the key components that make this ESP32 voice assistant intelligent and responsive.
Included Libraries
- ESP32_STT_Recognition_inferencing.h – Edge Impulse’s deployment library. In my code, it’s called ESP32_STT_Recognition_inferencing. In your case, it will be [Your Project Name]_inferencing. You can check by opening the example program from the installed library.
- freertos/FreeRTOS.h, freertos/task.h – Real-time operating system components that enable multitasking for parallel audio capture and processing.
- driver/i2s.h – I2S audio driver for the ESP32, used to interface with the digital MEMS microphone for audio input.
Data Structures, Constants & Configuration Variables
Core Libraries for ESP32 Voice Recognition Module
typedef struct {
   int16_t *buffer;        // Audio sample storage
   uint8_t buf_ready;      // Flag: buffer ready for processing
   uint32_t buf_count;     // Current write position
   uint32_t n_samples;     // Total buffer capacity
} inference_t;
This manages a circular buffer for real-time audio capture and ML processing. These libraries enable multitasking for parallel audio capture and ML inference, essential for responsive ESP32 offline voice recognition. FreeRTOS ensures your ESP32 voice assistant can simultaneously record audio, process speech, and control outputs without blocking.
2. Dual Confidence Threshold System for Accurate ESP32 Speech Recognition Offline
const float COMMAND_CONFIDENCE_THRESHOLD = 0.80;
const float RECOGNITION_CONFIDENCE_THRESHOLD = 0.50;
COMMAND_CONFIDENCE_THRESHOLD is used for executing commands, while RECOGNITION_CONFIDENCE_THRESHOLD is for indication only. Higher thresholds prevent false command execution.
3. Timing Configuration
const unsigned long LISTENING_DURATION_MS = 10000;This is the time window after the wake word during which commands are accepted.
4. Hardware Pin Definitions for ESP32 Speech to Text
const int CONTROL_LED_PIN = 22;
const int INDICATOR_LED_PIN = 23;
CONTROL_LED_PIN is the main LED being controlled, and INDICATOR_LED_PIN provides status feedback.
5. Audio Processing
static const uint32_t sample_buffer_size = 2048;This is the I2S DMA buffer size for audio capture.
6. State Management for ESP32 Offline Voice Recognition
static bool wake_word_detected = false;
static unsigned long wake_word_timestamp = 0;
static bool listening_mode = false;
static bool led_state = false;
static inference_t inference;
static signed short sampleBuffer[2048];
static bool debug_nn = false;
static bool record_status = true;
These variables manage detection status, timing, listening mode, LED state, recording state, audio buffer, and debug flags. These variables track the complete state of your ESP32 speech recognition offline system, managing wake word detection, command timing, LED status, and audio buffer management.
Setup Function
1. Serial Communication
Open the Arduino IDE Serial Monitor (115200 baud) to view real-time inference data from your ESP32 speech recognition offline system
Serial.begin(115200);
while (!Serial); // optional
Sets up the serial interface for debugging and monitoring at 115200 baud.
2. Hardware Pin Configuration
pinMode(CONTROL_LED_PIN, OUTPUT);
digitalWrite(CONTROL_LED_PIN, LOW);
pinMode(INDICATOR_LED_PIN, OUTPUT);
digitalWrite(INDICATOR_LED_PIN, LOW);
Configures GPIO pins for LED control and initialises them to OFF.
3. Audio System Initialisation
if (microphone_inference_start(EI_CLASSIFIER_RAW_SAMPLE_COUNT) == false) {
   ei_printf("ERR: Could not allocate audio buffer\n");
   Return;
}
Allocates audio buffer, initialises the I2S microphone, and starts the capture task.
Main Loop Function
The loop() function runs continuously and performs three key operations:
Audio Capture
bool m = microphone_inference_record();
if (!m) {
   ei_printf("ERR: Failed to record audio...\n");
   return;
}
Waits for the audio buffer to fill with new samples.
2. ML Inference
signal_t signal;
signal.total_length = EI_CLASSIFIER_RAW_SAMPLE_COUNT;
signal.get_data = µphone_audio_signal_get_data;
EI_IMPULSE_ERROR r = run_classifier(&signal, &result, debug_nn);Runs the Edge Impulse classifier to recognise speech and provides confidence levels for each trained word.
3. Command Processing
handle_wake_word_and_commands(result);Processes ML results and executes appropriate actions.
4. Debug Output
ei_printf("Predictions (DSP: %d ms., Classification: %d ms.): \n", ...);
for (size_t ix = 0; ix < EI_CLASSIFIER_LABEL_COUNT; ix++) {
   ei_printf("    %s: %.2f\n", result.classification[ix].label, ...);
}
Displays inference timing and confidence scores for all classes.
Custom Functions
There are four main categories of custom functions:
1. LED Visual Feedback System
show_wake_word_pattern()
show_listening_mode()
show_turning_on_pattern()
show_turning_off_pattern()
show_general_recognition_pattern()
stop_listening_mode()
These control the indicator LED to show what the system is doing. For example:
- Saying "Marvin" blinks the LED twice quickly.
- LED stays on while waiting for a command.
- Saying "on" flashes the LED for confirmation.
- Saying "off" produces a fading effect.
- Other words trigger a single quick blink.
- stop_listening_mode() turns off the indicator when the listening window ends.
2. Command Processing Function
handle_wake_word_and_commands(ei_impulse_result_t &result)This is the brain of the system. It finds the word with the highest confidence score. Words above 50% blink the LED once as feedback. Commands execute only if confidence is above 80%. Detection of "marvin" starts listening mode, then "on"/"off" commands control the main LED. This two-step process prevents accidental activations.
3. Audio Capture & Processing System
Functions,
audio_inference_callback(uint32_t n_bytes)
capture_samples(void* arg)
microphone_inference_start(uint32_t n_samples)
microphone_inference_record(void)
microphone_audio_signal_get_data(size_t offset, size_t length, float *out_ptr)
microphone_inference_end(void)
These handle continuous audio input. capture_samples runs in the background, reading audio from the I2S microphone and amplifying it. Data is copied to a buffer, and when full, is sent for processing. Functions convert audio to the format needed by the ML model and manage memory and background tasks.
4. I2S Hardware Interface
Functions,
i2s_init(uint32_t sampling_rate)
i2s_deinit(void)
These configure the ESP32 I2S hardware. i2s_init sets sample rate (16kHz), DMA buffers, and GPIO pins (26 for bit clock, 25 for word select, 33 for data input). Audio is captured continuously without CPU overhead. i2s_deinit shuts down I2S cleanly, though it’s not used in this always-on setup.
With this explanation, you now have a clear idea of how the code works for this project. Next, we’ll see it in implementation.
Testing Your ESP32 Speech Recognition Offline System
After successfully uploading the code, you can ESP32 voice assistant start observing it in action. The operation is simple. It uses a wake word, “Marvin.” When it recognises the wake word, it will wait for 10 seconds for a command word. The command word is then recognised and used to execute certain functions, like turning a light on or off. The system operates on a simple two-stage command structure optimised for reliable ESP32 offline voice recognition:
This can be seen in the GIF above, where a person says “Marvin” followed by “on” to turn on the blue light, and “off” to turn it off.
With this, you should have a clear idea of the whole project. You can still add any features to expand this project according to your imagination - this is just my implementation. One challenge is finding a proper dataset; if it’s suitable, everything should work fine. Finally, if you're curious about giving your Arduino the ability to recognise spoken commands, take a look at this Arduino Speech Recognition tutorial.
GitHub Repository
Visit the GitHub repository to download the source code, make modifications, and deploy the project effortlessly.


Frequently Asked Questions: ESP32 Voice Recognition & ESP32 Speech to Text
⇥ 1. What is the difference between ESP32 speech recognition and Text-to-Speech using ESP32?
ESP32 STT converts spoken audio into text commands for device control. TTS generates spoken audio output using the ESP32 from the text. This project focuses on STT for voice control. Additional audio output hardware and synthesis libraries are needed for TTS, and these can be integrated separately for voice response capabilities.
⇥ 2. Why should I use Edge Impulse to power my ESP32 voice assistant instead of Google TTS?
Edge Impulse supports true ESP32 offline voice recognition without worrying about the internet, API costs, or privacy concerns. Google TTS requires internet access and bills for each request, while with Edge Impulse, you will create self-contained models that run locally on the device, providing faster response times, unlimited usage, complete privacy, and working in offline environments and situations that are typical for Internet of Things (IoT) applications.
⇥ 3. What is the best microphone to use for offline many-voice detection with the ESP32?
The INMP441 MEMS omnidirectional microphone is the best choice for ESP32 voice recognition module applications. Based upon I²S digital output (no analog noise), 61dB SNR, omnidirectional pickup pattern, and 3.3V direct interface compatibility. You may also consider alternate options, such as a SPH0645 (similar to I²S MEMS), or a MAX9814 (an analog option with AGC, based upon your project specifications and budget constraints).
⇥ 4. How much power does an ESP32 voice assistant consume?
Active ESP32 speech recognition offline systems consume about 160-260mA during continuous listening (ESP32: 80-160mA, INMP441: 1.4mA, LEDs: 20-40mA each). Wake-word detection with deep sleep between activations reduces average power to as low as 10-50mA. This enables operating on batteries directly. In ultra-low power applications, external wake-word detection ICs can be used to trigger ESP32 voice recognition only when needed.
⇥ 5. Is it feasible to create a multilingual offline voice recognition system using one ESP32?
Certainly, Edge Impulse has the appropriate multilingual training technique for voice recognition modules used with the ESP32. While collecting the dataset, take audio samples of spoken words in all required languages, and the neural network will learn acoustic patterns which are not specific to a language. Likewise, you could build separate models for each required language and switch between the models. The performance of the models and the inference may vary, depending on whether the languages share any similarity and the amount of memory the ESP32 has available to run a larger multilingual model.
⇥ 6. What is the recognition latency of ESP32 speech-to-text systems?
Typical ESP32 voice assistant latency stands at approximately 200-500ms total: audio capture - 1000ms window, DSP preprocessing (50-100ms), neural network inference (100-300ms), and command execution (<50ms). Edge Impulse optimises inference for the ESP32's 240MHz dual-core processor. Latency rises with increased model complexity but is usually unnoticeable for most voice control applications, given the latency associated with cloud-based services of one to two seconds.
⇥ 7. What are some ways to enhance the ESP32 voice recognition module's accuracy in the presence of background noise?
Improve offline speech recognition in ESP32 by: (1) adding realistic background noise to the training data, (2) noise reduction in pre-processing, (3) placing directional microphones, (4) increasing confidence thresholds for wake words, (5) enclosing some acoustic isolation around INMP441, (6) retraining with voices at different distances, and (7) multi-confirmation on critical commands will prevent false positives.
Conclusion: Mastering ESP32 Speech Recognition Offline
You've now completed a working and fully self-contained ESP32 voice recognition module with the ability to operate offline without reliance on the cloud. This ESP32 speech to text system is proof of concept of edge computing for voice interfaces, combining machine learning, embedded systems, and real-time audio processing into an achievable IoT system of value. The framework you've built with this ESP32 voice assistant is endlessly expandable - from controlling a simple LED to integrating any disproportionate set of voice commands which can control home automation, industrial control systems, or even accessibility devices - having ESP32 offline voice recognition opens so many possibilities. Our artificial intelligence projects collection provides easy-to-follow AI and ML project ideas, including ESP32 voice control, smart parking systems, and innovative robotics applications.
This project was created by the Circuit Digest engineering team. Our experts focus on creating practical, hands-on tutorials that help makers and engineers master Raspberry Pi projects, Arduino projects, ESP32 Projects and IoT development projects.
I hope you liked this article and learned something new from it. If you have any doubts, you can ask in the comments below or use our forum for a detailed discussion.
Projects with Voice Control System
Previously, we have used the Voice Control System to build many interesting projects. If you want to know more about those topics, links are given below.

Voice-Controlled Smart Home Assistant
Develop a voice-controlled smart home assistant with Maixduino Kit, voice recognition, motion detection, and MQTT integration for seamless automation and enhanced user interaction with smart devices.

Building a Voice-Controlled Home Automation System with Arduino
Voice-controlled home Automation Using Arduino is an exciting project that aims to automate home appliances with the power of voice commands. In this project, voice instructions will be recognised, and text-to-speech conversion will be performed using an Android app.

Voice-Controlled Lights Using Raspberry Pi
In this Raspberry Pi home automation project, we will send voice commands from a smartphone to the Raspberry Pi using a Bluetooth Module, and the Raspberry Pi will receive that transmitted signal wirelessly and will perform the respective task over the hardware.

Alexa Voice Controlled LED using Raspberry Pi and ESP12
In this DIY tutorial, we are making an IoT project to control home appliances from anywhere in the world using AlexaPi and ESP12E.
Complete Project Code
/*
* ===============================================================================
* ESP32 ENHANCED VOICE CONTROL SYSTEM WITH EDGE IMPULSE
* ===============================================================================
*
* Author: CircuitDigest/RithikKrisna[me_RK]
* Date: August 2025
*
* DESCRIPTION:
* Advanced voice-controlled LED system using ESP32 microcontroller with Edge Impulse
* machine learning for wake word detection and command recognition. Features dual
* confidence thresholds for reliable command execution and enhanced user feedback.
*
* FEATURES:
* --------
* • Wake Word Detection: "marvin" activates listening mode
* • Voice Commands: "on" and "off" to control LED
* • Dual Confidence System:
* - 80% threshold for reliable command execution
* - 50% threshold for recognition feedback
* • Visual Feedback System:
* - Control LED (Pin 22): Main device being controlled
* - Indicator LED (Pin 23): Status and pattern feedback
* • Listening Window: 10-second timeout after wake word
* • Real-time Audio Processing: Continuous inference with I2S microphone
*
* LED PATTERNS:
* ------------
* • Wake Word ("marvin"): 2 quick pulses + steady listening indicator
* • Turn On Command: Triple flash + confirmation
* • Turn Off Command: Fade pattern + confirmation
* • General Recognition: Single quick blink for detected words
* • Listening Mode: Steady indicator light
*
* HARDWARE REQUIREMENTS:
* ---------------------
* • ESP32 Development Board
* • I2S Digital Microphone (INMP441 or similar)
* • 2x LEDs with appropriate resistors
* • Breadboard and connecting wires
*
* PIN CONFIGURATION:
* -----------------
* • I2S Microphone:
* - BCK (Bit Clock): Pin 26
* - WS (Word Select): Pin 25
* - Data In: Pin 33
* • LEDs:
* - Control LED: Pin 22
* - Indicator LED: Pin 23 (optional, set to -1 to disable)
*
* SOFTWARE DEPENDENCIES:
* ---------------------
* • Edge Impulse Arduino Library
* • ESP32 Arduino Core
* • FreeRTOS (included with ESP32 core)
*
* USAGE:
* ------
* 1. Say "marvin" to activate listening mode (indicator LED turns on)
* 2. Within 10 seconds, say "on" or "off" to control the main LED
* 3. System provides visual feedback for all recognized words
*
* ===============================================================================
*/
// ===============================================================================
// PREPROCESSOR DIRECTIVES AND MEMORY OPTIMIZATION
// ===============================================================================
// Memory optimization: Remove this macro to save 10K RAM if target is memory-limited
#define EIDSP_QUANTIZE_FILTERBANK 0
/*
** MEMORY ALLOCATION NOTE:
** If you encounter TFLite arena allocation issues due to dynamic memory fragmentation,
** try defining "-DEI_CLASSIFIER_ALLOCATION_STATIC" in boards.local.txt and copy to:
** <ARDUINO_CORE_INSTALL_PATH>/arduino/hardware/<mbed_core>/<core_version>/
**
** Reference: https://support.arduino.cc/hc/en-us/articles/360012076960-Where-are-the…-
** If issues persist, insufficient memory for this model and application.
*/
// ===============================================================================
// SYSTEM INCLUDES
// ===============================================================================
#include <"YOUR_PROJECT_TITLE"_inferencing.h> // Edge Impulse generated library
#include "freertos/FreeRTOS.h" // Real-time operating system
#include "freertos/task.h" // Task management
#include "driver/i2s.h" // I2S audio driver
// ===============================================================================
// AUDIO PROCESSING DATA STRUCTURES
// ===============================================================================
/**
* Audio inference buffer structure
* Manages circular buffer for real-time audio processing
*/
typedef struct {
int16_t *buffer; // Audio sample buffer
uint8_t buf_ready; // Buffer ready flag
uint32_t buf_count; // Current buffer position
uint32_t n_samples; // Total number of samples
} inference_t;
// ===============================================================================
// SYSTEM CONFIGURATION CONSTANTS
// ===============================================================================
// AI Model Confidence Thresholds
const float COMMAND_CONFIDENCE_THRESHOLD = 0.80; // 80% for reliable command execution
const float RECOGNITION_CONFIDENCE_THRESHOLD = 0.50; // 50% for recognition feedback
// Timing Configuration
const unsigned long LISTENING_DURATION_MS = 10000; // 10-second listening window after wake word
// Hardware Pin Configuration
const int CONTROL_LED_PIN = 22; // Main LED being controlled
const int INDICATOR_LED_PIN = 23; // Status indicator LED (-1 to disable)
// Audio Processing Configuration
static const uint32_t sample_buffer_size = 2048; // I2S sample buffer size
// ===============================================================================
// GLOBAL STATE VARIABLES
// ===============================================================================
// Wake Word System State
static bool wake_word_detected = false; // Wake word detection flag
static unsigned long wake_word_timestamp = 0; // Timestamp of last wake word
static bool listening_mode = false; // Active listening state
static bool led_state = false; // Current LED state
// Audio Processing State
static inference_t inference; // Audio inference structure
static signed short sampleBuffer[sample_buffer_size]; // Raw audio sample buffer
static bool debug_nn = false; // Neural network debug output
static bool record_status = true; // Recording status flag
// ===============================================================================
// LED VISUAL FEEDBACK SYSTEM
// ===============================================================================
/**
* @brief Create wake word detection pattern
* Shows 2 quick pulses to indicate "marvin" was detected
*/
void show_wake_word_pattern() {
if (INDICATOR_LED_PIN == -1) return;
// Wake pattern - 2 quick pulses to indicate wake word detected
for (int cycle = 0; cycle < 2; cycle++) {
digitalWrite(INDICATOR_LED_PIN, HIGH);
delay(150);
digitalWrite(INDICATOR_LED_PIN, LOW);
delay(100);
}
}
/**
* @brief Activate listening mode indicator
* Shows steady light during command listening period
*/
void show_listening_mode() {
if (INDICATOR_LED_PIN == -1) return;
digitalWrite(INDICATOR_LED_PIN, HIGH);
}
/**
* @brief Show "turning on" confirmation pattern
* Triple flash followed by confirmation sequence
*/
void show_turning_on_pattern() {
if (INDICATOR_LED_PIN == -1) return;
// Quick triple flash then steady
for (int i = 0; i < 1; i++) {
digitalWrite(INDICATOR_LED_PIN, HIGH);
delay(100);
digitalWrite(INDICATOR_LED_PIN, LOW);
delay(100);
}
// Brief pause then steady on for confirmation
delay(200);
digitalWrite(INDICATOR_LED_PIN, HIGH);
delay(800);
digitalWrite(INDICATOR_LED_PIN, LOW);
}
/**
* @brief Show "turning off" confirmation pattern
* Fade-like pattern to indicate device turning off
*/
void show_turning_off_pattern() {
if (INDICATOR_LED_PIN == -1) return;
// Start bright, then fade to off with pauses
digitalWrite(INDICATOR_LED_PIN, HIGH);
delay(300);
digitalWrite(INDICATOR_LED_PIN, LOW);
delay(150);
digitalWrite(INDICATOR_LED_PIN, HIGH);
delay(200);
digitalWrite(INDICATOR_LED_PIN, LOW);
delay(150);
digitalWrite(INDICATOR_LED_PIN, HIGH);
delay(100);
digitalWrite(INDICATOR_LED_PIN, LOW);
// Final confirmation that it's off
delay(500);
}
/**
* @brief Show general word recognition pattern
* Single blink for words detected above 50% confidence (non-commands)
*/
void show_general_recognition_pattern() {
if (INDICATOR_LED_PIN == -1) return;
// Single quick blink for general recognition
digitalWrite(INDICATOR_LED_PIN, HIGH);
delay(150);
digitalWrite(INDICATOR_LED_PIN, LOW);
}
/**
* @brief Deactivate listening mode
* Turns off indicator LED and resets listening state
*/
void stop_listening_mode() {
if (INDICATOR_LED_PIN == -1) return;
listening_mode = false;
digitalWrite(INDICATOR_LED_PIN, LOW);
}
// ===============================================================================
// VOICE COMMAND PROCESSING ENGINE
// ===============================================================================
/**
* @brief Enhanced wake word detection and command processing system
*
* Processes inference results with dual confidence thresholds:
* - High threshold (80%) for reliable command execution
* - Lower threshold (50%) for user feedback and recognition
*
* @param result Edge Impulse inference result containing classification data
*/
void handle_wake_word_and_commands(ei_impulse_result_t &result) {
// Find the classification label with highest confidence
float max_confidence = 0.0;
String detected_word = "";
// Iterate through all possible classifications
for (size_t ix = 0; ix < EI_CLASSIFIER_LABEL_COUNT; ix++) {
if (result.classification[ix].value > max_confidence) {
max_confidence = result.classification[ix].value;
detected_word = String(result.classification[ix].label);
}
}
float max_confidence_percentage = max_confidence * 100.0;
// ENHANCED FEATURE: Recognition feedback for any detected word above 50%
// Provides user feedback even for words below command threshold
if (max_confidence >= RECOGNITION_CONFIDENCE_THRESHOLD && !detected_word.equals("noise")) {
// Only show general recognition if not in command listening mode
if (!listening_mode && !detected_word.equals("marvin") &&
!detected_word.equals("on") && !detected_word.equals("off")) {
show_general_recognition_pattern();
}
ei_printf("Recognized: %s (%.1f%%)\n", detected_word.c_str(), max_confidence_percentage);
}
// Check if listening window has expired (10-second timeout)
if (wake_word_detected) {
unsigned long current_time = millis();
if (current_time - wake_word_timestamp > LISTENING_DURATION_MS) {
wake_word_detected = false;
listening_mode = false;
stop_listening_mode();
ei_printf("Listening window expired.\n");
return;
}
}
// COMMAND PROCESSING: Only execute commands above 80% confidence threshold
if (max_confidence_percentage < (COMMAND_CONFIDENCE_THRESHOLD * 100)) {
return;
}
// Ignore background noise classifications
if (detected_word.equals("noise")) {
return;
}
ei_printf("Detected: %s (%.2f%%)\n", detected_word.c_str(), max_confidence_percentage);
// WAKE WORD PROCESSING: Activate listening mode
if (detected_word.equals("marvin")) {
wake_word_detected = true;
wake_word_timestamp = millis();
listening_mode = true;
ei_printf("Wake word detected! Listening for commands for %d seconds...\n", LISTENING_DURATION_MS / 1000);
// Visual feedback: Show wake pattern then enter listening mode
show_wake_word_pattern();
delay(200); // Brief pause between patterns
show_listening_mode();
return;
}
// COMMAND PROCESSING: Execute LED control commands during active listening window
if (wake_word_detected && listening_mode) {
if (detected_word.equals("on")) {
// Execute LED ON command sequence
stop_listening_mode(); // End listening mode
show_turning_on_pattern(); // Visual confirmation
digitalWrite(CONTROL_LED_PIN, HIGH); // Turn on main LED
led_state = true;
ei_printf("LED turned ON\n");
wake_word_detected = false; // Reset wake word state
}
else if (detected_word.equals("off")) {
// Execute LED OFF command sequence
stop_listening_mode(); // End listening mode
show_turning_off_pattern(); // Visual confirmation
digitalWrite(CONTROL_LED_PIN, LOW); // Turn off main LED
led_state = false;
ei_printf("LED turned OFF\n");
wake_word_detected = false; // Reset wake word state
}
}
}
// ===============================================================================
// SYSTEM INITIALIZATION
// ===============================================================================
/**
* @brief Arduino setup function - System initialization
* Configures hardware, displays system information, and starts audio processing
*/
void setup()
{
// -------------------------------------------------------------------------
// Serial Communication Setup
// -------------------------------------------------------------------------
Serial.begin(115200);
while (!Serial); // Wait for USB connection (comment out for standalone operation)
Serial.println("Enhanced Voice Control Demo");
// -------------------------------------------------------------------------
// Hardware Pin Initialization
// -------------------------------------------------------------------------
// Configure control LED (main device being controlled)
pinMode(CONTROL_LED_PIN, OUTPUT);
digitalWrite(CONTROL_LED_PIN, LOW);
led_state = false;
// Configure indicator LED if enabled (status feedback)
if (INDICATOR_LED_PIN != -1) {
pinMode(INDICATOR_LED_PIN, OUTPUT);
digitalWrite(INDICATOR_LED_PIN, LOW);
}
// -------------------------------------------------------------------------
// System Configuration Display
// -------------------------------------------------------------------------
ei_printf("Voice control ready. Say 'marvin' then 'on' or 'off'\n");
ei_printf("Config: Command threshold=%.0f%%, Recognition threshold=%.0f%%\n",
COMMAND_CONFIDENCE_THRESHOLD*100, RECOGNITION_CONFIDENCE_THRESHOLD*100);
ei_printf("LEDs: Control=Pin%d, Indicator=Pin%d\n", CONTROL_LED_PIN, INDICATOR_LED_PIN);
ei_printf("LED Patterns:\n");
ei_printf(" - Wake word 'marvin': 2 quick pulses + listening mode (steady on)\n");
ei_printf(" - Command 'on': Triple flash + confirmation\n");
ei_printf(" - Command 'off': Fade pattern + confirmation\n");
ei_printf(" - Other words: Single blink (when not listening)\n");
// -------------------------------------------------------------------------
// Edge Impulse Model Information Display
// -------------------------------------------------------------------------
ei_printf("Inferencing settings:\n");
ei_printf("\tInterval: ");
ei_printf_float((float)EI_CLASSIFIER_INTERVAL_MS);
ei_printf(" ms.\n");
ei_printf("\tFrame size: %d\n", EI_CLASSIFIER_DSP_INPUT_FRAME_SIZE);
ei_printf("\tSample length: %d ms.\n", EI_CLASSIFIER_RAW_SAMPLE_COUNT / 16);
ei_printf("\tNo. of classes: %d\n", sizeof(ei_classifier_inferencing_categories) / sizeof(ei_classifier_inferencing_categories[0]));
// -------------------------------------------------------------------------
// Audio System Initialization
// -------------------------------------------------------------------------
ei_printf("\nStarting continuous inference in 2 seconds...\n");
ei_sleep(2000);
// Initialize microphone and audio buffer
if (microphone_inference_start(EI_CLASSIFIER_RAW_SAMPLE_COUNT) == false) {
ei_printf("ERR: Could not allocate audio buffer (size %d), this could be due to the window length of your model\r\n", EI_CLASSIFIER_RAW_SAMPLE_COUNT);
return;
}
ei_printf("Recording...\n");
}
// ===============================================================================
// MAIN PROCESSING LOOP
// ===============================================================================
/**
* @brief Arduino main loop - Continuous voice processing
* Handles real-time audio capture, ML inference, and command processing
*/
void loop()
{
// -------------------------------------------------------------------------
// Audio Capture
// -------------------------------------------------------------------------
bool m = microphone_inference_record();
if (!m) {
ei_printf("ERR: Failed to record audio...\n");
return;
}
// -------------------------------------------------------------------------
// Machine Learning Inference
// -------------------------------------------------------------------------
// Prepare signal structure for Edge Impulse classifier
signal_t signal;
signal.total_length = EI_CLASSIFIER_RAW_SAMPLE_COUNT;
signal.get_data = µphone_audio_signal_get_data;
ei_impulse_result_t result = { 0 };
// Run ML classification on audio data
EI_IMPULSE_ERROR r = run_classifier(&signal, &result, debug_nn);
if (r != EI_IMPULSE_OK) {
ei_printf("ERR: Failed to run classifier (%d)\n", r);
return;
}
// -------------------------------------------------------------------------
// Command Processing and LED Control
// -------------------------------------------------------------------------
handle_wake_word_and_commands(result);
// -------------------------------------------------------------------------
// Debug Information Output
// -------------------------------------------------------------------------
// Display inference timing and classification results
ei_printf("Predictions ");
ei_printf("(DSP: %d ms., Classification: %d ms., Anomaly: %d ms.)",
result.timing.dsp, result.timing.classification, result.timing.anomaly);
ei_printf(": \n");
// Print all classification probabilities
for (size_t ix = 0; ix < EI_CLASSIFIER_LABEL_COUNT; ix++) {
ei_printf(" %s: ", result.classification[ix].label);
ei_printf_float(result.classification[ix].value);
ei_printf("\n");
}
// Print anomaly score if available
#if EI_CLASSIFIER_HAS_ANOMALY == 1
ei_printf(" anomaly score: ");
ei_printf_float(result.anomaly);
ei_printf("\n");
#endif
}
// ===============================================================================
// AUDIO PROCESSING SUBSYSTEM
// ===============================================================================
/**
* @brief Audio data callback function
* Called when new audio samples are available from I2S
*
* @param n_bytes Number of bytes received
*/
static void audio_inference_callback(uint32_t n_bytes)
{
// Copy samples from I2S buffer to inference buffer
for(int i = 0; i < n_bytes>>1; i++) {
inference.buffer[inference.buf_count++] = sampleBuffer[i];
// Check if buffer is full
if(inference.buf_count >= inference.n_samples) {
inference.buf_count = 0; // Reset buffer position
inference.buf_ready = 1; // Signal buffer ready for processing
}
}
}
/**
* @brief FreeRTOS task for continuous audio sample capture
* Runs on separate core for real-time audio processing
*
* @param arg I2S bytes to read per iteration
*/
static void capture_samples(void* arg) {
const int32_t i2s_bytes_to_read = (uint32_t)arg;
size_t bytes_read = i2s_bytes_to_read;
// Continuous audio capture loop
while (record_status) {
// Read audio data from I2S microphone
i2s_read((i2s_port_t)1, (void*)sampleBuffer, i2s_bytes_to_read, &bytes_read, 100);
// Error handling for I2S read operations
if (bytes_read <= 0) {
ei_printf("Error in I2S read : %d", bytes_read);
}
else {
// Handle partial reads
if (bytes_read < i2s_bytes_to_read) {
ei_printf("Partial I2S read");
}
// Audio signal amplification (scale by 8x for better sensitivity)
for (int x = 0; x < i2s_bytes_to_read/2; x++) {
sampleBuffer[x] = (int16_t)(sampleBuffer[x]) * 8;
}
// Forward samples to inference callback if still recording
if (record_status) {
audio_inference_callback(i2s_bytes_to_read);
}
else {
break;
}
}
}
// Clean up FreeRTOS task when done
vTaskDelete(NULL);
}
// ===============================================================================
// MICROPHONE CONTROL FUNCTIONS
// ===============================================================================
/**
* @brief Initialize microphone inference system
* Allocates buffers and starts audio capture task
*
* @param n_samples Number of audio samples in buffer
* @return true if successful, false if memory allocation failed
*/
static bool microphone_inference_start(uint32_t n_samples)
{
// Allocate memory for audio sample buffer
inference.buffer = (int16_t *)malloc(n_samples * sizeof(int16_t));
if(inference.buffer == NULL) {
return false;
}
// Initialize inference structure
inference.buf_count = 0; // Reset buffer position
inference.n_samples = n_samples; // Set buffer size
inference.buf_ready = 0; // Buffer not ready initially
// Initialize I2S audio interface
if (i2s_init(EI_CLASSIFIER_FREQUENCY)) {
ei_printf("Failed to start I2S!");
}
ei_sleep(100); // Allow I2S to stabilize
record_status = true; // Enable recording
// Create FreeRTOS task for audio capture (high priority task)
xTaskCreate(capture_samples, "CaptureSamples", 1024 * 32, (void*)sample_buffer_size, 10, NULL);
return true;
}
/**
* @brief Wait for microphone inference buffer to be ready
* Blocks until audio buffer contains new samples for processing
*
* @return true when buffer is ready
*/
static bool microphone_inference_record(void)
{
bool ret = true;
// Wait for buffer to be filled by capture task
while (inference.buf_ready == 0) {
delay(10);
}
inference.buf_ready = 0; // Reset ready flag
return ret;
}
/**
* @brief Convert audio samples to float format for ML processing
* Edge Impulse callback function for accessing audio data
*
* @param offset Starting position in buffer
* @param length Number of samples to convert
* @param out_ptr Output buffer for float samples
* @return 0 on success
*/
static int microphone_audio_signal_get_data(size_t offset, size_t length, float *out_ptr)
{
numpy::int16_to_float(&inference.buffer[offset], out_ptr, length);
return 0;
}
/**
* @brief Clean up microphone inference resources
* Stops I2S and frees allocated memory
*/
static void microphone_inference_end(void)
{
i2s_deinit();
ei_free(inference.buffer);
}
// ===============================================================================
// I2S AUDIO INTERFACE CONFIGURATION
// ===============================================================================
/**
* @brief Initialize I2S audio interface for microphone input
* Configures ESP32 I2S peripheral for digital microphone communication
*
* @param sampling_rate Audio sampling frequency (typically 8kHz or 16kHz)
* @return 0 on success, error code on failure
*/
static int i2s_init(uint32_t sampling_rate) {
// I2S Configuration Structure
i2s_config_t i2s_config = {
.mode = (i2s_mode_t)(I2S_MODE_MASTER | I2S_MODE_RX | I2S_MODE_TX), // Master mode with RX
.sample_rate = sampling_rate, // Set by Edge Impulse model
.bits_per_sample = (i2s_bits_per_sample_t)16, // 16-bit audio samples
.channel_format = I2S_CHANNEL_FMT_ONLY_RIGHT, // Mono audio (right channel)
.communication_format = I2S_COMM_FORMAT_I2S, // Standard I2S protocol
.intr_alloc_flags = 0, // Default interrupt allocation
.dma_buf_count = 8, // Number of DMA buffers
.dma_buf_len = 512, // DMA buffer length
.use_apll = false, // Use PLL for clock generation
.tx_desc_auto_clear = false, // Don't auto-clear TX descriptors
.fixed_mclk = -1, // Auto-calculate master clock
};
// I2S Pin Configuration for INMP441 Digital Microphone
i2s_pin_config_t pin_config = {
.bck_io_num = 26, // Bit Clock (SCLK)
.ws_io_num = 25, // Word Select (LRCLK)
.data_out_num = -1, // Data Output (not used for input-only)
.data_in_num = 33, // Data Input (SD pin from microphone)
};
esp_err_t ret = 0;
// Install I2S driver
ret = i2s_driver_install((i2s_port_t)1, &i2s_config, 0, NULL);
if (ret != ESP_OK) {
ei_printf("Error in i2s_driver_install");
}
// Configure I2S pins
ret = i2s_set_pin((i2s_port_t)1, &pin_config);
if (ret != ESP_OK) {
ei_printf("Error in i2s_set_pin");
}
// Clear DMA buffers
ret = i2s_zero_dma_buffer((i2s_port_t)1);
if (ret != ESP_OK) {
ei_printf("Error in initializing dma buffer with 0");
}
return int(ret);
}
/**
* @brief Deinitialize I2S audio interface
* Stops and uninstalls I2S driver
*
* @return 0 on success
*/
static int i2s_deinit(void) {
i2s_driver_uninstall((i2s_port_t)1); // Stop and destroy I2S driver
return 0;
}
// ===============================================================================
// COMPILE-TIME VALIDATION
// ===============================================================================
// Ensure correct sensor type is configured in Edge Impulse model
#if !defined(EI_CLASSIFIER_SENSOR) || EI_CLASSIFIER_SENSOR != EI_CLASSIFIER_SENSOR_MICROPHONE
#error "Invalid model for current sensor."
#endif
// ===============================================================================
// END OF FILE
// ===============================================================================
