

In this comprehensive TMC2209 Arduino tutorial, we'll walk through a complete example of how to interface a Bigtree Tech TMC2209 stepper motor driver with Arduino UNO for precise directional rotation and step control. This stepper motor driver guide is perfect for beginners looking to learn Arduino stepper motor control using digital signals to move motors forward and backward with exceptional precision.
The TMC2209 stepper driver offers superior performance compared to traditional drivers, featuring silent operation, advanced microstepping support (up to 1/256 microsteps), and smart features like current limiting and StallGuard sensorless stall detection. With just three Arduino pins (DIR, STEP, and EN), you can achieve professional-grade stepper motor control without complex wiring or programming.
TMC2209 Stepper Motor Driver with Arduino - Quick Overview
Build Time: 30-45 minutes | Cost: $10-15 | Difficulty: Beginner
What You'll Learn: Stepper motor control, TMC2209 wiring, Arduino programming, Microstepping configuration, Silent operation setup
Applications: 3D printers, CNC machines, Camera sliders, Robotics projects, Automated positioning systems
A close alternative to the TMC2209 is the TMC2208 stepper driver, and we have already discussed how to use the TMC2208 stepper driver with Arduino, also predecessors like how to use the A4988 stepper driver with Arduino. Also at Circuit Digest, we’ve created many other Arduino projects and tutorials as well, all freely available so be sure to check them out if you’re interested in learning more.
Table of Contents
- Overview
- Components Required
- TMC2209 Pin Configuration and Arduino Connections
- TMC2209 Pinout
- TMC2209 vs TMC2208 vs A4988 vs DRV8825 - Comparision Table
- Advanced Features of the TMC2209
- Arduino Wiring Diagram and Circuit Connections
- Arduino Code Explanation and Programming Guide
- Demonstration
- Troubleshooting Common Issues
- TMC2209 Stepper Motor Driver Project Code
- Frequently Asked Questions About TMC2209 Stepper Motor Driver
- Similar Projects and Tutorials with Stepper Motors
TMC2209 Stepper Motor Control Overview
Stepper motors are commonly used in automation due to their ability to move in precise, discrete steps. However, to drive them efficiently, we need a motor driver module, a device that can interpret direction and step signals to control the motor's coils. In this project, we'll use basic digital output pins on the Arduino to send these signals.
We are not using UART, SPI, or advanced configuration methods, just the essential STEP, DIR, and EN pins, making this setup clean and beginner-friendly.
Components Required
Arduino UNO × 1
Stepper Motor (e.g., NEMA 17) × 1
Stepper Motor Driver Module (TMC2209) × 1
Breadboard × 1
Jumper Wires
External Power Supply (optional, based on motor specs)
TMC2209 Pin Configuration and Arduino Connections
The three main pins we’ll use to control the driver are:
TMC2209 Pinout
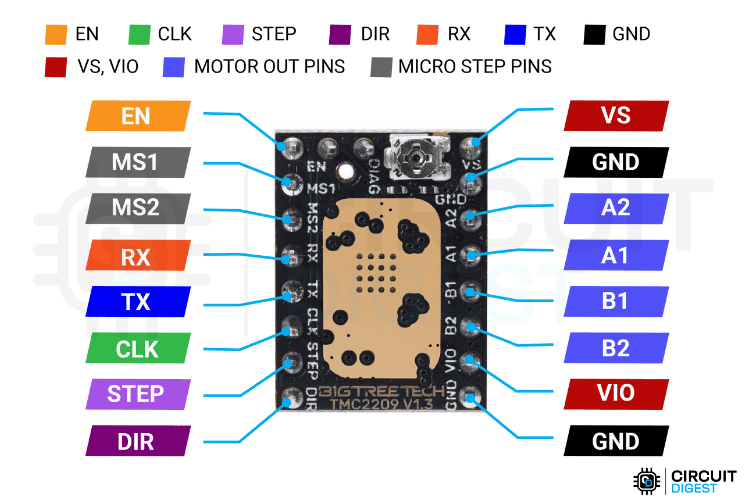
When the STEP pin receives a rising edge, the motor advances by one step. The DIR pin controls the direction (clockwise or counterclockwise), and the EN pin allows you to enable or disable the motor.
TMC2209 vs TMC2208 vs A4988 vs DRV8825 - Comparision Table
Advanced Features of the TMC2209
⇒ UART Configuration : One of the most powerful aspects of the TMC2209 is its single-wire UART interface. With UART, you can configure motor current, microstepping resolution, operating modes, and even read driver diagnostics — all in real time, through firmware.
⇒ StealthChop Mode : StealthChop is a silent running mode that significantly reduces stepper motor noise. This is especially useful in 3D printers, camera equipment, and other environments where noise is undesirable. It works best at low to medium speeds, producing smooth, quiet motion without the typical "buzz" of traditional stepper motors.
⇒ SpreadCycle Mode : In applications that demand higher torque or faster movements, SpreadCycle offers a high-performance chopper mode. It’s more aggressive in driving the motor and provides improved dynamic response at the cost of increased noise. SpreadCycle is ideal for rapid travel moves or heavier mechanical loads.
⇒ StallGuard4 Sensorless Homing : StallGuard4 allows the TMC2209 to detect mechanical stalls by monitoring the motor’s electrical load. This feature is especially useful for sensorless homing — eliminating the need for physical endstop switches. With proper tuning, StallGuard can reliably detect contact with the end of an axis, simplifying wiring and reducing hardware components.
⇒ CoolStep Current Control : CoolStep enables dynamic adjustment of motor current based on load conditions. When the motor is under low mechanical load, current is automatically reduced to save power and minimize heat.
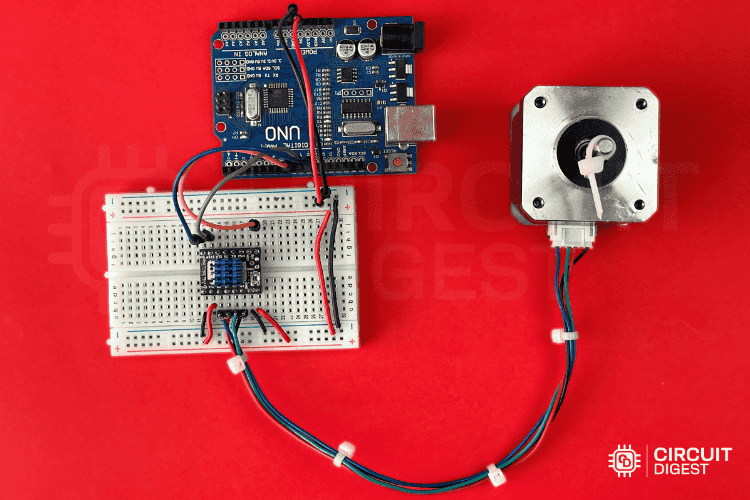
TMC2209 Arduino Wiring Diagram and Circuit Connections
Here’s a simple wiring configuration to connect your Arduino to a TMC2209 driver module:

Warning: Make sure all grounds (Arduino, motor power, and driver GND) are connected together.
Arduino Code Explanation and Programming Guide
Below is the Arduino code to rotate the stepper motor in both directions alternately. It uses digitalWrite and delayMicroseconds to create the step pulses. The complete code and its GitHub repo can be found at the bottom of this page. The code explanation is as follows.
» Pin Definitions
#define EN_PIN 8    // LOW: Driver enabled, HIGH: Driver disabled
#define STEP_PIN 9  // Step on the rising edge
#define DIR_PIN 10  // Set stepping direction
This section defines constants using #define to assign human-readable names to specific digital pins on an Arduino board. EN_PIN (enable pin) is connected to pin 8 and controls whether the motor driver is active or not. STEP_PIN is pin 9 and is used to send step signals to the motor—each rising edge triggers one step. DIR_PIN is pin 10 and sets the direction in which the stepper motor moves.
» Variables
int noOfSteps = 500;           // Number of steps to move in each direction
int microSecondsDelay = 1000;  // Delay in microseconds between each step
Here, two global variables are declared. noOfSteps determines how many steps the motor should take in a single direction during each cycle. microSecondsDelay sets the time delay between steps in microseconds, which controls the speed of the motor.
» setup()
void setup() {
 // Configure pin modes
 pinMode(EN_PIN, OUTPUT);
 pinMode(STEP_PIN, OUTPUT);
 pinMode(DIR_PIN, OUTPUT);
 // Initialize pin states
 digitalWrite(EN_PIN, LOW);   // Enable the driver
 digitalWrite(DIR_PIN, LOW);  // Set initial direction
}
The setup() function is run once when the Arduino is powered on or reset. Inside it, the three defined pins are set as output using pinMode(). Then, the motor driver is enabled by setting EN_PIN to LOW, and the initial direction is set to LOW using digitalWrite(DIR_PIN, LOW).
» Loop()
void loop() {
 // Move motor in one direction
 digitalWrite(DIR_PIN, LOW);  // Set direction to LOW
 moveSteps(noOfSteps);
 // Move motor in the opposite direction
 digitalWrite(DIR_PIN, HIGH); // Set direction to HIGH
 moveSteps(noOfSteps);
}
The loop() function continuously runs after setup(). It first sets the direction pin to LOW and calls moveSteps(noOfSteps), which causes the motor to take 500 steps in that direction. Then, the direction is reversed by setting the direction pin to HIGH, and the motor again takes 500 steps in the opposite direction. This creates a back-and-forth motion.
» MoveSteps()
void moveSteps(int steps) {
 for (int i = 0; i < steps; i++) {
   digitalWrite(STEP_PIN, HIGH);
   delayMicroseconds(microSecondsDelay);
   digitalWrite(STEP_PIN, LOW);
   delayMicroseconds(microSecondsDelay);
 }
}
This is a helper function that actually performs the stepping. It receives the number of steps to execute as an argument. Inside the for loop, it toggles the STEP_PIN to HIGH, waits for a short delay, sets it back to LOW, and waits again. This sequence generates a pulse that causes the stepper motor to move one step. Repeating it produces continuous motion.
Understanding Timing and Speed
The microSecondsDelay controls the motor speed:
Smaller delays → Faster rotation
Larger delays → Slower rotation
Warning: Keep in mind, if the delay is too small, the motor might skip steps or stall, especially under load. Experiment with values like 1000, 500, or even 200 to test the behavior.
Optional: Improve with Microstepping
If you are using a TMC2209 you can configure microstepping via the MS1, MS2 pins This allows for smoother and quieter motion. The code doesn’t change, but you’ll need to set the microstepping resolution in hardware or software (via jumpers or UART).
MS1/MS2: CONFIGURATION OF MICROSTEP RESOLUTION FOR STEP INPUT
Microstepping Basics
A typical stepper motor moves in discrete steps. For example, if it has 200 steps per revolution, each step turns the motor shaft by 1.8 degrees (360° / 200 = 1.8° per step). In full-step mode, the motor simply moves one step at a time, jumping 1.8° with each pulse.
Microstepping is a technique used by stepper motor drivers to divide each full step into smaller increments, often 2, 4, 8, 16, or even 256 microsteps per full step. This is done by precisely controlling the current to the motor coils, allowing the rotor to stop at intermediate positions between full steps.
TMC2209 Demonstration
Once everything is connected and the code is uploaded to your Arduino, you should see the motor rotating forward and backward repeatedly.
Troubleshooting Common Issues with the TMC2209
⇥ Motor Not Moving or Responding: When a stepper motor doesn’t move, it’s often due to wiring errors or insufficient signal. Check that the STEP, DIR, EN, and GND pins are correctly connected to the microcontroller. Also Ensure that both motor coil pairs are connected to the correct driver outputs.
⇥ Overheating Problems: If the driver or motor becomes hot to the touch quickly, the current is likely set too high. This can be addressed either by adjusting the physical Vref voltage on the board or, more efficiently, by setting the current digitally through UART. Using heat sinks and proper airflow (such as small fans) is essential in closed enclosures or continuous operation.
⇥ Noisy or Vibrating Motor: Although the TMC2209 is known for quiet operation, it may still produce noise if operating in SpreadCycle mode or due to interference from improper wiring. Switching to StealthChop mode significantly reduces noise and vibration. Also, use well-insulated and twisted motor wires to help eliminate electrical noise that can cause irregular motion.
Performance Optimization Tips:
⇥ Using UART to Fine-Tune Control: By leveraging the UART interface, you can fine-tune your driver settings in software. This includes dynamically adjusting current during motion, changing microstepping modes, and monitoring temperature or diagnostics in real time.
⇥ Selecting the Best Operating Mode: For quieter and smoother operation at slow speeds, use StealthChop. For rapid, high-torque movements such as travel or acceleration phases, switch to SpreadCycle.
⇥ Managing Heat and Cooling: Even though the TMC2209 is energy-efficient, it can still generate heat at higher current levels. To keep it cool, always use a heatsink and ensure airflow with fans if the driver is in a tight or enclosed space.
⇥ Using Higher Voltage for Better Performance: Running the TMC2209 at 24V instead of 12V improves torque at higher speeds because it allows for faster current ramp-up in the coils. This leads to better acceleration, fewer skipped steps, and improved responsiveness, especially in demanding applications like CNC or high-speed 3D printing.
Safety Considerations:
⇥ Power Safety: Always disconnect power before making wiring changes. Stepper drivers can be damaged or cause shorts if wires are moved while powered. Double-check polarity before connecting your power supply — reversing it can instantly destroy the driver.
⇥ Proper Cooling: The TMC2209 can run hot under heavy load. Use heatsinks on the driver chip and ensure airflow if the driver is in an enclosure. Overheating can lead to thermal shutdown or long-term damage, so monitor temperature during early tests.
⇥ Current Settings: Never set motor current higher than what your stepper motor is rated for. Overdriving the motor increases torque but also creates excessive heat and risks burning out the coils. Use UART to fine-tune current or calculate safe Vref manually.
⇥ Avoid Static Discharge: Handle the driver carefully, especially when not grounded. Static discharge can damage sensitive chips. Work on an anti-static mat or touch grounded metal before handling the board.
This basic stepper motor setup is a solid foundation for more advanced projects like 3D printers, CNC machines, camera sliders, and robotic arms. From here, you can expand the project by adding buttons for manual direction control, using potentiometers to adjust speed, or integrating sensors to add interactivity and automation.
If you have any doubts, need clarification, or want to share your own ideas and improvements feel free to ask. Let’s build and learn together!
This tutorial shows how to control a stepper motor using a TMC2209 (or similar) stepper driver and an Arduino UNO using only three digital pins. It covers everything from basic wiring and pin descriptions to detailed code walkthroughs. You now have the foundational understanding needed to explore more advanced motion control features in future projects.
If you found this helpful, be sure to check out our other Arduino + Stepper Motor projects and tutorials to continue learning.
TMC2209 Stepper Motor Driver Project Code


Frequently Asked Questions About TMC2209 Stepper Motor Driver
What voltage does TMC2209 stepper driver support?
The TMC2209 stepper motor driver supports a voltage range of 4.75V to 29V for motor power (VM/VS pin). For logic voltage (VIO), it requires 3.3V to 5V, making it fully compatible with both 3.3V and 5V Arduino boards including Arduino UNO, Nano, and ESP32.
Can TMC2209 work directly with 5V Arduino UNO?
Yes, the TMC2209 stepper driver works perfectly with 5V Arduino UNO. Connect the VIO pin to Arduino's 5V output for logic power, and use any digital pins for STEP, DIR, and EN control signals. The driver's logic inputs are 5V tolerant.
TMC2209 vs TMC2208: Which stepper driver is better?
TMC2209 is superior to TMC2208 because it includes StallGuard4 sensorless homing capability, which TMC2208 lacks. Both offer silent operation and up to 1/256 microstepping, but TMC2209 can detect motor stalls without additional sensors, making it ideal for CNC machines and 3D printers.
How many stepper motors can one Arduino control with TMC2209?
One Arduino UNO can control multiple TMC2209 drivers simultaneously. Each driver needs 3 digital pins (STEP, DIR, EN), so theoretically you can control 4-5 stepper motors with one Arduino UNO, depending on your other I/O requirements.
What is the maximum current rating for TMC2209?
The TMC2209 stepper motor driver can handle up to 2.8A peak current per motor phase. For continuous operation, it's recommended to stay around 2A per phase. Always match the driver current to your stepper motor's rated current for optimal performance.
Does TMC2209 require external cooling or heatsink?
While TMC2209 generates less heat than older drivers like A4988, a heatsink is recommended for currents above 1.5A or continuous operation. Good airflow and proper heat dissipation prevent thermal shutdown and ensure reliable performance.
Can TMC2209 be used without UART programming?
Yes, TMC2209 works perfectly without UART configuration. You can control it using just STEP, DIR, and EN pins like any basic stepper driver. UART is optional for advanced features like dynamic current control, diagnostics, and mode switching.
What microstepping settings does TMC2209 support?
TMC2209 supports 1/8, 1/16, 1/32, and 1/64 microstepping via MS1 and MS2 pins. Additionally, it uses MicroPlyer interpolation to achieve up to 1/256 effective microstepping resolution for ultra-smooth motor operation.
Is TMC2209 compatible with NEMA 17 stepper motors?
Yes, TMC2209 is fully compatible with NEMA 17 stepper motors. Most NEMA 17 motors draw 1.2-2A per phase, which is well within TMC2209's 2.8A capability. This makes it perfect for 3D printers, CNC machines, and robotics projects.
How to wire TMC2209 to Arduino for basic operation?
Connect TMC2209 to Arduino as follows: EN pin → Arduino D8, STEP pin → Arduino D9, DIR pin → Arduino D10, VIO → Arduino 5V, GND → Arduino GND, VM → Motor power supply (12-24V recommended).
Similar Projects and Tutorials with Stepper Motors
If you are looking for some project ideas related to stepper motors, below are some useful links,

DIY Motorized Camera Slider using Arduino and Stepper Motors for Video Shooting
Learn how to build a DIY motorized camera slider using Arduino. This project offers smooth, automated camera movement for capturing time-lapse and cinematic shots. Ideal for photography and videography enthusiasts looking for a budget-friendly camera slider solution.

Arduino based Roller Blinds to Automate and Control your Window Curtains with Google Assistant
Automate your window curtains with this Arduino-based roller blinds project. Using NodeMCU and a stepper motor, control blinds remotely via Wi-Fi. Learn how to build a smart curtain system with step-by-step instructions, circuit diagrams, and code for home automation.

DIY Arduino Based CNC Plotter Machine
This DIY Arduino CNC Machine can draw most of the basic shapes, texts and even cartoons. It's operation is similar to the way a human hand writes. It’s faster and more accurate compared to the way a human being can write or draw.

A Look at Sensorless Homing: Stepper Motor Control Without End Switches
Discover how sensorless homing works for stepper motors without using end switches. This article explains the principle, benefits, and practical implementation of sensorless homing for precise motor control in compact and cost-sensitive applications.
Complete Project Code
/*
Code for Interfacing TMC2209 with Arduino UNO board
Follow Circuit here:https://circuitdigest.com/fullimage?i=circuitdiagram_mic/Circuit-Diagram-of-Interfacing-TMC2209-with-Arduino.png
Github Repo: https://github.com/Circuit-Digest/Interfacing-TMC2209-Stepper-Motor-Driver-with-Arduino
*/
// Pin Definitions
#define EN_PIN 8    // LOW: Driver enabled, HIGH: Driver disabled
#define STEP_PIN 9  // Step on the rising edge
#define DIR_PIN 10  // Set stepping direction
int noOfSteps = 500;           // Number of steps to move in each direction
int microSecondsDelay = 1000;  // Delay in microseconds between each step
void setup() {
 // Configure pin modes
 pinMode(EN_PIN, OUTPUT);
 pinMode(STEP_PIN, OUTPUT);
 pinMode(DIR_PIN, OUTPUT);
 // Initialize pin states
 digitalWrite(EN_PIN, LOW);   // Enable the driver
 digitalWrite(DIR_PIN, LOW);  // Set initial direction
}
void loop() {
 // Move motor in one direction
 digitalWrite(DIR_PIN, LOW);  // Set direction to LOW
 moveSteps(noOfSteps);
 // Move motor in the opposite direction
 digitalWrite(DIR_PIN, HIGH); // Set direction to HIGH
 moveSteps(noOfSteps);
}
void moveSteps(int steps) {
 for (int i = 0; i < steps; i++) {
   digitalWrite(STEP_PIN, HIGH);
   delayMicroseconds(microSecondsDelay);
   digitalWrite(STEP_PIN, LOW);
   delayMicroseconds(microSecondsDelay);
 }
}
