

Today, we are going to investigate the TMC2208 stepper motor driver, a commonly used driver module that performs well with 2-phase bipolar stepper motors. The TMC2208 module is manufactured by Trinamic (a German company that specialises in motion control products); it has become popular due to its performance in a more efficient manner and provides silent operation. The TMC2208 module can be used to improve the performance of many applications due to the high performance and quiet operation it delivers.
A close alternative for the TMC2208 is the A4800 Stepper driver, and we have already discussed how to use the A4988 Stepper driver with Arduino; you can also check that if you are interested. Also, here at Circuit Digest, we have built more such Arduino projects and tutorials, all of which are free to learn, so do check them out if you wish to read more.
In this complete TMC2208 Arduino tutorial, you will learn about TMC2208 pinout mapping, TMC2208 schematic analysis, and full interfacing with many code examples. The TMC2208 stepper motor driver can significantly enhance your implementation when building a 3D printer, a CNC machine, or even in robotics.
Now let's get back to our TMC2208 stepper driver module, understand its basics and learn how to use it with an Arduino UNO board.
TMC2208 Stepper Motor Control with Arduino - Quick Overview
Build Time: 2-4 hours | Cost: $20-30 | Difficulty: Beginner-Intermediate
What You'll Learn: Stepper motor control, Microstepping, Digital pin configuration, TMC2208 driver interfacing
Applications: 3D printer motion, CNC machine control, Robotic arm movement, Automated camera slider
Table of Contents
- Overview
- Key Features
- TMC2208 Stepper Motor Driver Module
- └ Pinout and Pin Configuration
- Schematic Analysis and Circuit Design
- └ Schematic Key Components
- Required Components
- Circuit Diagram
- Arduino Code
- TMC2208 vs A4988
- Working Demonstration
- TMC2208 Vs TMC2209
- TMC2208 v3.0 Module
- Features of TMC2208 V3.0
- Frequently Asked Questions
- Conclusion
- GitHub Repository
- Explore More
TMC2208 Stepper Motor Driver Module Overview

Key Features of the TMC2208 Stepper Motor Driver Module
The TMC2208 module shines in the stepper driver world; it is considered advanced technology when compared to older technology boards like the A4988 driver. Quite frankly, it will be hard to convince most hobbyists to start using turtle technology like the A4988 when they discover the TMC2208 stepper motor driver functionality. So let's look at some of the benefits you get using this TMC2208 stepper motor driver over other cheaper alternative drivers:
Silent Operation
One of the standout features of the TMC2208 is its ability to operate almost silently. This is achieved through Trinamic’s StealthChop2, a no-noise, high-precision chopper algorithm for inaudible motion and inaudible standstill of the motor. This makes the TMC2208 Arduino combination perfect for desktop 3D printers and quiet automation projects.
Smooth Running
The TMC2208 has a micro-step interpolator that provides up to 256 microsteps, allowing for very fine control over motor movements. This results in smoother motion and higher precision in positioning.
Simple Connectivity
The TMC2208 is designed for easy integration with existing systems. It supports a standard step/dir interface and can be configured through UART for advanced features and fine-tuning.
Current Control
With the TMC2208, you can easily adjust the motor current through an onboard potentiometer or UART communication. This allows for optimal performance and efficiency by minimising heat generation and power consumption.
Automatic Standstill Power Down
This sensorless load detection feature allows the TMC2208 to detect motor stalls and provide feedback without the need for additional sensors. It enhances reliability and protects the motor from drawing excessive current.
Safeguards and Safety
TRINAMIC motor drivers offer safeguards to detect and protect against shorted outputs, output open circuit, overtemperature, and undervoltage conditions. These features enhance safety and ensure recovery from equipment malfunctions.
TMC2208 Stepper Motor Driver Module
Being a beginner, the 16 pins of this module might look complex, but believe me, it's simple to understand and use. Below, you can see the pinout marking of the TMC2208 stepper driver module using the actual driver image. At this time, I would like to mention that the module we are using in this tutorial is the TMC2208 V2.0, so kindly refer to it appropriately.

Understanding the pinout of the TMC2208 is crucial for correct TMC2208 Arduino interfacing. The 16 pins of the module may appear daunting to a beginner, but it is really simple to understand and implement. The TMC2208 pinout is logically laid out, which provides ease of connections.
Here is a full pinout description of the TMC2208 V2.0 module we are using in this tutorial:
in No | Pin Name | Type | Description |
1 | EN | Digital Input | Driver Enable Pin |
2 | MS1 | Digital Input (pd) | Microstep resolution configuration Pins |
3 | MS2 | Digital Input (pd) | Microstep resolution configuration Pins |
4 | NC | - | No Connections |
5 | PDN | Digital Input & Output | Pin responsible for automatic power down when kept low. Can also be used for UART communication. |
6 | CLK | Digital Input | Clock Input for connecting external clock if needed. |
7 | STEP | Digital Input | Step Input |
8 | DIR | Digital Input (pd) | Direction Input, Active Low |
9 | GND | Power | Ground Connection pin |
10 | VIO | Power | 3.3v to 5v IO Supply Coltage for all digital pins |
11 | M2A | Analog Output | Motor coil A Output 2 |
12 | M1A | Analog Output | Motor coil A Output 1 |
13 | M1B | Analog Output | Motor coil B Output 1 |
14 | M2B | Analog Output | Motor coil B Output 2 |
15 | GND | Power | Ground Connection pin |
16 | VM | Power | Motor supply voltage Pin |
| (pd) - Active Pull-Down |
|
|
TMC2208 Pinout and Pin Configuration
Here's how to configure the TMC2208 pinout for your TMC2208 Arduino project:
EN: This is the power enable pin for the motor power supply. Keeping it HIGH turns off the motor, and keeping it LOW turns on the motor.
MS1 & MS2: These are digital input pins used to configure the microstep resolution. Below, you can see a table that defines the respective micro-step resolution for the provided input pattern for the TMC2208 stepper motor driver:
MS1 | MS2 | Micro-step Resolution |
LOW | LOW | 1/8 |
LOW | HIGH | 1/2 |
HIGH | LOW | 1/4 |
HIGH | HIGH | 1/16 |
NC: This means no connection pin, so don't care about it.
PDN: This pin is a bit confusing as it can act as both input and output. If this pin is kept low, automatic standstill current reduction happens to reduce power wastage and the chance of overheating. Alternatively, this pin can be directly utilised as a UART input and output pin, which is an optional feature. Remember that in this module, this pin is connected to a jumper. If you need to use it, you must connect the jumper first; otherwise, the pin is internally configured as PullDown.
CLK: This is a clock input pin. If this pin is pulled LOW, the internal clock is utilised. Otherwise, you can provide an external clock signal. This is recommended for advanced use cases. For example, using a lower clock pulse, like 4MHz, can reduce power consumption and electromagnetic emissions, but it may sacrifice some performance accordingly.
STEP: This pin is used to control a step of the stepper motor. Each rising edge can rotate the shaft by one step.
DIR: This pin is used to control the direction of the motor. It determines whether the motor rotates clockwise or counterclockwise. Factors like motor wiring affect the actual direction. To simplify, keeping it LOW rotates the motor in one direction, while keeping it HIGH rotates it in the opposite direction.
M2A, M1A, M1B, M2B: These pins are where the motor gets connected. Finding the right wire configuration is straightforward. To simplify, you can use a continuity meter to identify the end terminals of each coil. These two individual coils are known as Coil A and Coil B. Connect the Coil A terminals to M1A and M2A, and the Coil B terminals to M1B and M2B, respectively. That's it.
VIO, VM, GND: These are the power inputs for the driver module. Typically, every ground terminal is common. VIO powers the driver input and output, and VM powers the motor alone. VIO operates at around 3 to 5.5 volts, while VM should match the voltage requirements of the motor itself.
I hope you understand the pinouts and their descriptions of the TMC2208 driver module. Next, let's learn more about this hardware.
TMC2208 Schematic Analysis and Circuit Design
To gain a better understanding of the TMC2208 module, let's examine the TMC2208 schematic. This will not only provide an understanding of how the tmc2208 stepper motor driver works internally, but also how to make correct connections in your projects.
To know more about the hardware, let's take a look at its schematic. Below is the actual module, the TMC2208 V2.0 stepper motor driver, used to provide an outline of the components onboard.

Next, you can see the schematic of the module that we reverse-engineered. This helps people who are interested in integrating the TMC2208 IC directly into their project. It's also helpful for electronics enthusiasts to understand more about the internals of the module and how it works.

TMC2208 Schematic Key Components
The TMC2208 schematic reveals several important aspects
The TMC2208 V2.0 module closely follows the application schematic found in the official datasheet.
Most of the required pins are directly connected to the header pins of the module, except for PDN and CLK. These two are electrically isolated using a jumper resistor. You can locate the jumper resistor in the parts marking image above. To bypass the jumper, simply solder the two pads provided there, ensuring no other components are disturbed.
There are three test pins available for advanced use cases.
Every ground is connected here to maintain a common ground.
A 110 milliohm sense resistor is used to allow for the maximum current provided by the module. According to the datasheet, 110 milliohms is suitable for motors rated up to 1.5A current.
Moreover, the other aspects of the schematics are self-explanatory. So, we have completed the overall hardware explanation, and next, we will be interfacing this sensor with Arduino.
Required Components for TMC2208 Arduino Project
For this TMC2208 Arduino tutorial, you'll need:
Arduino UNO x 1
NEMA17 Stepper Motor x 1
TMC2208 Stepper Driver Module x 1
BreadBoard x 1
Jumper Wires Required Quantity
Software:
Arduino IDE
Circuit Diagram: TMC2208 Stepper Motor Driver with Arduino
To make it simple to get started, I won't cover the complex application and working of the TMC2208. Below, you can see a simple circuit diagram of interfacing the TMC2208 stepper driver module with the Arduino UNO. If you are completely new to stepper motors, please check out our article on how a stepper motor works?, to understand the basics.
The schematic diagram below represents the complete TMC2208 Arduino interface. The schematics show the wiring per the TMC2208 pinout for performance:

We are using a 5V power supply for both the digital I/Os and the motor, sourced from the Arduino UNO board. This is suitable for our demonstration project, but normally, we would use a separate power supply. To control the TMC2208, we'll use three digital pins on the Arduino (8, 9, and 10), which correspond to the EN, STEP, and DIR pins on the TMC2208. Any digital output pins can be used for this purpose. We're not using UART communication to keep things simple.

Next, we'll connect the motor to the driver. The motor has four wires, which are the ends of two separate coils. You can find the right coil wires by checking the continuity. Connect coil A wires to M1A and M2A, and coil B wires to M1B and M2B. It's straightforward, and you don't need to worry about the polarity of the coils—it will just change the direction of the motor without causing any issues. Refer to the diagram above for detailed connection instructions.

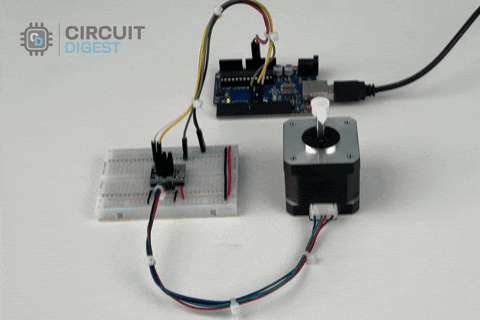
Above, you can see the assembled image of the hardware. As mentioned, I am just using the Arduino 5V power rail to power up everything.
Next, let's move to the coding part of controlling the stepper motor.
Arduino Code for TMC2208 Stepper Motor Control
As we are not using UART to control the motor, the code will look simpler. Here, we are going to perform functions like rotating the motor at a fixed speed and alternating the motor's rotation direction. So, let's get into the code.
This TMC2208 Arduino code presents basic stepper motor control with the TMC2208 module. The code implements the TMC2208 pinout for step/direction control:
Initially, you can see the Pin Definitions. As discussed, I am using pins 8, 9, and 10 of the Arduino UNO, which connect to EN, STEP, and DIR of the TMC2208.
// Pin Definitions
#define EN_PIN 8    // LOW: Driver enabled, HIGH: Driver disabled
#define STEP_PIN 9  // Step on the rising edge
#define DIR_PIN 10  // Set stepping direction
Next, there are two variables declared. ‘noOfSteps’ controls the number of steps needed to be moved, and ‘microSecondsDelay’ sets the delay between each step in microseconds.
int noOfSteps = 250;           // Number of steps to move in each direction
int microSecondsDelay = 1000;  // Delay in microseconds between each step
In the void setup() function, pins 8, 9, and 10 are set as OUTPUT. Initially, the Direction pin (DIR_PIN) is set LOW to establish the starting direction. The Enable pin (EN_PIN) is also set LOW, which activates the driver and powers the motor. Keeping EN_PIN HIGH would deactivate the motor, regardless of the driver's state. This setup ensures that the motor is enabled and ready to operate when the program starts.
void setup() {
  // Configure pin modes
  pinMode(EN_PIN, OUTPUT);
  pinMode(STEP_PIN, OUTPUT);
  pinMode(DIR_PIN, OUTPUT);
  // Initialize pin states
  digitalWrite(DIR_PIN, LOW);  // Set initial direction
  digitalWrite(EN_PIN, LOW);   // Enable the driver
}
In the `void loop()` function, there are two identical `for` loops that control a stepper motor. Each loop toggles the direction of the motor by changing the state of the `DIR_PIN`. The motor alternates between moving forward and backwards, determined by whether `DIR_PIN` is set to low or high.
void loop() {
  // Move the motor in one direction
  digitalWrite(DIR_PIN, LOW);  // Set direction to LOW
  for (int i = 0; i < noOfSteps * 2; i++) {
    digitalWrite(STEP_PIN, !digitalRead(STEP_PIN));  // Toggle the step pin
    delayMicroseconds(microSecondsDelay);            // Wait for the specified delay
  }
  // Move the motor in the opposite direction
  digitalWrite(DIR_PIN, HIGH);  // Set direction to HIGH
  for (int i = 0; i < noOfSteps * 2; i++) {
    digitalWrite(STEP_PIN, !digitalRead(STEP_PIN));  // Toggle the step pin
    delayMicroseconds(microSecondsDelay);            // Wait for the specified delay
  }
}
During each loop iteration, the motor takes a specified number of steps (`noOfSteps * 2`) and pauses briefly between steps (`delayMicroseconds(microSecondsDelay)`) to regulate its speed. This process repeats continuously, demonstrating basic motor control using digital signals and delays.
The motor moves one step per transition of the `STEP_PIN` from low to high, which is crucial for its rotation. Changing the direction is straightforward: keeping `DIR_PIN` low increments steps, while setting it high decrements steps. This setup illustrates fundamental motor driving principles using straightforward digital control techniques.
You can find the link to the complete code at the end of this article. Next, let's look at the working demonstration of the TMC2208.
TMC2208 vs A4988: Comprehensive Stepper Driver Comparison
It is important to understand the differences between TMC2208 vs A4988 to determine which driver is best suited for your application. Below captures a full comparison of these popular stepper motor drivers.
Feature | TMC2208 | A4988 | Winner |
|---|---|---|---|
Noise Level | Silent (StealthChop) | Audible | TMC2208 |
Microstepping | 256 microsteps | 16 microsteps | TMC2208 |
Maximum Current | 2A peak | 2A peak | Tie |
Heat Generation | Lower (better efficiency) | Higher | TMC2208 |
Cost | Higher | Lower | A4988 |
UART Communication | Yes | No | TMC2208 |
Stall Detection | Available via UART | No | TMC2208 |
Working Demonstration of TMC2208 Module Interfacing with Arduino UNO
After uploading the code to the Arduino Uno and making all the necessary connections, you can see the motor sweep. We already know three factors that affect motor rotation: MicroStep Resolution, Timing between each step, and Direction configuration. You can modify these factors to explore and learn more about controlling the servo using the TMC2208 module.
Above, you can see a GIF video demonstrating the project with the current configuration I used during the circuit connection and coding.
TMC2208 Vs TMC2209
The TMC2209 is a newer model compared to the TMC2208 and comes packed with many additional features. Let's compare the two by looking at the table below.
Feature | TMC2208 | TMC2209 |
Step/Dir Interface | Yes | Yes |
UART Interface | Yes | Yes |
MicroPlyer Interpolation (Smooth running) | Yes | Yes |
Microstep Resolution | 256 | 256 |
StallGuard (Sensorless load and stall detection) | No | Yes |
CoolStep (Current Control for energy saving) | No | Yes |
StealthChop (Silent motor operation) | Yes | Yes |
Drain Source Resistance - Low State | 280mΩ | 170mΩ |
Drain Source Resistance - High State | 290mΩ | 170mΩ |
Maximum Current | 2A peak | 2.8A peak |
Voltage Range | 4.75V - 36V | 4.75V - 29V |
The TMC2209 offers enhanced features like lower driver resistance, StallGuard, and CoolStep, making it more advanced and versatile compared to the TMC2208.
TMC2208 v3.0 Module
The module we used in this article mostly covers TMC2208, but it is important to have some base knowledge of their newer TMC2209. Both drivers are pin-compatible and share a similar pinout, but they have different features: BIGTREETECH's version of the TMC2208 V3.0 is the newest variation of the TMC2208 stepper motor driver. The V3.0 TMC2208 module has several key enhancements as compared to prior versions.
The significant enhancements of V3.0 TMC2208 module include:
∗ V3.0 TMC2208 Enhancements
∗ Better Thermal Management: Improved heat dissipation for continuous high-current operation
∗ Space Saving Design: Components below the PCB
∗ Better Documentation: Step-by-step guides for TMC2208 to Arduino implementation
∗ Greater Reliability: improved component selection and layout
The V3.0 retains full TMC2208 pinout compatibility while providing substantially better performance for more demanding possibilities
Features of TMC2208 V3.0
Versatility in Thermals: The TMC2208 V3.0 module is designed with improved thermal management.
Component Layout: Most components are hidden below the PCB, except for the potentiometer used for the TMC2208 current setting.
Documentation: BIGTREETECH provides comprehensive documentation for this module, making it easier to use and integrate.
Frequently Asked Questions on TMC2208 Stepper Motor Driver
⇥ What is the TMC2208 stepper driver, and how is it different from other stepper drivers?
Described as a quiet stepper motor driver, TMC2208 motor drivers feature StealthChop for the utmost silent operation and 256 microstep resolution. Compared to an A4988, it is a step quieter and has slightly better thermal dissipation of heat during motor actuation for finer motor control.
⇥ How to wire the TMC2208 pinout properly to Arduino?
Wiring TMC2208 properly would be VIO->5 V, GND->Ground, STEP->Arduino pin 9, DIR->pin 10, EN->pin 8. The motor coils will hook up to M1A/M2A and M1B/M2B. Give power to the VM pin to satisfy your motor power requirements.
⇥ Can the TMC2208 be made to run on my 3.3V Arduino?
Yes. You can feed 3.3V to 5.5V to the VIO pin of the TMC2208 module. A 3.3V and a 5V Arduino board will work. Just ensure that your motor power supply (VM) fits the specifications on the motor (typically 8 - 35V).
⇥ How to set the current limit on the TMC2208 driver?
Turn the potentiometer on the board clockwise to increase current to the motor. Turn counter-clockwise to decrease current. You can calculate the value using the following formula: Vref (Imotor *0.11Ω*√2). Measure the voltage between the potentiometer and ground with a multimeter, then calculate the Vref you will want for the rated current of your motor.
⇥ What voltage to use for the TMC2208 motor supply?
Motor supply (VM) should match your stepper motor specifications, which is 8-35V in most cases. Logic supply (VIO) should be supplied with 3.3-5.5V. Higher voltages will allow more torque at higher speeds but will generate more heat, so make sure you have enough cooling.
⇥ Is it possible to use UART communication on TMC2208?
If you bridge the jumper on the module PDN/UART, then connect the PDN pin to the Arduino (for example, pin 4) and use the TMCStepper library, you can use UART (Universal Asynchronous Receiver Transmitter) to get more Advanced features such as stallGuard, adjustment of the motor current and microstepping configuration all through advanced software commands.
Conclusion
If you can afford it, the TMC2208 V3.0 is a better choice due to its enhanced features and better design for thermal management. However, if budget is a concern, the TMC2208 v2.0 is also a good option and performs well.
Project Summary & GitHub Repository
The Project Summary provides an overview of the design and components, making it easier to quickly understand. It includes important technical details that help anyone, from an expert, understand the work. The GitHub Repository provides complete access to source code, circuit diagrams, and project documentation, allowing anyone to recreate.


Explore More Stepper Motor Control Projects
Create engaging applications that harness the power of stepper motors and microcontrollers. These projects showcase diverse uses of stepper motor drivers with Arduino and other boards, from automated curtains and precise camera sliders to smart bottle filling systems.

Arduino based Window Blinds Controller
In this project, we build an Arduino based automated motorized blinds that would open and close automatically at pre-defined times.

Control NEMA 17 Stepper Motor with Arduino and DRV8825
In this tutorial we are going to control NEMA 17 stepper motor using Arduino and DRV8825 stepper module. We will also use a potentiometer to control the direction of the stepper motor to rotate it in clockwise and anti-clockwise direction.

Automatic Bottle Filling System using Arduino
In this project we are going to design a prototype for Automatic Bottle Filling Machine using Arduino Uno, conveyor belt, solenoid valve, IR sensor, and Stepper motor.

In this project, we are going to make a stepper motor camera slider using Arduino. With this Camera Slider, you can start the movement by the start option, or you can restart the process by selecting the cancel button if necessary while shooting.
Complete Project Code
// Pin Definitions
#define EN_PIN 8    // LOW: Driver enabled, HIGH: Driver disabled
#define STEP_PIN 9  // Step on the rising edge
#define DIR_PIN 10  // Set stepping direction

int noOfSteps = 250;           // Number of steps to move in each direction
int microSecondsDelay = 1000;  // Delay in microseconds between each step

void setup() {
  // Configure pin modes
  pinMode(EN_PIN, OUTPUT);
  pinMode(STEP_PIN, OUTPUT);
  pinMode(DIR_PIN, OUTPUT);
  // Initialize pin states
  digitalWrite(DIR_PIN, LOW);  // Set initial direction
  digitalWrite(EN_PIN, LOW);   // Enable the driver
}

void loop() {
  // Move the motor in one direction
  digitalWrite(DIR_PIN, LOW);  // Set direction to LOW
  for (int i = 0; i < noOfSteps * 2; i++) {
    digitalWrite(STEP_PIN, !digitalRead(STEP_PIN));  // Toggle the step pin
    delayMicroseconds(microSecondsDelay);            // Wait for the specified delay
  }
  // Move the motor in the opposite direction
  digitalWrite(DIR_PIN, HIGH);  // Set direction to HIGH
  for (int i = 0; i < noOfSteps * 2; i++) {
    digitalWrite(STEP_PIN, !digitalRead(STEP_PIN));  // Toggle the step pin
    delayMicroseconds(microSecondsDelay);            // Wait for the specified delay
  }
}
