 Vedhathiri
Author

We use WhatsApp almost every day so much that it has become an unavoidable part of our routine. From a simple “good morning” message to a friend to a “good night” text to family, most of our daily communication happens through it. Beyond just messages, we constantly share moments from our lives by capturing photos on our phones and instantly sending them to others. It’s quick, easy, and something we hardly even think about anymore.
But here’s an interesting thought: what if this same experience could be extended beyond smartphones? What if, instead of a mobile phone, an embedded system or microcontroller could capture an image and send it directly to WhatsApp? Sounds exciting, right? We are going to make that happen.
In this project, we build a system where the ESP32-CAM is able to capture an image and send it directly to WhatsApp. With the help of the CircuitDigest Cloud, we can do that easily. Not only in WhatsApp, but we have already built the same system with the Email transfer, Real-Time Image Capture and Email Notification Using ESP32-CAM, which will guide you on how to build the setup for the Email transfer. Ok, now we get into the ESP32 cam WhatsApp system tutorial and see how to create the setup completely.
How ESP32-CAM send a WhatsApp message with an image:
- Register on CircuitDigest Cloud and get your API key.
- Wire a push button to GPIO 13 on the ESP32-CAM.
- Flash the Arduino sketch with your WiFi credentials, API key, and phone number.
- Press the button — the module captures a JPEG with flash and delivers it to WhatsApp within seconds.
Table of Contents
Components Required for the ESP32-CAM WhatsApp System
The components listed below are the ones which are used to build the ESP32 cam WhatsApp message complete setup.
| S.NO | Components | Purpose |
| 1. | ESP32 Cam | Act as a main controller and also with this we can able to capture images. |
| 2. | Push Button | Used to give the input by pressing. |
| 3. | Breadboard | Used make the connection easily |
*Note: We are using the ESP32-Cam that is interfaced with a micro USB port, so if you are using the normal ESP32-Cam, you need to connect the USB to Serial Converter for programming. If you are just getting started with the ESP32-CAM module, we recommend checking out our guide “How to Program the ESP32-CAM?”
Circuit Diagram - ESP32-CAM WhatsApp Image
The circuit diagram shows how the ESP32-CAM is connected to a push button as an input trigger. When the push button is pressed, a signal is sent to the ESP32-CAM, then the ESP32-CAM processes this signal and captures an image accordingly. The table below lists every component needed to assemble the ESP32-CAM WhatsApp message system from scratch.

GPIO Pin Connection Reference Table
| Pin / Node | Connected To | Function |
| GPIO 13 | Pin 1 | Capture trigger (INPUT_PULLUP — reads LOW on press) |
| GND | Pin 2 | Common ground reference |
| GPIO 4 | Onboard flash LED | Illumination during JPEG capture (150 ms burst) |
| 5 V / GND | Power supply rails | Stable 5 V input — a dedicated adapter is recommended over PC USB |
Hardware Configuration of ESP32 Cam WhatsApp
The image below shows how the ESP32-CAM and push button are connected for the complete setup. The use of a breadboard also reduces the number of jumper wires required, making the setup neat and manageable.

How ESP32-CAM Send WhatsApp Messages with Image
If you are new to the CircuitDigest Cloud platform, just go through this on how to register in CircuitDigest Cloud for the WhatsApp feature.
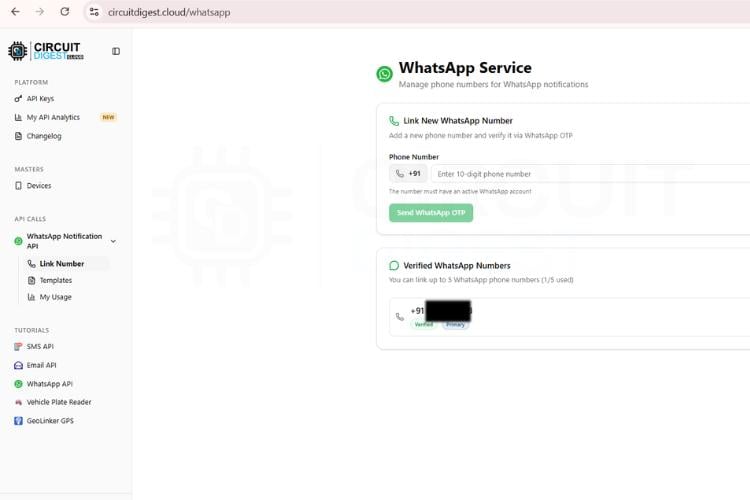
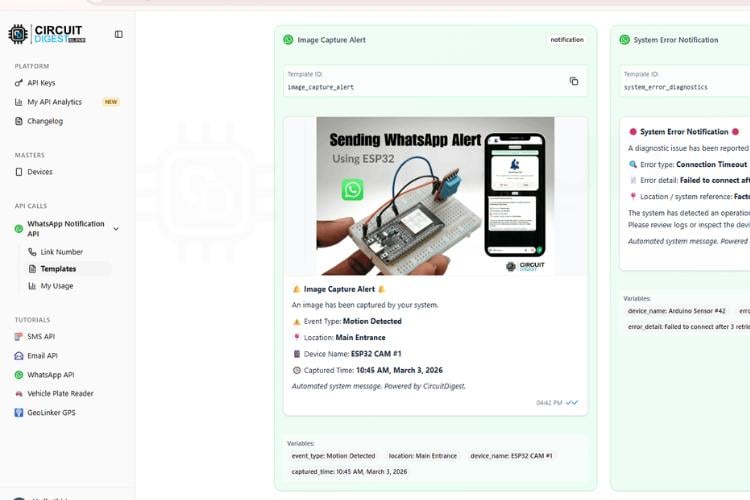
After registering on the CircuitDigest Cloud and completing the setup for the WhatsApp feature, the hardware is connected as per the circuit diagram. The ESP32-CAM can be programmed directly if it has a built-in micro USB interface; otherwise, a USB-to-Serial converter is required for uploading the code using the Arduino IDE. If you are new to this module, it is recommended to first understand the programming process before proceeding further. The image below shows the template used for sending images.
The working of this system is simple and efficient. The ESP32-CAM is mounted on a breadboard, and a push button is connected to GPIO13, with the other terminal connected to ground, while using an internal pull-up configuration in the code. When the button is pressed, it triggers the ESP32-CAM to capture an image using its onboard camera and flash. After capturing the image, the system processes it and sends it through the CircuitDigest API to WhatsApp.
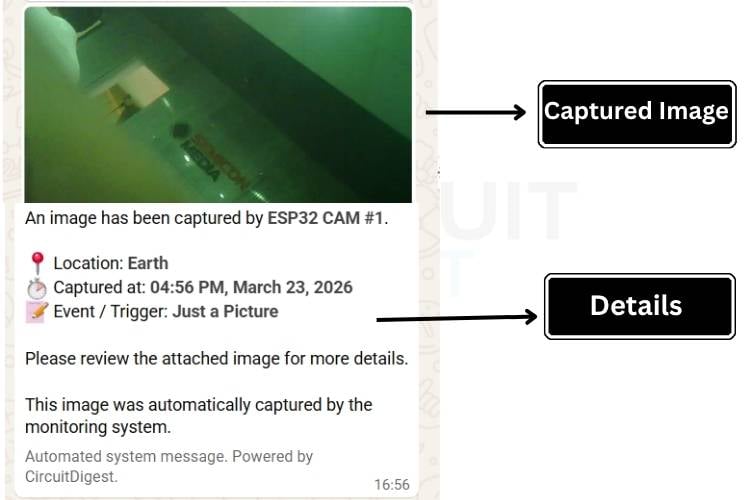
The image is delivered along with details such as event name and real-time information, making the system suitable for monitoring and instant communication applications. The images below show the real-time WhatsApp message with the details and the real-time picture. Not only this one, but we also did a project related to Automatic Number Plate Recognition using ESP32-Cam , check this out too.
ESP32-CAM WhatsApp System - Full Source Code Explained
The code is structured into multiple functional sections that handle configuration, initialization, input detection, image processing, and network communication. It begins with defining required libraries, constants, and credentials, followed by setting up the camera and WiFi connection. Separate functions are used for capturing images, formatting data, and handling HTTP requests to ensure modularity. The main loop continuously checks for input conditions and triggers the required functions accordingly. Overall, the code follows a structured and modular approach to efficiently manage tasks and resource utilisation.
#include "esp_camera.h"
#include <WiFi.h>
#include <WiFiClientSecure.h>
#include <time.h>
const char *ssid = "YOURSSID", *pwd = "YOURPASSWORD";
const char *apiKey = "YOURAPIKEY", *phone = "YOURNUMBER";
This section includes all required libraries for camera operation, WiFi connectivity, secure HTTPS communication, and time handling. It also defines the WiFi credentials, API key, and target phone number for sending WhatsApp messages. These values are essential for connecting the ESP32-CAM to the internet and interacting with the cloud API service.
void initCam() {
 camera_config_t cfg;
 cfg.ledc_channel = LEDC_CHANNEL_0;
 cfg.ledc_timer = LEDC_TIMER_0;
 cfg.pin_d0=5; cfg.pin_d1=18; cfg.pin_d2=19; cfg.pin_d3=21;
 cfg.pin_d4=36; cfg.pin_d5=39; cfg.pin_d6=34; cfg.pin_d7=35;
 cfg.pin_xclk=0; cfg.pin_pclk=22; cfg.pin_vsync=25;
 cfg.pin_href=23; cfg.pin_sscb_sda=26; cfg.pin_sscb_scl=27;
 cfg.pin_pwdn=32; cfg.pin_reset=-1;
 cfg.xclk_freq_hz = 20000000;
 cfg.pixel_format = PIXFORMAT_JPEG;
 cfg.frame_size = psramFound() ? FRAMESIZE_VGA : FRAMESIZE_QVGA;
 cfg.jpeg_quality = psramFound() ? 10 : 12;
 cfg.fb_count = psramFound() ? 2 : 1;
 if (esp_camera_init(&cfg) != ESP_OK) ESP.restart();
}
This part of the code configures the ESP32-CAM hardware by assigning GPIO pins and setting parameters such as clock frequency, image format, resolution, and buffer count. It ensures optimal performance by adjusting settings based on PSRAM availability. If initialization fails, the ESP32 restarts automatically to recover from errors.
uint8_t *imgBuf = (uint8_t*)malloc(fb->len);
if (!imgBuf) {
 esp_camera_fb_return(fb);
 fb = nullptr;
 return;
}
size_t len = fb->len;
memcpy(imgBuf, fb->buf, len);
esp_camera_fb_return(fb);
fb = nullptr;
esp_camera_deinit();
This part handles capturing the image from the camera and managing memory efficiently. It copies the captured frame into a dynamically allocated buffer to prevent data loss, then releases the original frame buffer and deinitializes the camera to free RAM. This step is crucial for avoiding memory overflow in ESP32-CAM.
String body = "--boundary\r\n"
"Content-Disposition: form-data; name=\"phone_number\"\r\n\r\n" + String(phone) + "\r\n"
"--boundary\r\n"
"Content-Disposition: form-data; name=\"template_id\"\r\n\r\nimage_capture_alert\r\n"
"--boundary\r\n"
"Content-Disposition: form-data; name=\"image\"; filename=\"p.jpg\"\r\n"
"Content-Type: image/jpeg\r\n\r\n";
client.println("POST /api/v1/whatsapp/send-with-image HTTP/1.1");
client.println("Host: www.circuitdigest.cloud");
client.println("Authorization: " + String(apiKey));
client.println("Content-Type: multipart/form-data; boundary=boundary");
client.print(body);
client.write(imgBuf, len);
This section handles sending the captured image to WhatsApp using an HTTP POST request. The API key is used for authentication, and the image is sent as multipart form data. Once the request is processed by the server, the image is delivered to the specified WhatsApp number along with event details.
bool cur = digitalRead(13);
if (lastBtn == HIGH && cur == LOW) {
 delay(50);
 if (digitalRead(13) == LOW) {
   camera_fb_t *s = esp_camera_fb_get();
   if (s) esp_camera_fb_return(s);
   digitalWrite(4, HIGH);
   delay(150);
   fb = esp_camera_fb_get();
   digitalWrite(4, LOW);
   sendWa();
 }
}
lastBtn = cur;
delay(10);
This section continuously monitors a push button connected to the ESP32. When pressed, it triggers image capture using the camera and activates the flash LED for better visibility. The captured image is then sent via WhatsApp using the previously defined function. Debouncing logic ensures accurate button detection without noise.
ESP32-CAM WhatsApp Image Alert System - Full Tutorial with Video
Real-World Applications of the ESP32-CAM WhatsApp System
Security Surveillance System
The system can be used for home or office security by capturing images when triggered and sending them instantly via WhatsApp for quick alerts.Smart Door Monitoring
It can act as a smart doorbell where pressing a button captures the visitor’s image and sends it to the user’s phone.Industrial Monitoring
Used in industries to monitor equipment or restricted areas and send real-time images when an event occurs.Wildlife Observation
The system can be deployed in remote areas to capture and send images of animals without human intervention.Educational & IoT Projects
It is highly useful for learning IoT concepts, combining image processing, communication, and embedded systems in a single project.
Troubleshooting the ESP32-CAM WhatsApp Setup
Issue 1: Image not captured
Solution:
This issue may occur if the camera module is not initialized properly or if there is insufficient power supply. Ensure that the ESP32-CAM is powered with a stable 5V source and all camera pins are correctly configured. Also, verify that the camera initialization code runs without errors in the serial monitorIssue 2: WiFi not connecting
Solution:
Check whether the entered WiFi SSID and password are correct. Ensure that the network is within range and supports 2.4 GHz frequency, as ESP32-CAM does not support 5 GHz networks. Restarting the router or re-uploading the code may also help resolve connection issues.Issue 3: WhatsApp message not sent
Solution:
This can happen due to an incorrect API key, phone number, or template ID. Verify all credentials in the code and ensure that the CircuitDigest cloud service is properly configured. Also, check the internet connection and server response in the serial monitor.Issue 4: Blurry or dark image
Solution:
Poor image quality may result from low lighting conditions or improper camera settings. Make sure the flash LED is working correctly and positioned properly. Adjusting the resolution and ensuring a stable setup can improve image clarity.Issue 5: Button not responding
Solution:
If the push button does not trigger the action, check the wiring connections and ensure it is connected to the correct GPIO pin. Verify that the internal pull-up configuration is enabled in the code. Debounce delay and proper grounding are also important for accurate detection.
This project presents a practical implementation of an IoT-based image capture and communication system using the ESP32-CAM. The system captures images based on user input and transmits them instantly, showing the combination of hardware, networking, and cloud services into a single solution. Overall, the project highlights the growing importance of connected systems in modern applications, where real-time data sharing plays a key role. It provides a basic foundation for developing advanced automation, monitoring, and smart communication systems, making it both an educational and practical implementation in the field of embedded and IoT technologies. If you need a more interesting project, check out our ESP32 projects collection.
ESP32-Cam WhatsApp System GitHub Repository
Here’s the GitHub repository where you can access the complete source code, detailed circuit diagrams, and all the resources needed to understand, build, and customise the project step by step.


Frequently Asked Questions - ESP32-CAM WhatsApp System
⇥ Does this system require an internet connection?
Yes, an active internet connection is required to send images via WhatsApp using the cloud API.
⇥ Can I use this project without WhatsApp?
Yes, the system can be modified to send images via email or store them locally instead of using WhatsApp.
⇥ Why is my ESP32-CAM getting heated?
This may be due to an improper power supply. Ensure a stable 5V source is used instead of relying only on USB power.
⇥ Can I trigger the camera without a push button?
Yes, you can use sensors like PIR or IR modules to automate image capture.
⇥ What image formats are supported?
The ESP32-CAM captures images in JPEG format, which is suitable for transmission over the internet.
⇥ How long does it take to send the image?
It typically takes a few seconds, depending on WiFi speed and server response time.
⇥ Can I send images to multiple numbers?
Yes, this can be achieved by modifying the API parameters to include multiple recipients.
⇥ Is this system secure?
Basic security is provided through API authentication, but additional encryption and authentication methods can be implemented for enhanced security.
Similar WhatsApp Notification Projects
These projects demonstrating how to send WhatsApp notifications using Arduino, ESP32, and Raspberry Pi Pico for real-time alerts, motion detection, and smart monitoring.

Raspberry Pi Pico Based Rain Detection System with WhatsApp Alert
Build a Raspberry Pi Pico W rain detection system that sends instant WhatsApp alerts over WiFi using CircuitDigest Cloud, without GSM or SIM cards.

Real-Time Motion Detection with XIAO ESP32 WhatsApp Alert System
Build a compact XIAO ESP32 motion detection system that sends instant WhatsApp alerts over WiFi using CircuitDigest Cloud, without GSM or SIM cards.

How to Send WhatsApp Messages from Arduino Uno R4 Wifi Board
Learn how to send instant WhatsApp notifications from Arduino UNO R4 WiFi using an ultrasonic sensor and CircuitDigest Cloud API without GSM or SIM cards.
Complete Project Code
#include "esp_camera.h"
#include <WiFi.h>
#include <WiFiClientSecure.h>
#include <time.h>
const char *ssid = "Yourssid", *pwd = "yourpassword";
const char *apiKey = "yourapikey", *phone = "yournumber";
camera_fb_t *fb = nullptr;
bool lastBtn = HIGH;
void initCam() {
 camera_config_t cfg; cfg.ledc_channel=LEDC_CHANNEL_0; cfg.ledc_timer=LEDC_TIMER_0;
 cfg.pin_d0=5; cfg.pin_d1=18; cfg.pin_d2=19; cfg.pin_d3=21; cfg.pin_d4=36; cfg.pin_d5=39;
 cfg.pin_d6=34; cfg.pin_d7=35; cfg.pin_xclk=0; cfg.pin_pclk=22; cfg.pin_vsync=25;
 cfg.pin_href=23; cfg.pin_sscb_sda=26; cfg.pin_sscb_scl=27; cfg.pin_pwdn=32; cfg.pin_reset=-1;
 cfg.xclk_freq_hz=20000000; cfg.pixel_format=PIXFORMAT_JPEG;
 cfg.frame_size=psramFound()?FRAMESIZE_VGA:FRAMESIZE_QVGA;
 cfg.jpeg_quality=psramFound()?10:12; cfg.fb_count=psramFound()?2:1;
 if(esp_camera_init(&cfg) != ESP_OK) ESP.restart();
}
void sendWa() {
 if(!fb) return;
 if(WiFi.status() != WL_CONNECTED) WiFi.reconnect();
 while(WiFi.status() != WL_CONNECTED) delay(100);

 uint8_t *imgBuf = (uint8_t*)malloc(fb->len);
 if(!imgBuf) { esp_camera_fb_return(fb); fb=nullptr; return; }
 size_t len = fb->len; memcpy(imgBuf, fb->buf, len);
 esp_camera_fb_return(fb); fb = nullptr;
 esp_camera_deinit(); delay(100);
 WiFiClientSecure client; client.setInsecure();
 if(!client.connect("www.circuitdigest.cloud", 443)) { free(imgBuf); initCam(); return; }
 struct tm ti; char ts[64] = "Time Unknown";
 if(getLocalTime(&ti, 1000)) strftime(ts, 64, "%I:%M %p, %B %d, %Y", &ti);
 String b = "ESP32CAMBound7MA4YWxkTrZu0gW", cr = "\r\n", d = "--";
 String body = d+b+cr+"Content-Disposition: form-data; name=\"phone_number\""+cr+cr+phone+cr+
   d+b+cr+"Content-Disposition: form-data; name=\"template_id\""+cr+cr+"image_capture_alert"+cr+
   d+b+cr+"Content-Disposition: form-data; name=\"variables\""+cr+cr+"{\"event_type\":\"Just a Picture\",\"location\":\"office\",\"device_name\":\"ESP32 CAM #1\",\"captured_time\":\""+String(ts)+"\"}"+cr+
   d+b+cr+"Content-Disposition: form-data; name=\"image\"; filename=\"p.jpg\""+cr+"Content-Type: image/jpeg"+cr+cr;
 String end = cr+d+b+d+cr;
 client.println("POST /api/v1/whatsapp/send-with-image HTTP/1.1");
 client.println("Host: www.circuitdigest.cloud\r\nAuthorization: " + String(apiKey));
 client.println("Content-Type: multipart/form-data; boundary=" + b);
 client.println("Content-Length: " + String(body.length() + len + end.length()) + "\r\n");

 client.print(body); client.write(imgBuf, len); client.print(end); free(imgBuf);
 while(client.connected()) if(client.readStringUntil('\n') == "\r") break;
 client.stop(); initCam();
}
void setup() {
 Serial.begin(115200); pinMode(4, OUTPUT); pinMode(13, INPUT_PULLUP);
 initCam();
 WiFi.begin(ssid, pwd);
 while(WiFi.status() != WL_CONNECTED) delay(100);
 configTime(19800, 0, "pool.ntp.org");
 Serial.println("Ready!");
}
void loop() {
 bool cur = digitalRead(13);
 if(lastBtn == HIGH && cur == LOW) {
   delay(50);
   if(digitalRead(13) == LOW) {
     camera_fb_t *s = esp_camera_fb_get(); if(s) esp_camera_fb_return(s);
     digitalWrite(4, HIGH); delay(150); fb = esp_camera_fb_get(); digitalWrite(4, LOW);
     Serial.println("Captured!"); sendWa(); cur = digitalRead(13);
   }
 }
 lastBtn = cur; delay(10);
}
