 Vedhathiri
Author

ESP32-CAM is a compact size, low-cost dev board with a camera, making it extremely convenient for camera-based applications. Even though it offers fewer GPIO pins compared to other ESP32 boards, it performs exceptionally well for focused tasks where imaging and connectivity matter the most. In this project, we’ll put the ESP32-CAM to good use by capturing a clear image and sending it via email. For the sake of simplicity, we are going to use a push button to capture the image, but you can replace the button with any sensor, and it will come in very handy when you want to take a picture remotely and send it to your Email based on any event.
In this tutorial, we will show you how to use the CircuitDigest Cloud Email API to send images that you capture from your ESP32-CAM dev board. And the best part is that CircuitDigest Cloud Email API is completely free to use and easy to set up. New to CircuitDigest Cloud? Then don't forget to check out our WhatsApp Notification API and SMS Notification API as well. The idea behind this tutorial is to empower engineers and makers to build, deploy, and scale their product ideas faster. If you would like to explore more projects involving ESP32-CAM and email alert functionality, refer to theour How to Send Email Notifications using ESP32-CAM project. Now lets get back to sending images from ESP32-CAM to emails.
Table of Contents
Components Required
The table shows what are all the components and their quantities that are needed to build the complete setup.
| S.No | Components | Quantity | Purpose |
| 1. | ESP32-CAM Module | 1 | Acts as the main controller and handles camera and Wi-Fi functions |
| 2. | Push Button | 2 | Used for user input or triggering actions |
| 3. | OLED | 1 | Displays basic information or system status |
| 4. | Connecting Wires | Required Amount | Used to connect all components together |
| 5. | Breadboard | 1 | To ease the connections between the components |
Note: We are using the ESP32-Cam that is interfaced with a micro USB port, So if you are using the normal ESP32-Cam, you need to connect the USB to Serial Converter for programming. If you are just getting started with the ESP32-CAM module, we recommend checking out our guide “How to Program the ESP32-CAM?”
Circuit Diagram
The circuit shows an ESP32-CAM connected to an I2C OLED display and two push buttons. Each push button is assigned a different function, and when pressed, it performs its respective operation. The OLED display is used to show the current status or data of the system, helping to monitor and verify the output in real time.

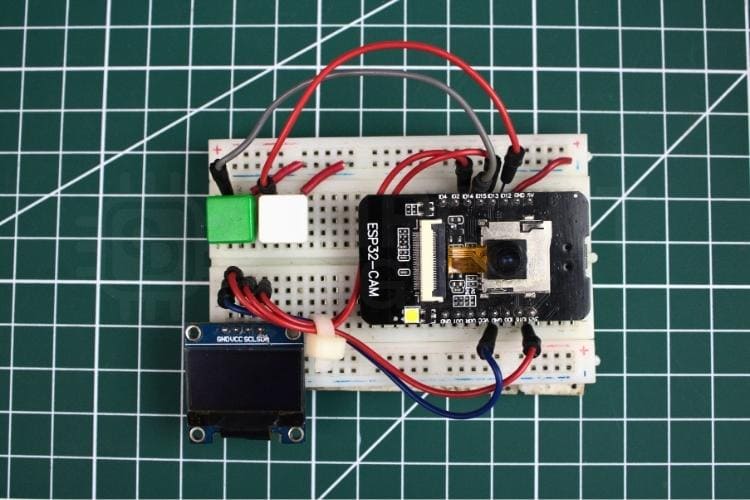
Hardware Connection Setup
The hardware setup shown below represents the actual physical connections of the system components. The setup consists of two push buttons, an I2C OLED display, and an ESP32-CAM module, all integrated to form a complete working system.
How to Send Captured Images and Email Using ESP32-Cam
In this system, the ESP32-CAM is connected to two push buttons and an OLED display to create a simple and interactive image capture and email notification setup. The ESP32-CAM acts as the main controller, managing the camera operation, button inputs, Wi-Fi connection, and cloud communication. The OLED display provides real-time feedback to the user, making the system easy to operate and understand.
The first push button is used to capture an image. When this button is pressed, the ESP32-CAM activates its camera module and captures a photo instantly.This esp32-cam capture image feature ensures fast and reliable photo acquisition before transmission. During this process, the OLED displays a flash-like indication to inform the user that the photo is being taken. This visual confirmation helps ensure that the capture process is successfully completed before proceeding to the next step. The captured image is then temporarily stored in memory.
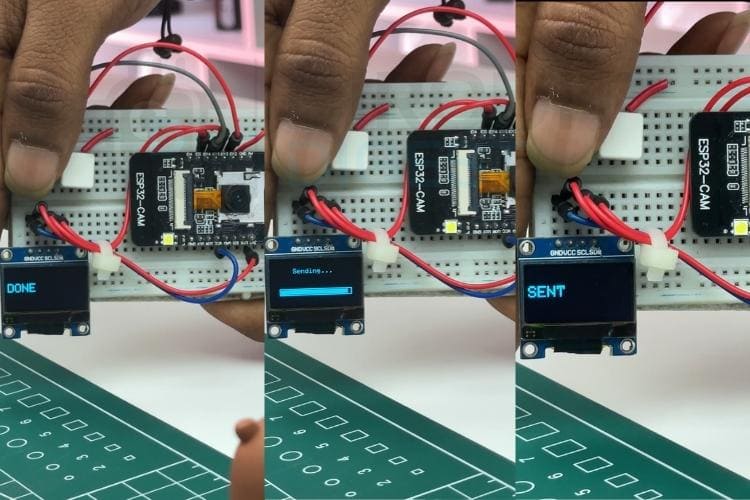
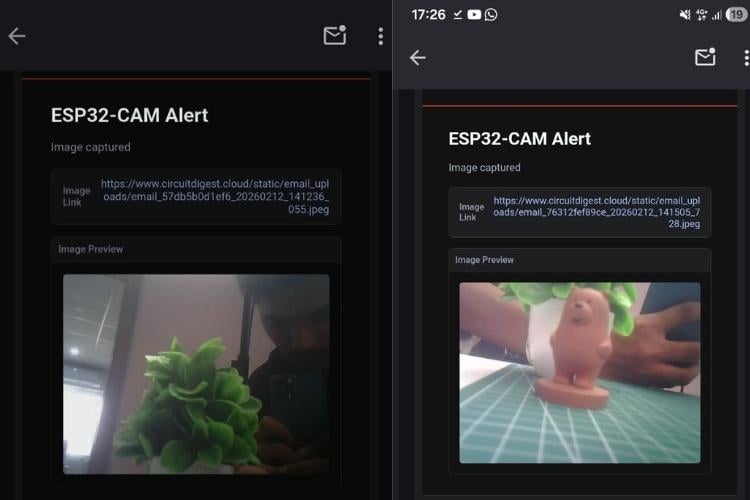
The second push button is used to send the captured image. After verifying that the photo has been taken, the user presses the send button to upload the image. The ESP32-CAM connects to the Wi-Fi network and prepares the required payload data. It then uploads the image to the CircuitDigest Cloud platform, which forwards the image to the registered email address. The received email contains the captured photo as an attachment, allowing the user to download and use it for further purposes. The image transmission occurs only if the payload is correctly formatted and the network connection is stable; otherwise, the image will not be sent. For more hands-on learning, explore additional electronics projects and continue experimenting.
Code Explanation
This code implements a WiFi-based image capture and email system using the ESP32-CAM, two push buttons, and an I2C OLED display. The program initializes the camera, connects to WiFi, and sets up secure communication with the CircuitDigest Cloud platform. One button is used to capture and store an image, while the other button sends the captured image to a registered email address through an HTTPS request. The OLED display provides real-time status messages such as booting, capturing, sending, and error notifications, making the system interactive and user-friendly.
#include "esp_camera.h"
#include <WiFi.h>
#include <WiFiClientSecure.h>
#include <Wire.h>
#include <Adafruit_GFX.h>
#include <Adafruit_SSD1306.h>
These libraries enable the core functionalities of the project. The esp_camera.h library controls the ESP32-CAM module, while WiFi.h and WiFiClientSecure.h handle internet connectivity and secure HTTPS communication. The Wire, Adafruit_GFX, and Adafruit_SSD1306 libraries are used to control the I2C OLED display. Together, these libraries allow the system to capture images, display messages, and send emails securely over the internet.
const char* ssid = "yourwifiname";
const char* password = "password";
const char* host = "www.circuitdigest.cloud";
const int httpsPort = 443;
const char* apiKey = "yourapikey";
This section defines the WiFi credentials and email API details. The ESP32-CAM uses the SSID and password to connect to the internet. The host, httpsPort, and apiKey are required to securely communicate with the CircuitDigest Cloud platform. These parameters ensure that the captured image is transmitted to the correct server using authenticated access.
camera_config_t config;
config.pixel_format = PIXFORMAT_JPEG;
config.frame_size   = FRAMESIZE_VGA;
config.jpeg_quality = 12;
config.fb_count     = 1;
if (esp_camera_init(&config) != ESP_OK) {
 oledBig("CAM ERR");
 while (true);
}
This part configures the camera settings such as image format, resolution, and compression quality. The image is captured in JPEG format with VGA resolution to balance quality and memory usage. The esp_camera_init() function initializes the camera hardware. If initialization fails, the OLED displays an error message and stops execution to prevent further issues.
storedFb = esp_camera_fb_get();
if (!storedFb) {
 oledBig("FAIL");
 imageAvailable = false;
 return;
}
imageAvailable = true;
oledBig("DONE");
This code captures the image when the capture button is pressed. The esp_camera_fb_get() function grabs a frame buffer containing the captured image. If the capture fails, an error message is displayed on the OLED. When successful, the image is stored temporarily in memory, and a confirmation message is shown to the user.
client.println("POST /api/v1/email/send-with-image HTTP/1.1");
client.println("Authorization: Bearer " + String(apiKey));
client.write(storedFb->buf, storedFb->len);
This section handles sending the captured image via HTTPS. The ESP32-CAM creates a secure client connection and sends an HTTP POST request to the CircuitDigest Cloud API. The API key is used for authentication, and the image buffer is transmitted as part of a multipart form-data payload. Once sent successfully, the OLED displays “SENT,” confirming that the email has been delivered.
Applications
Smart Security Monitoring
This system can be used as a simple security camera that captures and sends images instantly when required. It helps in monitoring homes, offices, or restricted areas remotely.
Visitor Verification System
The device can capture a visitor’s image and send it directly to the owner’s email for verification before granting access. This adds an extra layer of security.
Remote Evidence Collection
It can be used to capture and store important visual evidence during inspections or fieldwork. The images are safely delivered via email for documentation.
IoT-Based Alert System
The project can be integrated with sensors to automatically capture and send images when specific events occur, such as motion detection or abnormal conditions.
Educational and Research Projects
This setup is ideal for learning IoT, embedded systems, and cloud communication. It demonstrates real-time image processing and secure data transmission.
Future Enhancements
SD Card Storage Support
Images can be stored on a microSD card along with email transfer. This ensures backup storage even if internet connectivity fails.
Mobile App Integration
Instead of email-only notification, a dedicated mobile app or web dashboard can be developed to view captured images instantly and manage device settings remotely.
Cloud Database Logging
The system can store image logs with timestamps in a cloud database. This helps in maintaining historical records for monitoring and analysis.
AI-Based Face Recognition
Face detection or recognition algorithms can be implemented to identify authorized and unauthorized persons automatically.
Troubleshooting
Issue 1: Camera Initialization Failed (ESP_ERR_NOT_SUPPORTED or CAM ERR)
This error usually occurs due to incorrect camera model selection or improper wiring. Ensure the correct AI-Thinker ESP32-CAM model is selected in the Arduino IDE. Check if the camera ribbon cable is properly inserted and not loose. Also verify that sufficient power (5V stable supply) is provided to the board.
Issue 2: WiFi Not Connecting
If the ESP32-CAM fails to connect to WiFi, check the SSID and password carefully for typing errors. Make sure the WiFi network is 2.4GHz, as ESP32 does not support 5GHz networks. Also ensure that the signal strength is strong enough near the device.
Issue 3: Image Not Sending to Email
If the image is captured but not received via email, verify the API key and server host details. Ensure HTTPS port 443 is not blocked by the network. Also check that the payload formatting is correct and the internet connection is stable during transmission.
Issue 4: OLED Display Not Working
If the OLED does not display any message, check the I2C connections (SDA and SCL pins). Confirm the correct I2C address (usually 0x3C). Also ensure the required Adafruit libraries are properly installed in the Arduino IDE.
Issue 5: Board Resetting Frequently
Frequent resets usually occur due to insufficient power supply. The ESP32-CAM requires a stable 5V power source with adequate current. Avoid powering directly from weak USB ports and use an external regulated power supply if necessary.
Conclusion
This project technically displays the integration of camera interfacing, secure Wi-Fi communication, and cloud-based data transfer within a single embedded platform. It validates the practical use of the ESP32-CAM’s frame buffer management, JPEG compression handling, and HTTPS client communication for reliable image transmission.Proper configuration of camera parameters, stable power management, and secure socket communication ensure consistent system performance. Overall, this project shows image capture with email using ESP32-CAM for secure and real-time IoT communication. If you need more interesting projects with the ESP32-CAM, check out these Object Detection using ESP32-CAM and Edge Impulse and ESP32-CAM Currency Recognition System using Edge Impulse.
Frequently Asked Questions
⇥ 1. Why is ESP32-CAM used instead of a normal ESP32 board?
ESP32-CAM has a built-in camera module and Wi-Fi capability, making it ideal for image-based IoT applications without needing additional camera hardware.
⇥ 2. Does this project require an SD card?
No, the image is stored temporarily in memory and sent directly via Wi-Fi. However, an SD card can be added for backup storage.
⇥ 3. Why is the frame buffer count set to 1?
Setting the frame buffer count to 1 reduces memory usage. This improves stability since the ESP32-CAM has limited RAM.
⇥ 4. Can this system be expanded with additional sensors?
Yes, sensors such as PIR, temperature, gas, or door sensors can be integrated to trigger automatic image capture under specific conditions.
⇥ 5. Can I send the image to multiple email addresses?
Yes, this can be configured on the cloud platform or by modifying the API request settings to include multiple recipients.


Projects using ESP32-Cam
Explore these related ESP32-CAM projects to expand your knowledge in real-time image processing, surveillance systems, and AI-based IoT applications.

WiFi Controlled Surveillance Robot Car using ESP32-CAM Module
Build a DIY WiFi-controlled ESP32-CAM surveillance car with live video streaming and web-based remote control - a beginner-friendly IoT robotics project.

Build your own Security Camera using ESP32
Create a low-cost ESP32-CAM CCTV security system with real-time monitoring and wireless video streaming.
")
How to use ESP32 CAM for Automatic Number Plate Recognition (ANPR)
Learn license plate recognition using ESP32-CAM with AI and image processing for smart vehicle identification and automation projects.
Complete Project Code
#include "esp_camera.h"
#include <WiFi.h>
#include <WiFiClientSecure.h>
#include <Wire.h>
#include <Adafruit_GFX.h>
#include <Adafruit_SSD1306.h>
/* ================= OLED ================= */
#define SCREEN_WIDTH 128
#define SCREEN_HEIGHT 64
Adafruit_SSD1306 display(SCREEN_WIDTH, SCREEN_HEIGHT, &Wire, -1);
/* ================= WIFI ================= */
const char* ssid = "Yourssid";
const char* password = "password";
/* ================= EMAIL API ================= */
const char* host = "www.circuitdigest.cloud";
const int httpsPort = 443;
const char* apiKey = "yourapikey";
/* ================= BUTTONS ================= */
#define BTN_CAPTURE 12
#define BTN_SEND    15
/* ================= ESP32-CAM AI THINKER ================= */
#define PWDN_GPIO_NUM     32
#define RESET_GPIO_NUM    -1
#define XCLK_GPIO_NUM      0
#define SIOD_GPIO_NUM     26
#define SIOC_GPIO_NUM     27
#define Y9_GPIO_NUM       35
#define Y8_GPIO_NUM       34
#define Y7_GPIO_NUM       39
#define Y6_GPIO_NUM       36
#define Y5_GPIO_NUM       21
#define Y4_GPIO_NUM       19
#define Y3_GPIO_NUM       18
#define Y2_GPIO_NUM        5
#define VSYNC_GPIO_NUM    25
#define HREF_GPIO_NUM     23
#define PCLK_GPIO_NUM     22
/* ================= GLOBALS ================= */
camera_fb_t* storedFb = NULL;
bool imageAvailable = false;
bool lastCaptureState = HIGH;
bool lastSendState = HIGH;
/* ================= OLED HELPERS ================= */
void oledBig(const char* msg) {
 display.clearDisplay();
 display.setTextSize(2);
 display.setTextColor(SSD1306_WHITE);
 display.setCursor(0, 22);
 display.println(msg);
 display.display();
}
void oledFlash() {
 display.clearDisplay();
 display.fillRect(0, 0, 128, 64, SSD1306_WHITE);
 display.display();
 delay(120);
 display.clearDisplay();
 display.display();
}
void oledLoadingBar() {
 display.clearDisplay();
 display.setTextSize(1);
 display.setCursor(30, 10);
 display.println("Sending...");
 display.drawRect(10, 40, 108, 10, SSD1306_WHITE);
 display.display();
 for (int i = 0; i <= 100; i += 10) {
   display.fillRect(12, 42, i, 6, SSD1306_WHITE);
   display.display();
   delay(120);
 }
}
/* ================= SETUP ================= */
void setup() {
 Serial.begin(115200);
 Wire.begin(13, 14);
 if (!display.begin(SSD1306_SWITCHCAPVCC, 0x3C)) {
   Serial.println("OLED FAIL");
   while (true);
 }
 oledBig("BOOT");
 pinMode(BTN_CAPTURE, INPUT_PULLUP);
 pinMode(BTN_SEND, INPUT_PULLUP);
 WiFi.begin(ssid, password);
 oledBig("WiFi...");
 while (WiFi.status() != WL_CONNECTED) {
   delay(500);
 }
 oledBig("WiFi OK");
 camera_config_t config;
 config.ledc_channel = LEDC_CHANNEL_0;
 config.ledc_timer   = LEDC_TIMER_0;
 config.pin_d0       = Y2_GPIO_NUM;
 config.pin_d1       = Y3_GPIO_NUM;
 config.pin_d2       = Y4_GPIO_NUM;
 config.pin_d3       = Y5_GPIO_NUM;
 config.pin_d4       = Y6_GPIO_NUM;
 config.pin_d5       = Y7_GPIO_NUM;
 config.pin_d6       = Y8_GPIO_NUM;
 config.pin_d7       = Y9_GPIO_NUM;
 config.pin_xclk     = XCLK_GPIO_NUM;
 config.pin_pclk     = PCLK_GPIO_NUM;
 config.pin_vsync    = VSYNC_GPIO_NUM;
 config.pin_href     = HREF_GPIO_NUM;
 config.pin_sscb_sda = SIOD_GPIO_NUM;
 config.pin_sscb_scl = SIOC_GPIO_NUM;
 config.pin_pwdn     = PWDN_GPIO_NUM;
 config.pin_reset    = RESET_GPIO_NUM;
 config.xclk_freq_hz = 20000000;
 config.pixel_format = PIXFORMAT_JPEG;
 config.frame_size   = FRAMESIZE_VGA;
 config.jpeg_quality = 12;
 config.fb_count     = 1;
 if (esp_camera_init(&config) != ESP_OK) {
   oledBig("CAM ERR");
   while (true);
 }
 /* I2C RE-INIT AFTER CAMERA (CRITICAL FIX) */
 Wire.end();
 delay(50);
 Wire.begin(13, 14);
 oledBig("READY");
}
/* ================= LOOP ================= */
void loop() {
 bool captureState = digitalRead(BTN_CAPTURE);
 bool sendState = digitalRead(BTN_SEND);
 if (captureState == LOW && lastCaptureState == HIGH) {
   captureImage();
 }
 if (sendState == LOW && lastSendState == HIGH) {
   if (imageAvailable) {
     sendEmailWithImage();
   } else {
     oledBig("NO IMG");
   }
 }
 lastCaptureState = captureState;
 lastSendState = sendState;
 delay(50);
}
/* ================= FUNCTIONS ================= */
void captureImage() {
 if (storedFb) {
   esp_camera_fb_return(storedFb);
   storedFb = NULL;
 }
 oledBig("CAP ");
 oledFlash();  // BEFORE capture
 storedFb = esp_camera_fb_get();
 if (!storedFb) {
   oledBig("FAIL");
   imageAvailable = false;
   return;
 }
 imageAvailable = true;
 oledBig("DONE");
}
bool sendEmailWithImage() {
 oledLoadingBar();   // BEFORE network stress
 WiFiClientSecure client;
 client.setInsecure();
 if (!client.connect(host, httpsPort)) {
   oledBig("NET ERR");
   return false;
 }
 String boundary = "----ESP32CAMBoundary";
 String bodyStart =
   "--" + boundary + "\r\n"
   "Content-Disposition: form-data; name=\"to_email\"\r\n\r\n"
   "your register mailid\r\n"
   "--" + boundary + "\r\n"
   "Content-Disposition: form-data; name=\"template_id\"\r\n\r\n"
   "1002\r\n"
   "--" + boundary + "\r\n"
   "Content-Disposition: form-data; name=\"variables\"\r\n\r\n"
   "{\"title\":\"ESP32-CAM Alert\",\"description\":\"Image captured\"}\r\n"
   "--" + boundary + "\r\n"
   "Content-Disposition: form-data; name=\"image\"; filename=\"image.jpg\"\r\n"
   "Content-Type: image/jpeg\r\n\r\n";
 String bodyEnd = "\r\n--" + boundary + "--\r\n";
 int contentLength = bodyStart.length() + storedFb->len + bodyEnd.length();
 client.println("POST /api/v1/email/send-with-image HTTP/1.1");
 client.println("Host: " + String(host));
 client.println("Authorization: Bearer " + String(apiKey));
 client.println("Content-Type: multipart/form-data; boundary=" + boundary);
 client.print("Content-Length: ");
 client.println(contentLength);
 client.println();
 client.print(bodyStart);
 client.write(storedFb->buf, storedFb->len);
 client.print(bodyEnd);
 delay(1000);
 client.stop();
 esp_camera_fb_return(storedFb);
 storedFb = NULL;
 imageAvailable = false;
 oledBig("SENT");
 return true;
}
