
Welcome to the DIY world of Circuit Digest! In this blog, we're going to show you How to build your own Simple CCTV Security Camera using an ESP32 camera module. From tinkering with hardware connections to coding functionalities and enabling remote access, join us on a step-by-step tutorial to craft a cost-effective and customizable surveillance solution. We have previously built many projects using the ESP32 Camera module; you can also check them out. Like always all projects are documented in proper DIY step with circuit diagram and code for you to build and test on your own.
The components we will need to build these parts are: -
ESP32 CAM
FTDI programmer
Jumper wires
Acrylic cut body parts
Micro- sd card
ESP32 Camera Module
The ESP32 camera is a powerful, versatile microcontroller developed by Espressif Systems, renowned for its dual-core processing, built-in Wi-Fi and Bluetooth capabilities, and a rich array of GPIO pins, making it a preferred choice for a wide range of IoT applications. Its dual-core architecture allows for simultaneous execution of tasks, enabling efficient handling of complex operations.
Previosuly we have used the ESP32 camera module to build a smart attendance system and a face mask detection system, you can check out both the projects if you are intrested.

Pinout of ESP32 Camera Module
The ESP32 CAM module typically features a pinout that includes a variety of GPIO pins for versatile connectivity.

Commonly, it includes power and ground pins, a GPIO pin for the camera, an SD card slot for storage expansion, UART pins for serial communication, and general-purpose GPIO pins that can be utilized for various purposes such as I2C or SPI communication, digital input/output, or for interfacing with sensors and actuators. Additionally, it often includes pins for enabling flash memory, controlling the camera, and facilitating programming modes like boot and reset.
FTDI Module Pinout
The FTDI module is also known as the (Future Technology Devices International) module.

It is often used for USB to serial communication, typically features a pinout that includes:
RXD (Receive Data): This is where data is received by the FTDI chip from an external device.
TXD (Transmit Data): Data to be transmitted from the FTDI chip to an external device is sent out through this pin.
CTS (Clear to Send): Also related to hardware flow control, this pin indicates to the FTDI chip that the external device is ready to receive data.
DTR (Data Terminal Ready): This pin is often used to reset or control an external device.
5V or 3.3V: Depending on the module, it provides either a 5-volt or 3.3-volt power output.
GND (Ground): The ground pin provides the reference voltage for the module.
Step By Step Tutorial for Building ESP32 DIY Security Camera
Now after you’ve acquired information about that, let’s dive into the step by step making of the project: -
a) Setting up the Development Environment:
Install the Arduino IDE.
Add the ESP32 board to the Arduino IDE. Copy the following link "https://espressif.github.io/arduino-esp32/package_esp32_index.json” and paste this into a new row in the File > preferences > additional boards manager.

Install the necessary libraries for the ESP32 camera module from tools>boards>manage libraries and typing “esp32” in the search bar, then install the library by expressif.

b) Wiring:
The wiring of the FTDI module with the ESP32 CAM is pretty simple.

Connect the Vcc of the ESP32 CAM to the 5V pin of FTDI. Connect the GND of the ESP32 CAM to the GND of FTDI. Connect the RX pin of the ESP32 CAM to the TX pin of FTDI. Connect the TX pin of the ESP32 CAM to the RX pin of FTDI. Connect the GPIO0 to GND so that you can upload the code in the ESP32.
c) How to Program ESP32 CAM with Arduino IDE?
After installing the ESP32 board, got to tools> board> ESP32 Arduino and Select Ai thinker ESP32 Cam board.

After that is done go to Files> Examples> ESP32> Camera Web Server and open the code
You need to add // in front of #define CAMERA_MODEL_ESP_EYE command and remove it from the #define CAMERA_MODEL_AI_THINKER.

Next replace the “hotspot” and “hotspotpassword” strings with your phone’s hotspot ssid and password and upload the code.

d) Testing on Browser
Take the ip address of the serial monitor and then write it on your mobile browser.
After that is done, press start stream option and you will see the camera feed.
e) Enclosure Design and Assemble
I wanted to make the design as simple and easy as possible. Hence, I used a simple chart paper for the camera’s main body. If you want a more durable body.. You can also use PVC pipe or a 3d printed enclosure.

For the front and back plate, I used onshape and designed it and then laser cut the same.

We then assembled the esp32 cam into the enclosure and this is how the final project looked.


Projects using ESP32 Camera Module
Face Mask Detection Using ESP32 CAM
Explore Face Mask Detection with ESP32 CAM! Dive into our latest blog where we demystify the fusion of cutting-edge ESP32 CAM technology with innovative AI algorithms to create a seamless face mask detection system. Discover step-by-step guides, insightful tips, and real-world applications, empowering enthusiasts and developers to harness this solution for heightened safety in various environments.
Mask Detection System Using ESP32 Cam and M5Stack Core2
Building a Mask Detection System with ESP32 CAM and M5Stack Core2! Explore our latest blog unveiling the synergy between ESP32 CAM and M5Stack Core2, propelling the development of a robust and versatile mask detection system. Delve into a comprehensive guide that navigates the amalgamation of hardware, software, and AI, empowering enthusiasts and developers to create intelligent solutions for public health and safety.
Battery Powered Attendance System Using Face Recognition on ESP32-CAM Board
Empowering Efficiency: Creating a Battery-Powered Attendance System with Face Recognition on ESP32-CAM Board! Discover our latest blog where we unravel the fusion of cutting-edge technology and practicality, guiding enthusiasts and professionals through the creation of a portable, battery-operated attendance system. Learn step-by-step how ESP32-CAM's capabilities are leveraged alongside facial recognition algorithms, enabling a seamless, efficient tracking solution.
Complete Project Code
//Code for ESP32 CCTV Security Camera
#include "esp_camera.h"
#include <WiFi.h>
// WARNING!!! PSRAM IC required for UXGA resolution and high JPEG quality
// Ensure ESP32 Wrover Module or other board with PSRAM is selected
// Partial images will be transmitted if image exceeds buffer size
//
// You must select partition scheme from the board menu that has at least 3MB APP space.
// Face Recognition is DISABLED for ESP32 and ESP32-S2, because it takes up from 15
// seconds to process single frame. Face Detection is ENABLED if PSRAM is enabled as well
// ===================
// Select camera model
// ===================
//#define CAMERA_MODEL_WROVER_KIT // Has PSRAM
//#define CAMERA_MODEL_ESP_EYE // Has PSRAM
//#define CAMERA_MODEL_ESP32S3_EYE // Has PSRAM
//#define CAMERA_MODEL_M5STACK_PSRAM // Has PSRAM
//#define CAMERA_MODEL_M5STACK_V2_PSRAM // M5Camera version B Has PSRAM
//#define CAMERA_MODEL_M5STACK_WIDE // Has PSRAM
//#define CAMERA_MODEL_M5STACK_ESP32CAM // No PSRAM
//#define CAMERA_MODEL_M5STACK_UNITCAM // No PSRAM
#define CAMERA_MODEL_AI_THINKER // Has PSRAM
//#define CAMERA_MODEL_TTGO_T_JOURNAL // No PSRAM
//#define CAMERA_MODEL_XIAO_ESP32S3 // Has PSRAM
// ** Espressif Internal Boards **
//#define CAMERA_MODEL_ESP32_CAM_BOARD
//#define CAMERA_MODEL_ESP32S2_CAM_BOARD
//#define CAMERA_MODEL_ESP32S3_CAM_LCD
//#define CAMERA_MODEL_DFRobot_FireBeetle2_ESP32S3 // Has PSRAM
//#define CAMERA_MODEL_DFRobot_Romeo_ESP32S3 // Has PSRAM
#include "camera_pins.h"
// ===========================
// Enter your WiFi credentials
// ===========================
const char* ssid = "ssid";
const char* password = "password";
void startCameraServer();
void setupLedFlash(int pin);
void setup() {
Serial.begin(115200);
Serial.setDebugOutput(true);
Serial.println();
camera_config_t config;
config.ledc_channel = LEDC_CHANNEL_0;
config.ledc_timer = LEDC_TIMER_0;
config.pin_d0 = Y2_GPIO_NUM;
config.pin_d1 = Y3_GPIO_NUM;
config.pin_d2 = Y4_GPIO_NUM;
config.pin_d3 = Y5_GPIO_NUM;
config.pin_d4 = Y6_GPIO_NUM;
config.pin_d5 = Y7_GPIO_NUM;
config.pin_d6 = Y8_GPIO_NUM;
config.pin_d7 = Y9_GPIO_NUM;
config.pin_xclk = XCLK_GPIO_NUM;
config.pin_pclk = PCLK_GPIO_NUM;
config.pin_vsync = VSYNC_GPIO_NUM;
config.pin_href = HREF_GPIO_NUM;
config.pin_sccb_sda = SIOD_GPIO_NUM;
config.pin_sccb_scl = SIOC_GPIO_NUM;
config.pin_pwdn = PWDN_GPIO_NUM;
config.pin_reset = RESET_GPIO_NUM;
config.xclk_freq_hz = 20000000;
config.frame_size = FRAMESIZE_UXGA;
config.pixel_format = PIXFORMAT_JPEG; // for streaming
//config.pixel_format = PIXFORMAT_RGB565; // for face detection/recognition
config.grab_mode = CAMERA_GRAB_WHEN_EMPTY;
config.fb_location = CAMERA_FB_IN_PSRAM;
config.jpeg_quality = 12;
config.fb_count = 1;
// if PSRAM IC present, init with UXGA resolution and higher JPEG quality
// for larger pre-allocated frame buffer.
if(config.pixel_format == PIXFORMAT_JPEG){
if(psramFound()){
config.jpeg_quality = 10;
config.fb_count = 2;
config.grab_mode = CAMERA_GRAB_LATEST;
} else {
// Limit the frame size when PSRAM is not available
config.frame_size = FRAMESIZE_SVGA;
config.fb_location = CAMERA_FB_IN_DRAM;
}
} else {
// Best option for face detection/recognition
config.frame_size = FRAMESIZE_240X240;
#if CONFIG_IDF_TARGET_ESP32S3
config.fb_count = 2;
#endif
}
#if defined(CAMERA_MODEL_ESP_EYE)
pinMode(13, INPUT_PULLUP);
pinMode(14, INPUT_PULLUP);
#endif
// camera init
esp_err_t err = esp_camera_init(&config);
if (err != ESP_OK) {
Serial.printf("Camera init failed with error 0x%x", err);
return;
}
sensor_t * s = esp_camera_sensor_get();
// initial sensors are flipped vertically and colors are a bit saturated
if (s->id.PID == OV3660_PID) {
s->set_vflip(s, 1); // flip it back
s->set_brightness(s, 1); // up the brightness just a bit
s->set_saturation(s, -2); // lower the saturation
}
// drop down frame size for higher initial frame rate
if(config.pixel_format == PIXFORMAT_JPEG){
s->set_framesize(s, FRAMESIZE_QVGA);
}
#if defined(CAMERA_MODEL_M5STACK_WIDE) || defined(CAMERA_MODEL_M5STACK_ESP32CAM)
s->set_vflip(s, 1);
s->set_hmirror(s, 1);
#endif
#if defined(CAMERA_MODEL_ESP32S3_EYE)
s->set_vflip(s, 1);
#endif
// Setup LED FLash if LED pin is defined in camera_pins.h
#if defined(LED_GPIO_NUM)
setupLedFlash(LED_GPIO_NUM);
#endif
WiFi.begin(ssid, password);
WiFi.setSleep(false);
while (WiFi.status() != WL_CONNECTED) {
delay(500);
Serial.print(".");
}
Serial.println("");
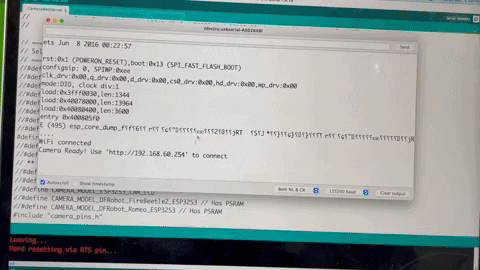
Serial.println("WiFi connected");
startCameraServer();
Serial.print("Camera Ready! Use 'http://");
Serial.print(WiFi.localIP());
Serial.println("' to connect");
}
void loop() {
// Do nothing. Everything is done in another task by the web server
delay(10000);
}
