Despite Lowest Q2 Market Share in Past Three Years, How China is Still Leading the Global EV Race
In an effort to reduce the greenhouse gas emissions and boost the growth of carbon-neutral vehicles, governments throughout the world are unleashing new initiatives, schemes, and legislation. For instance, USA’s bipartisan infrastructure law is looking for a target of 50 percent of new car sales to be electric by the end of 2030, while the European Climate law is looking for a net-zero carbon emissions by the end of 2030. Asian countries such as India, Indonesia, China, Thailand are also adopting the same measures. Currently, Indonesian roads are furnished with 28,000 electric vehicles and they are looking to have 2.5 million EV consumers by the end of 2025. Neighboring countries such as India are also planning to have 30 percent of EV penetration by 2030 and as per the analysis of Rocky Mountain Institute (RMI), the market share could range from 62 percent to 86 percent of total sales.
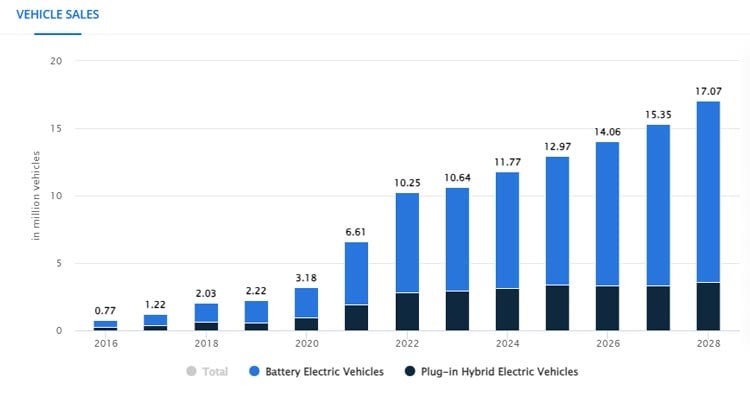
Of late, global research institute Counterpoint also stated that the Q2 of 2023 witnessed a 50 percent YoY growth of battery electric vehicle (BEV) unit sales, which is mostly spearheaded by North America, Western Europe, and few markets in the Asian region. The point to be noted is that the frail economy of China failed to augment the country’s market during the first quarter and hence, they had a 37 percent YoY growth, which is far below the international average. Nonetheless, the OEMs in China are still leading the market because they enjoyed scale advantages that helped them to grab 56 percent of the international sales.
Archie Zhang, Research Analyst, China said, "BYD Auto, GAC Group and Geely Holdings were three of the world’s top five passenger EV makers last quarter, yet none are household names in the west. They sell most of their cars at home. Chinese OEMs play mainly in the compact or subcompact space with performance and features reflecting this positioning. They might look sleek but they’re not a Tesla – at least not yet."
But, the International Energy Agency (IEA) has something else to say. According to their analysts, in 2022, 14 percent of cars sold globally were electric, which has increased from 9 percent in 2021. Speaking of international sales, three countries topped the spot. China once again became a market leader as it managed to have 60 percent of international EV sales. Europe, is now the second biggest EV market in the world that had 15 percent sales in 2022, while the US grabbed a sales market share of 8 percent. For 2023, around 2.3 million electric cars were already sold and it seems the volume is likely to escalate by 14 percent by the end of this year.
Again speaking of China, the trend outside the country has shifted to premium models. Analysts have observed that the chunk of passenger EVs sold are highly-priced, deluxe, and bigger in size. Although Tesla is a huge brand in the premium segment, competitors such as Mercedes, Vokswager, Hyundai kia, BMW are also leading the segment. The adoption process is a bit slow because electrification is urging car-makers to reassess manufacturing. Experts believe that premium electric cars will popularize like smartphones in the coming years and is going to provide more services than conventional vehicles.
Brady Wang, Associate Director, Semiconductors and Components at Counterpoint Research said, "Tesla’s brought a new dimension to the automotive industry by tightly integrating advanced hardware with software and electrification. While the traditional OEMs are competing with this level of modernization and sophistication, Tesla is racing to scale down this software-centric approach from luxury to premium and mainstream levels. For most OEMs, they had to start from scratch and play catch up. It's a learning curve on employing cutting edge chips, components, and software and achieving a level of user experience set by Tesla.”
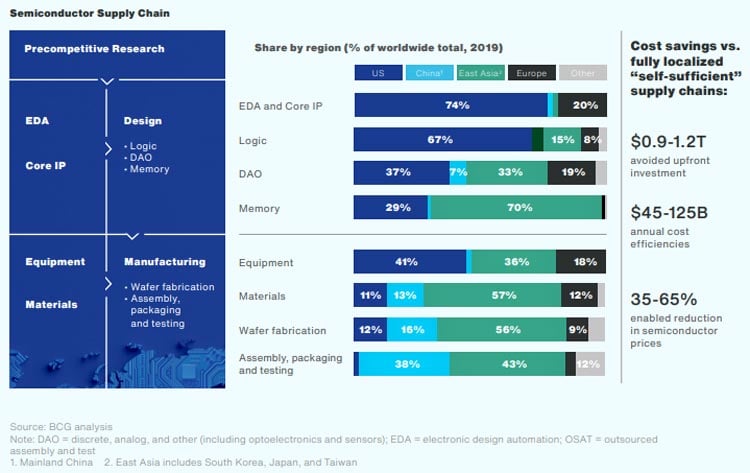
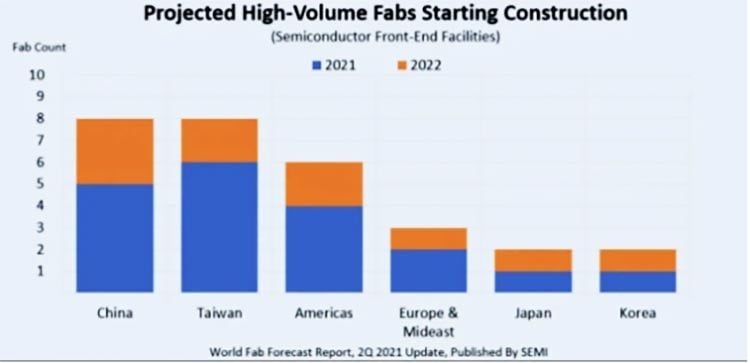
The upcoming electric cars require more sophisticated chipset and numerous hardware components such as batteries, power-controllers, sensors, and others. Therefore, securing and sourcing these essentials is extremely imperative to manufacturing e-cars to unlock state-of-the-art experiences. The semiconductor production slump is an ongoing scenario for the past few years and it posed a massive challenge to automobile manufacturers to fight with procurement.
Electric vehicles are poised to completely dominate the global auto market and therefore, the industry is witnessing a new demand cycle spearheaded by swiftly expanding requirements for software capabilities, computing power, and sensors. Currently, the European and the US car-makers are paying more attention to enhanced procurement processes, but speaking of the Chinese OEMs, they could augment the geopolitical tussle as they expand more into the premium EV segment and elevate the computing value chain.
As per the IEA Stated Policies Scenario (STEPS), the current policies formulated by the governments, and OEM's objectives, the future sales shares of EVs are expected to increase by 30 percent in 2030. As per the expectations, China is again likely to lead the Ev market with 40 percent of sales in 2030, the US will have 20 percent share, while Europe will retain its ongoing 25 percent share. The all-new CO2 standards for vehicles by the EU, USA’s Inflation Reduction Act coupled with California's Advanced Clean Cars II rule could provide a 50 percent market share for EVs in 2030, which is as per the national target.
IEA’s STEPS further mentioned that the demand of oil for road transportation will soar excessively in 2025, with the amount of oil displaced by electric vehicles exceeding 5 million barrels per day in 2030. In the STEPS, emissions of around 700 Mt CO2-equivalents are avoided by the use of electric cars in 2030. The global announcements on battery manufacturing as of Q1 2023 will be more than enough to meet the growing demand for the industry. Hence, there is a higher probability of having bigger sales shares for EVs than those expected out of government policies and national targets.
Again, speaking of the bigger unit sales in EV, China, which is considered to be the world’s largest market in this industry, witnessed only 37 percent YoY growth in terms BEV sales, far lower than the industry average of 50 percent. It shows there is a slump in the country’s domestic market and the demand is affected by its fragile economy. Tesla and BYD are still dominating the market devoid of any confusion and they around one-third of the in-house unit sales. Interestingly, China’s GAC Motor in a very short period has entered the number three in the competition as the demand has increased and its range of Sedan and Hatchbacks have reduced the price of the cars to a larger extent.
Not only that, there are various domestic mid-level firms in China, which are witnessing good sales volume, which is due to the fact they are equipped with wide-range of vehicles. However, various automobile manufacturers are also facing challenges as the market soothes. The fact is that the vehicle market in China is gigantic, but there are numerous mid-sized car manufacturers and therefore, if the market starts tumbling suddenly, smaller firms will definitely exit.
In an effort to have strong EV unit sales in the coming years, the majority of the Chinese OEMs are looking forward to growth in this industry in other countries and simultaneously grabbing a massive market share in Asia and in Europe. Keeping aside China, currently, the globe’s second largest EV market in Western Europe. SAIC, BYD, and MG are helping to elevate China's EV share in the region owing to its affordable range of vehicles. The old renowned car firms are facing difficulty because they are failing to meet the demand of selling EVs between $20,000 – $40,000 price range. This is why Chinese car-makers are able to dominate the market.
 Rudy is a member of the Technical Content Marketing team at Mouser Electronics, bringing 35+ years of expertise in advanced electromechanical systems, robotics, pneumatics, vacuum systems, high voltage, semiconductor manufacturing, military hardware, and project management. As a technology subject matter expert, Rudy supports global marketing efforts through his extensive product knowledge and by creating and editing technical content for Mouser's website. Rudy has authored technical articles appearing in engineering websites and holds a BS in Technical Management and an MBA with a concentration in Project Management. Prior to Mouser, Rudy worked for National Semiconductor and Texas Instruments.


 Principal of Information Exchange Services: Jean-Jacques DeLisle Jean-Jacques (JJ) DeLisle attended the Rochester Institute of Technology, where he graduated with a BS and MS degree in Electrical Engineering. While studying, JJ pursued RF/microwave research, wrote for the university magazine, and was a member of the first improvisational comedy troupe @ RIT. Before completing his degree, JJ contracted as an IC layout and automated test design engineer for Synaptics Inc. After 6 years of original research—developing and characterizing intra-coaxial antennas and wireless sensor technology—JJ left RIT with several submitted technical papers and a US patent.


