

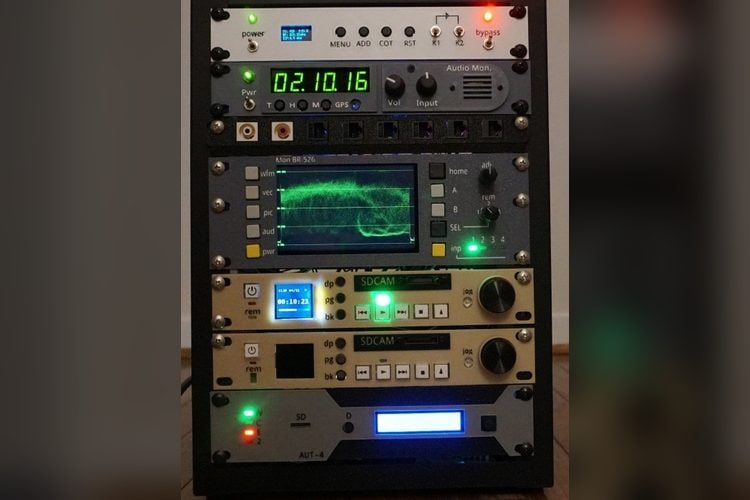
The analog TV signals that old tube sets need stopped being broadcast almost 20 years ago, so when BorisDigital bought a 1995 Sony Watchman pocket CRT TV for 15 dollars at a thrift store, it had nothing to watch. A cheap analog TV transmitter board fixed that. Then he kept going. The result is a full 1990s-style TV station in a 10-inch home lab rack, built from six Raspberry Pis, two Raspberry Pi Picos and a set of 3D-printed front panels, based on the master control room he worked in during the early 1990s. He says that room held hundreds of thousands of dollars of equipment, and he copied its functions for a few hundred.
What is in the rack
- Transmitter: a low-cost analog TV transmitter board, with its OLED and buttons moved onto a custom rack panel and a power switch added
- SD Cam decks: two video playback units modelled on the Panasonic AJ-D350 tape deck he operated in 1993. That machine cost about 50,000 dollars then, roughly 113,000 dollars today. His version runs on a 35-dollar Raspberry Pi 3B+ with the open-source MPV player, a jog and shuttle wheel, a small colour display and an SD card slot
- Waveform monitor and vectorscope: modelled on a Tektronix unit that costs over 7,000 dollars. His runs on a Raspberry Pi 5 with a 5-inch touchscreen, reading video through a cheap composite-to-USB adapter
- Clock and audio monitor: a Pi Pico running CircuitPython, with a small SparkFun amplifier
- AUT-4 automation unit: a Pico with an LCD that controls both decks over serial and switches the transmitter input, driven by text files on a microSD card, just like the hard-to-love automation system he remembers from the 1990s
How the scope works
The scope screen is a Chromium browser in kiosk mode, with every waveform drawn in JavaScript. The Pi 5 runs balenaOS with three containers: the browser, a web server that serves the scope pages, and a Python controller that reads the front-panel buttons. To mimic the four-screen Tektronix display, he currently uses three Raspberry Pi 4s, each with its own capture adapter, combined by an old security DVR. He hopes to do all four views on one Pi 5 later.
Power and range
The whole rack runs from a single 5 V, 60 A supply with a rear distribution panel, so there is one plug instead of a dozen wall adapters. With everything running it draws about 36 W, which a portable power bank handled when he took it outdoors. Reception on the Watchman was good up to about 50 to 100 feet from the transmitter. The rack needs no network or internet at all.
Our take
Every panel was mocked up on paper first, drawn in Tinkercad and printed with the lettering in a second colour, which is why it looks so convincing. The useful lesson is the approach: pick a piece of expensive single-purpose gear, work out what it actually does, and rebuild that function with a Pi, a cheap adapter and a good front panel. STL files and code are going up on GitHub, though he notes the repo is still a work in progress.
Image credit: BorisDigital, YouTube thumbnail, cropped and resized.
About the author: Aswinth Raj is an electronics engineer and the editor of CircuitDigest, where he has published more than 150 hands-on projects and tutorials across Arduino, PIC, ESP32, Raspberry Pi and EV battery systems. He selects the stories on this page for what engineers and makers can actually learn or build from. Connect on LinkedIn

Add a comment
No account needed. Your comment appears once a moderator has reviewed it.