

In this project, we are going to interface HC-SR04 Ultrasonic sensor module to Raspberry Pi to measure distance. We have previously used an Ultrasonic sensor with a Raspberry Pi to build Obstacle Avoiding Robot. Through this project, we can measure distance with a Raspberry Pi. Before going any further, let's know about the Ultrasonic sensor.
Table of Contents
HC-SR04 Ultrasonic Sensor Overview
The Ultrasonic Sensor is used to measure the distance with high accuracy and stable readings in . It can measure distances from 2cm to 400cm or from 1 inch to 13 feet. It emits an ultrasound wave at the frequency of 40KHz in the air and if the object will come in its way, then it will bounce back to the sensor. By using the time which it takes to strike the object and come back, you can calculate the distance.
The Raspberry Pi Ultrasonic sensor uses a technique called “ECHO”. “ECHO” is simply a reflected sound wave. You will have an ECHO when sound reflects back after reaching a dead end. This HC-SR04 RPI combination is perfect for distance measurement applications.
HCSR04 module generates a sound vibration in ultrasonic range when we make the ‘Trigger’ pin high for about 10us which will send a 8 cycle sonic burst at the speed of sound and after striking the object, it will be received by the Echo pin. Depending on time taken by sound vibration to get back, it provides appropriate pulse output. If the object is far away then it takes more time for ECHO to be heard and the output pulse width will be big. And if the obstacle is near, then the ECHO will be heard faster and output pulse width will be smaller. This comprehensive Raspberry Pi distance sensor project demonstrates how to interface the HC-SR04 ultrasonic sensor for accurate distance.
We can calculate the distance of the object based on the time taken by ultrasonic wave to return back to the sensor. Since the time and speed of sound is known we can calculate the distance by the following formulae.
Distance= (Time x Speed of Sound in Air (343 m/s))/2.
The value is divided by two since the wave travels forward and backward covering the same distance.Thus the time to reach obstacle is just half the total time taken
So Distance in centimeter = 17150*T
We have previously made many useful projects using this Ultrasonic sensor and Arduino, check them below:
- Arduino Based Distance Measurement using Ultrasonic Sensor
- Door Alarm using Arduino and Ultrasonic Sensor
- IOT Based Dumpster Monitoring using Arduino
Components Required for Raspberry Pi Distance Measurement
Here we are using a Raspberry Pi 2 Model B with Raspbian Jessie OS. All the basic Hardware and Software requirements are previously discussed, you can look it up in the Raspberry Pi Introduction and Raspberry PI LED Blinking for getting started, other than that, we need:
- Raspberry Pi with pre-installed OS
- HC-SR04 Ultrasonic Sensor
- Power supply (5v)
- 1KΩ resistor (3 pieces)
- 1000uF capacitor
- 16*2 character LCD
Circuit Explanation
This Raspberry Pi ultrasonic distance sensor project explains the connections between the Raspberry Pi and LCD, are shown in the table below:
| LCD connection | Raspberry Pi connection |
| GND | GND |
| VCC | +5V |
| VEE | GND |
| RS | GPIO17 |
| R/W | GND |
| EN | GPIO27 |
| D0 | GPIO24 |
| D1 | GPIO23 |
| D2 | GPIO18 |
| D3 | GPIO26 |
| D4 | GPIO5 |
| D5 | GPIO6 |
| D6 | GPIO13 |
| D7 | GPIO19 |
In this Raspberry pi distance measurement project we have circuits, which have 8-bit communication (D0-D7) to connect LCD with Raspberry Pi, however this is not a compulsory, we can also use 4-bit communication (D4-D7), but with 4-bit communication program becomes a bit complex for beginners, so just go with 8-bit communication. Here we have connected 10 pins of LCD to Raspberry Pi in which 8 pins are data pins and 2 pins are control Pins.
Below is the circuit diagram for connecting HC-SR04 sensor and LCD for distance measurement using ultrasonic sensor and raspberry pi

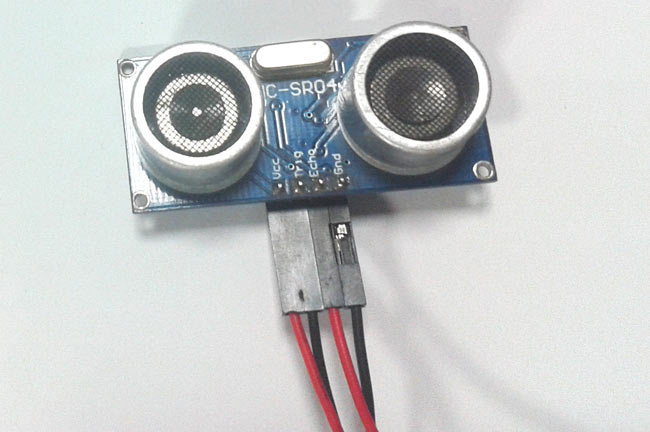
As shown in the figure, the HC-SR04 Ultrasonic Sensor has four pins,
- PIN1- VCC or +5V
- PIN2- TRIGGER (10us High pulse given to tell the sensor to sense the distance)
- PIN3- ECHO (Provides pulse output whose width represents distance after trigger)
- PIN4- GROUND
Echo pin provides +5V output pulse which cannot be connected to Raspberry Pi directly. So we will be using Voltage Divider Circuit (built using R1 and R2) to get +3.3V logic instead of +5V logic.
Working Explanation
Complete working of Raspberry Pi Distance Measure goes as,
1. Triggering the sensor by pulling up the trigger pin for 10uS.
2. Sound wave is sent by the sensor. After receiving the ECHO, the sensor module provides an output proportional to distance.
3. We will record the time when the output pulse goes from LOW to HIGH and when again when its goes from HIGH to LOW.
4. We will have start and stop time. We will use the distance equation to calculate the distance.
5. The distance is displayed on a 16x2 LCD.
This is how it works with the Raspberry Pi ultrasonic sensor code.
Accordingly, we have written the Ultrasonic sensor Raspberry Pi Python code to perform the following functions:
1. To send a trigger to the sensor
2. Record the start and stop time of the pulse output from the sensor.
3. To calculate the distance by using the START and STOP time.
4. To display the result obtained on the 16*2 LCD
Frequently Asked Questions
⇥ For what purpose do the HC-SR04 ultrasonic sensor and Raspberry Pi require resistors?
Raspberry Pi GPIO pins only accept 3.3V, but the HC-SR04 outputs 5V logic levels. To safely lower the 5V Echo signal to 3.3V, the resistors form a voltage divider circuit.
⇥ Is it feasible to use a 4-bit LCD connection rather than an 8-bit one?
Saving GPIO pins with a 4-bit connection is possible, but the code gets trickier. Beginners can comprehend and use the 8-bit connection more easily.
⇥ How far can this sensor detect?
The HC-SR04 has good accuracy when measuring distances between 2 and 400 cm, or roughly 1 inch and 13 feet.
⇥ How precise is the distance measurement in this ultrasonic sensor project using a Raspberry Pi?
Under ideal circumstances, the accuracy of the distance measurement is usually ±1 cm. Temperature, humidity, object surface material, and electrical noise all affect how accurately our Raspberry Pi setup measures distance. Avoid measuring distances to sound-absorbing materials, make sure your power supply is steady, and ground your HC-SR04 RPI properly for optimal performance.
Measure Distance using Raspberry Pi GitHub Repository
The complete Python code for this Raspberry Pi distance sensor project is available in our GitHub repository. The code includes GPIO setup, ultrasonic sensor, triggering echo timing measurement, distance calculation algorithms, and LCD functions for implementation. You can download the complete files, including Python scripts, circuit diagrams , component lists, and detailed documentation for your HC-SR04 PRi setup.


Explore More Distance Measurement Projects
Dive into a collection of projects using ultrasonic sensors for distance detection. These tutorials complement our distance sensor guide and provide solutions for various applications, including robotics, automation, and IoT projects.

Distance Measurement using HC-SR04 and AVR Microcontroller
In this tutorial we are going to discuss and design a circuit for measuring distance. This circuit is developed by interfacing ultrasonic sensor“HC-SR04” with AVR microcontroller.

Build Raspberry Pi Pico based Ultrasonic Distance Meter
This raspberry pi pico based project will become a very important instrument in practical if it is used perfectly. In case we use a laser range finder it will not be efficient enough since laser beams will pass through a transparent medium(object) that will not be able to detect it.
Distance Measurement using Ultrasonic Sensor and Arduino
In this project, we have used the HC-SR04 Ultrasonic Sensor with Arduino to determine the distance of an obstacle from the sensor. The basic principle of ultrasonic distance measurement is based on ECHO.
Complete Program and Demo Video are given below. The program is well explained through the comments. If you have any doubts, you can ask in the comments section below.
Complete Project Code
import time
import RPi.GPIO as IO    #calling for header file which helps in using GPIOs of PI
string_of_characters = 0
IO.setwarnings(False)    #do not show any warnings
IO.setmode (IO.BCM)      #programming the GPIO by BCM pin numbers. (like PIN29 as GPIO5)
IO.setup(17,IO.OUT)      #initialize GPIO17,27,24,23,18,26,5,6,13,19,21 as an output
IO.setup(27,IO.OUT)
IO.setup(24,IO.OUT)
IO.setup(23,IO.OUT)
IO.setup(18,IO.OUT)
IO.setup(26,IO.OUT)
IO.setup(5,IO.OUT)
IO.setup(6,IO.OUT)
IO.setup(13,IO.OUT)
IO.setup(19,IO.OUT)
IO.setup(21,IO.OUT)
IO.setup(16,IO.IN)      #initialize GPIO16 as an input
def send_a_command (command):  #steps for sending a command to 16x2 LCD
    pin=command
    PORT(pin);
    IO.output(17,0)
    #PORTD&= ~(1<<RS);
    IO.output(27,1)
    #PORTD|= (1<<E);
    time.sleep(0.001)
    #_delay_ms(50);
    IO.output(27,0)
    #PORTD&= ~(1<<E);
    pin=0
    PORT(pin);
def send_a_character (character):  #steps for sending a character to 16x2 LCD
    pin=character
    PORT(pin);
    IO.output(17,1)
    #PORTD|= (1<<RS);
    IO.output(27,1)
    #PORTD|= (1<<E);
    time.sleep(0.001)
    #_delay_ms(50);
    IO.output(27,0)
    #PORTD&= ~(1<<E);
    pin=0
    PORT(pin);
def PORT(pin):                    #assigning level for PI GPIO for sending data to LCD through D0-D7
    if(pin&0x01 == 0x01):
        IO.output(24,1)
    else:
        IO.output(24,0)
    if(pin&0x02 == 0x02):
        IO.output(23,1)
    else:
        IO.output(23,0)
    if(pin&0x04 == 0x04):
        IO.output(18,1)
    else:
        IO.output(18,0)
    if(pin&0x08 == 0x08):
        IO.output(26,1)
    else:
        IO.output(26,0)
    if(pin&0x10 == 0x10):
        IO.output(5,1)
    else:
        IO.output(5,0)
    if(pin&0x20 == 0x20):
        IO.output(6,1)
    else:
        IO.output(6,0)
    if(pin&0x40 == 0x40):
        IO.output(13,1)
    else:
        IO.output(13,0)
    if(pin&0x80 == 0x80):
        IO.output(19,1)
    else:
        IO.output(19,0)
def send_a_string(string_of_characters):
  string_of_characters = string_of_characters.ljust(16," ")
  for i in range(16):
    send_a_character(ord(string_of_characters[i]))  #send characters one by one through data port

while 1:
    send_a_command(0x38);  #16x2 line LCD
    send_a_command(0x0E);  #screen and cursor ON
    send_a_command(0x01);  #clear screen
    time.sleep(0.1)                #sleep for 100msec

    IO.setup(21,1)
    time.sleep(0.00001)
    IO.setup(21,0)           #sending trigger pulse for sensor to measure the distance

    while (IO.input(16)==0):
        start = time.time()  #store the start time of pulse output

    while (IO.input(16)==1):
        stop = time.time()   #store the stop time


    distance = ((stop - start)*17150)  #calculate distance from time
    distance = round(distance,2)       #round up the decimal values
    if(distance<400):                  #if distance is less than 400 cm, display the result on LCD
        send_a_command(0x80 + 0);
        send_a_string ("Dist=%s cm"% (distance));
        time.sleep(0.15)

    if(distance>400):                  #If distance is more than 400cm, just print 400+ on LCD
        send_a_command(0x80 + 0);
        send_a_string ("Dist= 400+ cm");
        time.sleep(0.15)
Comments
Hi
First of all thanks for great explanation.
I'm running same code with same connections but not able to output on display.
However both LCD and hcsr04 individually works fine.please help me to resolve this issue.

Starting at about line 20 of the program - I see about 8 lines that start with the hashtag (#). My understanding of the Python language, hashtags are used for comments only and Python does not read these as commands or instructions.