
Security has always been a major concern for all of us and there are many Hi tech and IoT based security and surveillance system are available in the market. Intruder or Burglar Alarm is one of the classic and popular project among the Electronics students and hobbyists. We have also built many Burglar Alarms based on various technologies:
Today we are adding one more Security Alarm in our list which is based on Ultrasonic Sensor. This Arduino Controlled Door alarm can be installed near the door to detect the presence of anybody at the door. Whenever somebody comes in the range of Ultrasonic sensor, buzzer starts beeping. You can adjust the sensor detection range according to your door. This system can also serve the purpose of Motion Detector.
Required Components:
- Breadboard
- Ultrasonic Sensor
- Buzzer
- Arduino Mega (any model)
- Jumper Wires
- USB cable for Arduino or 12v, 1A adapter.
Ultrasonic Sensor Module:
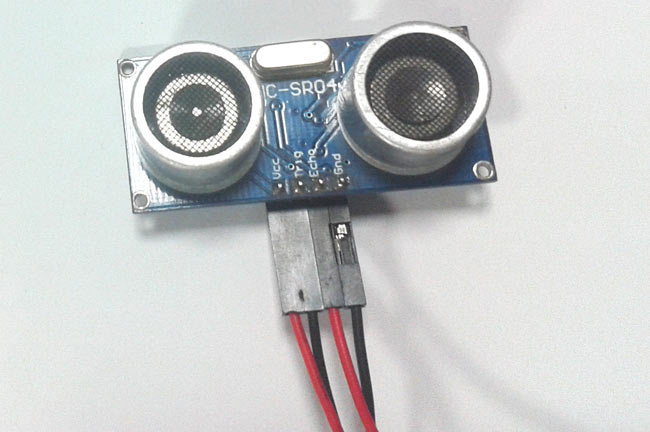
Ultrasonic sensor HC-SR04 is used here to detect the presences of any person at the door. The sensor module consists of ultrasonic transmitter, receiver and the control circuit. Ultrasonic Sensor consists of two circular eyes out of which one is used to transmit the ultrasonic wave and the other to receive it.
We can calculate the distance of the object based on the time taken by ultrasonic wave to return back to the sensor. Since the time and speed of sound is known we can calculate the distance by the following formulae.
- Distance = (Time x Speed of Sound) / 2
The value is divided by two since the wave travels forward and backward covering the same distance. But in this project we have used NewPing.h library, and this library takes care of this calculation and we just need to use some key words, explanation is given in programing section below.
Check the below project to measure the distance of any object and to properly understand the Ultrasonic sensor working:
- Arduino Based Distance Measurement using Ultrasonic Sensor
- Distance Measurement using HC-SR04 and AVR Microcontroller
Circuit Diagram and Explanation:

Circuit connections for this Ultrasonic Alarm are very simple. Trigger pin of ultrasonic sensor is connected to pin no. 12 of Arduino and Echo pin of sensor is connected to pin no 11 of Arduino. Vcc of sensor is connected to 5V pin of Arduino and GND of sensor is connected to GND of Arduino. One pin of buzzer is connected to GND of Arduino and the other pin is connected to 8th pin of Arduino.
Working Explanation:
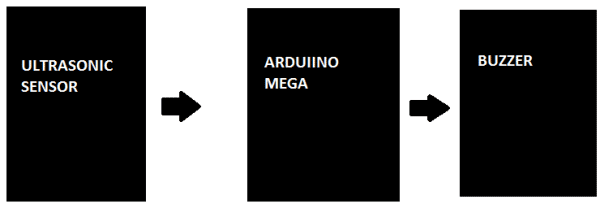
Working this Arduino Door Alarm is very easy. Whenever anyone comes in the path/range of Ultrasonic Sensor, microcontroller detects the distance of object from the sensor and if the object is in the defined range, it sends the High signal to the buzzer and buzzer starts beeping.
You can test the circuit by putting any thing in front of sensor within the range, check the Video for demonstration. This function of Ultrasonic Sensor can also be used to build Obstacle Avoiding Robot.
Programming Explanation:
In this project we have used NewPing.h Library for Ultrasonic sensor, developed by Tim Eckel. Although we can use Ultrasonic sensor without this library like we did in our previous project, but this Library provides many good features for Ultrasonic sensor and it becomes easy to Code for ultrasonic sensor using this library. We can use ultrasonic sensor’s functions easily using this library without writing too many lines of code; it’s like other libraries which are used to handle the complexity at lower level.
#include <NewPing.h>
You can check all the features, uses and sample codes of this Library by following this link. Also check the official Arduino page of this Library.
Latest release of Library can be downloaded from the above given link. Further, we have downloaded the Library from below link, which is modified for Teensy:
https://github.com/PaulStoffregen/NewPing
You should first test the sensor by burning Example Codes given at its page. We have also used the Example Codes for our project and modified them according to our Door Alarm Project.
Trigger pin is connected to the Pin 12 of Arduino and Echo pin is connected to pin 11 of Arduino. MAX_DISTANCE means that the distance up to which the sensor can detect the obstacle is 500 cm or 5m.
#define TRIGGER_PIN  12
#define ECHO_PIN     11
#define MAX_DISTANCE 500
Below line states the Baud Rate at which the data is sent to the Arduino serial port from ultrasonic sensor.
Serial.begin(115200);
Pin no 10 is configured as output pin and is connected to buzzer. Other pin of buzzer is connected to GND of Arduino.
pinMode(10, OUTPUT);
In void echoCheck() function, sonar.ping_result / US_ROUNDTRIP_CM is used to calculate the distance of obstacle from the sensor. flag is used to execute the buzzer when obstacle is in 50 cm range from the ultrasonic sensor. You can change this ‘distance’ according to your requirement or your door size.
if ((sonar.ping_result / US_ROUNDTRIP_CM) < 50)
      flag = 1;
    else if ((sonar.ping_result / US_ROUNDTRIP_CM) > 50)
      flag = 0;
The Code is very well commented by the Author of NewPing.h library and can be easily understood. Further you can check the library page itself to get better understanding of it and can use this library to make complex project using ultrasonic sensor. Full code for this Door Alarm project is given below.
Primarily Ultrasonic sensor is used to measure distance from any object, but here we can see that it can be used as Security alarm or Door alarm with Arduino. Likewise we can create many useful projects using this like: Automatic Water Level Indicator and Controller using Arduino
Complete Project Code
#include <NewPing.h>
#define TRIGGER_PIN  12  // Arduino pin tied to trigger pin on ping sensor.
#define ECHO_PIN     11  // Arduino pin tied to echo pin on ping sensor.
#define MAX_DISTANCE 500 // Maximum distance we want to ping for (in centimeters). Maximum sensor distance is rated at 400-500cm.
NewPing sonar(TRIGGER_PIN, ECHO_PIN, MAX_DISTANCE); // NewPing setup of pins and maximum distance.
unsigned int pingSpeed = 50; // How frequently are we going to send out a ping (in milliseconds). 50ms would be 20 times a second.
unsigned long pingTimer;
int flag = 0; // Holds the next ping time.
void setup() {
  Serial.begin(115200); // Open serial monitor at 115200 baud to see ping results.
  pingTimer = millis();
  pinMode(10, OUTPUT); // Start now.
  // Start now.
}
void loop() {
  // Notice how there's no delays in this sketch to allow you to do other processing in-line while doing distance pings.
  if (millis() >= pingTimer) {   // pingSpeed milliseconds since last ping, do another ping.
    pingTimer += pingSpeed;      // Set the next ping time.
    sonar.ping_timer(echoCheck); // Send out the ping, calls "echoCheck" function every 24uS where you can check the ping status.
  }
  if (flag == 1)
  {
    digitalWrite(10, HIGH);
    delay(500);
    digitalWrite(10, LOW);
    delay(500);
    digitalWrite(10, HIGH);
    delay(500);
    digitalWrite(10, LOW);
    delay(500);
  }
  else
  {
    digitalWrite(10, LOW);
  }
}
void echoCheck() { // Timer2 interrupt calls this function every 24uS where you can check the ping status.
  if (sonar.check_timer()) { // This is how you check to see if the ping was received.
    // Here's where you can add code.
    Serial.print("Ping: ");
    Serial.print(sonar.ping_result / US_ROUNDTRIP_CM); // Ping returned, uS result in ping_result, convert to cm with US_ROUNDTRIP_CM.
    Serial.println("cm");
    if ((sonar.ping_result / US_ROUNDTRIP_CM) < 50)
      flag = 1;
    else if ((sonar.ping_result / US_ROUNDTRIP_CM) > 50)
      flag = 0;
  }
}
Comments
i loved this technology
Can i use Arduino Uno to make this project?
No you can't because you have to use Arduino Dos
Yes you can use arduino uno
// Thanks to Avinash Kumar
#include <Wire.h>
#include <LiquidCrystal_I2C.h>
LiquidCrystal_I2C lcd(0x3F, 2, 1, 0, 4, 5, 6, 7, 3, POSITIVE);
#include <NewPing.h>
#define TRIGGER_PIN 10 // Trigger pin
#define ECHO_PIN 11 // Echo pin
#define MAX_DISTANCE 500 // Distancia máxima
#define led 6 // Led pin
#define buzzer 12 // Buzzer pin
NewPing sonar(TRIGGER_PIN, ECHO_PIN, MAX_DISTANCE);
unsigned int pingSpeed = 250; // frecuencia del chequeo
unsigned long pingTimer;
int flag = 0;
int dist = 0; // frecuencia sonora de la alarma
int alarma = 120; // distancia máxima hasta donde suena la alarma en cms = 1.20mts
//////////////////////////////////////////////////////////////////////////
void setup() {
pinMode(10, OUTPUT);
pinMode(buzzer, OUTPUT);
pinMode(led, OUTPUT);
lcd.begin(16,2);
lcd.setCursor(0,0);
lcd.print("ULTRASONIC");
lcd.setCursor(6,1);
lcd.print("Berreizeta");
delay(1000);
lcd.clear();
lcd.setCursor(0,0);
lcd.print("Distancia: ");
lcd.setCursor(6,1);
lcd.print("cms:");
pingTimer = millis();
}
////////////////////////////////////////////////////////////////////////
void loop() {
if (millis() - pingTimer >= pingSpeed) {
sonar.ping_timer(echoCheck);
dist = sonar.ping_result / US_ROUNDTRIP_CM;
lcd.setCursor(11,1);
lcd.print(" ");
if (flag == 1) {
lcd.setCursor(12,1);
}
else
{
lcd.setCursor(11,1);
}
lcd.print(dist);
pingTimer = millis();
} // end if millis
if (flag == 1)
{
digitalWrite(buzzer, HIGH);
digitalWrite(led, HIGH);
delay(15);
digitalWrite(buzzer, LOW);
digitalWrite(led, LOW);
delay(dist * 2); // Probar con otras frecuencias 1.5, 3, 3.5 etc (delay = distancia * 2)
}
else
{
digitalWrite(10, LOW);
}
}
///////////////////////////////////////////////////////////////////////
void echoCheck() {
if (sonar.check_timer()) {
if (dist < alarma)
flag = 1;
else if (dist > alarma)
flag = 0;
} // end void
/////////////////////////////////////////////////////////////////////////////
} // end loop
Code from Avinash Kumar modified for CAR PROXIMITY ALARM

I want pdf file of door alarm using arduino and ultrasonic sensor