
Ultrasonic sensors are great tools to measure distance and detect objects without any actual contact with the physical world. It is used in several applications, like measuring liquid level, checking proximity and even more popularly in automobiles to assist in self-parking or anti-collision systems. Previously, we have also built many Ultrasonic Sensor projects, such as water level detection, Ultrasonic Radar, etc. This is an efficient way to measure small distances precisely. In this project, we have used the HC-SR04 Ultrasonic Sensor with Arduino to determine the distance of an obstacle from the sensor. The basic principle of ultrasonic distance measurement is based on ECHO. When sound waves are transmitted in the environment, the waves return to the origin as an echo after striking the obstacle. So we only need to calculate the travelling time of both sounds, which means the outgoing time and returning time to the origin after striking the obstacle. As the speed of sound is known to us, after some calculation, we can calculate the distance. We are going to use this same technique for this Arduino distance measurement project, so let's get started.
This whole guide will cover the initial circuit connections, all the way through to final programming for Arduino distance measurement projects. Whether you're building a distance detector Arduino system or just implementing proximity sensing, you have the answer here.
If you are completely new, check out this Arduino Ultrasonic Sensor tutorial to learn the basics of an ultrasonic sensor and how it works. That being said, let's get started....
Table of Contents
Components Required for Distance Measurement Using Ultrasonic Sensor Project
The HC-SR04 ultrasonic sensor is the most popular choice for Arduino distance measurement projects due to its reliability and cost-effectiveness. Before starting your ultrasonic sensor distance measurement project, gather these essential components:
- Arduino Uno or Pro Mini
- Ultrasonic Sensor Module
- 16x2 LCD
- Scale
- Bread board
- 9-volt battery
- Connecting wires
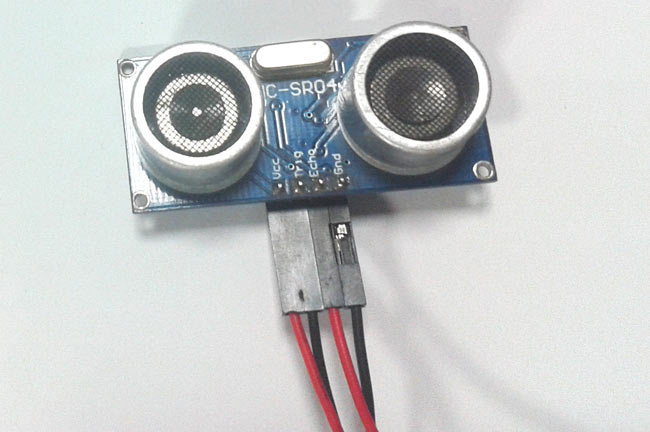
Ultrasonic Sensor Module
Understanding the working principle is crucial for successful distance measurement using ultrasonic sensor implementation. There are many types of Arduino distance sensors, but in this project, we have used the HC-SR04 to measure distance in a range of 2cm-400cm with an accuracy of 3mm. The sensor module consists of an ultrasonic transmitter, receiver and control circuit. The working principle of the ultrasonic sensor is as follows:
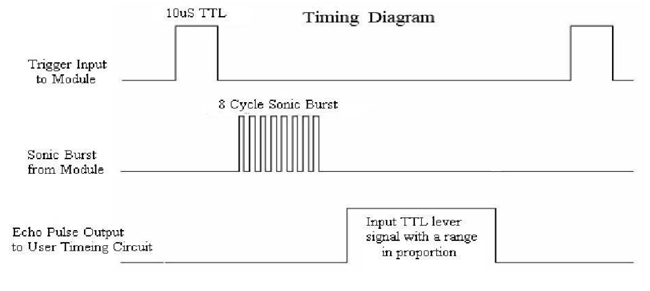
- A high-level signal is sent for 10us using Trigger.
- The module sends eight 40 KHz signals automatically, and then detects whether a pulse is received or not.
- If the signal is received, then it is through a high level. The time of high duration is the time gap between sending and receiving the signal.
Distance= (Time x Speed of Sound in Air (340 m/s))/2
Timing Diagram
The module works on the natural phenomenon of the echo of sound. A pulse is sent for about 10us to trigger the module. After which the module automatically sends 8 cycles of 40 KHz ultrasound signal and checks its echo. The signal after striking with an obstacle returns and is captured by the receiver. Thus, the distance of the obstacle from the sensor is simply calculated by the formula given as
Distance (time x speed)/2.
Here, we have divided the product of speed and time by 2 because the time is the total time it took to reach the obstacle and return. Thus, the time to reach the obstacle is just half the total time taken.
Distance Measurement Using Ultrasonic Sensor Circuit Diagram
The circuit connection for distance measurement using an ultrasonic sensor with Arduino is straightforward but requires attention to detail for optimal performance.

The circuit diagram for Arduino and an ultrasonic sensor is shown above to measure the distance. In circuit connections, the Ultrasonic sensor module’s “trigger” and “echo” pins are directly connected to pins 18(A4) and 19(A5) of the Arduino. A 16x2 LCD is connected to the Arduino in 4-bit mode. Control pins RS, RW and En are directly connected to Arduino pins 2, GND and 3. And data pin D4-D7 is connected to 4, 5, 6 and 7 of Arduino. Proper calibration ensures maximum accuracy in your ultrasonic sensor distance measurement project.
HC-SR04 to Arduino Connections
| HC-SR04 Pin | Arduino Pin | Function |
| VCC | 5V | Power Supply |
| GND | GND | Ground Connection |
| Trig | A4 (Pin 18) | Trigger Signal Output |
| Echo | A5 (Pin 19) | Echo Signal Input |
First of all, we need to trigger the ultrasonic sensor module to transmit a signal by using Arduino and then wait for the ECHO. Arduino reads the time between triggering and receiving ECHO. We know that the speed of sound is around 340m/s. So we can calculate distance by using the given formula:
Distance= (travel time/2) * speed of sound
The speed of sound is around 340 m/s.
16x2 LCD Display Connections
A 16x2 LCD is used for displaying distance.
| LCD Pin | Arduino Pin | Description |
| VSS | GND | Ground |
| VDD | 5V | Power Supply |
| RS | Pin 2 | Register Select |
| EN | Pin 3 | Enable Pin |
| D4-D7 | Pin 4-7 | Data Pins (4-bit mode) |
Find more about the working of the distance measurement project in this tutorial: Distance measurement using ultrasonic sensor and AVR Microcontroller.
Arduino Ultrasonic Sensor Code for Distance Measurement
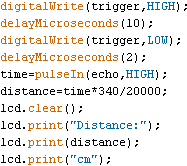
This optimised distance measurement using an ultrasonic sensor with Arduino code provides accurate readings with proper error handling and display formatting. The complete code for this ultrasonic distance measurement project is given at the bottom of this page. In the code, we read time by using pulseIn(pin). And then perform calculations and display the result on a 16x2 LCD by using appropriate functions.
Technical Summary and GitHub Repository
The Technical Summary explains the project’s design and function, while the GitHub Repository offers code and diagrams for hands-on use.


Real-World Applications of Arduino Distance Measurement
The versatility of distance measurement using ultrasonic sensor technology extends across numerous industries and applications.
Industrial Applications:
» Automated Parking Systems: Vehicle detection and monitoring.
» Liquid Level Monitoring: Tank measurement in process and chemical plants.
» Conveyor Belt Control: Detection and counting of objects.
» Robot Navigation: Navigation, obstacle avoidance, and mapping.
Conclusion
This guide provides all the necessary information for successful distance measurement using ultrasonic sensor projects with Arduino. The HC-SR04 is a great ultrasonic distance sensor, which provides fairly reliable and accurate distance detection in various situations, from simple proximity sensing applications to complex robot navigation.
You can build dependable Arduino distance measurement systems by following the circuit diagrams, examples of code snippets, and testing and troubleshooting advice provided in this guide. Remember to consider the surrounding environmental factors and perform good error checking, along with good calibration for your particular application.
Whether you are creating a simple distance detector Arduino project or installing ultrasonic sensing into complicated automation systems, this guide should serve as your complete reference for accomplishing the task.
Frequently Asked Questions on Arduino Distance Measurement
⇥ Q1: What is the maximum distance the HC-SR04 ultrasonic sensor can measure accurately?
The HC-SR04 ultrasonic sensor will be able to measure distance from a target object effectively anywhere from 2cm to 400cm (0.8 in to 157 in) ±3mm based on ideal conditions, i.e., an adequate power supply and the target object is perpendicular.
⇥ Q2: Why do I get inconsistent results with my ultrasonic sensor?
Inconsistent results are generally caused by an insufficient power supply, electromagnetic noise, misalignment of the sensor, or reflective characteristics of the surface of the target object - sensor readings may include inconsistent values depending on the types of surfaces (e.g., cement, plastic, metal, etc). In order to eliminate these factors as possible sources of erroneous readings, ensure that the power supply is very well regulated, stable, and grounded, and if possible, use systematic calibration trials against different target materials to have repeatable data.
⇥ Q3: Can ultrasonic sensors measure transparent or curved objects?
Ultrasonic sensors can sense transparent objects, such as glass or plastic objects, unlike infrared sensors, which draw a parallel example. However, curved surfaces would still scatter ultrasonic waves, which leads to less accurate and less precise measures compared to the use of flat and perpendicular surfaces (both highly accurate and precise).
⇥ Q4: Where to hook up the HC-SR04 - what pins on the Arduino?
You can use any digital pin for the echo and trigger pins. Most people tend to use 2 & 3, 7 & 8 or A4 &A5 (In Analog input, set to digital I/O mode). Don't use pins 0 and 1 since that is part of the serial communication (also modified by libraries).
⇥ Q5: Does temperature influence the accuracy of the ultrasonic sensors?
Yes. Temperature does play a role, as temperature affects the speed of sound (average speed). Sound will travel faster as the air gets warmer, for example, 343 m/s at 20 °C. If there is a precision requirement, it is best to compensate for the temperature. Use the equation: Speed=331.4 + (0.606 * Temperature °C) to calculate speed.
⇥ Q6: Can I use more than one ultrasonic sensor, using one Arduino?
Yes, you can! You can have any number of HC-SR04 sensors, using different pairs of pins on an Arduino, and it is generally acceptable. However, you will want to keep to maximum performance by avoiding measuring at the same time, since it can create interference cross-talk. You will have to read in a sequencing method, or orient the sensors away from each other.
Projects Using Ultrasonic Sensor
Previously, we have used this ultrasonic sensor to build many interesting projects. If you want to know more about those topics, links are given below.

How does an HC-SR04 Ultrasonic Range Sensor work, and how to interface with ESP32
So, in this project, we are going to know every little detail about the HC-SR04 Ultrasonic Distance Sensor module, along with interfacing it with ESP32. The HC-SR04 ultrasonic sensor has a detection range of 13 feet with an angle of 15 degrees, which is great for detecting obstacles.

How to Interface Raspberry Pi Pico W with an Ultrasonic Sensor
In this blog, we will learn how you can interface a Raspberry Pi Pico W to an ultrasonic sensor. We will also take a look at how you can display these ultrasonic values on an OLED screen. So, if you are excited to learn how. Stay tuned.

Interfacing SR04T/SR04M Waterproof Ultrasonic Sensor with Arduino Uno
The article also discusses the working of the module, along with a detailed explanation of the code required to process the data into a usable format.
Complete Project Code
#include <LiquidCrystal.h>

#define trigger 18
#define echo 19

LiquidCrystal lcd(2,3,4,5,6,7);

float time=0,distance=0;

void setup()
{
 lcd.begin(16,2);
 pinMode(trigger,OUTPUT);
 pinMode(echo,INPUT);
 lcd.print(" Ultra sonic");
 lcd.setCursor(0,1);
 lcd.print("Distance Meter");
 delay(2000);
 lcd.clear();
 lcd.print(" Circuit Digest");
 delay(2000);
}

void loop()
{
 lcd.clear();
 digitalWrite(trigger,LOW);
 delayMicroseconds(2);
 digitalWrite(trigger,HIGH);
 delayMicroseconds(10);
 digitalWrite(trigger,LOW);
 delayMicroseconds(2);
 time=pulseIn(echo,HIGH);
 distance=time*340/20000;
 lcd.clear();
 lcd.print("Distance:");
 lcd.print(distance);
 lcd.print("cm");
 lcd.setCursor(0,1);
 lcd.print("Distance:");
 lcd.print(distance/100);
 lcd.print("m");
 delay(1000);
}
Comments
nice work.. i just have one query
can you tell me the calculation of (voltage change per distance?)
reply me at []
thanks
i need this copy
i want to know the arduino model
I think you should read the arduino.cc page for more about arduino.
Its Arduino Pro Mini, as mentioned in Components section.
can anyone put the link to buy arduino pro mini and IR sensor used here??? plzz help
i need complete detailed calculation of distance
can you program the measurement sensor to power a motor at a particular distance for a short period of time
Hi,
i am also implement this type of projects but real time problem is how to mobile no is store through sms.
and send the sms from gsm your mobile no is registered. second problem tx /rx pin. what pin are using tx and rx . Nobody can entered the this type of sms because sms is tool long .
command:
Tv On tv off
on off
like another message.
after send the sms through the mobile then sms memory is full how to delete the sms memory after gsm read the message . pl use eeprom header and use the eeprom memory in ardunio. then store the mobile no and you can easily change mobile no .
HOW TO CURRENT SUPPLY TO PRO MINI
i am already programme the arduino pro mini using arduino uno board
uno rest to pro mini rest button
uno vcc to pro mini vcc button
uno gnd to pro mini gnd button
uno tx and rx to pro mini txo and rxi button
it is correct or not sir
another one thing is my pro mini board consists
A6 and A7 pin
but in circuit diagram pro mini board consists a A4, A5 pin
it is correct or not
pls tell that sir
You can connect to A6 and A7 but then define the Trigger and 'echo' pin accordingly.
project is success sir thank you for your response
but in this programme [340/20000]. how its possible
because in explanation is 340/2
but it is not use in the progromme why sir
I need one help to u
am doing final year project please give some ideas harish
- Travel time = PulseIn(), gives results in microseconds. This has to be converted to seconds, therefore divide by 1,000,000 (1s = 1000000us).
- The distance measure we want to display in cm instead of m. Therefore, multiply by 1000 (1m =1000cm).
This result in: (340/2)/(1000000)*(1000) = 340/20000
digitalWrite(trigger,LOW);
delayMicroseconds(2);
digitalWrite(trigger,HIGH);
delayMicroseconds(10);
digitalWrite(trigger,LOW);
delayMicroseconds(2);
pls tell meaning of the lines sir
i don't know sir
Why does this project use Arduino Pro Mini and all I was seeing from YouTube and other sites are Arduino Mega or Arduino Uno. Is there a significant difference? Does the code above really works?
You can use any model, Code will work in all of them. Further Arduino Pro Mini is small in size and generally used on PCBs because of its size.
Hey if I use ultrasonic sensor for moving robot then how it will be calculate the distance?????
Check this: Robot using Ultrasonic Sensor and Robot using Arduino
Hi
i read your article
im curious about how to measure inclined plane
with inclined plane distance data has an error
do u know method to modify this problem?
we are making this project and our teacher asked if what is scale?
Hai
We are planning to make this project and our teacher asked what is the used of Scale because it is in the components thanks.
its a mind blowing project....therikka vitutinga...
What should be the possible program and circuit if centimeter will change to feet?
can i trans output of this sensor to 4 -20 mA?
Please give some ideas about projects any concepts you guys know please share it now for final year project
Sanvi there are lots of projects here, you can choose anything you like.... Also check the featured projects on the bottom of the page
I’d like to measure human heights in clinic. Is this sensor sensitive to hair? I mean it is important to measure exact height in this case which requires measuring height till the end of skull also to prevent error occurs by hair. I mean height shouldn’t be dependent to hairstyle. can this ultrasonic sensor help me?
No sarath, This sensor will be reflected by hair. I cannot think of any sensor that could measure distance past hair.. May be try posting on forum (available on menu on top) and someone might have an answer for you
please how can I get the code if I am using a pid as my controller with the Arduino
hi can you tell me whats the model of lcd display used their?
actully its accuracy is very good'and your discreiption and your support made my day thank you ones agian i made some changes for arduino uno
This site is helping a lot for me to easily understand all the arduino related projects and to do it myself.
im tryn to make a blind stick using arduino nano with buzzer.but there is some error ...can u guyz help me...!
#include <LiquidCrystal.h>
#define trigger 12
#define echo 11
#define BUZZER 10
float time=0,distance=0;
void setup()
{
pinMode(trigger,OUTPUT);
pinMode(echo,INPUT);
pinMode(BUZZER,OUTPUT);
}
void loop()
{
digitalWrite(trigger,LOW);
delayMicroseconds(2);
digitalWrite(trigger,HIGH);
delayMicroseconds(10);
digitalWrite(trigger,LOW);
delayMicroseconds(2);
time=pulseIn(echo,HIGH);*
distance=time*340/20000;
if(distance<40)
{
BUZZER=1;
}
else
{BUZZER=0;}
delay(1000);
}
What error are you getting? Also did you look at this project (link below), i think this is what you are looking for
https://circuitdigest.com/microcontroller-projects/arduino-smart-blind-…
hello, please is it possible to integrate a set of led bulbs to the circuit such that the led bulb comes on with respect to the distance of the obstacle.? if it is possible can someone help me out with the codes?
Yes michael it is possible, just interface the LED's to the GPIO pins of the arduino. And add in the program to read the value of distance and make the pins high
hay..i am machanical engg....but interest in electrical & electronic..i see in u tube-ultrasonic ,leaser distance project.. i want know that --can i measured in micron or milimeter in dacimal just like 0.1 mm insteed centimeter..secondry i want measured a wheel center out or runout radial not wheel diameter measure. is this possible to check by ardino project..if yes so please share step by step on my email.id
Can anyone please tell me the cost of project approximately
What changes do I need to make for the code if I do not have an LCD and just want the distance recorded on serial monitor
Can u explain me what is the use of Potentiometer when we are using a Arduino uno/Why potentiometer is used inthe circuit??
How To Add Buzzer And LED for Limit Distance???
i need this experiment's documentation
Hello, this projetc isso Good, more no image in failere

Can you give me a distance meter flow chart.