
In this tutorial, we'll guide you through interfacing an Arduino with an ultrasonic sensor to measure distance and show it on the Serial monitor. We'll start by explaining how to interface the ultrasonic sensor, and then we'll add the I2C LCD display to the project at the end.
If you have just started to work with Arduino do check out our Arduino Projects and Tutorials. We have a collection of almost 500+ Arduino projects with Code, Circuit Diagram, and detailed explanations completely free for everyone to build and learn on their own.
Components Required
Arduino board (e.g., Arduino Uno)
HC-SR04 Ultrasonic Sensor
I2C LCD Display (e.g., 16x2 characters)
Jumper wires
In our previous attempts, we have used this HC-SR04 with an Arduino, Raspberry Pi, and PIC microcontroller to build many interesting projects, some of which are linked below.
Interfacing Ultrasonic Sensor HC-SR04 with PIC Microcontroller
Raspberry Pi Based Obstacle Avoiding Robot using Ultrasonic Sensor
HCSR04 Ultrasonic Sensor Pinout
The Ultrasonic Sensor has 4 pins: - VCC, Trig, Echo and GND. The Pinout explanation is given as below

VCC - The supply pin of the HC-SR04 Module.
GND - This is the Ground pin of the module
Trig - This is the trigger pin of the HC-SR04 module
Echo - This is the echo pin of the HC-SR04 sensor module.
Working of Ultrasonic Sensor
An ultrasonic sensor comprises several essential components that work together to measure distances or detect objects using high-frequency sound waves. At its core is the transducer, typically made of a piezoelectric crystal, which both emits and receives ultrasonic waves.

The sensor's operation begins with the ultrasonic transmitter, which sends out bursts of high-frequency sound waves into the environment.
On the back of the Ultrasonic sensor, we have the MAX232 sensor on right side, which converts the electrical signal received from the trig pin. Converts it into ultrasonic pulse and send it’s through the transmitter side.
These waves bounce off objects in their path and are detected by the ultrasonic receiver. The two LM324 ICs on the left side take this ultrasonic pulse converts it into electrical signal and sends it to the echo pin.
The receiver converts the reflected waves into electrical signals.
The time it takes for the sound waves to travel to the object and back is precisely measured by signal processing circuitry within the sensor. This time measurement is crucial for calculating distances and determining the presence of objects in proximity to the sensor. Now to calculate the distance we will use the following formula.
Speed= Distance x Time
Now we know the speed of sound is 343.2 m/s. To calculate the distance we need to convert the speed of sound to cm/us which will be 0.03432 cm/uS, and we also know the time value received from the ultrasonic sensor which is 500 uS.
Distance= (0.03432 cm/us x 700uS) / 2 = 8.58 cm
Hence, we know that the object is 8.58 cm away from the sensor.
Commonly asked questions about Ultrasonic Sensor
What is the maximum range of an ultrasonic sensor?
The maximum range of an ultrasonic sensor can vary depending on the specific model and design, but typical ranges for standard sensors are between 2 centimeters (0.79 inches) to several meters (tens of feet). Specialized sensors can have longer ranges for specific applications.
Are ultrasonic sensors affected by environmental conditions?
Yes, ultrasonic sensors can be affected by environmental factors like temperature, humidity, and air pressure. Changes in these conditions can alter the speed of sound, potentially affecting the accuracy of distance measurements.
Can ultrasonic sensors detect multiple objects simultaneously?
Yes, ultrasonic sensors can detect multiple objects as long as they are within the sensor's detection range. However, they may struggle to distinguish between closely spaced objects if their echoes overlap.
Circuit Diagram of Arduino Interfacing with Ultrasonic Sensor

To Interface the Ultrasonic Sensor to the Arduino. You need to connect the sensor's TRIG (trigger) pin to Arduino pin 4. The sensor's ECHO pin to Arduino pin 5. Sensor’s VCC (power) pin to Arduino's 5V output and sensor's GND (ground) pin to Arduino's GND.
Arduino Code for Interfacing Ultrasonic Sensor with Arduino
Here is the complete line by line code explanation for Interfacing Arduino with Ultrasonic Sensor. The complete code can be found at the absolute bottom of the blog.
const int trigPin = 4;
const int echoPin = 5;
These lines define two constants, trigPin and echoPin, to specify the Arduino pins to which the trigger and echo pins of the ultrasonic sensor are connected, respectively.
long duration;
int distance;
Here, two variables, duration (of type long) and distance (of type int), are declared. These variables will be used to store the duration of the echo pulse and the calculated distance, respectively.
void setup() {
  Serial.begin(9600);
In the setup() function, the Arduino initializes serial communication at a baud rate of 9600 bits per second. This is used to communicate with the Serial Monitor on your computer, where you'll see the distance measurements displayed.
  pinMode(trigPin, OUTPUT);
  pinMode(echoPin, INPUT);
These lines set the trigPin as an OUTPUT and the echoPin as an INPUT. This configuration is necessary for controlling the ultrasonic sensor. The trigger pin (TRIG) sends a signal, while the echo pin (ECHO) receives the returning signal.
void loop() {
  delayMicroseconds(2);
  digitalWrite(trigPin, HIGH);
  delayMicroseconds(10);
  digitalWrite(trigPin, LOW);
Inside the loop() function, these lines initiate a measurement from the ultrasonic sensor. It first sets the trigger pin (TRIG) to LOW, waits for a brief period using delayMicroseconds() to ensure a clean trigger signal, then sets it to HIGH for 10 microseconds before setting it back to LOW. This sequence triggers the ultrasonic sensor to send out an ultrasonic pulse.
duration = pulseIn(echoPin, HIGH);This line uses the pulseIn() function to measure the duration (in microseconds) of the pulse received on the echo pin (ECHO). It waits until the ECHO pin goes HIGH and then waits again until it goes LOW, measuring the time between those events.
distance = duration * 0.034 / 2;Here, the code calculates the distance based on the duration of the echo pulse. The formula used here is based on the speed of sound in air (approximately 0.034 centimeters per microsecond) and the fact that the pulse travels to the object and back. Dividing by 2 accounts for the two-way trip.
  Serial.print("Distance: ");
  Serial.print(distance);
  Serial.println(" cm");
These lines print the calculated distance to the Serial Monitor with a descriptive label ("Distance: ") followed by the actual distance value and "cm" for centimeters.
delay(1000);Finally, a delay of 1000 milliseconds (1 second) is added to control the rate at which distance measurements are taken. You can adjust this delay to change the measurement frequency as per your requirements.
Circuit Diagram for Arduino Interfacing with Ultrasonic Sensor and 16x2 LCD
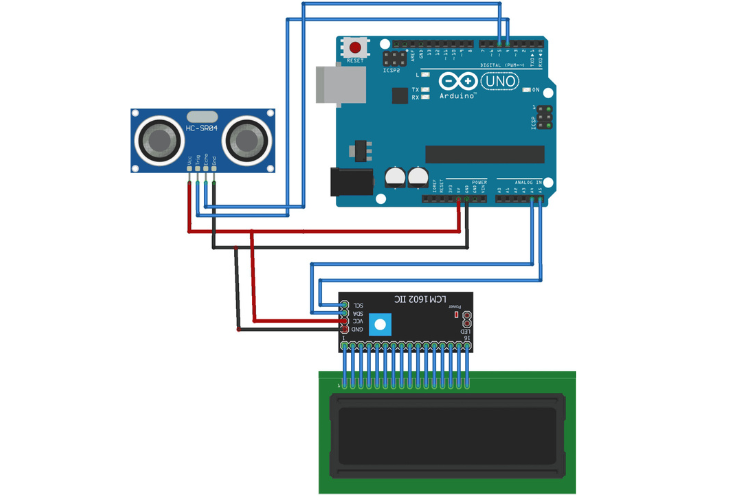
Connect the ultrasonic sensor to the Arduino as mentioned earlier (TRIG to pin 4, ECHO to pin 5).
Connect the I2C LCD to the Arduino:
SDA to A4 (for Arduino Uno)
SCL to A5 (for Arduino Uno)
VCC to 5V
GND to GND
Code for Interfacing Arduino with Ultrasonic Sensor and 16x2 LCD
Ensure you have the necessary libraries installed for the I2C LCD. You can use the "LiquidCrystal_I2C" library for this purpose. You can install it via the Arduino Library Manager too

Here’s the complete code for Arduino, Ultrasonic Sensor and LCD interfacing which you can copy paste and upload on your Arduino Board.
#include <Wire.h>
#include <LiquidCrystal_I2C.h>
LiquidCrystal_I2C lcd(0x27,16,2);
const int trig=4;
const int echo=5;
void setup() {
  // put your setup code here, to run once:
  lcd.begin();
  lcd.backlight();
  lcd.print("Distance : ");
  pinMode(trig,OUTPUT);
  pinMode(echo,INPUT);
  Serial.begin(9600);
}
void loop() {
  // put your main code here, to run repeatedly:
  digitalWrite(trig,LOW);
  delay(2);
  digitalWrite(trig,HIGH);
  delay(10);
  digitalWrite(trig,LOW);
  long duration = pulseIn(echo,HIGH);
  long distance=duration*0.034/2; //speed of sound=340 m/s =0.034 cm/microsecond.
  lcd.setCursor(10,0);
  lcd.print("    ");
  lcd.setCursor(10,0);
  lcd.print(distance);
  Serial.print("Distance : ");
  Serial.println(distance);
  Serial.print(" cm")
  delay(10);
}
Distance Measurement by using Ultrasonic Sensor and LCD with Arduino
Here’s the working demonstration of Arduino and Ultrasonic Interfacing with real-time distance value presented on the screen.
Projects using Ultrasonic Sensor

How to Interface Raspberry Pi Pico W with an Ultrasonic Sensor
Discover the perfect pairing of Raspberry Pi Pico W and Ultrasonic Sensor in our upcoming blog. Learn how to create a powerful and cost-effective distance measurement system with step-by-step instructions and code examples. Stay tuned for an insightful guide that will empower your Raspberry Pi Pico W projects!

Building a Smart Blind Stick using Arduino - Inspired by Shark Tank Torchit
Explore the fascinating world of innovation as we embark on a journey to create a Smart Blind Stick inspired by the revolutionary Shark Tank product, Torchit. Our upcoming blog will guide you through the process of building an Arduino-powered Smart Blind Stick, complete with obstacle detection, real-time feedback, and enhanced safety features. Join us in making a positive impact on the lives of the visually impaired through technology and entrepreneurship.

IoT based Smart Dustbin Management System using NodeMCU
Discover the future of waste management with our upcoming blog on the IoT-based Smart Dustbin Management System using NodeMCU. Learn how to transform traditional waste disposal into an efficient, technology-driven process. We'll guide you through the setup, coding, and integration of NodeMCU to monitor, optimize, and remotely manage your dustbins.
Complete Project Code
Code for Arduino and Ultrasonic Sensor
const int trigPin = 4; // Trigger pin of the ultrasonic sensor (connected to Arduino digital pin 2)
const int echoPin = 5; // Echo pin of the ultrasonic sensor (connected to Arduino digital pin 3)
void setup() {
  Serial.begin(9600); // Initialize serial communication for debugging
  pinMode(trigPin, OUTPUT);
  pinMode(echoPin, INPUT);
}
void loop() {
  // Trigger the ultrasonic sensor by sending a 10us pulse
  digitalWrite(trigPin, LOW);
  delayMicroseconds(2);
  digitalWrite(trigPin, HIGH);
  delayMicroseconds(10);
  digitalWrite(trigPin, LOW);
  // Measure the time it takes for the echo to return
  long duration = pulseIn(echoPin, HIGH);
  // Calculate the distance in centimeters
  // Speed of sound in air at room temperature is approximately 343 meters/second or 0.0343 cm/microsecond
  // Divide the duration by 2 to account for the time it takes for the sound pulse to travel to the object and back
  int distance = duration * 0.0343 / 2;
  // Print the distance to the Serial Monitor
  Serial.print("Distance: ");
  Serial.print(distance);
  Serial.println(" cm");
  delay(1000); // Delay for readability (adjust as needed)
}

Code for Arduino, Ultrasonic Sensor, and LCD Display
#include <Wire.h>
#include <LiquidCrystal_I2C.h>
LiquidCrystal_I2C lcd(0x27,16,2);
const int trig=4;
const int echo=5;
void setup() {
  // put your setup code here, to run once:
  lcd.begin();
  lcd.backlight();
  lcd.print("Distance : ");
  pinMode(trig,OUTPUT);
  pinMode(echo,INPUT);
  Serial.begin(9600);
}
void loop() {
  // put your main code here, to run repeatedly:
  digitalWrite(trig,LOW);
  delay(2);
  digitalWrite(trig,HIGH);
  delay(10);
  digitalWrite(trig,LOW);
  long duration = pulseIn(echo,HIGH);
  long distance=duration*0.034/2; //speed of sound=340 m/s =0.034 cm/microsecond.
  lcd.setCursor(10,0);
  lcd.print("    ");
  lcd.setCursor(10,0);
  lcd.print(distance);
  Serial.print("Distance : ");
  Serial.println(distance);
  Serial.print(" cm")
  delay(10);
}

very informative blog... there is a mistake in the blog...
it is mentioned that <SPEED = DISTANCE * TIME>
it should be SPEED = DISTANCE/TIME.