
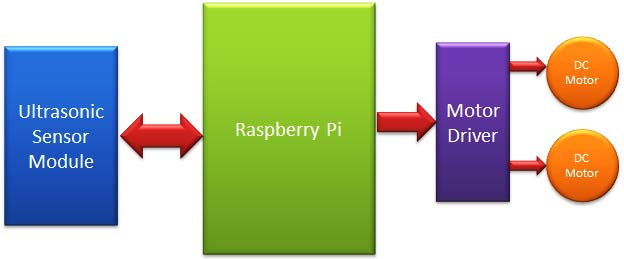
Robots are machines which reduce the human efforts in heavy works by automating the tasks in industries, factories, hospitals etc. Most of the robots are run by using some control unit or components like a push button, remote, joystick, PC, gestures and by executing some command by using controller or processor. But today we are here with a Automatic Robot which moves autonomously without any external events avoiding all the obstacle in its path, yes we talking about Obstacle Avoiding Robot. In this project, we have used Raspberry Pi and Motor driver to drive the robot and Ultrasonic sensor for detecting objects in the path of Robot.
Previously we have covered many useful Robots, you can find them in our Robotics projects section.
Components Required:
- Raspberry Pi
- Ultrasonic Sensor Module HC-SR04
- ROBOT Chassis complete with screw
- DC Motors
- L293D IC
- Wheels
- Bread Board
- Resistor (1k)
- Capacitor (100nF)
- Connecting wires
- Power supply or Power bank
Ultrasonic Sensor Module:
An Obstacle Avoider Robot is an Automated Robot and it doesn’t need to be controlled using any remote. These types of automated robots have some ‘sixth sense’ sensors like obstacle detectors, sound detector, heat detector or metal detectors. Here we have done Obstacle Detection using Ultrasound Signals. For this purpose, we have used Ultrasonic Sensor Module.
Ultrasonic Sensors are commonly used to detect objects and determine the distance of the obstacle from the sensor. This is a great tool to measure the distance without any physical contact, like as Water Level Measurement in tank, distance measurement , Obstacle avoider robot etc. So here, we have detected the object and measured the distance by using Ultrasonic Sensor and Raspberry Pi.
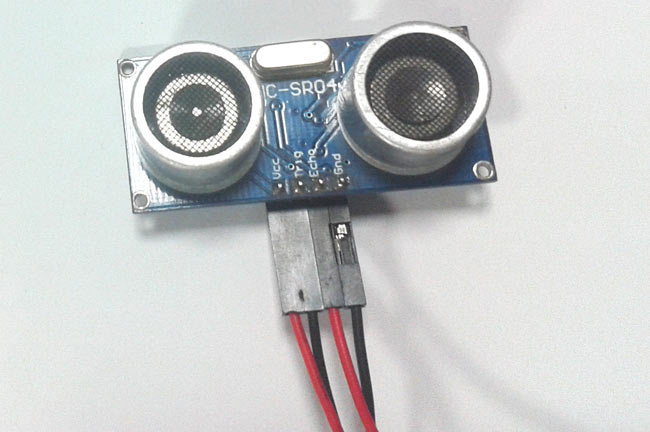
Ultrasonic sensor HC-SR04 is used to measure distance in the range of 2cm-400cm with an accuracy of 3mm. The sensor module consists of an ultrasonic transmitter, receiver, and the control circuit. Ultrasonic Sensor consists of two circular eyes out of which one is used to transmit the ultrasonic wave and the other to receive it.
We can calculate the distance of the object based on the time taken by ultrasonic wave to return back to the sensor. Since the time and speed of sound is known we can calculate the distance by the following formulae.
- Distance= (Time x Speed of Sound in Air (343 m/s))/2.
The value is divided by two since the wave travels forward and backward covering the same distance.Thus the time to reach obstacle is just half the total time taken.
So we have calculated the distance (in centimetre) from the obstacle like below:
  pulse_start = time.time()
  while GPIO.input(ECHO)==1:
      #Check whether the ECHO is HIGH
       GPIO.output(led, False)
  pulse_end = time.time()
  pulse_duration = pulse_end - pulse_start
  distance = pulse_duration * 17150
  distance = round(distance,2)
  avgDistance=avgDistance+distance
Where pulse_duration is the time between sending and receiving ultrasonic signal.
Circuit Explanation:
Circuit is very simple for this Obstacle Avoiding Robot using Raspberry Pi. An Ultrasonic Sensor module, used for detecting objects, is connected at GPIO pin 17 and 27 of Raspberry Pi. A Motor Driver IC L293D is connected to Raspberry Pi 3 for driving robot’s motors. Motor driver’s input pins 2, 7, 10 and 15 are connected to Raspberry Pi GPIO pin number 12, 16, 20 and 21 respectively. Here we have used two DC motors to drive the robot in which one motor is connected to the output pin 3 & 6 of motor driver IC and another motor is connected at Pin 11 & 14 of motor driver IC.

How it works:
Working of this Autonomous Robot is very easy. When the Robot is powered on and starts running, Raspberry Pi measures the distances of objects, in front of it, by using Ultrasonic Sensor Module and stores in a variable. Then RPi compares this value with predefined values and take decisions accordingly to move the Robot Left, Right, Forward, or backward.
Here in this project, we have selected 15cm distance for taking any decision by Raspberry Pi. Now whenever Raspberry Pi gets less than the 15cm distance from any object then Raspberry Pi stops the robot and moves it back and then turns it left or right. Now before moving it forward again, Raspberry Pi again checks whether any obstacle is present within the range of 15 cm distance, if yes then again repeats the previous process, else move the robot forward until it will detect any obstacle or object again.

Programming Explanation:
We are using Python language here for the Program. Before coding, user needs to configure Raspberry Pi. You can check our previous tutorials for Getting Started with Raspberry Pi and Installing & Configuring Raspbian Jessie OS in Pi.
The programming part of this project plays a very important role to perform all the operations. First of all, we include required libraries, initialize variables and define pins for ultrasonic sensor, motor and components.
import RPi.GPIO as GPIO
import time

#Import time library
GPIO.setwarnings(False)
GPIO.setmode(GPIO.BCM)

TRIG = 17
ECHO = 27
... .....
.... .....
After it, we have created some functions def forward(), def back(), def left(), def right() to move robot in forward, backward, left or right direction respectively and def stop() to stop the robot, check the functions in Code given below.
Then, in the main program, we have initiated Ultrasonic Sensor and read time between transmission and reception of the signal and calculated the distance. Here we have repeated this process for 5 times for better accuracy. We have already explained the process of calculating the distance using Ultrasonic sensor.
i=0
 avgDistance=0
 for i in range(5):
  GPIO.output(TRIG, False)
  time.sleep(0.1)

  GPIO.output(TRIG, True)
  time.sleep(0.00001)
  GPIO.output(TRIG, False)

  while GPIO.input(ECHO)==0:
       GPIO.output(led, False)
  pulse_start = time.time()

  while GPIO.input(ECHO)==1:
      #Check whether the ECHO is HIGH
       GPIO.output(led, False)
  pulse_end = time.time()
  pulse_duration = pulse_end - pulse_start

  distance = pulse_duration * 17150
  distance = round(distance,2)
  avgDistance=avgDistance+distance
Finally if Robot finds any obstacle in front of it then after getting distance from the obstacle, we have programmed the Robot to take different route.
 if avgDistance < 15:
    count=count+1
    stop()
    time.sleep(1)
    back()
    time.sleep(1.5)
    if (count%3 ==1) & (flag==0):
     right()
     flag=1
    else:
     left()
     flag=0
    time.sleep(1.5)
    stop()
    time.sleep(1)
 else:
    forward()
    flag=0
Complete code for this Raspberry Pi Obstacle Avoiding Robot is given below with a Demonstration Video.
Complete Project Code
import RPi.GPIO as GPIO                    #Import GPIO library

import time
#Import time library

GPIO.setwarnings(False)

GPIO.setmode(GPIO.BCM)                    # programming the GPIO by BCM pin numbers
TRIG = 17

ECHO = 27

led = 22
m11=16

m12=12

m21=21

m22=20
GPIO.setup(TRIG,GPIO.OUT)                  # initialize GPIO Pin as outputs

GPIO.setup(ECHO,GPIO.IN)                   # initialize GPIO Pin as input

GPIO.setup(led,GPIO.OUT)
GPIO.setup(m11,GPIO.OUT)

GPIO.setup(m12,GPIO.OUT)

GPIO.setup(m21,GPIO.OUT)

GPIO.setup(m22,GPIO.OUT)
GPIO.output(led, 1)
time.sleep(5)
def stop():

    print "stop"

    GPIO.output(m11, 0)

    GPIO.output(m12, 0)

    GPIO.output(m21, 0)

    GPIO.output(m22, 0)
def forward():

    GPIO.output(m11, 1)

    GPIO.output(m12, 0)

    GPIO.output(m21, 1)

    GPIO.output(m22, 0)

    print "Forward"
def back():

    GPIO.output(m11, 0)

    GPIO.output(m12, 1)

    GPIO.output(m21, 0)

    GPIO.output(m22, 1)

    print "back"
def left():

    GPIO.output(m11, 0)

    GPIO.output(m12, 0)

    GPIO.output(m21, 1)

    GPIO.output(m22, 0)

    print "left"
def right():

    GPIO.output(m11, 1)

    GPIO.output(m12, 0)

    GPIO.output(m21, 0)

    GPIO.output(m22, 0)

    print "right"
stop()

count=0

while True:

 i=0

 avgDistance=0

 for i in range(5):

  GPIO.output(TRIG, False)                 #Set TRIG as LOW

  time.sleep(0.1)                                   #Delay
  GPIO.output(TRIG, True)                  #Set TRIG as HIGH

  time.sleep(0.00001)                           #Delay of 0.00001 seconds

  GPIO.output(TRIG, False)                 #Set TRIG as LOW
  while GPIO.input(ECHO)==0:              #Check whether the ECHO is LOW

       GPIO.output(led, False)

  pulse_start = time.time()
  while GPIO.input(ECHO)==1:              #Check whether the ECHO is HIGH

       GPIO.output(led, False)

  pulse_end = time.time()

  pulse_duration = pulse_end - pulse_start #time to get back the pulse to sensor
  distance = pulse_duration * 17150        #Multiply pulse duration by 17150 (34300/2) to get distance

  distance = round(distance,2)                 #Round to two decimal points

  avgDistance=avgDistance+distance
 avgDistance=avgDistance/5

 print avgDistance

 flag=0

 if avgDistance < 15:      #Check whether the distance is within 15 cm range

    count=count+1

    stop()

    time.sleep(1)

    back()

    time.sleep(1.5)

    if (count%3 ==1) & (flag==0):

     right()

     flag=1

    else:

     left()

     flag=0

    time.sleep(1.5)

    stop()

    time.sleep(1)

 else:

    forward()

    flag=0
Comments
Check our various circuits on
Check our various circuits on Ultrasonic sensor where you can learn to connect it on Breadboard: https://circuitdigest.com/search/node/ultrasonic%20sensor
raspberry pi to python
I have used this code to run dc motor ...... No error ...but code was not running
Linefollower
Can anyone say about linefollower code using raspberry py
Hi, the bit of code after you
Hi, the bit of code after you define the GPIO outputs where you declare i=0 comes up as an error for me, any ideas why?
Dear Simon Handy
Hey Simon - not sure if your still working on this but did you make sure the spacing was correct when you ran the Python Program? Whats the exact error your getting?
regarding an additional option of coonecting servo motor
Hi Saddam sir
I am Amal . I made a same prototype using arduino . Now I am very interested in making this using raspberry pi3
in my project, I used a servo motor on which ultrasonic sensor was attached which was used to scan distance and move accordingly so can u plzzz make the schematic of the one using servo motor and its code in raspberry pi3......plzzzzzzz
You can add onExit() function
You can add onExit() function to the python script to stop the motors
question about your algorithme
do you can tell me the purpose of count and flag variables and why you use this condition if (count%3 ==1) & (flag==0):
No Ultrasensor
How can i implement this code for without the Ultrasonic sensor but i have the distance sensor.
Where to buy the supplies
Hi, can I ask where did you buy the chassis and the small breadboard? Thanks
Both are commonly available.
Both are commonly available. You should be able to get it in your local electronics hardware shop
Issue with code
Hello,
I been following your tutorial and for some reason when I run the code, it just causes the car to go forward and run in objects rather than stopping within a certain amount of distance and turn around to go the other direction. Any ideas whats going on? I directly copy the main code from the tutorial so I don't know why its not working.
Thank you!

Can you please show me how to connect the ultrasonic sensor to the bread board. I'm having a bit of confusion.
Thank you so much