

If you’ve tinkered with Raspberry Pi boards for a while, you probably know the default choice: Raspberry Pi OS. It’s lightweight, optimised, and works flawlessly for most DIY projects. But what if you could install Windows 11 on Raspberry Pi? That's exactly what I accomplished on my Raspberry Pi 4 and later on the Pi 5 and Pi 3.
That’s exactly what I set out to do on my Raspberry Pi 4 and later on other models like the Pi 5 and Pi 3. Spoiler: it’s not as smooth as running Raspberry Pi OS, but it’s an exciting experiment that transforms your Pi into a tiny Windows PC. In this comprehensive guide, I'll share my complete journey of running Windows 11 ARM on Raspberry Pi using the Windows on Raspberry (WoR) project.
You'll learn everything about Windows 11 on Raspberry Pi 4 performance, Windows 11 on Raspberry Pi 5 setup, and how Raspberry Pi 5 Windows 11 performance compares to older models. Discover a wide range of creative and practical electronics projects on CircuitDigest, including detailed guides for the Raspberry Pi Pico and Raspberry Pi Zero projects and tutorials, perfect for beginners and hobbyists looking to explore embedded systems and IoT applications.
And if you’re someone who wants to dive deeper into the world of Raspberry Pi, whether it’s automation, IoT, robotics, or DIY electronics, you’ll find plenty more hands-on Raspberry Pi tutorials and projects here on Circuit Digest. This Windows 11 installation guide represents just one of many ways to unlock your Pi's potential.
Table of Contents
- Why Install Windows 11 on Raspberry Pi?
- Benefits
- What You Need
- └ Compatibility
- └ Hardware Requirements
- └ Additional Requirements
- Download Windows 11 ARM64 for Raspberry Pi
- Limitations of Running Windows 11 on Raspberry Pi
- Pi 4 vs Pi 5 - The Real Difference
- └ Performance: Pi 4 vs Pi 5 Comparison
- Final Thoughts
Why Install Windows 11 on Raspberry Pi?
At first, I asked myself the same question. Raspberry Pi OS is fast, stable, and built specifically for the hardware, while Windows 11 is known to be a resource-hungry operating system. Why attempt Windows 11 Raspberry Pi installation at all?
Well, after diving into the project, I realised there are several good reasons to give it a try:
- Familiar Interface: For many of us, Windows feels like home. If you’re used to the Start menu, File Explorer, and the Microsoft ecosystem, running Windows 11 on Pi makes the transition from a traditional PC to a single-board computer much easier.
- Windows Software Access: While not everything works, some ARM64-native Windows apps do run. I was able to launch Office tools like Word and Excel, browse with Edge, and even test out lightweight developer tools without needing Linux equivalents.
- Experimentation & Learning: This was the biggest reason for me. Running Windows on hardware it was never meant for is like solving a fun puzzle. You learn about ARM architecture, UEFI firmware, and how operating systems boot under the hood.
- Remote Management with Microsoft Tools: If you’re already working in a Windows environment, things like PowerShell, Remote Desktop, and Microsoft’s developer utilities integrate more seamlessly compared to Linux.
- A Budget-Friendly Testbed: Raspberry Pi is cheap compared to buying an ARM laptop or Surface device. By running Windows 11 on Pi, I could test ARM-based Windows apps in a low-cost environment before moving them to more powerful hardware.
- Show-Off Factor: Let’s be honest, there’s something cool about pointing at your tiny Raspberry Pi board and saying: “Yep, that’s Windows 11 running right there.” It’s a perfect conversation starter for tech meetups or classroom demos.
- Expanding Project Possibilities: Some robotics and electronics engineers may prefer working in Windows. Running it on Pi means you can still connect to GPIO, USB devices, and other interfaces while coding or debugging in a familiar environment.
After completing the installation and testing Windows 11 ARM on Raspberry Pi across multiple models, I discovered several compelling reasons:
Benefits of Running Windows 11 on Raspberry Pi
| Benefit | Description | Best For |
| Familiar Interface | Windows Start menu, File Explorer, and Microsoft ecosystem make transitioning from traditional PCs seamless for users unfamiliar with Linux | Windows users |
| Windows ARM Software | Access to ARM64-native Windows apps including Office 365, Edge browser, and lightweight development tools without Linux alternatives | Productivity tasks |
| Learning Experience | Deep dive into ARM architecture, UEFI firmware, and operating system boot processes—perfect for understanding Windows internals | Education |
| Remote Management | PowerShell, Remote Desktop, and Microsoft developer utilities integrate seamlessly for Windows-centric workflows | IT professionals |
| Budget Testing Platform | Test ARM-based Windows applications in a low-cost environment before investing in expensive ARM laptops or Surface devices | Developers |
| Demonstration Value | Impressive conversation starter for tech meetups, classroom demonstrations, and showcasing technical capabilities | Educators, makers |
Even though Windows 11 on Raspberry Pi isn't officially supported and comes with trade-offs, the learning experience and experimentation possibilities make it worthwhile for curious makers and developers.
What You Need to Install Windows 11 on Raspberry Pi
Before you begin the Windows 11 Raspberry Pi installation process, gather the necessary hardware and software. Requirements differ slightly between Raspberry Pi 4 and Pi 5 models.
Windows 11 Raspberry Pi Compatibility
| Raspberry Pi Model | Minimum RAM | Recommended RAM | Performance Rating | Best Use Case |
| Raspberry Pi 3 | 1GB | N/A | (Slow) | Testing only |
| Raspberry Pi 4 | 2GB | 4GB-8GB | (Moderate) | Light tasks, browsing |
| Raspberry Pi 5 | 4GB | 8GB | (Good) | Office apps, development |
Hardware Requirements for Raspberry Pi 4 and Pi 3
| Components | Quantity |
Additional Requirements for Raspberry Pi 5 Windows 11
However, setting up Windows 11 on a Raspberry Pi 5 board requires two separate storage devices,
| Component | Quantity | Purpose |
| Raspberry Pi 5 board | 1 | 4GB or 8GB RAM for optimal Raspberry Pi 5 Windows 11 performance |
| 1GB+ microSD card | 1 | To hold UEFI firmware files (separate from Windows storage) |
| External USB SSD | 1 | 64GB+ for Windows 11 ARM installation (faster than microSD) |
| Same peripherals as Pi 4 | — | Keyboard, mouse, HDMI display, network adapter |
Download Windows 11 ARM64 for Raspberry Pi
Unlike installing Windows on a standard PC, you can’t just grab any ISO from Microsoft’s website. For Raspberry Pi, we need the ARM64 build of Windows 11. Instead of the UUP dump, I used the official ESD Image Downloader from the Windows on Raspberry (WoR) project, which makes the process much simpler and more reliable. To install Windows 11 on Raspberry Pi, you need the ARM64 build. I used the official ESD Image Downloader from the Windows on Raspberry (WoR) project, which simplifies the process significantly compared to UUP dump methods.
Here’s how I did it:
Step 1: How to Download Windows 11 ARM for Raspberry Pi
1. Open your browser and go to the WoR ESD download page.
2. In the Version dropdown, select the latest stable release of Windows 11.

3. In the Build menu, choose the build you want to install. For me I picked the stable build so I could get the reliable features and security patches.
4. Under Architecture, select ARM64. This is very important; if you choose x64 or x86, it won’t run on Raspberry Pi.
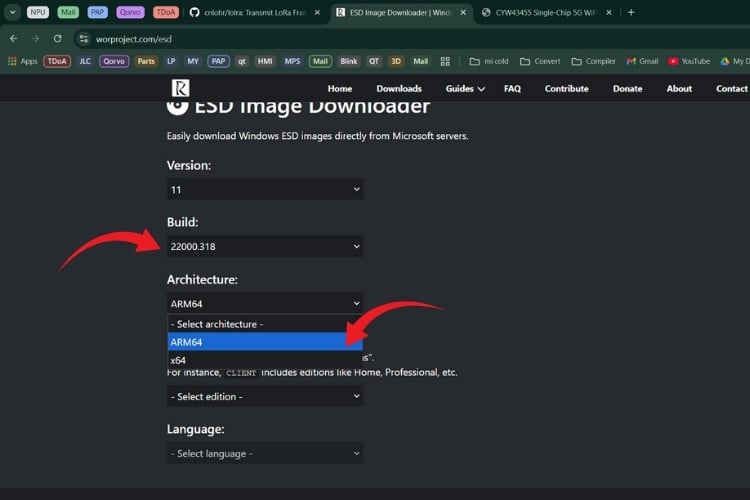
5. Next, pick the Edition you prefer. For example:
- Client: Windows 11 Home or Pro
- Education or Enterprise editions, if you want more features
I went with Windows 11 Home (Client) ARM64 for testing.

6. Finally, choose your Language (I picked English (United States), but you can pick whichever suits you).
7. After making all these selections, click Download. The tool will fetch the official Windows files directly from Microsoft’s servers and create an ESD package for you.
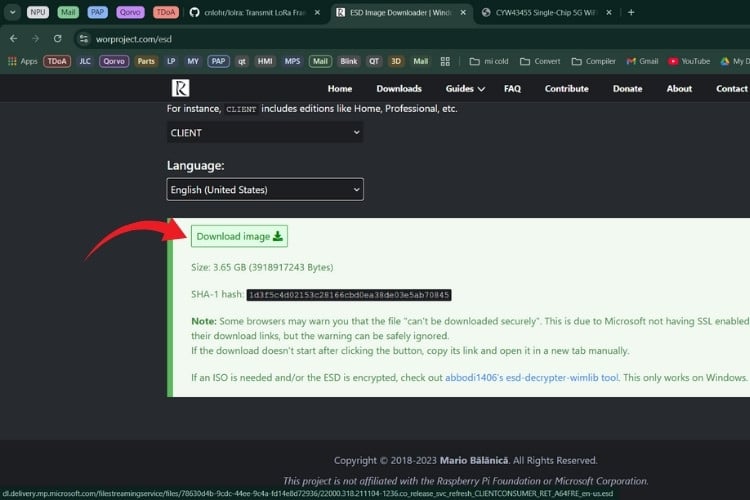
8. Once downloaded, you can add the ESD file to the WoR Imager in the next step.
At the end of this process, I had a clean, ARM64-compatible Windows 11 image sitting on my PC, ready to flash onto the Raspberry Pi.
Step 2: Install Windows 11 on Raspberry Pi Using WoR Imager
Once I had the Windows 11 ARM64 ESD image ready, the next challenge was to actually get it onto the Raspberry Pi. This is where the WoR Imager tool (Windows on Raspberry Pi Imager) comes in. Think of it as the bridge between the Windows image on your PC and your Raspberry Pi’s storage device.
Here’s exactly how I went through it:
Complete WoR Installation Process
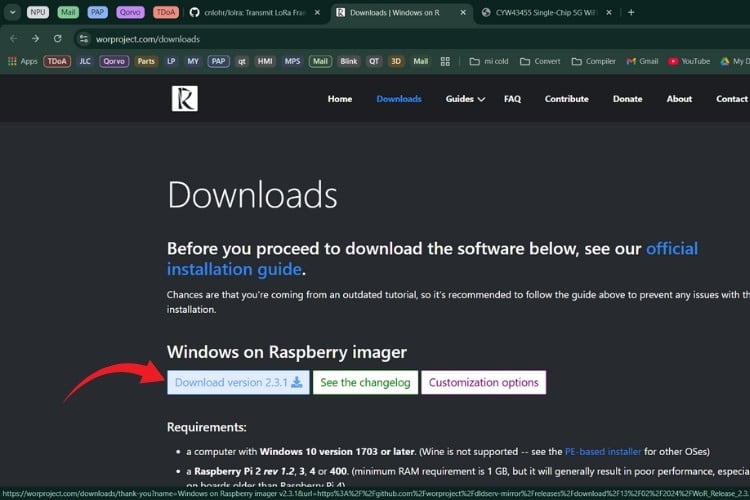
1. First, I downloaded the Windows on Raspberry Pi Imager from the official WoR Project Downloads page.
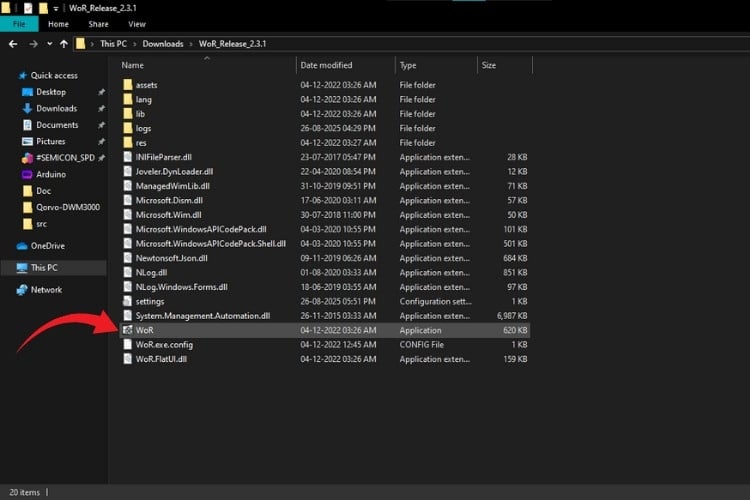
2. After extracting the ZIP file, I right-clicked on WoR.exe and selected Run as Administrator.
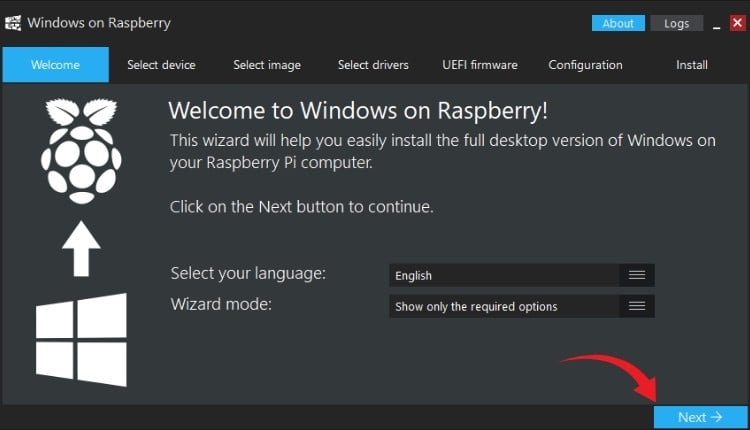
3. The Welcome screen of WoR Imager popped up. I clicked Next to begin.
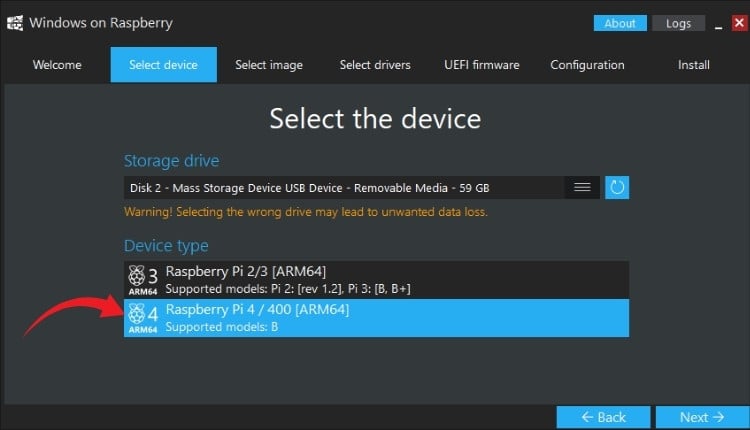
4. On the next screen, WoR asked me to select the storage device.
- For my Raspberry Pi 4, I used a 64GB microSD card.
- For my Raspberry Pi 5, I chose an external SSD (recommended for speed).

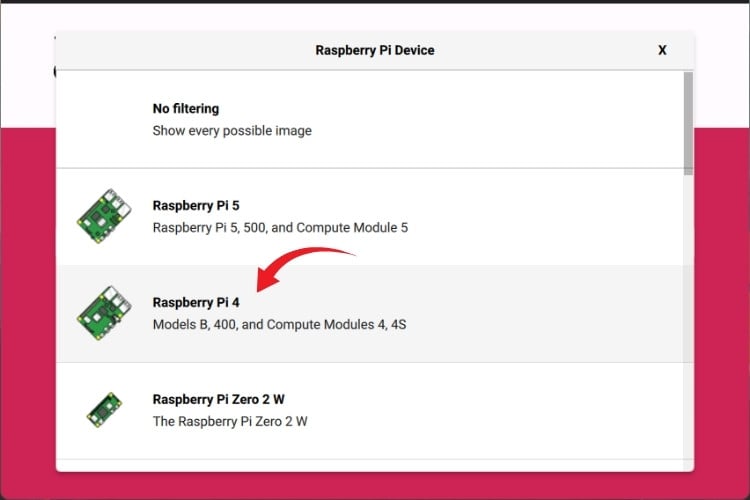
5. After picking the storage, I had to select the device type (Raspberry Pi model).
If you’re on Pi 4: Select Raspberry Pi 4/400.
If you’re on Pi 5: Here’s the trick: you actually need to choose the Raspberry Pi 2/3 option. Choosing Pi 4/400 results in an ACPI BIOS error when booting.
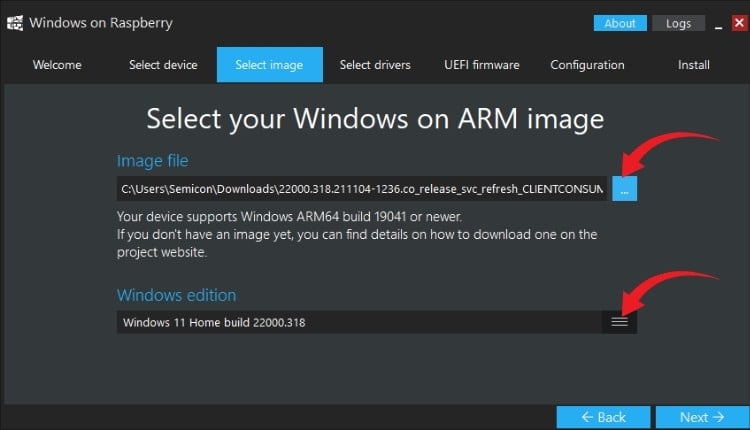
6. Next, WoR asked for the Image file. I clicked the (browse) button and pointed it to the Windows 11 ARM64 ESD/ISO I downloaded earlier.
7. The tool then let me pick which edition of Windows 11 I wanted to install (Home, Pro, etc.). I selected Windows 11 Pro ARM64 for additional features.
8. WoR then displayed an Installation Overview with my selections, device type, storage device, and image file location. After confirming, I clicked Install, and it prepared the storage device by partitioning, copying files, and setting up the UEFI bootloader.
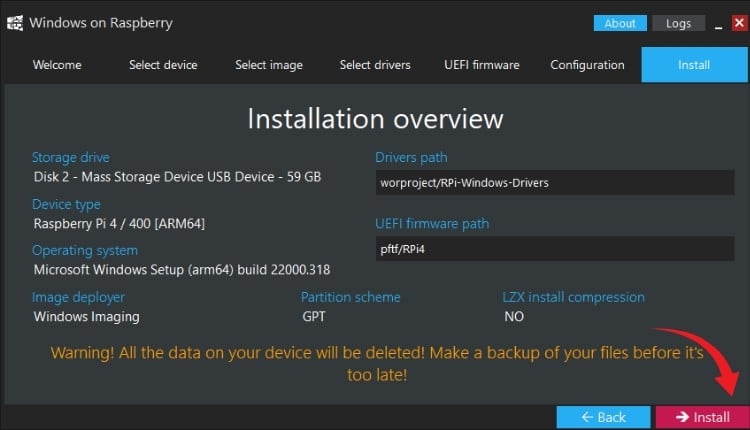
9. Depending on your PC and storage speed, this process can take anywhere from 15 to 45 minutes. I let it run, grabbed a coffee, and came back to see the success message.
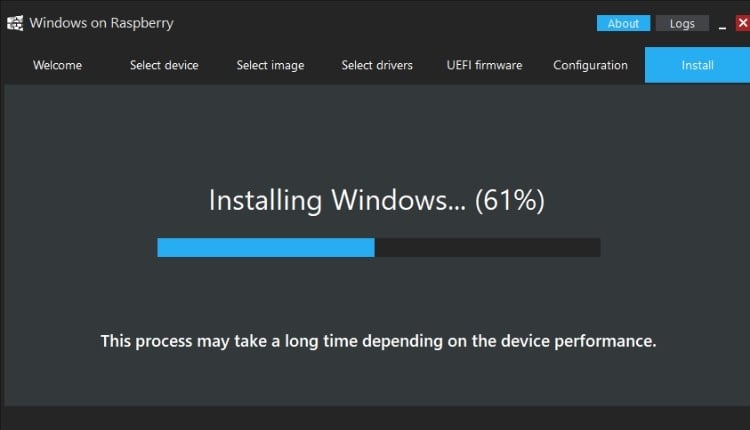
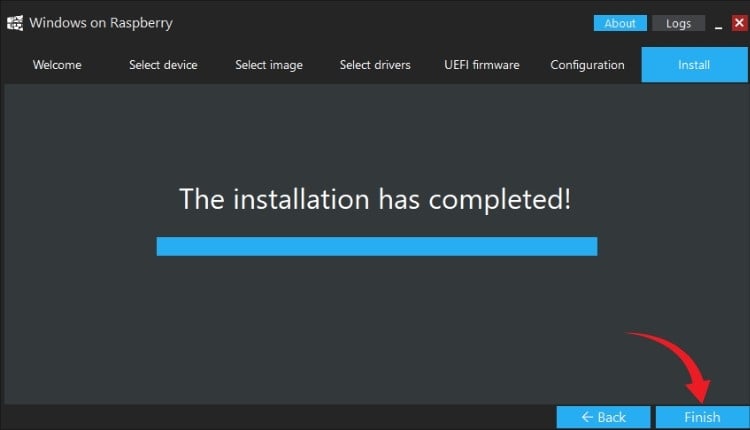
10. When it was finished, I hit Finish and safely ejected the storage device.
At this stage, my Raspberry Pi storage (microSD/SSD) had Windows 11 ARM fully installed on it. For Raspberry Pi 4 users, you can skip ahead to the boot section. But for Raspberry Pi 5 owners, there’s one extra step: setting up UEFI firmware (which I’ll cover in Step 3). Your Raspberry Pi storage now contains a complete Windows 11 ARM installation.
Step 3: Configure UEFI Firmware for Raspberry Pi 5 Windows 11
If you’re using a Raspberry Pi 4 or 3, you can skip this step completely. But when I moved to my Raspberry Pi 5, I quickly discovered that things weren’t as straightforward.
The issue is that the WoR installer doesn’t officially support the Pi 5 yet. If you try to boot Windows directly after flashing it with WoR, you’ll most likely be greeted with an ACPI BIOS error and a frozen boot screen. That’s where the UEFI firmware workaround comes in. When testing Windows 11 on Raspberry Pi 5, I encountered a significant obstacle: the WoR installer doesn't officially support Pi 5 yet.
Why Raspberry Pi 5 Needs UEFI Firmware
Here’s how I handled it:
- I downloaded the latest Raspberry Pi 5 UEFI firmware package from its official GitHub release page. This is a small collection of boot files that essentially act as a translator, letting the Pi 5 understand how to load Windows 11.
- I grabbed a spare microSD card (at least 1GB) and formatted it to FAT32 using Windows’ built-in format tool.
- Once the card was ready, I extracted all the UEFI files from the GitHub download and copied them straight onto the root of the microSD card.
- With that done, I inserted the microSD card into the Raspberry Pi 5. This card now acts like a custom BIOS chip, giving the Pi the extra instructions it needs to boot into Windows.
- Finally, I connected my external SSD (where I had flashed Windows 11 earlier using WoR) and powered on the Pi 5. This time, instead of the dreaded ACPI error, the UEFI firmware initialised correctly and handed things over to the Windows installer.
The setup is more complex than Pi 4, but it's currently the only way to achieve Raspberry Pi 5 Windows 11 performance testing until WoR adds official Pi 5 support.
Technical Note: The microSD card must remain inserted permanently for Raspberry Pi 5 Windows 11 installations.
Step 4: Update Raspberry Pi Bootloader (Optional but Recommended)
Before installing Windows 11 on a Raspberry Pi 4, there’s one extra step I highly recommend if you’re using a Raspberry Pi 4 or Raspberry Pi 3. Before installing Windows 11 on Raspberry Pi 4 or Pi 3, I strongly recommend updating the bootloader firmware. Updating the bootloader ensures that your Pi can boot cleanly from microSD cards or even from USB drives without weird glitches.
Bootloader Update Process
Here’s what I did:
1. On my Windows PC, I downloaded and launched the Raspberry Pi Imager and selected the board type.
2. I clicked on Choose OS, then scrolled down to Misc utility images → Bootloader.

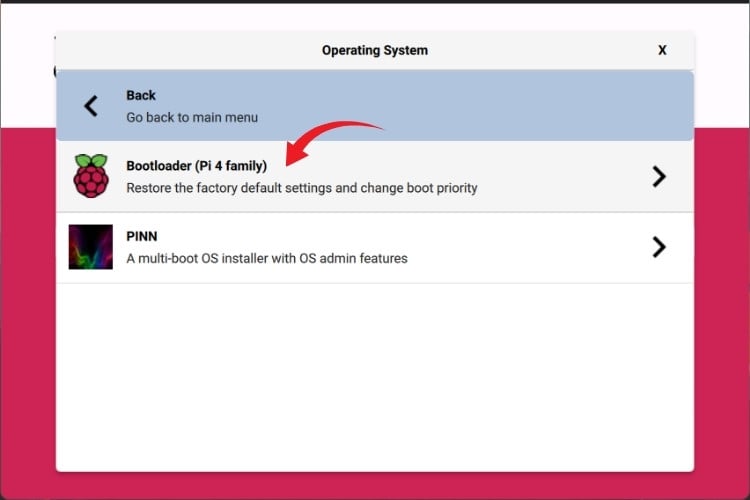
3. From there, I picked the boot mode I wanted:
- SD card boot: If you plan to run Windows 11 from a microSD card.
- USB boot: If you’re using an external SSD or USB flash drive (which I recommend for performance).
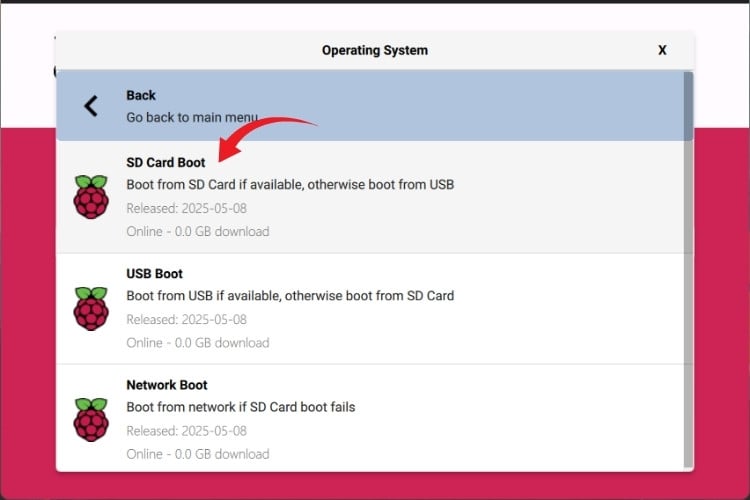
4. Then I clicked on Choose Storage and selected my microSD card (just a small one is fine, 1GB+ is enough).
5. Finally, I hit Write to flash the new bootloader to the card.
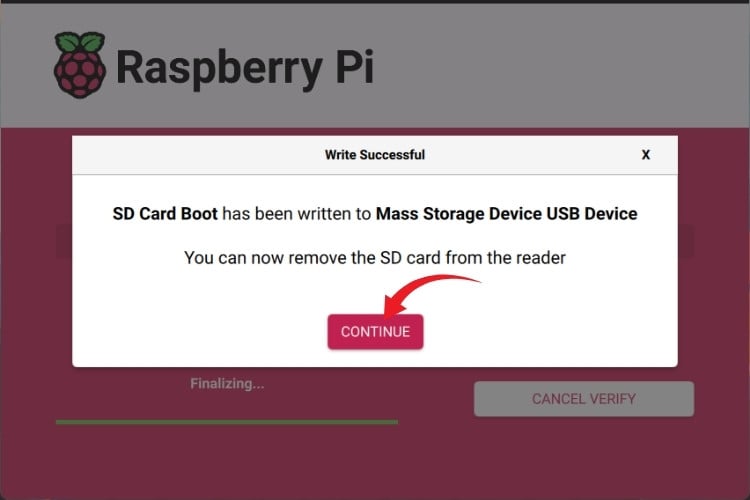
6. Once the process finished, I inserted the card into my Pi, plugged in the power, and waited.
First, the green ACT LED on the board blinked rapidly.
Then, the screen connected to my Pi turned solid green; this is the Pi’s way of telling you the bootloader update was successful.
7. After seeing the green screen, I shut down the Pi, removed the bootloader card, and set it aside. Now my Pi was running the latest boot firmware, ready for Windows 11. Your Raspberry Pi now runs the latest boot firmware optimised for Windows 11 on Raspberry Pi 4 installations.
Step 5: Boot Windows 11 on Raspberry Pi
This was the moment I had been waiting for: actually seeing Windows 11 come to life on my Raspberry Pi. After hours of downloading, flashing, and preparing firmware, it was finally time to plug everything in and hit the power button. This is the exciting moment of actually seeing Windows 11 ARM on Raspberry Pi boot for the first time.
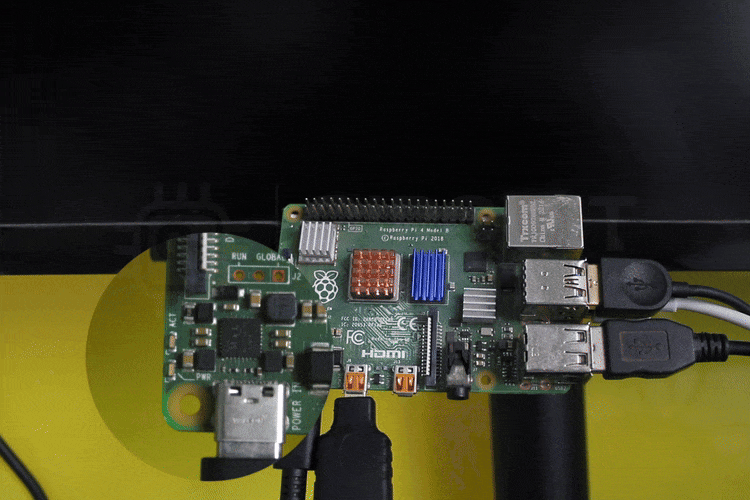
Insert the storage devices
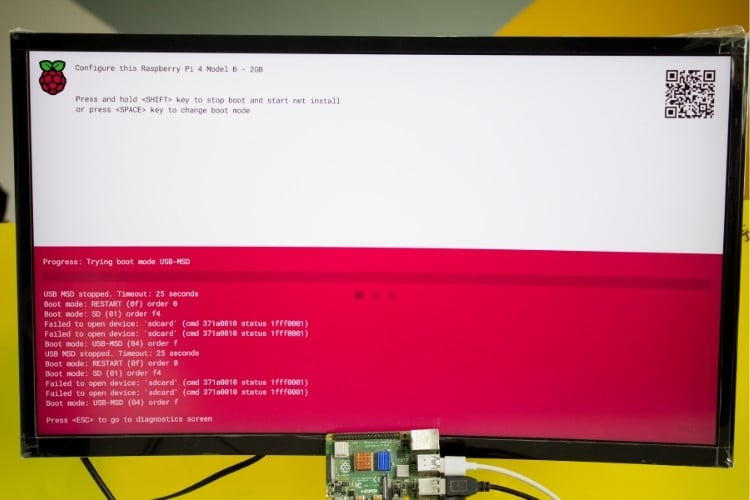
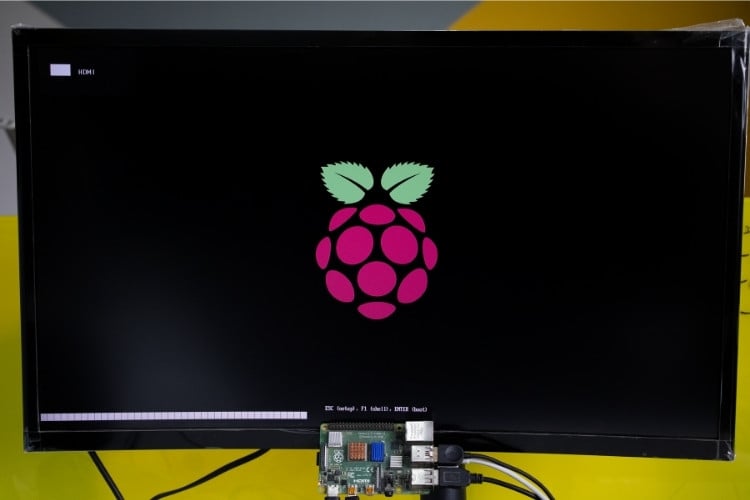
First boot screen: When I powered on the Pi, I saw the WoR/UEFI splash screen appear. On the Pi, it took a few extra seconds for the UEFI firmware to initialise, but eventually the Windows installer kicked in.
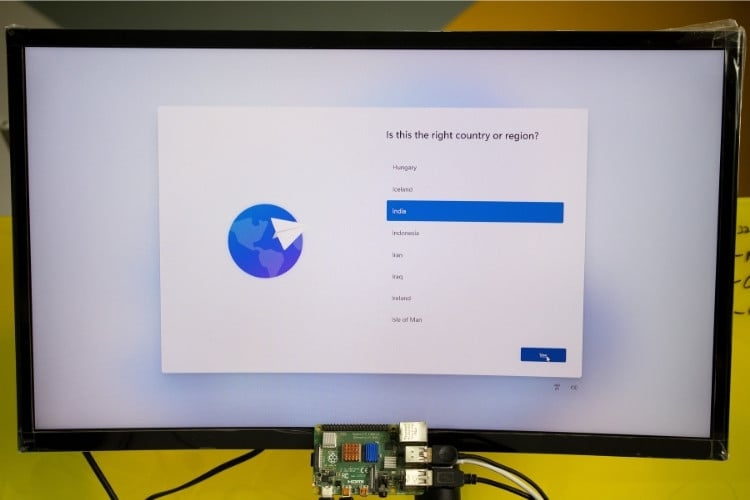
Region selection: The Windows installer asked me to choose my region. I picked India, but you can select your country/region from the list.
Keyboard layout: Next, it asked for a keyboard layout. I went with the US Keyboard, but you can add a layout if needed.
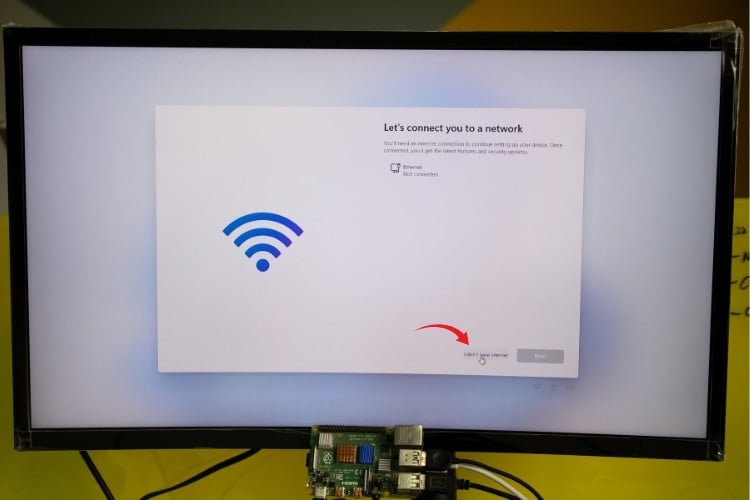
Network connection & Microsoft Account sign-in (…or not): Now, here’s where things got interesting. By default, Microsoft really wants you to sign in with a Microsoft account and stay connected to the internet during setup. They’ve been pushing this more and more in Windows 11, and on a Raspberry Pi, where networking is already a bit tricky, it feels like a roadblock designed just to test your patience. However, for Windows 11 Raspberry Pi installations where networking can be tricky, there's a workaround. Once you have network connectivity, you might want to configure a static IP address on your Raspberry Pi for stable remote access and development work. For comparison, see how Android performs on Raspberry Pi using emteria.OS—another alternative operating system experiment worth exploring.
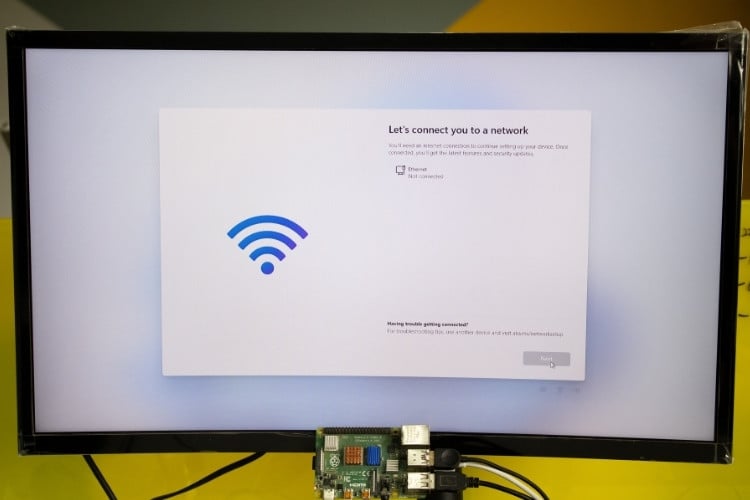
At first, I connected my phone for USB tethering and did it the “official” way, just like Microsoft intended. But then I thought: “Wait, this is a Raspberry Pi project… Do we really need to play by Microsoft’s rules?” Turns out, you don’t!
Here’s the fun workaround:
1. When you’re stuck at the “Let’s connect you to a network” screen, press Shift + F10 on your keyboard. This opens a secret Command Prompt window during the setup process. Yes, right in the middle of Windows Setup.
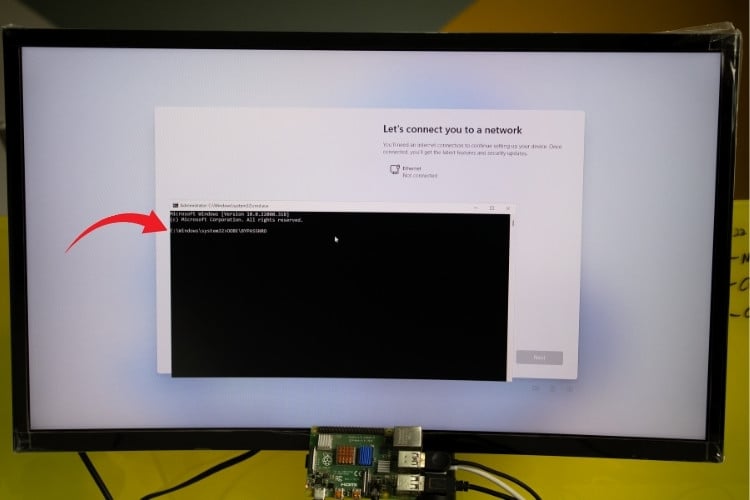
2. Type the following command and hit Enter:
| OOBE\BYPASSNRO |
3. The system will restart once, and when you’re back, voilà, there’s now an option to create a local account without needing any internet connection.
It’s almost like pulling the curtain back on Microsoft’s little magic trick. They try so hard to push you online, but one tiny command lets you skip the whole charade. Honestly, it felt like discovering a cheat code in a video game.
So whether you want to do it the “proper Microsoft way” (sign in with a Microsoft account and sync everything) or take the shortcut to a good old-fashioned local account, the choice is yours. I personally went with the bypass; it just felt more “Raspberry Pi hacker style.”
Privacy and personalisation options: The installer walked me through several toggles: location settings, data sharing, diagnostics, etc. I disabled most of them to save resources. Then it tried to upsell me on Microsoft 365 and Game Pass, and I skipped those, too. I disabled most options to conserve Raspberry Pi resources and improve Windows 11 on Raspberry Pi 4 performance.

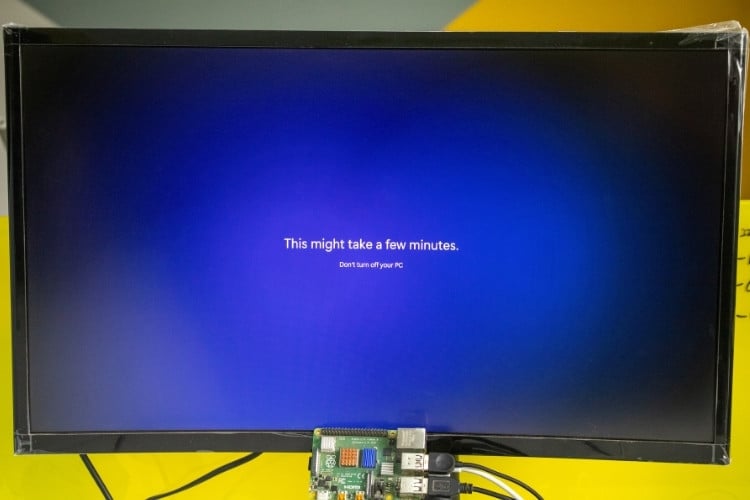
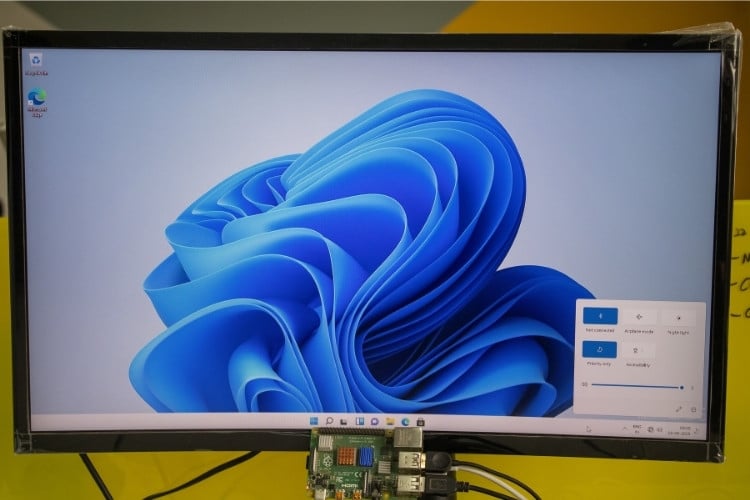
First reboot: After completing all the setup steps, the Pi restarted once more. This time, instead of the installer, the Windows 11 desktop appeared in all its glory. The system even popped up a message saying it created a temporary paging file, which is normal on ARM devices.
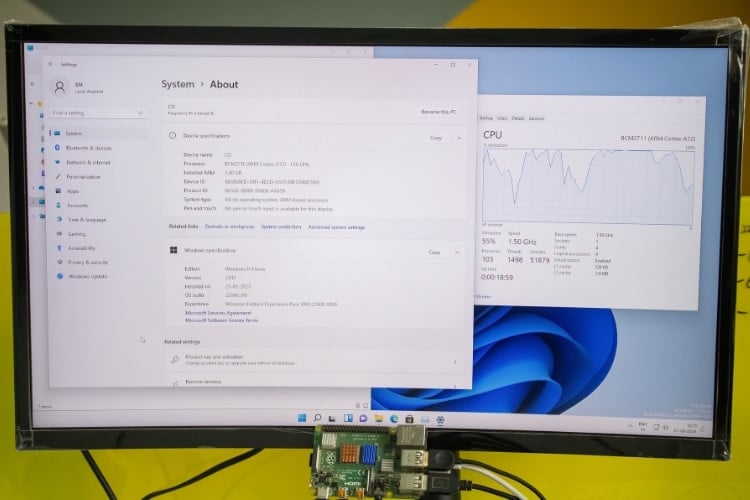
And there it was, Windows 11 running on a Raspberry Pi. Seeing the Start menu open on a tiny single-board computer honestly felt surreal. Sure, it wasn’t blazing fast, but it worked. I was able to launch Edge, browse the web, and even type this article draft from within Windows 11 on my Pi. While Raspberry Pi 5 Windows 11 performance isn't blazing fast, it's functional enough for web browsing, Office applications, and light development work.
Limitations of Running Windows 11 on Raspberry Pi
While installing Windows 11 on Raspberry Pi is technically possible and educational, it's important to understand the significant limitations before committing time to this project.
For projects requiring GPIO functionality, consider these alternatives: Controlling Raspberry Pi GPIO using MQTT Cloud or getting started with Raspberry Pi for full hardware access.
Pi 4 vs Pi 5 - The Real Difference
On the Raspberry Pi 4 (2GB), Windows felt more like a proof-of-concept. It worked, but you constantly hit memory limits, freezing, and slowdowns. Honestly, I wouldn’t recommend using 2GB unless you’re doing this just for fun. A 4GB or 8GB Pi 4 would perform better.
On the Raspberry Pi 5, the experience was dramatically better. Faster boot, smoother browsing, and fewer hangs. Still not “daily driver” level, but at least usable. With 4GB or 8GB RAM, Windows 11 on Raspberry Pi 4 becomes moderately usable.
Windows 11 Raspberry Pi Performance: Pi 4 vs Pi 5 Comparison
After testing Windows 11 on Raspberry Pi 4 and Windows 11 on Raspberry Pi 5, the performance differences are substantial. Here's my real-world comparison based on extensive hands-on testing. Raspberry Pi 5 Windows 11 performance represents a significant leap forward. The Pi 5's improved CPU, faster memory, and better I/O make Windows 11 genuinely usable for everyday tasks.
| Metric | Raspberry Pi 4 (2GB) | Raspberry Pi 4 (4GB) | Raspberry Pi 5 (8GB) |
| Boot Time (Cold Start) | 5-6 minutes | 4-5 minutes | 1.5-2 minutes |
| Desktop Responsiveness | (Laggy) | (Moderate) | (Smooth) |
| Microsoft Edge Launch | 15-20 seconds | 10-12 seconds | 5-7 seconds |
| Web Browsing (3-5 tabs) | Frequent freezing | Usable, occasional lag | Generally smooth |
| Office Apps (Word/Excel) | Not recommended | Light documents only | Works well |
| Video Playback (720p) | Stuttering | Playable with drops | Smooth |
| Multitasking Capability | Very limited | 2-3 apps max | 5-6 apps comfortably |
| Overall Usability | Proof-of-concept only | Light tasks acceptable | Actually usable |
Frequently Asked Questions About Windows 11 on Raspberry Pi
⇥ 1. Can I run Windows 11 on Raspberry Pi 3?
Yes, but it’s painfully slow. A Raspberry Pi 4 or 5 with at least 4GB RAM is highly recommended for usable performance.
⇥ 2. Do I really need to update the bootloader?
Not always, but if you’re on Pi 3 or Pi 4 and your board refuses to boot Windows, updating the bootloader with Raspberry Pi Imager usually fixes it.
⇥ 3. Why doesn’t WiFi work on Windows 11 for Raspberry Pi?
Because the WiFi chip manufacturer never released Windows ARM drivers. Without those, Windows simply can’t talk to the onboard WiFi hardware. Use a USB-Ethernet adapter or phone tethering instead.
⇥ 4. My Pi 5 shows an ACPI BIOS error when booting. What should I do?
That happens if you select the wrong device type in WoR. For Pi 5, always select Raspberry Pi 2/3 in WoR Imager and use the UEFI firmware microSD workaround.
⇥ 5. Can I create a local account instead of using a Microsoft account?
Yes! When stuck at the “Connect to network” screen, press Shift + F10, then type on CMD:
| OOBE\BYPASSNRO |
Hit Enter, and Windows will restart with the option to create a local account, no Microsoft account required.
⇥ 6. Why does my Pi take so long to boot Windows 11?
That’s normal. Windows 11 is heavy compared to Raspberry Pi OS. Expect around 4-5 minutes on Pi 4 and under 2 minutes on Pi 5.
⇥ 7. Can I use GPIO pins or other Pi hardware in Windows 11?
Not really. Windows doesn’t have drivers or APIs for Raspberry Pi GPIO. If GPIO access is critical, stick with Raspberry Pi OS or Linux.
⇥ 8. Which storage is best: microSD or SSD?
Windows 11 runs much faster from an SSD connected via USB 3. A microSD will work, but expect slower performance and longer boot times.
Final Thoughts
Running Windows 11 on Raspberry Pi 4 or 5 is like strapping a jet engine onto a bicycle. It works, but it’s clunky, quirky, and not officially supported. Still, it’s one of the most satisfying Pi experiments I’ve done. It’s not the smoothest ride, but if you’re a tinkerer like me, the process itself is worth it. The WoR team has made the impossible possible, and now you can show off Windows 11 running on a credit-card-sized board. To learn how to set up and configure your device, explore this comprehensive tutorial on installing Windows 10 IoT Core on Raspberry Pi.
I tested Windows 11 on Raspberry Pi 4 and Raspberry Pi 5 for a long period of time. Here are my humble thoughts: it's an interesting way to "experiment" and learn about things like ARM architecture, operating systems, and hardware restrictions; however, it's not intended to be a daily driver replacement for Raspberry Pi OS.
This tutorial was created by the Circuit Digest engineering team. Our experts focus on creating practical, hands-on tutorials that help makers and engineers master Raspberry Pi Projects, Arduino projects, and IoT development projects.
I hope you liked this article and learned something new from it. Share your Windows 11 Raspberry Pi journey in the comments below or use our Circuit Digest forum for a detailed discussion.
Would I use this daily? Probably not. But as a weekend project? Absolutely.
If you try this out, let me know how it went for you. I’d love to hear if you hit the same quirks or discovered new workarounds.
Raspberry Pi-Based Tutorials
Explore essential Raspberry Pi tutorials covering setup, configuration, and performance enhancement for a wide range of DIY projects.

How to Boot Raspberry Pi from USB without SD Card
Learn how to boot a Raspberry Pi from USB without using an SD card. This step-by-step guide covers Raspberry Pi 3, 4, and 5 models, helping you improve system reliability and performance.

How to install Android on Raspberry Pi
In this tutorial, we will convert the Raspberry Pi into an Android device using a popular platform - emteria. OS.

How to Set a Static IP on Raspberry Pi?
Learn how to set a static IP on Raspberry Pi using NetworkManager (nmcli) and GUI methods. Complete step-by-step guide for Raspberry Pi OS Bookworm with screenshots and troubleshooting tips.

wow.. thank you for sharing this article, this is what im looking for how to install windows on raspberry! Thank you