

If you've ever worked with a Raspberry Pi, you’ve probably run into that annoying moment when your Raspberry Pi just disappears from the network. You try to SSH into it or access a local web dashboard, but suddenly it's not there. You fire up the terminal and type ping raspberrypi.local, and nothing. It turns out, your router handed the Pi a different IP address this time, and now you have to go hunt it down again. Setting a static IP on a Raspberry Pi can solve this issue permanently.
This happened to me more times than I’d like to admit, especially while working on IoT projects, setting up MQTT servers, or running home automation scripts that needed the Pi to be reliably reachable. If your Raspberry Pi IP address static configuration is changing too often, this complete guide is going to demonstrate how a Raspberry Pi configure static IP through NetworkManager (using nmcli) and desktop GUI methods.
Quick Overview
Duration: 30-60 minutes | Type: Tutorial | Difficulty: Beginner-Intermediate
Technical Scope:
Static IP configuration using NetworkManager
Use Cases:
SSH access, IoT projects, home servers
Table of Contents
Set Static IP on Raspberry Pi: From dhcpcd.conf Failure to NetworkManager Success
Like many others, I started by editing /etc/dhcpcd.conf, the method recommended by most set static IP on Raspberry Pi tutorials. I added all the correct lines, rebooted, and nothing changed. The Pi still grabbed a random IP from my router.
At first, I assumed I had done something wrong. But after checking and retrying a few times, it became clear that something deeper was going on. That’s when I discovered that recent versions of Raspberry Pi set static IP network manager. And when NetworkManager is in charge, dhcpcd.conf gets completely ignored.
If you’re running the latest Pi OS and Raspberry Pi static IP WiFi settings just won’t stick, this might be exactly what’s happening to you, too.
Why NetworkManager (nmcli) is Superior for Raspberry Pi Static IP Configuration
Honestly, this approach feels way more modern. Unlike the old dhcpcd.conf trick, which can be silently overridden or ignored, using NetworkManager’s CLI gives me full control over networking. It also works well for both Wi-Fi and Ethernet interfaces, and even works well with a Raspberry Pi headless setup.
If you're using Raspberry Pi OS Bookworm or anything released recently, this is the method you should go with, especially if dhcpcd.conf isn't behaving the way you expect.
Benefits of a Static IP Address on Raspberry Pi
Let me explain why making a Raspberry Pi IP static configuration is crucial: your Raspberry Pi, by default, gets its IP address dynamically from the router using DHCP. That means every time it reboots, there’s a chance it’ll get a different address. While this might be okay for casual use, it becomes a nightmare when you’re working on more advanced setups like:
⇒ Remote SSH or VNC connections
⇒ Hosting a local web server or dashboard
⇒ Setting up a home assistant or smart devices
⇒ Configuring port forwarding to access your Raspberry Pi from outside your network
⇒ Using the Pi as an MQTT broker, file server, or NAS
All of these use cases benefit from Raspberry Pi IP address static configuration. It gives your networked Pi a stable presence like a permanent desk in a shared office, so everything else knows exactly where to find it.
Method 1: Set Static IP on Raspberry Pi Using nmcli (NetworkManager)
Once I realised that dhcpcd.conf wasn’t going to work, so I started exploring how Raspberry Pi set static IP NetworkManager to handle configuration. The good news is that NetworkManager has a powerful command-line interface called nmcli, and once you get the hang of it, it’s pretty straightforward.
Here’s how I fixed the Raspberry Pi configure static IP using nmcli.
Step 1: Determine Your Current Raspberry Pi IP Address
Before setting anything, I wanted to know what IP address my Pi was currently using. This gives a good starting point to avoid conflicts and confirm that my network is active.
In the terminal, I ran:
hostname -I

This printed the current IP address, which in my case was something like 192.168.29.71. It’s the temporary, dynamic address assigned by the router via DHCP.
Step 2: Find Your Default Gateway (Your Router’s IP)
Next, I needed to get my router’s IP address. This is the gateway the Pi uses to access the internet and other devices on the LAN. I used this command:
ip r | grep default
This showed me something like:

So, my gateway is 192.168.29.1. That’s what I’ll use later for both the gateway and DNS fields.
Step 3: Check Your Current Network Connection Name
Since I was connected over Wi-Fi, I had to find the name of the active wireless profile. With NetworkManager, every connection has a name (usually the same as your SSID). I listed them using:
nmcli connection show
This printed a list of known and active connections. I saw my Wi-Fi connection listed as:
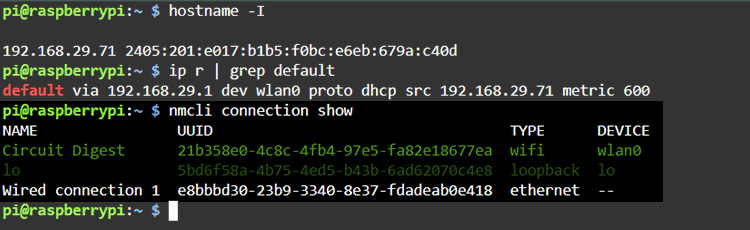
So in my case, "Circuit Digest" was the name of my active connection. If you’re using Ethernet, you’ll probably see something like Wired connection 1.
Step 4: Check Existing IPv4 Info (Optional but Handy)
Before overwriting anything, I wanted to peek at the current IPv4 settings. This command shows just the IPv4 configuration for the connection:
nmcli connection show "Circuit Digest" | grep ipv4

This told me how the IP was currently being assigned, usually set to IPv4.method: auto when using DHCP.
Step 5: Configure the Static IP Address on Raspberry Pi
Now comes the fun part, actually assigning the static IP address on Raspberry Pi.
I decided to give my Pi the address 192.168.29.155, which is within my subnet and outside my router’s dynamic DHCP pool. Here’s the exact command I used:
Here’s what each part does:

If you’re using Ethernet instead of Wi-Fi, just replace "Circuit Digest" with the Ethernet connection name.
Step 6: Restart Connection to Apply Static IP Changes
After set static IP Raspberry Pi terminal configuration, I needed to bring the connection down and then back up so the new config would be used.
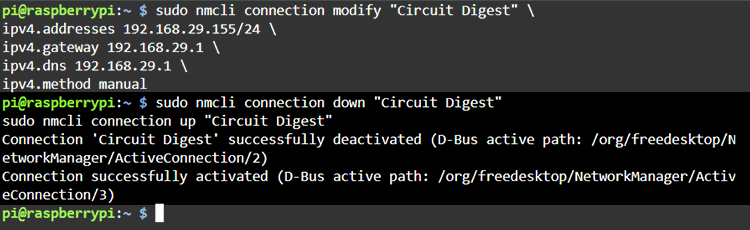
At this point, the Pi disconnected from Wi-Fi briefly, then reconnected using the new static IP address on Raspberry Pi, which I assigned.
Step 7: Verify the Static IP Address Is Set
To confirm everything worked, I ran:
hostname -I
This time, the result was:
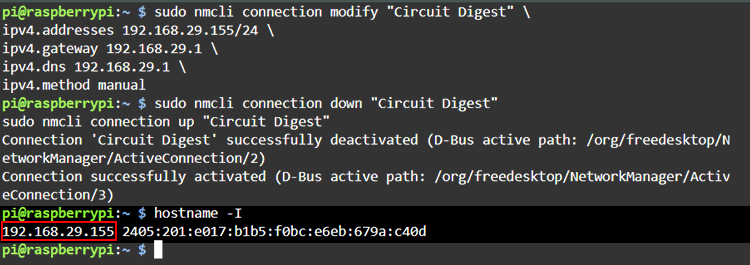
Perfect. The Raspberry Pi static IP WiFi configuration was successfully implemented (192.168.29.155), and I could SSH into it, ping it from other devices, and configure port forwarding confidently.
Key Commands for Setting a Static IP
Task | Command | Purpose |
Check the current IP | hostname -I | Display current IP address |
Find gateway | ip r | grep default | Get router's IP address |
List connections | nmcli con show | Show all network profiles |
Set a static IP | nmcli con modify | Configure static address |
Restart network | nmcli con down/up | Apply new settings |
Method 2: Set Static IP on Raspberry Pi Using the Desktop GUI
While I usually work on Raspberry Pi, configure static IP setups through the terminal, especially for headless projects, there are times when I’m using the Raspberry Pi OS with Desktop. If you’re using the full version with a graphical interface (the one that boots into the familiar desktop environment), you don’t need to touch the terminal at all to make Raspberry Pi IP static.
Note: This method only works if you're using Raspberry Pi OS with a Desktop GUI. If you're using Raspberry Pi OS Lite or running your Pi headless (no monitor), this approach won’t be available. For that, you'll need to use the nmcli method I explained earlier.
Setting a Static IP via Raspberry Pi OS GUI
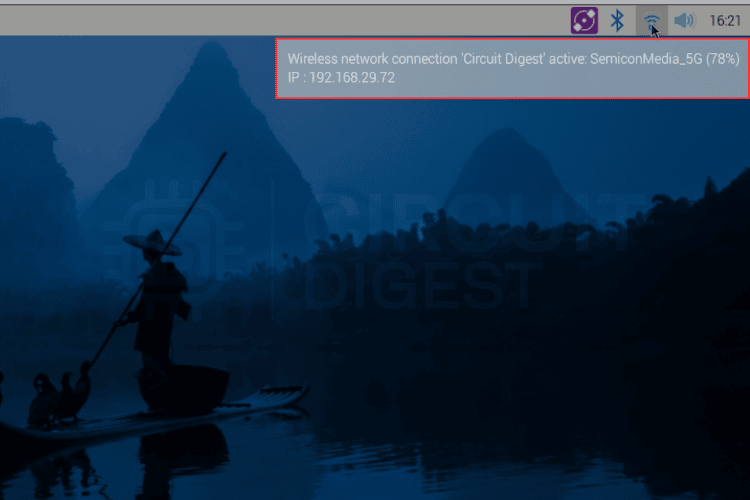
1. Click the Network Icon
First, I clicked on the network icon in the top-right corner of the Raspberry Pi desktop screen. It looks like either a Wi-Fi symbol or two arrows (for Ethernet), depending on how your Pi is connected.
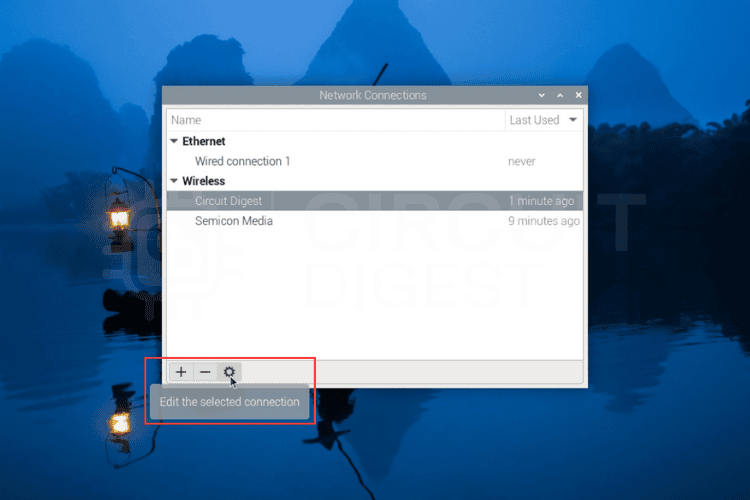
2. Open Advanced Settings > Edit Connections
I selected "Advanced Options" from the menu that popped up, and then clicked "Edit Connections". This opened the Network Connections window, where all configured network profiles are listed.

3. Select the Right Network Connection
Under the Wi-Fi section, I selected my wireless network (in my case, it matched the SSID I was connected to). If you’re using Ethernet, you’d find your wired connection listed there instead.
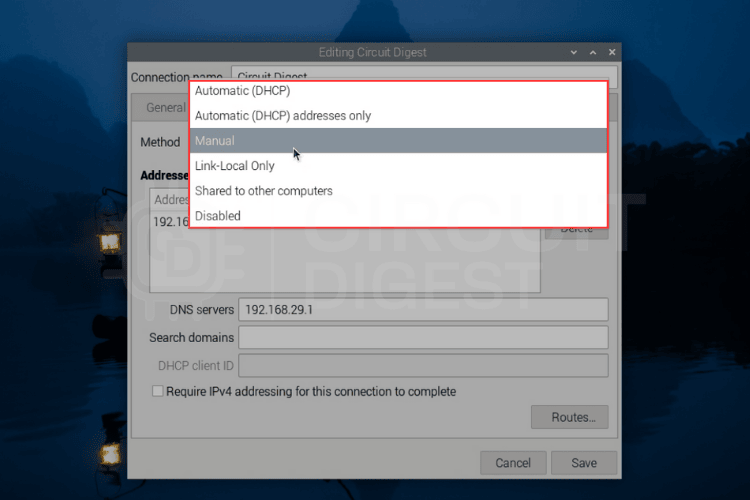
4. Set Method to Manual
By default, this was set to "Automatic (DHCP)", so I changed it to Manual from the Method dropdown.
5. Go to the IPv4 Settings Tab
Once I selected the connection and clicked Edit, I switched to the IPv4 Settings tab from the menu at the top of the window.
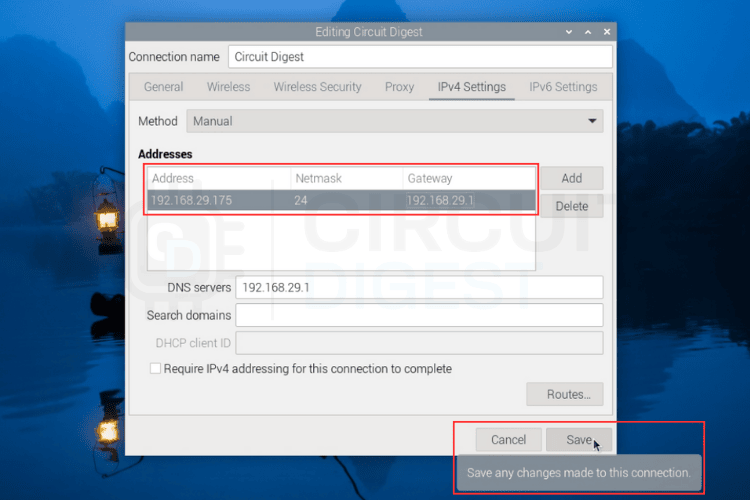
6. Enter the Static IP, Gateway, and Subnet
In the "Addresses" section, I added my desired static IP address, the netmask (CIDR format), and the gateway. For example, I entered:
That tells the Pi to always use 192.168.29.175 as its local IP and send traffic through the 192.168.29.1 router.
Note: When managing multiple Pis, set static IP on Raspberry Pi for each device using sequential addresses to simplify network management and device identification
7. Enter DNS Server Address
In the DNS Servers field below, I typed in 192.168.29.1 (my router’s address) to use it as the DNS resolver. You could also use a public DNS server like 8.8.8.8 (Google DNS) if you prefer.
8. Click Apply and Reboot
Once everything was entered, I clicked Apply to save the changes. Then I rebooted the Raspberry Pi to make sure the settings would stick.
Note: When selecting your Raspberry Pi IP address static configuration, ensure you choose an address outside your router's DHCP range but within the same subnet.

Raspberry Pi Static IP Methods Comparison
| Method | Difficulty | Headless Support | Pi OS Compatibility | Best For |
| nmcli (NetworkManager) | Medium | Yes | Latest versions | All setups |
| Desktop GUI | Easy | No | Desktop version only | Beginners with a monitor |
| dhcpcd.conf (Legacy) | Easy | Yes | Older versions only | Legacy systems |
If you’re running the latest Raspberry Pi OS with NetworkManager, and most people are, you'll find that traditional methods like editing /etc/dhcpcd.conf just don’t work anymore. But with nmcli, Raspberry Pi configure static IP becomes not only possible, but it’s better. You have full control, and it works for both Wi-Fi and Ethernet interfaces.
Whether you’re building an IoT project, setting up a local web server, running Home Assistant, or just want reliable SSH access without IP changes, this static IP configuration is crucial for SSH access, web servers, and IoT projects on your Raspberry Pi.
If you're planning to set static IP Raspberry Pi terminal configurations for port forwarding, headless setups, or integrating your Raspberry Pi into a multi-device IoT system, let me know I can walk you through those next. Setting a static IP address on Raspberry Pi is just the beginning of what a well-networked Pi can do.
This tutorial was created by the Circuit Digest engineering team. Our experts focus on creating practical, hands-on tutorials that help makers and engineers master Raspberry Pi projects, Arduino, and IoT development projects.
I hope you liked this article and learned something new from it. If you have any doubts, you can ask in the comments below or use our forum for a detailed discussion.
Frequently Asked Questions on Set Static IP on Raspberry Pi
⇥ Why is the editing of /etc/dhcpcd.conf not working in setting a static IP for the Raspberry Pi?
Recent Raspberry Pi OS versions have Network Manager running by default, and hence anything set in dhcpcd.conf will not be considered. The easiest, shortest, and guaranteed way to set static IPs is by using nmcli.
⇥ How do I set a static IP on a Raspberry Pi without a GUI?
Using the nmcli command. sudo nmcli connection modify "connection-name" ipv4. addresses IP/24 IPv4.gateway GATEWAY IPv4.DNS IPv4.Method manual ... then restart the connection.
⇥ Can the static IP be set for both WiFi and Ethernet of the Raspberry Pi?
Definitely! You can assign static IPs for both interfaces through two different nmcli commands. Both connections-wifi and Ethernet-can have their static IP configuration.
⇥ How to check if the Raspberry Pi's static IP is working properly?
Use hostname -I to examine the present IP, ping the Pi from another computer, and check that the IP remains after a reboot. Also, check with the ip addr show command.
⇥ What would happen if I specify a static IP that already exists?
You'll have IP conflicts resulting in network connectivity problems. Always check your network first with nmap or through your router's device list before allocating static IPs.
⇥ Will a Static IP Change how a Raspberry Pi Performs?
No, a static IP will not affect the operation of a Raspberry Pi or other devices. It simply defines how the Pi gets its IP Address, which makes its network usage a little steadier and stable.
⇥ What IP Address Range Should I Use to Pre-install the Static Pi Address for My Raspberry Pi?
You want an IP Address that is out of the range of DHCP, while still being on the same subnet: 192.168.1.100-254 or 192.168.0.100-254, etc, depending on your router's configuration.
Similar Raspberry Pi Networking Projects
Previously, we have built many projects using Raspberry Pi. If you want to know more about those projects, links are given below.

How to Quickly Set Up TeamViewer on Raspberry Pi
In this tutorial, we will install TeamViewer on a Raspberry Pi to access the Desktop from anywhere in the world.

Getting Started with the RASPBERRY PI ZERO W – Headless Setup without Monitor
Learn how to set up the Raspberry Pi Zero W to have SSH access over Wi-Fi using Windows.

Sharing your Wifi Internet over the Ethernet Port of Raspberry Pi
Learn how to connect a Raspberry Pi to any Wifi and then share that WiFi’s internet over the LAN port of the Raspberry Pi.

Raspberry Pi-based Smartphone Controlled Home Automation
Explore how to control home appliances through a smartphone using Raspberry Pi 3 and Bluetooth.

Voice-controlled Home automation using Amazon Alexa on Raspberry Pi
Learn how to build a voice-controlled home automation system using Amazon Alexa and Raspberry Pi.
You could also just use
sudo nmtui
Which is similar to the GUI, but still in the CLI.

Very useful document.
Thank you