
Anyone who is interested in learning about computers and electronics will definitely love experimenting with a small and powerful platform “Raspberry Pi”. The only problem is that it doesn’t have a monitor and keyboard-mouse. This is actually isn’t a problem though, because there is a way to setup and work on the Pi without connecting it to a monitor and keyboard. It is called headless because it has no monitor and keyboard connected to it, so it is said to be running headlessly.
In this tutorial, we will see how to set up a Raspberry Pi without a monitor and keyboard on a new installation of Raspbian.
Requirements
- Raspberry pi model B or above
- SD card (8 gb or above)
- SD card reader
- LAN cable
- 5v Adapter
- Laptop with working internet connection
We will be following these steps
- Installing Raspbian in SD card
- Configuring Network and Installing required softwares in laptop
- Booting of Raspberry pi
- Connecting Raspberry pi without Ethernet
Installing Raspbian in SD card
Although we have previously explained about how to install and configure Raspberry pi in detail, here we again covering it briefly.
Step 1:- There are many versions of OS for Raspberry Pi but Raspbian is more popular. So, we will download OS image of Raspbian Stretch from official site of raspberry pi.
Raspbian also has 3 three versions so, download the ZIP file of Raspbian stretch with Desktop. As shown in below image

Step 2:- After download is finished, plug the SD card reader in the USB port of laptop with SD card in it to write the downloaded setup in this SD card.
Step 3:- Download the SD card formatter and OS flasher . After downloading, install these softwares one by one. We will use these tools to format the SD card properly and flash the Raspbian image in it.
Step 4:- Now, open SD card formatter and choose your SD card to format it and click on Format.

Step 5:- Open balena Etcher flasher and choose the location of Raspbian zip file that you have downloaded. Now, choose the SD card and click on flash.

Step 6:- After flashing is done, open SD card folder. Create an empty file named as “ssh” without any extension by right click -> New -> Text document.
While renaming the file remove the .txt

This file is put into SD card to enable the SSH (Secure Shell Login) in Raspberry Pi, because Raspbian comes with SSH disabled by default.
Now, we are ready with the SD card. Plug the SD card in the Raspberry pi card slot.
Configuring network and Installing required softwares in Laptop
Step 1:- In windows 10 , search for Network Settings -> Network and sharing center. Here you will see active wi-fi network to which your laptop connected.
Click on your connection name as shown.

Step 2:- Now, click on Properties. A Wi-Fi properties dialogue box will appear. Select the Internet Protocol Version 4 if it is not selected.

Step 3:- Click on Sharing in the same box and select both the options as shown.
Click on OK.

Step 4:- Using above steps, an IP address is allotted to our Raspberry Pi. Connect you Raspberry Pi with the laptop using Ethernet cable and power on the pi.
Step 5:- After connecting your pi Ethernet cable to laptop, you will see another Unidentified connection below the active networks.

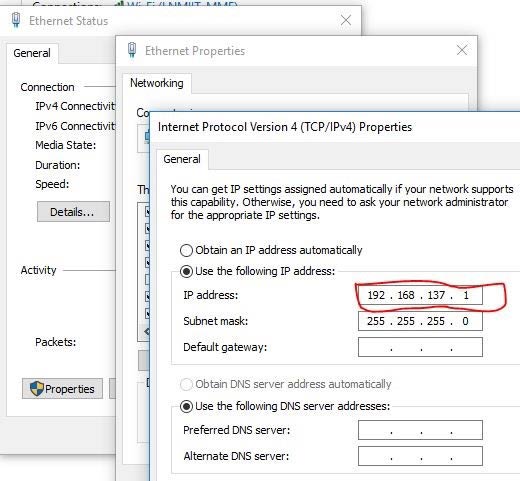
Step 6:- Click on the Ethernet option of the network then click on Properties. Double click on IpV4 .You will see gateway address of your pi. We will use this address range in Advance IP scanner.
Step 7:- Now, we need IP scanner software and SSH client software to talk with our raspberry pi. For this you can use Putty or MobaXterm . Download and install these softwares. We will use MobaXterm as this software allow us to access the desktop of raspberry pi while putty allows only terminal for the access of raspberry pi files.
Step 8:- Copy that IP address that you have found in above step and paste it in the search bar of IP scanner and make the range as in my case 192.168.137.1-254.

Booting of Raspberry Pi
Step 1:- Now, this is your Raspberry pi’s real IP address. Copy this IP address and open MobaXterm or putty. In MobaXterm click on Session -> SSH. Paste the address of Raspberry pi in Remote host space and click on Ok .

Step 2:- You will be asked for username and password of your pi. By default, Raspberry pi has username as “pi” and password is “raspberry”. Enter these credentials and hit enter.

Step 3:- Now, this is your raspberry pi’s terminal. You can access anything inside your pi by using different commands.

Step 4:- For starting the desktop of your pi, type startlxde in the terminal and hit enter. The desktop will appear as shown. You can feel the same desktop experience as with the monitor pi interface.

Step 5:- To close the desktop, click on Exit button in MobaXterm. In putty also, you can get the terminal same as previous. It will look like this.

To shutdown the Raspberry pi type this command sudo shutdown now and hit enter.
So, this is how you can access your Pi without having extra monitor and keyboard. But sometimes we are unable to get the IP address of the pi using Ethernet connection. To overcome this problem, we can connect the Raspberry Pi with the laptop without Ethernet connection.
Now in next steps we will see how to connect your Pi without Ethernet.
Connecting Raspberry Pi without Ethernet
For this method, your Rpi and laptop should be connected with same Wi-Fi network. We need to save the Wi-Fi credentials by creating a new file in pi’s SD card. So, remove the SD card from the Rpi and insert it in card reader and plug that reader in laptop.
Step 1:- Go to Boot directory of the card. Make a text file with the name wpa_supplicant.conf and open this file using notepad. Paste the below code in this file Replace the YOUR-SSID and PASSWORD with your Wi-FI network’s credentials and save it.
ctrl_interface=DIR=/var/run/wpa_supplicant GROUP=netdev
update_config=1

network={
ssid="YOUR-SSID"
psk="YOUR-PASSWORD"
scan_ssid=1
}
Step 2:- Now, plug the sd card in your Pi and power it on. I am using my phone’s hotspot to connect the laptop and Pi. If you are using Router, then Open your wireless router’s configuration page. From there, you can find router’s DHCP lease table and note the Pi’s IP address.
Step 3:- To find the IP address while using phone’s hotspot, you need to install Hotspot manager application in your smartphone from this link.
Step 4:- Open the Hotspot manager application and make your hotspot credentials.

Step 5:- Tap on Clients and refresh it. From the list given you can see the IP address of your PI.

Use this IP address in putty or MobaXterm to connect your Raspberry Pi headlessly and you are ready with to access anything in your Raspberry Pi. While this method works, if the assigned IP may changed after reboots you can Set a static IP on your Raspberry Pi to ensure permanent access at a fixed address.
Below you can check the Demonstration video of Raspberry Pi Headless Setup.
