

In this tutorial, we will learn how to send an email from your ESP32 microcontroller. This feature allows important details such as sensor data, time of occurrence, images, and system status to be sent through email in a clear and reliable format. It is especially useful for event-based alerts, maintaining records, and monitoring systems over a long period. By integrating the Email Notification API, the platform now supports automatic alert emails triggered directly by IoT devices, ensuring that critical events are communicated even when users are not actively monitoring the system. And the best part is that we will be doing this using CircuitDigest Cloud Email API, which is completely free and quick to set up and use. The idea behind this tutorial is to empower engineers and makers to build, deploy, and scale their product ideas faster. This ESP32 email alert system tutorial shows how to use an HC-SR04 ultrasonic sensor with an ESP32 DevKit and demonstrates event-driven alerting. When an object moves within 30 cm of the sensor, the board connects securely to the CircuitDigest Cloud platform. It then triggers an ESP32 email notification containing the live distance reading.
Not just Emails, but as part of extending the functionality of the CircuitDigest Cloud Platform, we have already implemented several real-time IoT solutions, such as the GeoLinker GPS Visualizer, Vehicle Number Plate Reader, WhatsApp Notification API, and SMS Notification API. And much more is yet to come. Now lets get back to sending emails from EPS32.
How to Send Email Notification Using ESP32
- Fill in the fields on circuitdigest.cloud for creating an account and linking your recipient's email address through an OTP.
- Obtain your API key and the ID of the template you've chosen as well.
- Connect an ultrasonic distance measuring sensor with TRIG going to GPIO 32 and ECHO going to GPIO 33.
- Add the files "WiFi.h" and "WiFiClientSecure.h" to your sketch.
- When sending data over port 443 to "www.circuitdigest.cloud", you will need to create a JSON-formatted payload of the data from your sensor(s).
- Make sure you use a boolean set to false to avoid sending multiple email alerts for one event, resetting it when the condition has cleared.
Table of Contents
Setting Up CircuitDigest Cloud to Send Email Alerts from ESP32
Now, let us go through the step-by-step procedure to link your email address with the platform and learn how to use the Email Notification API in your projects.
| Step | Action | Result |
| 1 | Log in to CircuitDigest Cloud → locate Email Notification API → click View | Opens the Email API tutorials and dashboard |
| 2 | Click Link Mail Address → enter email → click Send OTP | 6-digit OTP delivered to inbox |
| 3 | Paste OTP into verification field → click Verify | Email linked (up to 5 addresses per account) |
| 4 | Go to My Templates → browse 86+ pre-built templates or create custom | Note the template ID for use in your sketch |
| 5 | Copy your API key from the API Keys section | Key is ready to paste into the ESP32 sketch |
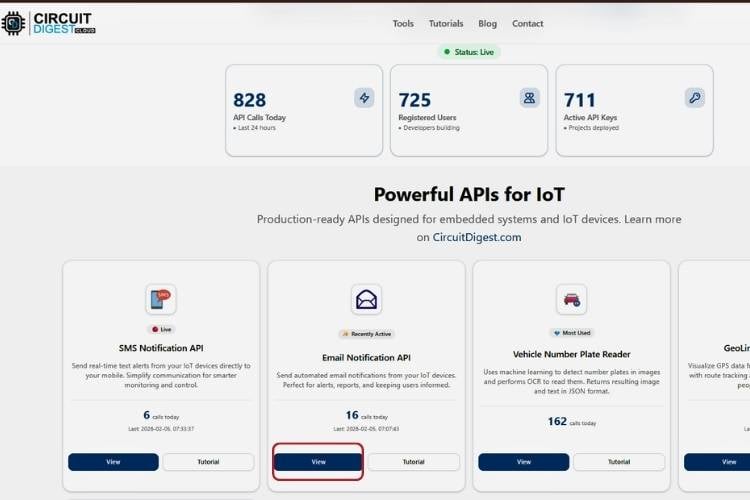
Step 1⇒ Navigate to the Email Notification API
Once you have logged into the Circuit Digest Cloud account, go to the Circuit Digest Cloud home page. Once on the home page, locate the Email Notification API feature and click on the View option to proceed.
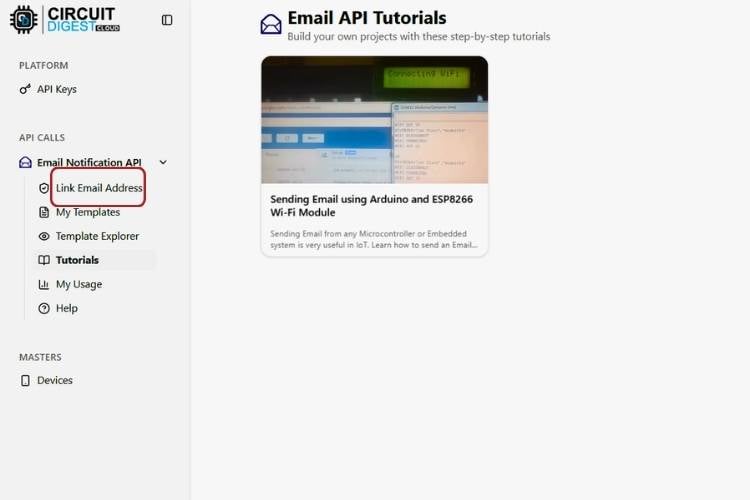
Step 2⇒ Link Your Recipient Email Address
Clicking the View option will take you to the Email Notification API Tutorials page. Here, you can find various tutorials that guide you on how to use the email notification feature effectively. To link your email address, click on the Link Mail Address option available on the left side of the page.
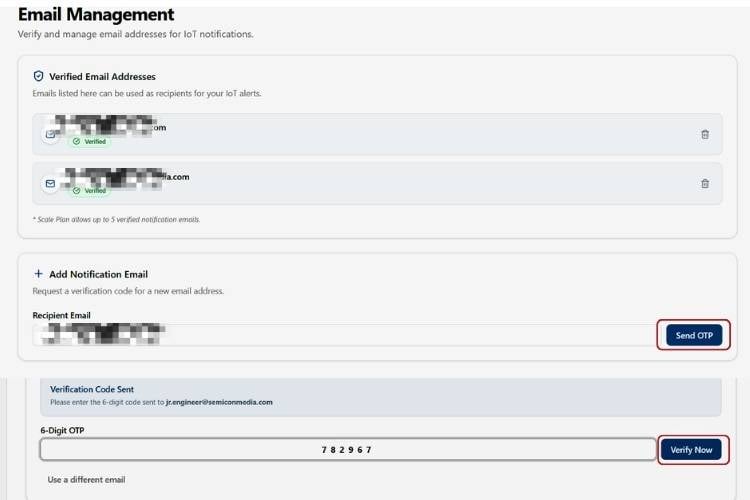
Step 3 ⇒Verify with OTP
Once you click on Link Mail Address, you will be redirected to the Add Notification Email section. Enter your email address in the provided field and click on the Send OTP button. Within a few seconds, an OTP will be sent to the entered email address. Copy the 6-digit OTP, paste it into the OTP verification field, and click Verify. After successful verification, your email address will be linked and ready to be used for sending notifications.
Note: A maximum of five email addresses can be linked to a single CircuitDigest Cloud account.
Step 4 ⇒ Explore Email Templates
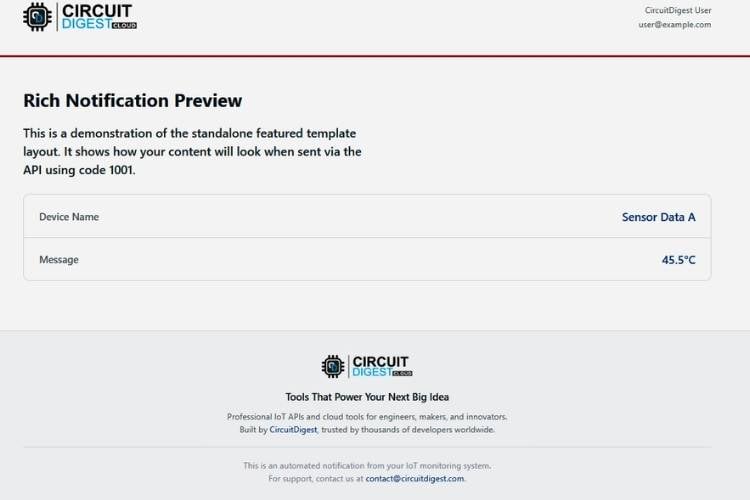
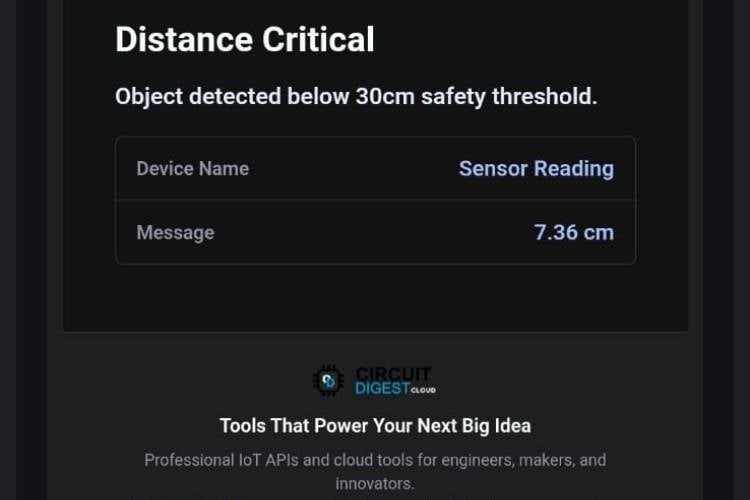
Now that the email address has been successfully added and verified, we are ready to explore the various options available in the Email Notification API. In this step, we will learn how to access and use the different features provided by the API for sending email notifications in your projects. Click on the My Templates option available on the left side of the page to open the pre-defined email templates page. Here, you will find a list of Featured Templates. Each template includes a JSON request example, which helps you understand how to structure the email request in your code. By clicking the View Preview option, you can also see the exact format in which the email will be received by the user.
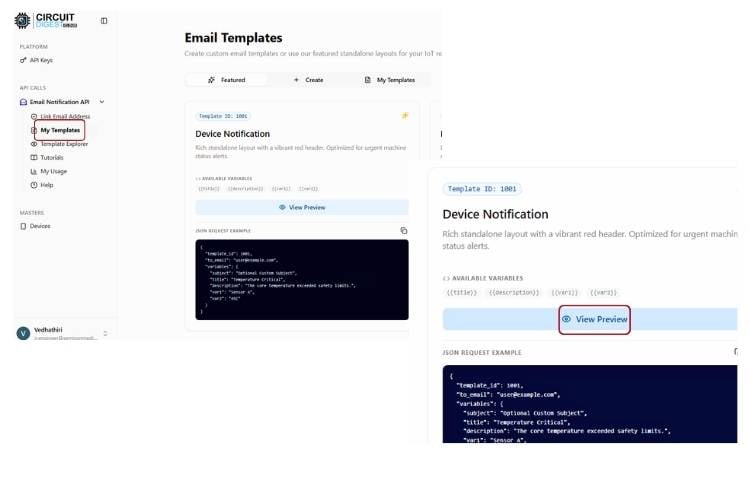
The preview will look like the picture below. With this feature, you can check how the notification will be received.
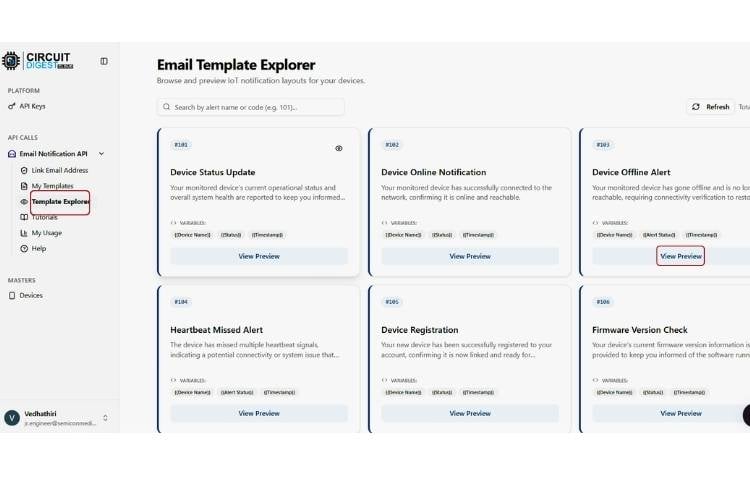
In addition to these, the platform offers nearly 86 pre-designed email templates that can be used across a wide range of sensor-based projects and system setups. By clicking the Templates Explorer option on the left side of the page, you can view all the available templates. These templates are designed to enhance notification quality by presenting information in a clear and well-structured format, making alerts more informative, meaningful, and visually appealing for real-world IoT applications.
Creating a Custom Email Template for Your ESP32 Project
If you still prefer to create your own email template, the platform has you covered. Click on the My Templates option on the left side of the page, which will take you to the templates dashboard. At the top of the page, you will find the Create Template option. Click on it to open the template creation section, where you can design your own custom email template.
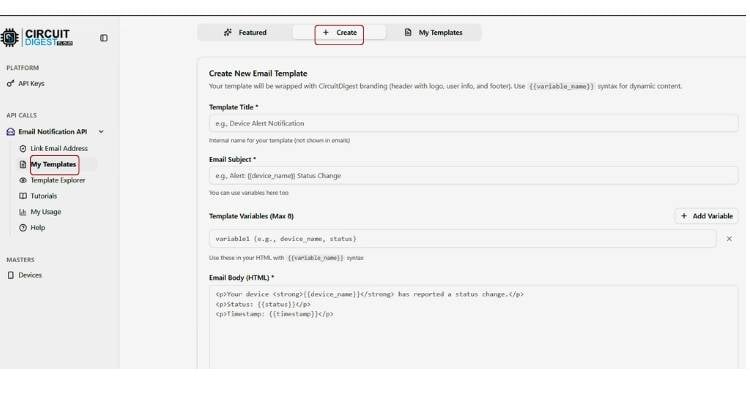
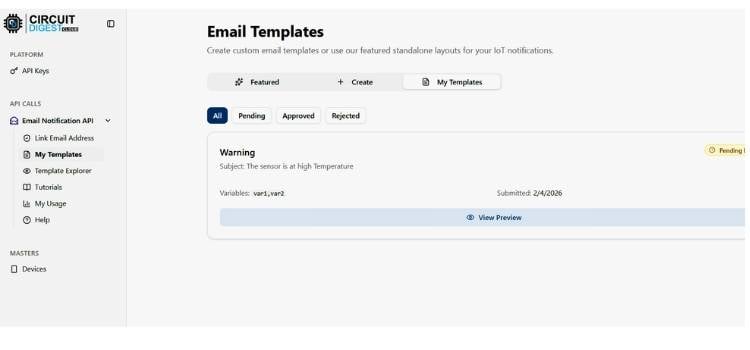
After filling in all the required fields, click the Submit for Approval button. Once approved, the custom template will be available in the " My Templates " section to use in your projects.
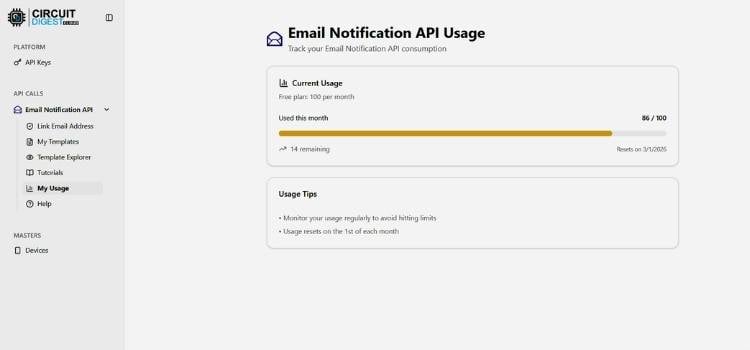
To view the usage count of the Email Notification API, click on the My Usage option. Here, you can see how many email notifications have already been used and how many are remaining under your account limits.
We have registered our email and explored the email features. Now, let's try the Email Feature with the ESP32. If you are looking for more projects in the ESP32, check out our ESP32 Projects.
How to Send Email with the ESP32
Now, we will see how to use the Email Notification API by interfacing an ultrasonic sensor with the ESP32. This ESP32 Email Alert System tutorial explains how to send email notification using ESP32. In this ESP32 email alert project, the board connects to WiFi and sends an automatic email notification when an event is triggered.
Components Required for the ESP32 Email Alert System
This send email alert using ESP32 project requires minimal hardware; the ESP32's onboard WiFi handles all network communication, so no additional wireless module is needed.
S.No | Component | Purpose |
| 1. | ESP32 | Acts as a Main controller |
| 2. | Ultrasonic Sensor | Used to sense the distance |
| 3. | Breadboard | To ease the connection |
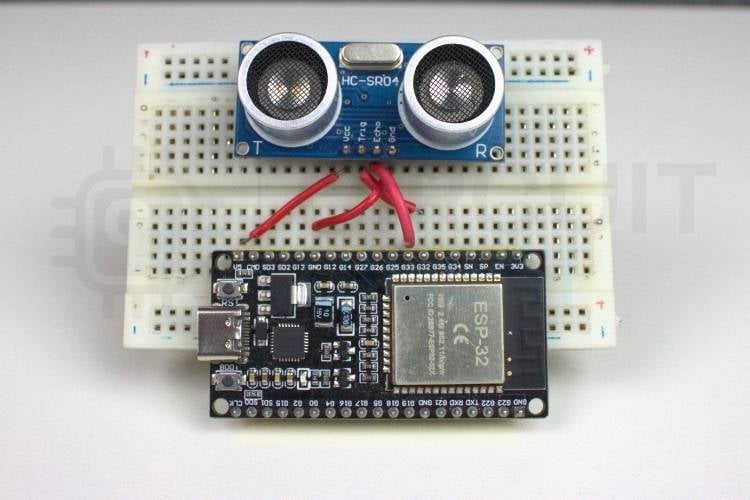
Circuit Diagram of ESP32 with Ultrasonic Sensor
The wiring for this ESP32 email alert project is straightforward. The circuit diagram shows the connection between the ESP32 and the ultrasonic sensor. The Trigger pin is configured as an output to generate ultrasonic pulses, while the Echo pin is configured as an input to receive the reflected signal. Proper power and ground connections ensure stable sensor operation and accurate distance measurements.

HC-SR04 to ESP32 - Pin Connection Table
| HC-SR04 Pin | ESP32 GPIO | Direction |
| VCC | 5V (or 3.3V for 3.3V module) | Power |
| TRIG | GPIO 32 | Output (trigger pulse) |
| ECHO | GPIO 33 | Input (echo return) |
| GND | GND | Common gr |
The hardware setup for this project is simple and consists of an ESP32 and an ultrasonic sensor. The ultrasonic sensor is interfaced with the ESP32 to measure the distance of an object in real time. The trigger pin of the ultrasonic sensor is connected to GPIO 32 of the ESP32, while the echo pin is connected to GPIO 33. The sensor is powered using the 5V (or 3.3V, depending on the sensor module) and GND pins of the ESP32.
How the ESP32 Email Alert System Works
In this project, the ESP32 is interfaced with an ultrasonic sensor to continuously measure the distance of an object in front of it. The ultrasonic sensor works by transmitting a high-frequency sound pulse and analyzing the reflected echo. Based on the time taken for the echo to return, the ESP32 calculates the distance of the object.
The ESP32 is programmed to compare the measured distance with a predefined threshold value of 30 cm. Under normal conditions, when the detected distance is greater than 30 cm, the system remains in monitoring mode, and no action is taken. When an object moves closer, and the measured distance falls below 30 cm, the condition is considered a trigger event.
| Stage | Action | Outcome |
| 1. Boot | ESP32 connects to 2.4 GHz WiFi network | Serial Monitor shows IP address |
| 2. Monitor | HC-SR04 polled continuously; distance computed in cm | Distance printed to Serial Monitor in real time |
| 3. Threshold check | Distance compared to 30 cm threshold; emailSent flag checked | Normal (>30 cm): monitoring continues |
| 4. Alert trigger | Distance <30 cm → sendEmail() called with live reading | HTTPS POST sent to CircuitDigest Cloud API |
| 5. Email dispatch | Cloud API renders template, delivers email to registered address | Alert email with sensor reading arrives in inbox |
| 6. Reset | emailSent flag blocks repeats; resets when distance ≥30 cm | The system is ready for the next proximity event |
Once this condition is met, the ESP32 sends an email notification request to the CircuitDigest Cloud Platform using the Email Notification API. The request includes the selected email template and required parameters such as subject, message content, and sensor data. The cloud platform processes this request and instantly sends an email alert to the registered email address. This enables real-time event-based alerts without the need for constant manual monitoring. The system can be effectively used in applications such as proximity alerts, safety warnings, intrusion detection, and automated monitoring systems where timely email notifications are essential. If you need ideas for making interesting projects, just take a look at our electronics projects.
ESP32 Email Alert Code Explanation
This program demonstrates how an ESP32 can be used to monitor distance using an ultrasonic sensor and trigger an email notification if the limit is crossed through the CircuitDigest Cloud Email Notification API. Secure HTTPS communication is used to send structured JSON data to the cloud platform, ensuring reliable and real-time notifications.
#include <WiFi.h>
#include <WiFiClientSecure.h>
#define TRIG_PIN 32
#define ECHO_PIN 33
The code begins by including the required libraries. The WiFi.h library enables the ESP32 to connect to a wireless network, while WiFiClientSecure.h allows secure HTTPS communication with the CircuitDigest Cloud server. The ultrasonic sensor’s trigger and echo pins are defined using GPIO pins 32 and 33, which are used later to generate ultrasonic pulses and measure the reflected signal.
const char* ssid     = "Your Wi-Fi name";
const char* password = "password";
const char* host = "www.circuitdigest.cloud";
const int   port = 443;
const char* apiKey   = "Your apikey";
const char* toEmail  = "Your registered email";
const int   templateID = 1001;
This section defines the WiFi credentials required for internet connectivity. It also configures the CircuitDigest Cloud Email API details such as the server address, HTTPS port, API key, registered email address, and template ID. These parameters allow the ESP32 to authenticate itself and send email requests securely using the predefined email template.
float readDistance() {
 digitalWrite(TRIG_PIN, LOW);
 delayMicroseconds(2);
 digitalWrite(TRIG_PIN, HIGH);
 delayMicroseconds(10);
 digitalWrite(TRIG_PIN, LOW);
 duration = pulseIn(ECHO_PIN, HIGH, 30000);
 distance = duration * 0.034 / 2;
 return distance;
}
The readDistance() function is responsible for calculating the distance using the ultrasonic sensor. A short pulse is sent through the trigger pin, and the echo time is measured using pulseIn(). The distance is calculated based on the speed of sound and returned in centimetres. This function is repeatedly called in the main loop to monitor object proximity.
void sendEmail(float dist) {
 WiFiClientSecure client;
 client.setInsecure();
String payload = "{";
payload += "\"to_email\":\"" + String(toEmail) + "\",";
payload += "\"template_id\":1001,";
payload += "\"variables\":{";
payload += "\"subject\":\"Ultrasonic Sensor Alert\",";
payload += "\"title\":\"Distance Critical\",";
payload += "\"description\":\"Object detected below 30cm safety threshold.\",";
payload += "\"var1\":\"Sensor Reading\",";
payload += "\"var2\":\"" + String(dist, 2) + " cm\"";
payload += "}}";
The sendEmail() function creates a secure HTTPS client and prepares a JSON payload using the selected email template. The payload includes dynamic values such as the measured distance. The setInsecure() function is used to bypass certificate validation for simplicity. This structured JSON data is sent to the CircuitDigest Cloud API, which processes the request and delivers the email to the registered address.
if (dist > 0 && dist < 30 && !emailSent) {
 sendEmail(dist);
 emailSent = true;
}
if (dist >= 30) {
 emailSent = false;
}
In the loop() function, the ESP32 continuously reads the distance from the ultrasonic sensor. When the measured distance falls below 30 cm, the email notification is triggered. A boolean flag, emailSent, ensures that only one email is sent per event, preventing repeated notifications when the object remains closed. Once the object moves away beyond 30 cm, the flag resets, allowing the system to detect and notify of the next event.
Future Enhancements for the ESP32 Email Notification System
1. Multi-Sensor Integration
The system can be improved by integrating multiple sensors, such as temperature, gas, or motion sensors. This allows the ESP32 to monitor different environmental parameters and trigger email alerts based on various conditions.
2. Rich Email Notifications
The email notification feature can be enhanced to include images, location data, or detailed sensor logs. This makes alerts more informative and useful for analysis and decision-making
3. Hybrid Notification System
The system can be upgraded to support multiple alert methods, such as SMS, push notifications, or mobile app alerts, along with email. This ensures critical events are not missed under any circumstances.
4. Data Logging and Analytics
Sensor data can be stored in the cloud for long-term analysis and visualisation. This enables trend analysis, generating reports, and predictive maintenance for advanced IoT applications.
Troubleshooting the ESP32 Email Alert System
The most common issues encountered when building this send email notification using ESP32 project, along with verified root causes and fixes.
Issue 1: Email Not Being Delivered
If the ESP32 shows that the email is sent, but you do not receive it, the issue may be related to an incorrect API key, a wrong recipient email, or an unverified email address. Make sure the API key is valid and properly copied into the code. Also, check your spam or junk folder, as automated emails are sometimes filtered there.
Issue 2: Incorrect Template ID or Parameters
If the email is sent but the content is missing or incorrect, the template ID or variables in the request may not match the configured template on the server. Verify that the template ID is correct and that all required parameters are properly formatted in the HTTP request body.
Issue 3: Power Supply Issues During Setup
During full setup testing, unstable power can cause unexpected resets. Sending HTTPS requests consumes more power than normal operation. Use a stable 5V power source and avoid weak USB cables. Sudden restarts during email sending usually indicate insufficient power.
Issue 4: Sensor Not Detecting Input
If the sensor is not triggering the email, the most common reason is incorrect wiring. Check that VCC is connected to 3.3V or 5V as required, GND is properly connected, and the signal pin matches the GPIO defined in the code. Even one loose jumper wire can prevent proper detection.
Issue 5: Upload Fails or “Failed to Connect” Error
If you see errors like “Failed to connect to ESP32,” the board may need to be put into boot mode manually. Press and hold the BOOT button while clicking upload, then release after upload starts. Also, ensure no other application is using the same COM port.
This project demonstrates that sending email alerts from ESP32 does not require complex SMTP setup or heavyweight libraries. It can be integrated with an ultrasonic sensor and the CircuitDigest Cloud Email Notification API to create a real-time alert system. By continuously monitoring distance and triggering email notifications when a predefined threshold is crossed, the system provides timely and reliable alerts without the need for manual supervision. This project gives the flexibility of cloud-based notification services and their importance in modern IoT applications. With minimal hardware and a structured cloud API, the system can be easily extended to support more complex monitoring and automation scenarios, making it suitable for both learning purposes and practical real-world implementations.
Frequently Asked Questions
1. What is the purpose of using the Email Notification API in this project?
The Email Notification API is used to send automatic email alerts when a specific condition is met. In this project, an email is triggered when the ultrasonic sensor detects an object within 30 cm, enabling real-time notifications without manual monitoring.
2. What happens if WiFi connectivity is lost?
If the ESP32 loses WiFi connectivity, email notifications will not be sent until the connection is restored. The system will automatically resume normal operation once WiFi is reconnected.
3. Can this project be used with other sensors?
Yes, the same email notification logic can be applied to other sensors, such as temperature, gas, PIR, or flame sensors, by modifying the trigger condition in the code.
4. What are the real-world applications of this project?
This project can be used in proximity alert systems, intrusion detection, smart parking, safety monitoring, and automated warning systems where timely email notifications are required.
5. Does the CircuitDigest Cloud Email API cost anything to use?
No, the CircuitDigest Cloud Email Notification API does not require any payment for use. Up to five email recipients can be added to each account. There are more than 86 pre-made templates and usage statistics on the My Usage tab. The API is made specifically for IoT microcontrollers like ESP32, ESP8266, Arduino, and Raspberry Pi.
6. What is the threshold value for detecting distance used in this ESP32 email alert system?
The default threshold value used is 30 cm. Once the HC-SR04 detects any object closer than 30 cm from the sensor itself, it sends out a notification through the ESP32 to the CircuitDigest cloud server. The DIST_THRESHOLD variable used in the code can be modified according to your requirements.
ESP32 Email Alert GitHub Repository
The full, functional code for this ESP32 email alert project is available on GitHub. The ESP32 Email Alert GitHub Repository (includes the entire .ino file featuring WiFi configuration; HC-SR04 distance measurement; HTTPS JSON Post to CircuitDigest Cloud; and Event Flag Logic) that can be cloned/downloaded and used to configure the project with your own credentials.


Projects Using Ultrasonic Sensor and Email Feature
If you need more projects related to the ultrasonic sensor and Email Feature, check out the links below

Sending Email Using MSP430 Launchpad and ESP8266
Learn how to send an email using the MSP430 Launchpad and ESP8266 Wi-Fi module when a fire sensor detects smoke, enabling basic IoT email alerts.

IoT-Based Contactless Body Temperature Monitoring Using Raspberry Pi with Camera and Email Alert
IoT project using Raspberry Pi, MLX90614 IR sensor, and Pi Camera for contactless body temperature monitoring with email alerts when abnormal temperatures are detected.

How does an HC-SR04 Ultrasonic Range Sensor Work and How to Interface with ESP32
Learn how to interface the HC-SR04 ultrasonic sensor with ESP32 to measure distance accurately and display results using Arduino IDE.
Complete Project Code
#include <WiFi.h>
#include <WiFiClientSecure.h>  // ← ADD THIS for HTTPS
/* ================= ULTRASONIC SENSOR ================= */
#define TRIG_PIN 5
#define ECHO_PIN 3
long duration;
float distance;
/* ================= WIFI DETAILS ================= */
const char* ssid     = "yourwifiname";
const char* password = "yourpassword";
/* ================= EMAIL API DETAILS ================= */
const char* host = "www.circuitdigest.cloud";
const int   port = 443;  // ← CHANGED to HTTPS port
const char* apiKey   = "yourapikey";
const char* toEmail  = "yourregisteredemail";
const int   templateID = 1001;
/* ================= FLAGS ================= */
bool emailSent = false;
/* ================= READ DISTANCE ================= */
float readDistance() {
 digitalWrite(TRIG_PIN, LOW);
 delayMicroseconds(2);
 digitalWrite(TRIG_PIN, HIGH);
 delayMicroseconds(10);
 digitalWrite(TRIG_PIN, LOW);
 duration = pulseIn(ECHO_PIN, HIGH, 30000);
 distance = duration * 0.034 / 2;
 return distance;
}
/* ================= SEND EMAIL ================= */
void sendEmail(float dist) {
 WiFiClientSecure client;  // ← CHANGED to secure client
 client.setInsecure();     // ← ADD THIS (skip certificate validation)

 if (!client.connect(host, port)) {
   Serial.println(" Server connection failed");
   return;
 }
 /* -------- COMPLETE TEMPLATE PAYLOAD -------- */
 String payload = "{";
 payload += "\"to_email\":\"" + String(toEmail) + "\",";
 payload += "\"template_id\":1001,";
 payload += "\"variables\":{";
 payload += "\"subject\":\"Ultrasonic Sensor Alert\",";
 payload += "\"title\":\"Distance Critical\",";
 payload += "\"description\":\"Object detected below 30cm safety threshold.\",";
 payload += "\"var1\":\"Sensor Reading\",";
 payload += "\"var2\":\"" + String(dist, 2) + " cm\"";
 payload += "}}";
 Serial.println("Payload:");
 Serial.println(payload);
 /* -------- HTTP REQUEST -------- */
 client.println("POST /api/v1/email/send HTTP/1.1");
 client.println("Host: www.circuitdigest.cloud");
 client.println("Authorization: " + String(apiKey));
 client.println("Content-Type: application/json");
 client.println("Content-Length: " + String(payload.length()));
 client.println("Connection: close");
 client.println();
 client.println(payload);
 /* -------- WAIT FOR RESPONSE -------- */
 unsigned long timeout = millis();
 while (!client.available()) {
   if (millis() - timeout > 10000) {
     Serial.println(" Server timeout");
     client.stop();
     return;
   }
 }
 /* -------- STATUS LINE -------- */
 String statusLine = client.readStringUntil('\n');
 Serial.println("STATUS: " + statusLine);
 /* -------- SKIP HEADERS -------- */
 while (client.available()) {
   String line = client.readStringUntil('\n');
   if (line == "\r") break;
 }
 /* -------- RESPONSE BODY -------- */
 String body = client.readString();
 Serial.println("BODY:");
 Serial.println(body);

 client.stop();
}
/* ================= SETUP ================= */
void setup() {
 Serial.begin(9600);
 pinMode(TRIG_PIN, OUTPUT);
 pinMode(ECHO_PIN, INPUT);
 Serial.println("\nConnecting to WiFi...");
 WiFi.begin(ssid, password);
 while (WiFi.status() != WL_CONNECTED) {
   delay(500);
   Serial.print(".");
 }
 Serial.println("\n WiFi Connected");
 Serial.print("IP Address: ");
 Serial.println(WiFi.localIP());
}
/* ================= LOOP ================= */
void loop() {
 float dist = readDistance();
 Serial.println(dist);
 /* ---- TRIGGER EMAIL BELOW 30 cm ---- */
 if (dist > 0 && dist < 30 && !emailSent) {
   Serial.println(" Distance below 30 cm — sending email");
   sendEmail(dist);
   emailSent = true;
 }
 /* ---- RESET WHEN OBJECT MOVES AWAY ---- */
 if (dist >= 30) {
   emailSent = false;
 }
 delay(1000);
}
