
We are moving towards the World of Internet of Things (IoT), a technology which is going to play a very important role in the consumer and industrial electronics. Sending an Email from any Microcontroller or Embedded system is one of the very basic thing which is required in IoT. Here we create a demo IoT project where we use ESP8266 and MSP430 Launchpad to send an email upon fire detection.
Components Required
- MSP430 Launchpad
- ESP8266 Wi-Fi module
- Fire Sensor
- Connecting wires
- 16x2 LCD
- 3.3v and 5v Power supply
- 10k POT
- Bread Board or PCB
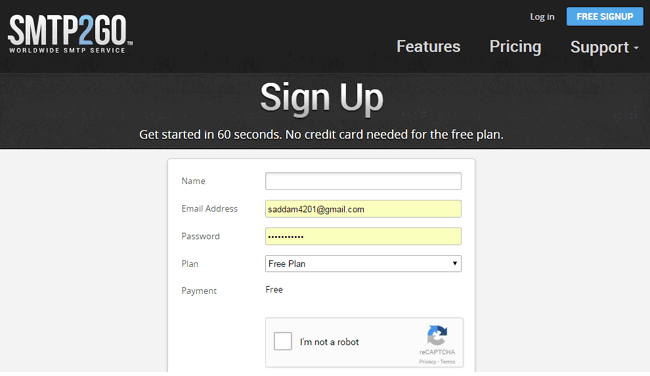
Getting ready with you E-mail ID
For sending Email via Wi-Fi module and MSP430 Launchpad, we need to have an email account which can be easily created on https://www.smtp2go.com/. After signup remember the email address and password, which will be needed in MSP430 program later.
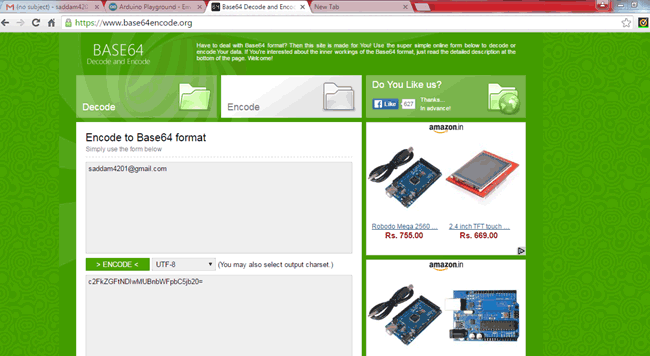
We also need to convert the E-mail ID and password into base 64 format by using this website https://www.base64encode.org/. We are going to use this in our program
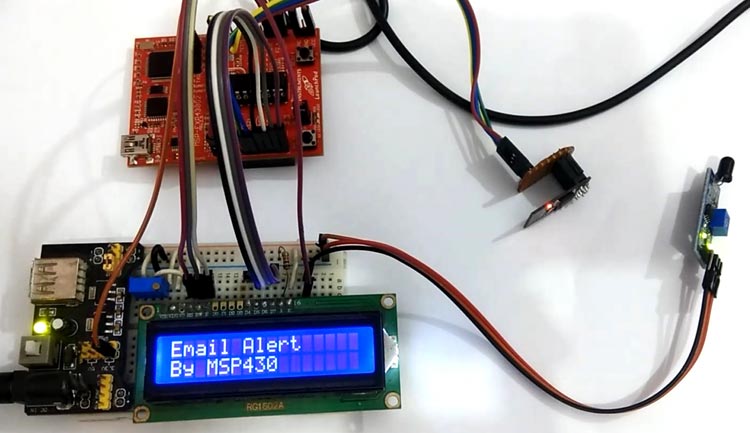
In this project, a 16x2 LCD is used for displaying the status of Wi-Fi Connection and Fire detection messages. Here an email will be sent whenever system detects any fire near it.
To learn sending email with ESP8266 using other microcontroller, go through below tutorials:
- How to Send E-mail using PIC Microcontroller and ESP8266
- Sending Email using Arduino and ESP8266 WiFi Module
- IoT Raspberry Pi Smart Container with Email Alert
Circuit Diagram and Explanation
Circuit for sending email using MSP430 and ESP8266 is very simple. For this project we only need an MSP430 Launchpad and ESP8266 Wi-Fi module. 16x2 LCD is used for displaying various messages, which is optional. ESP8266’s Vcc and GND pins are directly connected at 3.3V and GND. And CH_PD is also connected with 3.3V. A fire sensor is used to trigger the MSP430 Launchpad to send Email Alert of fire.

Rx and Tx pins of ESP8266 is directly connected at pin P1_4 and P1_3 of MSP430 Launchpad. LCD’s rs, RW, and en pins are directly connected to P2_4 and P2_3. Data pins of LCD D4-D7 are connected to P1_5, P2_0, P2_1, P2_2. LCD is powered by using 5v supply and its ground is connected with MSP430 Launchpad’s GND. Fire sensor is connected at pin P2_5.
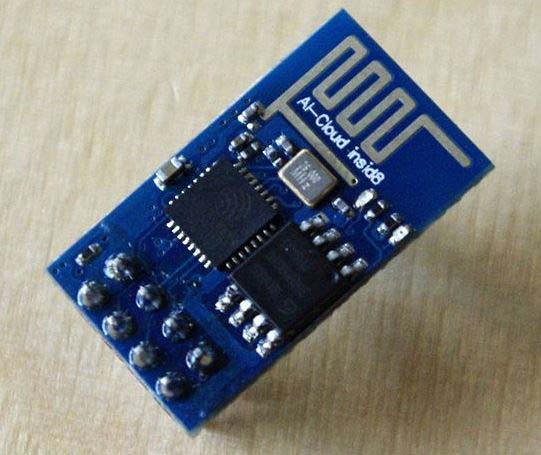
Below is the picture and pinout of ESP8266:

If you are new to MSP430 then follow our getting started with MSP430 tutorial.
Code and Working Explanation
Programming part of this project is a little bit difficult to understand for a beginner. Complete code for sending email via MSP430 is given at the end, here we have explained few parts of it.
As usual, first we have to include libraries for LCD and SoftwareSerial for connecting LCD and ESP8266 respectively. Software serial library is used for serial communication with ESP8266. We have also defined a pin for fire sensor module and taken some variables and array for storing other data for calculation.
#include<LiquidCrystal.h>
LiquidCrystal lcd(P2_4, P2_3, P1_5, P2_0, P2_1, P2_2);
#include <SoftwareSerial.h>
SoftwareSerial ESP(P1_3, P1_4); // RX, TX
#define fireSensor P2_5
char str[40];
int i=0;
Below connect_wifi function is used for connecting ESP8266 to Wi-Fi network. In this function, we have passed three arguments: command, response and time to read the response. The code inside this function will be continuously executed until ESP successfully connects with Wifi network.
void connect_wifi(char *cmd, char *res, int t)
{
  while (1)
  {
    for (int i = 0; i < 40; i++)
      str[i] = NULL;
    i = 0;
    ESP.println(cmd);
    Serial.print("-->");
    Serial.println(cmd);
    Serial.print("<--");
    delay(t);
    serialEvent1();
    // Serial.println(str);
    if (strstr(str, res))
      return;
    delay(1000);
  }
}
After this, in setup function we initialize debug serial port and ESP Serial port, and give direction to fire sensor pin. Then we initialize LCD and show some welcome message over LCD, then initialize Wi-Fi and connect it to a hotspot or Wi-Fi router using above described function.
  ESP.begin(9600);
  Serial.begin(9600);
  pinMode(fireSensor, INPUT);
  lcd.begin(16,2);
  lcd.print("Email Alert ");
  lcd.setCursor(0,1);
  lcd.print("By MSP430");
  delay(2000);
  lcd.clear();
  lcd.print("Circuit Digest");
  delay(2000);
  lcd.clear();
  lcd.print("Finding ESP8266");
  lcd.setCursor(0,1);
  lcd.print("Please Wait...");
    connect_wifi("AT", "OK", 1000);
  connect_wifi("ATE0", "OK", 1000);
  connect_wifi("AT+CWMODE=3", "OK", 1000);
  connect_wifi("AT+CWQAP", "OK", 1000);
  lcd.clear();
  lcd.print("Connecting WiFi");
  Serial.println("Connecting Wifi....");
After successfully connecting with hotspot or Wi-Fi router, it comes in loop function where it waits for a trigger to send email. Here fire sensor will initiate that trigger whenever it detects fire.
Whenever fire sensor gets activated, MPS430 sends an email. Before sending email, it configures the email setting and connects to Email server. Then it prepares body with the message given in the code below and sends it to recepient email address that we have provided in email configurations.
else
  {
    lcd.clear();
    lcd.print("Fire Alert      ");
    lcd.setCursor(0,1);
    lcd.print("Sending Email");
    //lcd.print("Configuring Email..");
      ESP.println("AT+CIPMUX=1");
  delay(1000);
  ESP.println("AT+CIPSERVER=1,80");
  delay(2000);
    ESP.println("AT+CIPSTART=4,\"TCP\",\"mail.smtp2go.com\",2525");
    delay(2000);
    ESP.println("AT+CIPSEND=4,180");
    delay(2000);
    ESP.println("EHLO 192.168.1.123");
    ESP.println("AUTH LOGIN");
    ESP.println("c2FkZGFtNDIwMUBnbWFpbC5jb20=");
    ESP.println(" tu934yt89ert83=");
    ESP.println("MAIL FROM:<[email protected]>");
    ESP.println("RCPT To:<[email protected]>");
    ESP.println("DATA");
    // ESP.println("Testing Success saddam.");
    ESP.println("Fire Alert from Arduino");
    ESP.println(".");
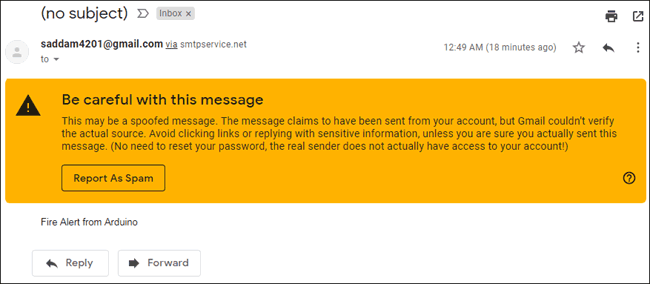
Note: Many email servers will not accept email from the IP addresses issued by unknown server.
We have to enter recepient email, sender email and password in base64encoded format, which we have converted in previous section using https://www.base64encode.org/ website.
Check the complete explanation and demonstration in the Video below.
Complete Project Code
#include<LiquidCrystal.h>
LiquidCrystal lcd(P2_4, P2_3, P1_5, P2_0, P2_1, P2_2);
#include <SoftwareSerial.h>
SoftwareSerial ESP(P1_3, P1_4); // RX, TX
#define fireSensor P2_5
char str[40];
int i=0;
void connect_wifi(char *cmd, char *res, int t)
{
  while (1)
  {
    for (int i = 0; i < 40; i++)
      str[i] = NULL;
    i = 0;
    ESP.println(cmd);
    Serial.print("-->");
    Serial.println(cmd);
    Serial.print("<--");
    delay(t);
    serialEvent1();
    // Serial.println(str);
    if (strstr(str, res))
      return;
    delay(1000);
  }
}
void setup()
{
  ESP.begin(9600);
  Serial.begin(9600);
  pinMode(fireSensor, INPUT);
  lcd.begin(16,2);
  lcd.print("Email Alert ");
  lcd.setCursor(0,1);
  lcd.print("By MSP430");
  delay(2000);
  lcd.clear();
  lcd.print("Circuit Digest");
  delay(2000);
  lcd.clear();
  lcd.print("Finding ESP8266");
  lcd.setCursor(0,1);
  lcd.print("Please Wait...");
    connect_wifi("AT", "OK", 1000);
  connect_wifi("ATE0", "OK", 1000);
  connect_wifi("AT+CWMODE=3", "OK", 1000);
  connect_wifi("AT+CWQAP", "OK", 1000);
  lcd.clear();
  lcd.print("Connecting WiFi");
  Serial.println("Connecting Wifi....");
  connect_wifi("AT+CWJAP=\"Redmi\",\"arishkhan\"","CONNECTED", 7000);
  lcd.clear();
  lcd.print("WIFI Connected...");
  Serial.println("Wifi Connected");
  ESP.println("AT+CIFSR");
  delay(5000);

}
void loop()
{
  if(digitalRead(fireSensor))
  {
     lcd.setCursor(0,0);
     lcd.print("No Fire        ");
  }
  else
  {
    lcd.clear();
    lcd.print("Fire Alert      ");
    lcd.setCursor(0,1);
    lcd.print("Sending Email");
    //lcd.print("Configuring Email..");
      ESP.println("AT+CIPMUX=1");
  delay(1000);
  ESP.println("AT+CIPSERVER=1,80");
  delay(2000);
    ESP.println("AT+CIPSTART=4,\"TCP\",\"mail.smtp2go.com\",2525");
    delay(2000);
    ESP.println("AT+CIPSEND=4,180");
    delay(2000);
    ESP.println("EHLO 192.168.1.123");
    ESP.println("AUTH LOGIN");
    ESP.println("c2FkZGFtNDIwMUBnbWFpbC5jb20=");
    ESP.println(" tu934yt89ert83=");
    ESP.println("MAIL FROM:<[email protected]>");
    ESP.println("RCPT To:<[email protected]>");
    ESP.println("DATA");
    // ESP.println("Testing Success saddam.");
    ESP.println("Fire Alert from Arduino");
    ESP.println(".");
    delay(2000);
    ESP.println("AT+CIPSEND=6");
    delay(1000);
    ESP.println("QUIT");
    delay(1000);
    lcd.clear();
    lcd.print("Email Sent...");
    delay(2000);
    lcd.clear();
  }
}
void serialEvent1()
{
  int ln=ESP.available();
  if(ln>0)
  {
    for(int i=0;i<ln;i++)
    {
      char ch=ESP.read();
      str[i]=ch;
      Serial.print(ch);
      delay(1);

    }
  }
}
Comments
Awesome Project but the smtpg20 site is not work so can you suggest me any different site for the email send

Awesome Project. But im having a few issues with the code. I hope you can help me rectify it.
Errors shown below :-
subdir_rules.mk:9: recipe for target 'main.o' failed
../main.c:1:9: fatal error: LiquidCrystal.h: No such file or directory
1 | #include"LiquidCrystal.h"
| ^~~~~~~~~~~~~~~~~
compilation terminated.
gmake: *** [main.o] Error 1
gmake: Target 'all' not remade because of errors.
**** Build Finished ****