
This DIY Bluetooth Speaker is a budget-friendly project that delivers clear wireless audio using affordable components. With the help of a DIY Bluetooth Speaker amplifier, the Bluetooth module sends the audio signal to the amplifier, which then provides the necessary power to drive the speakers. It can also be used for building a DIY Bluetooth portable speaker. The setup is simple, compact, and powerful for anyone looking to create their own portable speaker without spending a lot. It’s a fun and practical way to learn the basics of electronics.
If you’re interested in this type of project, there are also a few improved versions you can explore. One of them is Simple DIY Wireless Bluetooth Speakers Using an Audio Amplifier, which includes an upgraded amplifier and speaker setup to deliver noticeably better sound performance. Another is the Arduino Bluetooth Speaker with Reactive NeoPixel LEDs, an advanced version that integrates dynamic lighting effects using NeoPixel LEDs for a more interactive experience. These projects are built on the same core concept while adding new features to your DIY Bluetooth Speaker.
Table of Contents
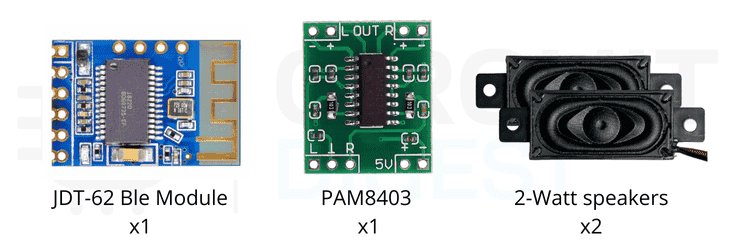
DIY Bluetooth Speaker Components Required
Building a DIY Bluetooth Speaker requires only a handful of essential DIY Bluetooth Speaker components. Below is a comprehensive list of everything you'll need for this project:
| Components | Description |
| JDY-62 Bluetooth Module | Bluetooth 4.2 audio module used to receive wireless audio signals. |
| PAM8403 Amplifier | A 5V stereo amplifier that boosts the audio output for the speakers |
| 2-Watt 8Ω Speakers | Compact speakers used to output the left and right audio channels. |
| Wires | Used for electrical connections between modules. |
| Soldering Iron | Required to solder wire and ensure stable, long-lasting connections. |
Understanding Component Pinouts for Your DIY Bluetooth Speaker
In order to successfully assemble a working DIY Bluetooth Speaker, it is important to have a sound understanding of the pinouts and connections of each component. Connecting a component in a circuit with the wrong polarity can sometimes damage the component or make the circuit unusable. Let’s examine each component in detail:
JDY-62 Bluetooth 4.2 Audio Module
The JDY-62 enables wireless audio streaming from your phone or device. It can be used for building DIY Bluetooth stereo speakers, handling the Bluetooth connection and sending the audio signal to the amplifier for wireless playback. It's ideal for building DIY Bluetooth stereo speakers, handling the Bluetooth connection and transmitting high-quality audio signals to the amplifier for wireless playback.

| Pin Name | Function | Description |
| VCC | Power Supply | Connect to +5V DC |
| GND | Ground | Connect to ground. |
| L OUT | Left Audio Output | Sends the left channel audio signal to the amplifier. |
| R OUT | Right Audio Output | Sends the right channel audio signal to the amplifier. |
PAM8403 Stereo Audio Amplifier Board
The PAM8403 is a small, efficient audio amplifier that powers the speakers to produce clear sound. It can be used for creating a DIY Bluetooth Speaker amplifier, boosting the audio signal from the Bluetooth module so the speakers deliver crisp, high-quality sound. With its Class-D architecture, the PAM8403 operates efficiently with minimal heat generation, making it ideal for building a DIY Bluetooth portable speaker powered by batteries or USB power banks.
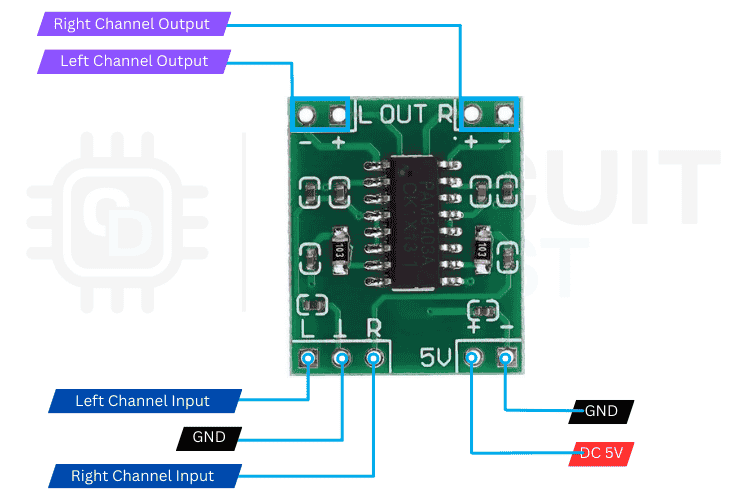
| Pin Name | Function | Description |
| VCC | Power Supply | Connect to +5V DC |
| GND | Ground | Connect to ground. |
| L IN | Left Audio Input | Connect to the left output from the Bluetooth module. |
| R IN | Right Audio Input | Connect to the right output from the Bluetooth module. |
| L OUT | Left Speaker Output | Connect to the left speaker terminals |
| R OUT | Right Speaker Output | Connect to the right speaker terminals. |
You can also build your own amplifier circuit. If you need some guidance, you can refer to projects like the Simple Arduino Audio Player and Amplifier with LM386 or the Simple Microphone to Speaker Amplifier Circuit. These alternatives offer different power levels and features for customising your DIY Bluetooth stereo setup.
DIY Bluetooth Speaker Wiring Diagram and Circuit Connections
The DIY Bluetooth Speaker wiring diagram shows the connection between the JDY-62 Bluetooth 4.2 module, the PAM8403 audio amplifier, and the two 2W/8Ω speakers. Using the right DIY Bluetooth Speaker components, the Bluetooth module and amplifier share the same 5V power supply, while the left and right audio signals are routed directly from the JDY-62 to the corresponding inputs on the PAM8403. Each speaker is connected to the amplifier’s left and right outputs of the amplifier, enabling the stereo audio setup

Wiring Instructions
- Wiring Power: Connect the 5V power supply positive terminal to the VCC pin on both the JDY-62 and PAM8403. Connect all GND pins to the negative terminal of the power supply.
- Wiring the Audio Signal: Connect the L OUT on the JDY-62 to the L IN on the PAM8403. Connect the R OUT on the JDY-62 to the R IN on the PAM8403.
- Wiring the Speakers: Connect the left speaker to the L OUT terminals on the PAM8403 (being sure to observe +/- polarity). Connect the right speaker to the R OUT terminals.
- Wiring Quality Check: Use 22-24 AWG wire for connecting signals and 18-20 AWG for connecting the speakers. Solder all connections to keep them secure.
- Optional Wiring: You can add a power switch or switch capable of turning the power off and on between the power supply and VCC, and you also have the possibility to wire a volume potentiometer on the amplifier if you prefer.
Operating Your DIY Bluetooth Speaker System
Once you've completed the wiring according to the DIY Bluetooth Speaker wiring diagram, powering on your device triggers automatic functionality. When powered on, the device instantly reconnects via Bluetooth if it has been paired with that device before. For a new device, you need to pair it manually. Just look for “JDY-62” in the available Bluetooth devices list. The indicator light confirms the connection status, while the speakers deliver clear, high-quality audio that’s ready to play immediately. This easy connection and good sound quality make it a reliable choice for anyone looking to enjoy wireless audio without any hassle. Many builders ask, "How to make a Bluetooth speaker louder DIY" after completing their initial build.
Building a DIY Bluetooth Speaker on a budget is an easy and fun way to enjoy wireless music while learning basic electronics. With simple components, you can create a portable, clear-sounding speaker without spending much, making it a perfect project for beginners and hobbyists.
Future Enhancement Techniques
1. Upgrade to a More Powerful Amplifier: The PAM8403 is a good product for basic uses, but upgrading to a PAM8610 (10W per channel at 12V) or TDA7297 (15W per channel) will dramatically increase maximum volume. Because the power supply will need to deliver higher current, ensure that your power supply can comply with this. Higher wattage amplifiers require somewhat like 2-3A of power delivery. This is the single best upgrade for anyone asking how to make a Bluetooth speaker louder DIY.
2. Source a Higher Wattage Speaker: If you replace the 2W speaker with either a 5W or 10W speaker, the amplifier will be able to deliver more acoustic power without distortion. Be sure to match the impedance (4Ω or 8Ω) of your speaker to your amp. Using larger speaker drivers (40mm-100mm diameter) will also provide better bass response and sound projection overall.
3. Make sure to use a proper power supply: Many of the volume problems are simply due to not getting adequate current. Use a supply rated at least 2A for PAM8403 and 3A or greater for any more powerful amp. For any DIY Bluetooth portable speaker, you can consider a supply like hi-capacity power banks (10,000mAh+) or several 18650 Li-ion cells in series-parallel with charging circuit options.
4. Construct an Effective Enclosure for Speakers: An acoustic enclosure eliminates the issue of sound waves existing in the same space and from cancelling each other out. Enclosures also help to create stronger bass frequencies. An easy solution would be to create just a simple sealed box, which can increase perceived volume and sound quality quite a bit. Whatever the construction, make sure to measure the volume of the enclosure you want to create around your speaker specs. Most small drivers need 0.5-2 litres of enclosure volume, or whatever the manufacturer recommends. For the best results, use a dense material like MDF, plywood, or even solid hardwood.
5. Improve Connections of Components: Use thicker wiring (a reasonable range is 18-20 AWG) on speaker connections, as it acts as resistance to the speaker. Keep all wire runs short and clean, as clean solder joints are also valuable, as bad solder connections create signal loss and distortion. If your amplifier's integrated chip runs hot during long periods of use, add heat sinks.
Frequently Asked Questions on DIY Bluetooth Speaker Amplifier
⇥ 1. How does Bluetooth pairing work?
Once powered on, the JDY-62 module automatically enters pairing mode. It can connect to your smartphone, laptop, or any Bluetooth-enabled device. No additional configuration is required.
⇥ 2. Does it require any app or software to work?
No app is needed. It works as a standard Bluetooth audio device, so any device that supports Bluetooth audio can connect to it.
⇥ 3. Can I use different speakers?
Yes, but make sure the speaker matches the amplifier’s output. Using a higher power speaker without adjusting the circuit may damage the amplifier.
⇥ 4. How can I make my DIY Bluetooth speaker louder?
Use a more powerful amplifier, a larger speaker, provide stable power, and use short, thick wires to reduce signal loss.
In this post, we will build a Raspberry Pi-based Bluetooth Speaker by combining the power of A2DP, Linux, and an audio codec to stream data packets from an audio source to an audio sink wirelessly.
Creating a DIY Bluetooth Speaker is a fun and easy way to experience music wirelessly while learning basic electronic concepts. You can buy the components to make a basic DIY Bluetooth Speaker components less than $6 and build a portable speaker that sounds just as clear as expensive commercial speakers. Whether you make a basic desktop speaker or a more advanced DIY Bluetooth portable speaker that is battery-powered, the principles are the same. Your DIY Bluetooth stereo journey starts here—have fun building and enjoy your wireless music!
This tutorial was created by the CircuitDigest engineering team. Our experts focus on creating practical, hands-on tutorials that help makers and engineers master Raspberry Pi projects, Arduino projects, Electronic circuits and IoT development projects.
Similar DIY Speaker-Based Projects
Previously, we have used different types of speakers to build many interesting projects. If you want to know more about those projects, the links are given below.

How to Build an Amazon Alexa Speaker using Raspberry Pi
In this tutorial, I will show you how to build your own DIY version of the Amazon Alexa by installing Alexa Voice Service (AVS) on a Raspberry Pi 4.

Here we use LM386 and a speaker with ESP32 to play music files. The audio output may not be loud, but this application shows the ability of the ESP32 board to play audio files.

ESP32 Based Internet Radio using MAX98357A I2S Amplifier Board
To build our ESP32 web radio, we have chosen the ESP32 development board (obviously) and the MAX98357A I2S Amplifier board.

Raspberry Pi Bluetooth Speaker: Play Audio wirelessly using Raspberry Pi
In this post, we will build a Raspberry Pi-based Bluetooth Speaker by fusing the power of A2DP, Linux and an audio codec to stream the data packets from an audio source to an audio sink wirelessly.
