
For those who love tinkering with electronics, making a Bluetooth speaker from scratch can be a satisfying and fun experience. In this article, we'll learn a step-by-step guide on how to build your very own wireless Bluetooth speaker using basic electronic components under 9$ or 700rs. We have previously built many audio-related projects using various amplifiers. Follow the link to learn more.
Materials you’ll need:
- Bluetooth audio receiver
- Amplifier
- Lipo battery
- Switch
- TP0456
- Acrylic laser-cut parts
- Some wires
- A soldering iron
- A hot glue gun
Before we dive into the step-by-step process. Let’s understand the working of some of the important modules which are necessary to build this speaker
Bluetooth Audio Receiver 3.0 Module
The Bluetooth audio receiver module can receive an audio signal wirelessly from the source and then can send output directly (for low-watt speakers) or to the amplifier (for high-watt speakers).
The input is received through Bluetooth, and then these signals are sent to the LOUT and ROUT pins as output. This module needs to be powered through a 5V DC power supply.
Pinout of Bluetooth 3.0 Audio Receiver Module
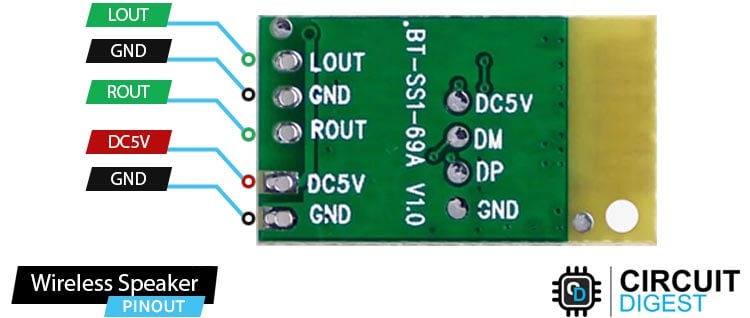
LOUT Left audio output. This pin provides the left audio channel output from the module.
ROUT Right audio output. This pin provides the right audio channel output from the module.
DC5V 5V Power supply input pin for the module
GND Ground pin for the module.
PAM8403 Amplifier Module
The PAM8403 is an audio amplifier module. An amplifier is a device which is used to convert weak signals into strong signals, i.e increase the magnitude of the signal.
In our use case, the amplifier module is used so that the input received from the Bluetooth module can be amplified and thus sent to the speakers through the left and right channel outputs.
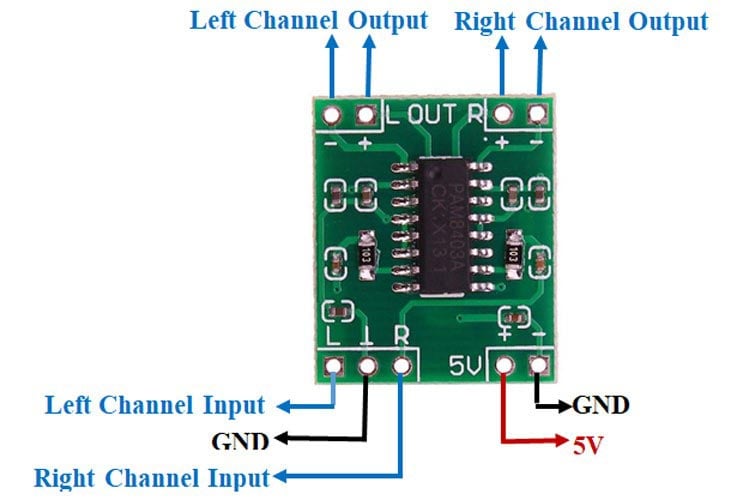
Pinout of PAM8403 Amplifier Module
VCC Power supply pin for the amplifier module. Connected to the positive terminal of the power source (5V) or voltage regulator.
GND Ground pin for the amplifier module. Connected to the negative terminal of the power source and the ground reference.
LIN Left channel input. This pin receives the audio signal for the left audio channel.
RIN Right channel input. This pin receives the audio signal for the right audio channel.
GND Ground pin for the audio input signals. Connected to the ground reference of the audio source.
LOUT+ Positive left channel output. This pin provides the amplified positive signal for the left audio channel.
LOUT- Negative left channel output. This pin provides the amplified negative signal for the left audio channel.
ROUT+ Positive right channel output. This pin provides the amplified positive signal for the right audio channel.
ROUT- Negative right channel output. This pin provides the amplified negative signal for the right audio channel.
Circuit Diagram of PAM8403 Module
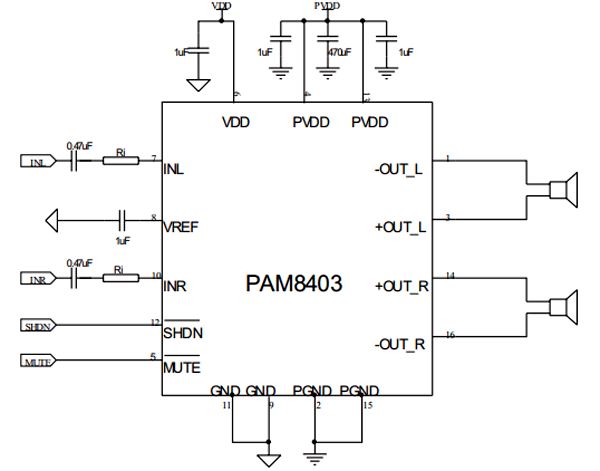
The PAM8403 is an audio amplifier module that can amplify sound signals to drive speakers. It is a 2-channel amplifier, which means it can handle both left and right audio signals. The module has a power supply pin (VCC) and a ground pin (GND) to provide the necessary power for the amplifier to work.
To connect audio signals, there are two pins called INL and INR, which stand for left and right channel input. These pins receive the audio signals from your audio source, like a smartphone or computer. To improve the audio quality, it is recommended to connect a small capacitor (0.47µf) between these input pins and the ground. This helps reduce any unwanted noise that may come from the power supply.
The amplified audio signals are then sent to the speakers. The module has four output pins: ± OUT_L and ± OUT_R. The positive side of the left channel connects to the + OUT_L pin, and the negative side connects to the - OUT_L pin. Similarly, the positive side of the right channel connects to the + OUT_R pin, and the negative side connects to the - OUT_R pin.
One of the advantages of the PAM8403 is that it doesn't require additional low-pass output filters. This means it can directly drive the speakers without the need for extra components, making it more efficient compared to other amplifier types. The recommended operating voltage for the PAM8403 is 5.5V, so you should provide a power supply that matches this voltage to ensure proper operation.
Commonly asked questions about amplifier modules
What is the use of the PAM8403 amplifier module?
The PAM8403 amplifier module is commonly used to amplify audio signals and drive speakers in various applications. It is particularly popular in portable audio devices, such as Bluetooth speakers, MP3 players, and small audio systems. Its compact size, efficiency, and filterless architecture make it suitable for low-power audio amplification needs.
Difference between class:- A, B, AB and C amplifiers
Different amplifier classes refer to the way the amplifiers operate and their efficiency. Class A amplifiers have high-quality output but lower efficiency as they continuously consume power. Class B amplifiers use two transistors to amplify positive and negative halves of the input signal, resulting in better efficiency but with some distortion at the crossover point. Class AB amplifiers combine characteristics of Class A and B amplifiers, aiming for both decent quality and improved efficiency. Class C amplifiers are highly efficient but not suitable for audio due to their high distortion, mainly used in radio frequency (RF) applications.
What are the different types of amplifiers according to their use case?
There are several types of amplifiers based on their use case, including:
Audio Amplifiers: Used to amplify audio signals for speakers or headphones, ranging from small audio devices to home theatre systems.
Instrument Amplifiers: Specifically designed to amplify electric musical instruments like guitars, keyboards, and basses.
RF Amplifiers: Used in wireless communication systems and RF devices to amplify radio frequency signals.
Operational Amplifiers (Op-Amps): Widely used in electronic circuits for various applications, such as amplification, signal conditioning, filtering, and mathematical operations.
Power Amplifiers: Designed to amplify high-power signals, typically used in large sound systems, PA systems, and concert venues.
Differential Amplifiers: Used in communication systems, audio equipment, and measurement instruments to amplify the difference between two input signals.
These are just a few examples, and there are many other types of amplifiers catering to specific applications and requirements.
Now that we are done with the theory, let’s start building this project Step by Step
Create Speaker Enclosure
The first step in building your wireless Bluetooth speaker is to create the speaker enclosure. You can use any material you like, but we used acrylic.
To make this first, you need to use SolidWorks and create the design for the speaker. Then the next step is to cut them through a laser cutting machine (if you own one or through a nearby shop)
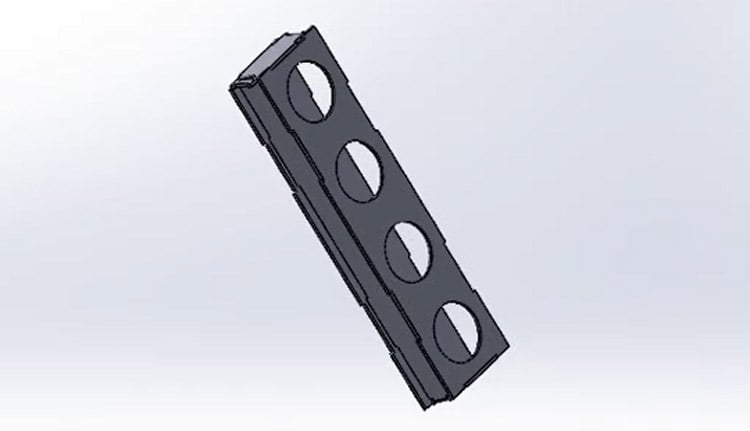
After laser cutting, the parts will look like this.
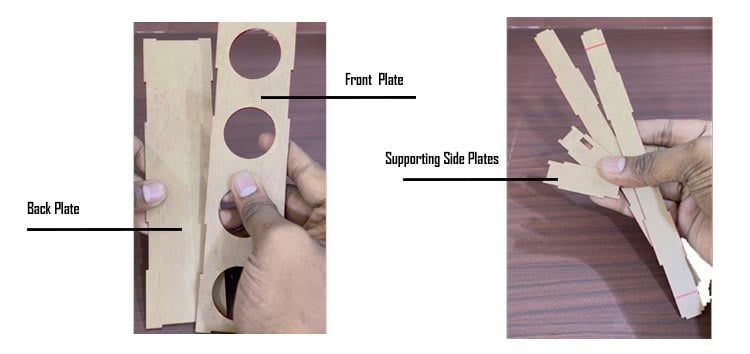
Assembling Front Plate
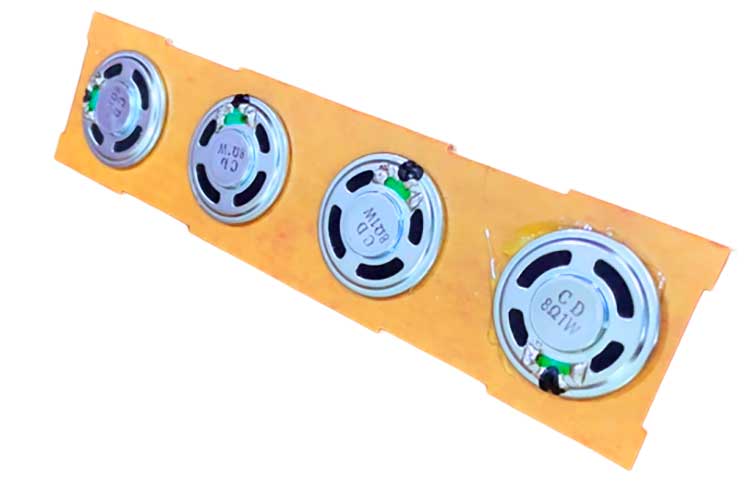
The next thing you need to do is attach the speakers to the front plate of the laser-cut parts. Just attach some glue to the front plate and connect the 4 speakers to it.
Back Cover
Take the back cover and attach the supporting side structures to it.

First attach the amplifier, Bluetooth module and the battery to the back plate.
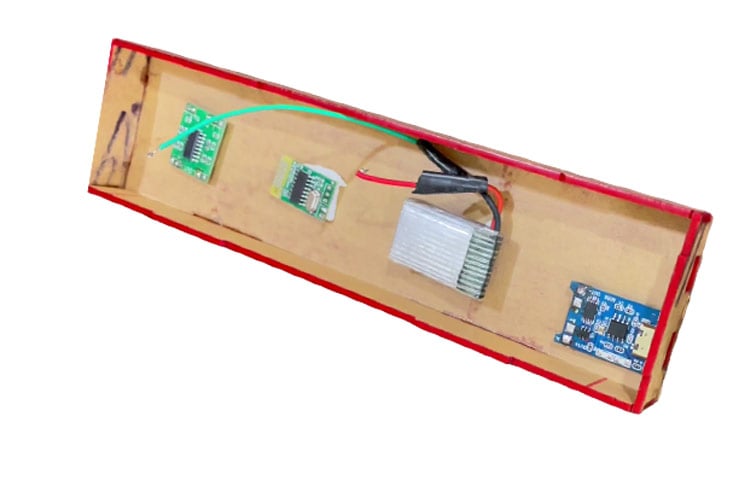
When that is done. You can attach the TP0456 charging module and the switch.
Circuit Diagram of Wireless Bluetooth Speaker

You can refer to the above circuit diagram to recreate your project. It’s simple to follow.
Final Assembly and Testing
When that is done, you can connect the front and back panels and then glue them.
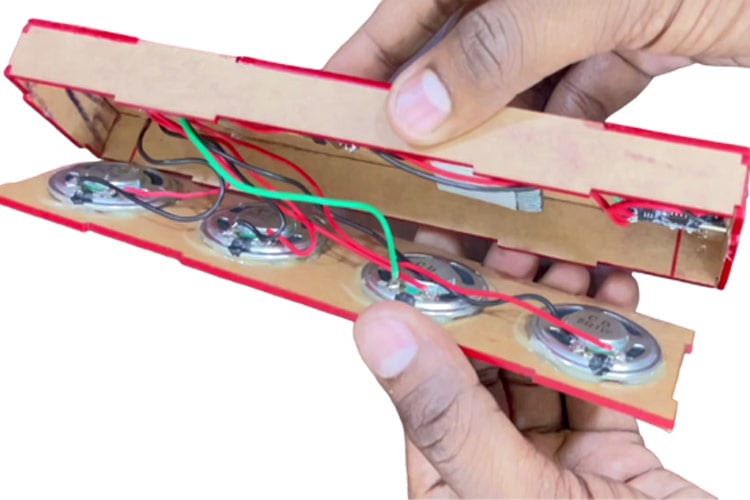
Remove the paper layer of the acrylics to get an amazing final look.

Congratulations, you've just built your own wireless Bluetooth speaker! To use it, simply turn on your Bluetooth-enabled device and pair it with the speaker. You should now be able to enjoy high-quality sound from your new DIY speaker.
In conclusion, building a wireless Bluetooth speaker is a fun and rewarding project that anyone can do with some basic electronic components and a little bit of know-how. Just follow the steps outlined above, and you'll be on your way to enjoying your very own homemade speaker in no time!
Projects using Bluetooth and Speakers

Arduino Bluetooth Speaker with Reactive NeoPixel LEDs
Imagine immersing yourself in the rhythm of your favourite music while being surrounded by a dazzling display of colourful lights that dance in sync with every beat. In this blog, we will explore how to build an Arduino-powered Bluetooth speaker that not only delivers impressive sound but also features reactive NeoPixel LEDs that respond to the music. Get ready to bring your music listening experience to a whole new level of audiovisual delight!

Raspberry Pi Bluetooth Speaker: Play Audio wirelessly using Raspberry Pi
Tired of being tied down by cables while listening to your favourite music? In this blog, we'll explore how to transform your Raspberry Pi into a Bluetooth speaker, allowing you to wirelessly stream audio from your smartphone, tablet, or any Bluetooth-enabled device. Say goodbye to tangled wires and embrace the convenience and freedom of a Raspberry Pi Bluetooth speaker setup!

Simple Microphone to Speaker Amplifier Circuit
Are you looking to amplify the sound from a microphone and directly drive a speaker? In this blog, we'll guide you through the process of building a straightforward microphone-to-speaker amplifier circuit. With just a few components and minimal soldering skills, you can create an amplifier that will enhance the audio captured by a microphone and produce louder output through a speaker. Let's dive in and get started!
