

Analog radios are becoming extinct in this digital world since everything, from movies to songs, is being directly streamed from the Internet today. Let’s see how an Internet radio can be made by leveraging some simple digital electronics, coding, and an active Internet connection. Now, those who are following us regularly might already know that we have built a Raspberry Pi-based Internet Radio previously, but in this tutorial, we will further simplify it by just using an ESP32.
ESP32 Internet Radio - Quick Overview
Build Time: 2-4 hours | Cost: $15-25 | Difficulty: Beginner-Intermediate
What You'll Learn: I2S protocol, Wi-Fi connectivity, Audio streaming, ESP32 programming
Applications: Home audio streaming, Portable radio, Custom music player, IoT audio device
Table of Contents
What is ESP32 Internet Radio?
Internet Radio, also known as streaming, web, IP, or online radio, is generally used to telecast messages, music, discussions, etc. in the form of audio. In other words, it is a digital audio service transmitted via the Internet. However, broadcasting on the Internet or web is usually referred to as webcasting, as no transmission happens broadly through wireless means. ESP32 internet radio (also referred to as ESP32 web radio) is a device that is capable of streaming audio from internet radio stations via Wi-Fi, playing through the connected speakers.
The Internet radio can be created as a stand-alone device that runs through the internet, or as software running through a computer that is connected to the internet. Here, we will make a stand-alone device that will be connected to the Wi-Fi, access the internet, and finally play the audio. To build our ESP32 web radio, we have chosen the ESP32 development board (obviously) and the MAX98357A I2S Amplifier. If you are looking to build a simple FM Radio that can work offline, then you should check the linked article. Now we build a powerful ESP32 internet radio player with the MAX98357A I2S amplifier board with this complete tutorial. Accessing online radio stations using Wi-Fi has never been easier! Setting up the circuit connections and programming your own internet radio player is explained in detail.
Why use ESP32 for Internet Radio Projects?
- Built-in WiFi: Internet streaming audio.
- I2S Supported: Digital audio output for quality audio.
- Price: Cheap compared to commercial Internet radios.
- Modify: You will be able to add functions such as display, volume control, and so forth.
- Low Power: A low-power mode of operation must be supported. For example, running on batteries for portable use.
Components Required to Build ESP32 Web Radio
You will need the following components to build our Internet radio using ESP32. Most of the parts should be available easily.
- ESP32 Devkit
- MAX98357A
- 8-Ohms Speaker with a rating of 0.5W to 1W.
- USB Cable
- 5V 1A charger
- Active internet connection
Understanding I2S Communication Protocol
As most of us already know, ESP32 is a very low-cost, low-power system on a chip microcontroller that has integrated Wi-Fi and dual-mode Bluetooth. We have previously built many ESP32 projects; you can check them out if interested. However, we are not going to use the Bluetooth functionality of ESP32 here, but still, we have selected ESP32 for the three reasons listed below.
- It has a Wi-Fi Module
- It is low-cost
- It has I2S peripheral support.
Now, why is I2S important?
The Integrated Inter-IC Sound Bus (I2S) is a serial bus interface standard that is used for connecting digital audio devices. It is made by Philips Semiconductor. This interface is most commonly used by audio ADC and DAC components.
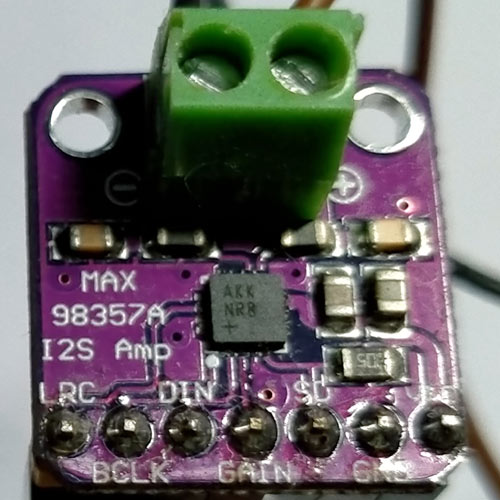
Since to run a radio we need to use a Speaker and need to produce analog output, we need some sort of digital-to- analog converter. Here comes the interesting part of the project. The MAX98357A module. It offers a Digital Class D amplifier that uses the Digital Audio Interface or I2S to communicate with microcontroller units.
MAX98357A I2S Amplifier Features
- It is 92% efficient
- Could provide 3.2W output Power into a 4-ohm load at 5V
- Click and Pop-up noise reduction
- Short circuit and thermal protection
- Supports Left, Right or (Left/2 + Right/2) Output
- Works from 2.5V to 5.5V.
The MAX98357A I2S module that we have used in this project is shown below.
ESP32 Internet Radio Circuit Diagram

The schematic is simple. The MAX98357 connection is given in the table below.
Module Pin | Connection | Description |
LRC | IO26 | Left Right Clock |
BCLK | IO27 | Bit Clock Input |
DIN | IO25 | Digital Data input |
GAIN | GND | Gain Select. If connected with VDD, Gain is 6dB, If GND, Gain 12dB. |
SD | - | Shutdown. To activate, pull it low. |
GND | GND | Supply Ground |
VIN | 5V | Voltage Input |
Since the Gain pin is connected with the GND, the gain is 12dB.
ESP32 Internet Radio Code Implementation
Well, this project uses the ESP32-audioI2S library that is available on GitHub. Before we get into the code, make sure you download the library from the link below and add it to the Arduino IDE.
The full code is provided at the bottom of this page. You can directly copy and use the code, but if you want its explanation, then read further.
First, the libraries required for the project are included, as shown below.
#include "Arduino.h"
#include "WiFi.h"
#include "Audio.h"
Then, the pinouts of the MAX98357A are specified. If you are using the same module shown above, you can leave it as shown below.
#define MAX98357A_I2S_DOUT  25
#define MAX98357A_I2S_BCLK 27
#define MAX98357A_I2S_LRC  26
Audio audio;
Put your Wi-Fi SSID and Password; this allows the ESP32 to connect to the internet.
String ssid = "Your User Id";
String password = "Your Password";
In the setup, the WiFi password and SSID are being set, and the WiFi is started. After the Wi-Fi is connected, the Audio Pinouts are selected, and the volume is also set to the maximum.
  audio.setPinout(MAX98357A_I2S_BCLK, MAX98357A_I2S_LRC, MAX98357A_I2S_DOUT);
  audio.setVolume(100);
Set the streaming URL here. You can choose any streaming URL of your choice, and you can also introduce a potentiometer to switch between multiple streaming channels if needed.
  audio.connecttohost("http://vis.media-ice.musicradio.com/CapitalMP3");
}
After all of this, the audio is played continuously in the void loop using the code below.
void loop()
{
  audio.loop();
}
Testing our ESP32 Internet Radio Player
The circuit is connected properly as per the schematic and connected to the Wi-Fi. As soon as the setup is powered, it connects to the internet and starts streaming the audio from the URL mentioned in the program.
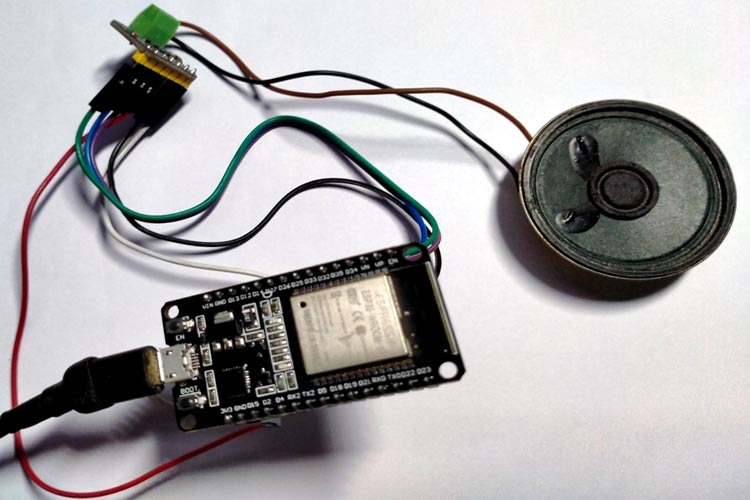
I also found that the audio is quite clear and very usable without any additional amplifiers in between. You can check out the video below that demonstrates the complete project to test the audio quality yourself.
Troubleshooting Common Issues
| Problem | Possible Cause | Solution |
| No audio output | Incorrect I2S wiring | Verify GPIO pin connections match code definitions |
| WiFi connection fails | Wrong credentials | Double-check SSID and password in code |
| Distorted audio | Power supply issues | Use adequate 5V 1A+ power adapter |
| Streaming interruptions | Weak WiFi signal | Move closer to router or use WiFi extender |
Future Improvements or ESP32 Web Radio
∗ LCD Display: Song name, connection state, and station info are displayed on the LCD.
∗ Rotary Encoder: Volume control and station switching capability.
∗ Multiple Stations: Storage of chosen radio streams in memory.
∗ Web Interface: Possible control over radio via browser interface.
∗ Bluetooth: Ability to stream from Bluetooth-enabled mobile devices.
∗ Touch Controls: A modern capacitive touch interface.
∗ Battery Powered: To make portable with a rechargeable battery.
∗ Other Antenna: If necessary, a more sensitive antenna to pick up the WiFi better.
Technical Summary and GitHub Repository
The Technical Summary highlights the core design, working, and applications of the project, while the GitHub Repository provides complete source code, schematics, and documentation for developers.


ESP32 Internet Radio FAQ - People Also Ask
⇥ Does the ESP32 internet radio function without a stable WiFi connection?
No. The ESP32 device needs a continuous WiFi connection to stream. However, SD card support can be added for offline play, or an auto-reconnect algorithm can be implemented to manage momentary network loss.
⇥What audio quality does the ESP32 web radio output?
The ESP32 internet radio produces excellent audio through the I2S protocol. MAX98357A amplifier supporting 16-bit/48kHz audio at an efficiency of 92%, powers it at 3.2W, producing clear audio to rival that of any commercial streaming device.
⇥ How many radio stations can the ESP32 internet radio save?
ESP32 can save hundreds of URLs for radio stations inside flash memory. Given 4MB of space, storing 200+ station presets is no challenge. Some very advanced applications can use an external SD card to store unlimited stations and playlists.
⇥ Is the ESP32 internet radio project beginner-friendly?
Yes, this ESP32 internet radio project is easy for beginners. Even basic Arduino programming skills and basic wiring knowledge are enough. The circuit only requires 6 connections, and the code provided will work straight away after uploading with little to no configuration.
⇥ Is it possible to include volume control for my ESP32 internet radio?
Yes, add a potentiometer on the ESP32 analog pin for hardware-based volume control or a rotary encoder for digital control. The audio library provides support for volume levels 0-21, which allows fine control using straightforward analogRead() commands.
This comprehensive ESP32 internet radio project exemplifies how contemporary microcontrollers can be used to generate complex audio streaming devices. The ESP32's wireless 'WiFi' connectivity and the I2S amplification from the MAX98357A result in great audio quality that is similar to commercial internet radios.
Hope you enjoyed this ESP32 Radio project and would build one on your own. Again, this
is a very simple setup, and you can improvise it with a display and a control knob to switch between multiple radio stations and even control the volume just like a traditional radio. If you have any questions or ideas, feel free to drop them in the comment section below.
Explore the Radio-Based Projects
From simple experiments to advanced prototypes, this radio project has been extended into various applications. Check out the related ideas and builds below.

Arduino Based FM Radio Using RDA5807
In this tutorial, we are going to construct an Arduino FM Receiver, and add it to our project arsenal. We will use the RDA5807 FM Receiver IC with Arduino and program it so, play any FM radio station which can be tuned by the user with a potentiometer.

Raspberry Pi Internet Radio and Streaming Station
In this tutorial, we are going to set up a Raspberry Pi streaming station using DarkIce and Icecast. DarkIce and Icecast are two Raspberry Pi packages used for audio recording, encoding, and streaming. DarkIce is a live audio streamer that records audio from an audio interface, i.e. Microphone, encodes it, and sends it to a streaming server.

Smart Phone Controlled FM Radio using Arduino and Processing
In this project, we will use an existing FM radio which went out of repair a long time ago to convert it into a Smart Wireless FM Radio controlled using a Phone, with the help of Arduino and Processing. We can convert any manually operated electronic device into a Smart Device using the same procedure.
Complete Project Code
#include "Arduino.h"
#include "WiFi.h"
#include "Audio.h"
#define I2S_DOUT     25
#define I2S_BCLK      27
#define I2S_LRC        26
Audio audio;
String ssid =    "Sourav";
String password = "87654321";
void setup() {
  WiFi.disconnect();
  WiFi.mode(WIFI_STA);
  WiFi.begin(ssid.c_str(), password.c_str());
  while (WiFi.status() != WL_CONNECTED)
  delay(1500);
  audio.setPinout(I2S_BCLK, I2S_LRC, I2S_DOUT);
  audio.setVolume(100);
  audio.connecttohost("http://vis.media-ice.musicradio.com/CapitalMP3");
}
void loop()
{
  audio.loop();
}
Comments
Please communicate in english.
Really useful project, i needed something simple to understand how it worked, and now i understand completely, all others i have looked at were a bit complicated, now i feel i can make my Internet Radio/Blutooth/USB/Memory card Player: Thanks :)
This need to be expanded perhaps with a waY to change stations display which sttion is playing and adjust volume. Do you have any pointers?
When verifying the sketch in the Arduino IDE, it stops at line 7 with this message: exit status 1 'Audio' does not name a type. I am confused.
Hi AL, have you installed the Audio.h library in your Arduino IDE?
Hi Ashish . Thank you for the lovely project. I am an amateur , but I built this Radio and it works just fine. Need your help to increase the stations and also for station selection

bonjour a vous et merci pour le tuto
pourriez vous expliquer la marche à suivre pour introduire un autre URL ? avec un exemple concret
je ne comprends pas l'ajout d'un potentiometre, ne serait il pas plutot un bouton poussoir ?
Ou le raccorder? à quelles broches du esp ?
D'avance un grand merci !
Piret Alain