
In this tutorial, we are going to set up a Raspberry Pi streaming station using DarkIce and Icecast. DarkIce and Icecast are two Raspberry Pi packages used for audio recording, encoding, and streaming. DarkIce is a live audio streamer that records audio from an audio interface, i.e. Microphone, encodes it, and sends it to a streaming server. DarkIce can record audio from OSS audio devices, ALSA audio devices, Jack sources, and CoreAudio. It can encode the recorded audio in the MP3, MP2, AAC LC, AAC HEv2, Opus, and Vorbis formats. Then it can send the encoded audio to the ShoutCast, IceCast, and Darwin Streaming Servers.
Icecast is an audio/video streaming media server that supports Ogg, Opus, WebM, and MP3 streams. It can be used to create everything from Internet radio stations to jukeboxes and many things in between. Previously, we have used Raspberry Pi to build many interesting projects, which you can also check.
Components Required
- Raspberry Pi
- USB Microphone
How to Install DarkIce and Icecast onto Raspberry Pi
Before installing the DarkIce and Icecast, the Raspberry Pi needs to be fully updated. Use the below commands to update the Raspberry Pi to its latest version:
sudo apt-get update
sudo apt-get upgrade
Use the below commands to download the darkice deb package and install it. The default DarkIce package comes without MP3 support.
Wget https://github.com/x20mar/darkice-with-mp3-for-raspberry-pi/blob/master/darkice_1.0.1-999~mp3+1_armhf.deb?raw=true
mv darkice_1.0.1-999~mp3+1_armhf.deb?raw=true darkice_1.0.1-999~mp3+1_armhf.deb
sudo apt-get install libmp3lame0 libtwolame0
sudo dpkg -i darkice_1.0.1-999~mp3+1_armhf.deb
Now, before configuring, DarkIce will need to install Icecast on Raspberry Pi. Use the below command to install the Icecast:
sudo apt-get install icecast2
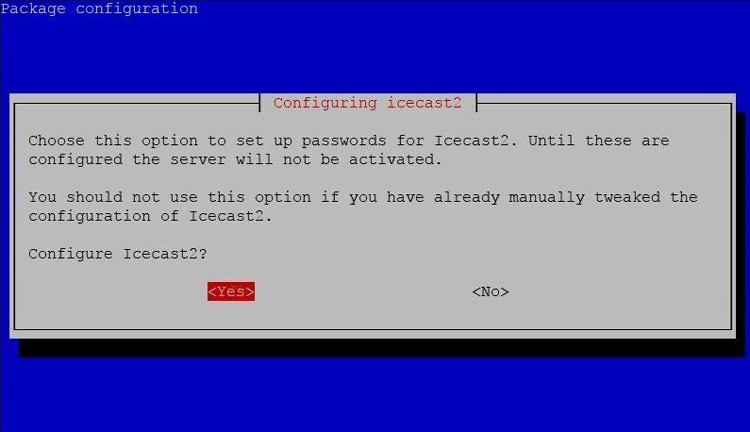
During the installation process, it will ask you if you want to configure Icecast2. Select Yes.
The next screen will ask you to specify the domain name. Select OK to use the default hostname "localhost".

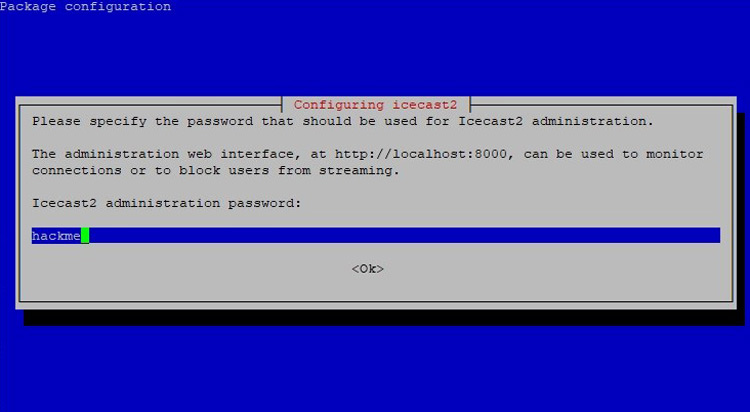
Now, in the next steps, you will be required to add 3 passwords. The first one is to control access to media sources, the second is to use stream relays, and the third password is to grant access to the administration console. Click ‘ok’ to use the default password. The default username will be “admin”.
After installing the Icecast2, we need to create a darkice config file to use the right sound card and talk to icecast2. Create a config file using the following command:
sudo nano darkice.cfg
Then copy and paste these configurations in the file:
# this section describes general aspects of the live streaming session
[general]
duration     = 0     # duration of encoding, in seconds. 0 means forever
bufferSecs   = 5     # size of internal slip buffer, in seconds
reconnect    = yes   # reconnect to the server(s) if disconnected
# this section describes the audio input that will be streamed
[input]
device          = plughw:0,0  # Soundcard device for the audio input
sampleRate      = 22050     # sample rate in Hz. try 11025, 22050 or 44100
bitsPerSample   = 16        # bits per sample. try 16
channel         = 2         # channels. 1 = mono, 2 = stereo
# this section describes a streaming connection to an IceCast2 server
# there may be up to 8 of these sections, named [icecast2-0] ... [icecast2-7]
[icecast2-0]
bitrateMode     = abr       # average bit rate
format          = mp3       # format of the stream: ogg vorbis
bitrate         = 320       # bitrate of the stream sent to the server
server          = localhost # host name of the server
port            = 8000      # port of the IceCast2 server, usually 8000
password        = lolcat123 # source password to the IceCast2 server
mountPoint      = Stream.mp3  # mount point of this stream on the IceCast2 server
name            =  Raspberry Pi Stream # name of the stream
description     = Broadcast from Raspberry Pi # description of the stream
#public          = yes       advertise this stream?
Save the changes using Ctrl+X > Y > Enter.
Then create another file named "darkice.sh" using the below command:
sudo nano darkice.sh
Paste the below line in the file. This line contains the address to the configuration file.
sudo /usr/bin/darkice -c /home/pi/darkice.cfg
Then make the darkice.sh file executable using the below command:
sudo chmod 777 /home/pi/darkice.sh
Next, start the Icecast2 service using the below command:
sudo service icecast2 start
Boot on start:
Now, we have DarkIce working and everything we now need to make DarkIce run as soon as Raspberry Pi starts. For that use the below command to open up crontab:
crontab –e
And add the below command at the end of the file. Change the file path to match your installation directory.
@reboot sleep 10 && sudo /home/pi/darkice.sh
Save the changes by typing CTRL+X, then Y, then pressing the ENTER key. With this done, the setup is over. Reboot the Pi using the below command:
sudo reboot
Testing the Raspberry Pi Internet Radio
Now that everything is ready, let’s test if the stream was set up correctly or not. For that go to your browser type http:// Pi IP Address:8000. Mine is 192.168.1.226:8000.
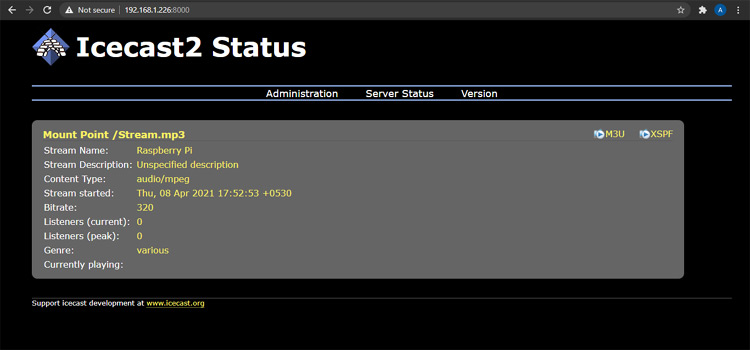
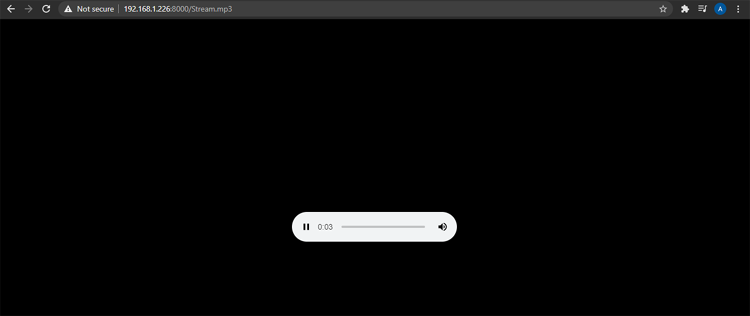
Click on M3U in the top right corner or enter http:// 192.168.1.226:8000/Stream.mp3 to open the stream. If you're able to listen to the content, the stream is running properly.
This is how you can build a Raspberry Pi Internet Radio and Streaming Station. A complete working video is given below.
Comments
further this is error reported by darkice.sh
Using config file: /home/crs/darkice.cfg
Using ALSA DSP input device: plughw:0,0
Using POSIX real-time scheduling, priority 98
DarkIce: DarkIce.cpp:1187: can't open connector [0]

I have followed instructions and on giving the URL in browser icecast2status screen appears and this is seen
Adminstration server status only appears nothing below that
Please advise