
DIY Music players are fun to build, and we previously built a few music players using Arduino and a dedicated MP3 module. Now we are using the ESP32 speaker output to build an interesting audio player, in which you can add sound effects by just connecting an extra speaker to the ESP32. Here we will use LM386 and a speaker with ESP32 to play music files. The audio output may not be loud, but this application shows the ability of the ESP32 speaker amplifier. Building an ESP32 audio player is an exciting DIY electronics project that demonstrates the ESP32's powerful DAC capabilities. This comprehensive guide shows you how to create an ESP32 music player using an LM386 ESP32 amplifier circuit and a standard 8-ohm speaker. Whether you're exploring ESP32 audio projects or need a simple ESP32 speaker solution, this tutorial covers everything from circuit connections to audio file preparation.
Table of Contents
ESP32 Audio Player Quick Reference
| Specification | Details |
| Microcontroller | ESP32 Development Board |
| Audio Output Pin | GPIO 25 (DAC1) |
| Amplifier IC | LM386 Audio Amplifier |
| Speaker Impedance | 8 Ohm |
| Audio Format | WAV (Unsigned 8-bit PCM) |
| Sample Rate | 8000-16000 Hz |
| Power Supply | 5V via USB/VIN |
Components Required for ESP32 Music Player
To build this ESP32 audio player project, you'll need the following electronic components:
| Component | Specification | Purpose |
| ESP32 Development Board | Any variant with DAC pins | Main controller for audio playback |
| LM386 Amplifier Module | Gain adjustable (20-200) | Amplifies ESP32 speaker output signal |
| Speaker | 8 Ohm, 0.5W or higher | Audio output transducer |
| Jumper Wires | Male-to-Male/Female | Circuit connections |
| Breadboard (Optional) | Standard size | Prototyping platform |
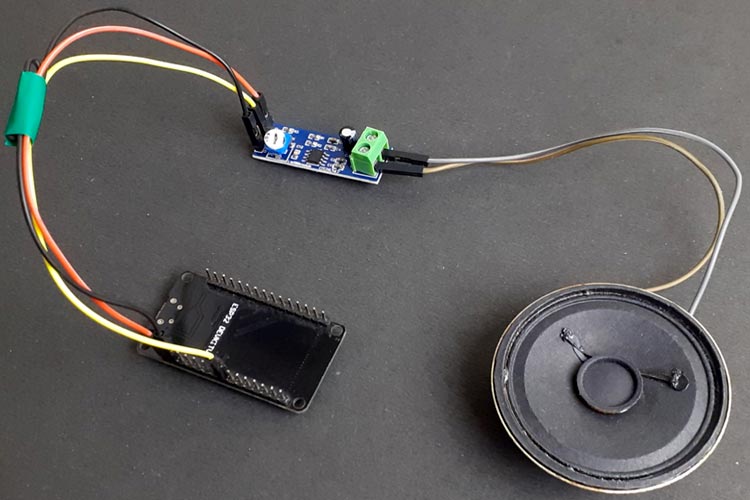
ESP32 Audio Player Circuit Diagram
The circuit diagram below shows how to connect a speaker with ESP32 using the LM386 amplifier module for optimal audio performance:

Circuit Connection Overview
Follow these exact wiring instructions for your ESP32 speaker amplifier:
» Power Wiring: Connect your LM386 module VCC to the ESP32 VIN pin (5V) and GND to the ESP32 GND pin
» Audio Connection: Connect LM386 IN (input) pin to ESP32 GPIO 25 (DAC1 output pin)
» Speaker Connection: Connect the 8-ohm speaker to the LM386 OUT terminals
» Volume Control: You can use the onboard potentiometer on the LM386 to control the audio volume
Understanding the LM386 ESP32 Amplifier Circuit
To play sound on ESP32, we need a speaker. The speaker is connected through the LM386 Audio Amplifier module. Vcc and GND pins of the Amplifier Module are connected to VIN and GND of ESP32, while the IN pin of the Amplifier module is connected to the GPIO 25 pin of ESP32. GPIO 25 is one of the 2 DAC (Digital to Analog Converter) pins.
This is how the complete setup for the ESP32 Music Player will look:
LM386 is an audio amplifier IC. You can learn more about LM386 by following the link. In this ESP32 audio player configuration, the LM386 performs several critical functions:
Preparing Audio Files for ESP32 Music Player
The ESP32 platform has specific audio format requirements due to memory constraints. This section covers converting audio files to ESP32-compatible WAV format for your ESP32 audio projects.
To play audio sounds on the ESP32 board, we need audio files in .wav format because the ESP32 can play an audio file in .wav format only.
⇒ Step 1: Install Audacity Audio Editor
So the first step will be getting the file that you want to play on the ESP32. After that, download and install the Audacity Audio Editor App. This app will be used to change the file type, Sample Rate, and other properties.
⇒Step 2: Import Your Audio File
Once the installation is complete, open the Audacity app and then go to File> Open and select the audio file to edit.
⇒Step 3: Adjust Sample Rate for ESP32 Audio Player
The sample rate determines audio quality and memory usage for your ESP32 speaker project:
The first thing that needed to be changed is the sampling rate. For playing an audio file on ESP32, a sampling rate of 8000 to 16000 will be good, as ESP32 doesn’t have much memory. So change the Project Rate to 16000.

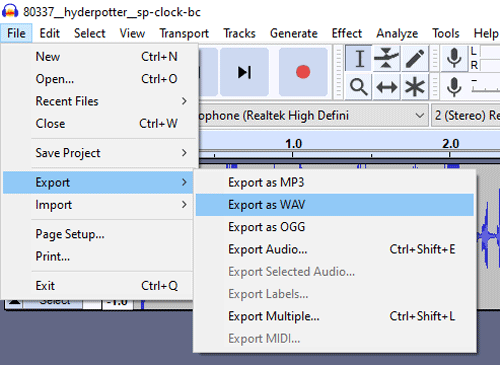
⇒Step 4: Export as WAV File
Since this ESP32 speaker output design uses a single speaker:
After that, navigate to File > Export > Export as WAV to save the audio file in .wav format.
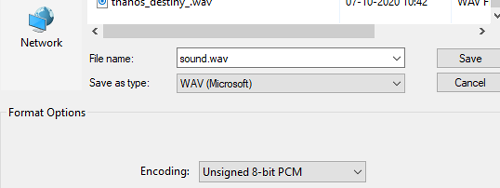
⇒Step 5: Configure WAV Encoding Settings
Now, in the next window, select WAV (Microsoft) as the file type and Unsigned 8-bit PCM as an Encoding format and then click on Save.
Converting a WAV File to a Hex Code Array
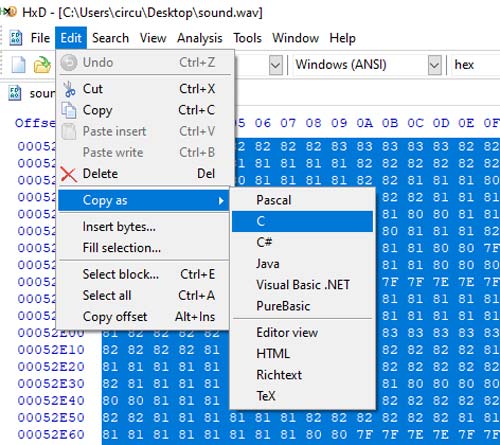
Now we need a Hex Editor app to generate the Hex codes for the audio file. So download and install the Hex Editor (HxD) from the given link. After that, open the app, then go to File > Open and open the .wav file. This will generate the Hex code for the .wav file.
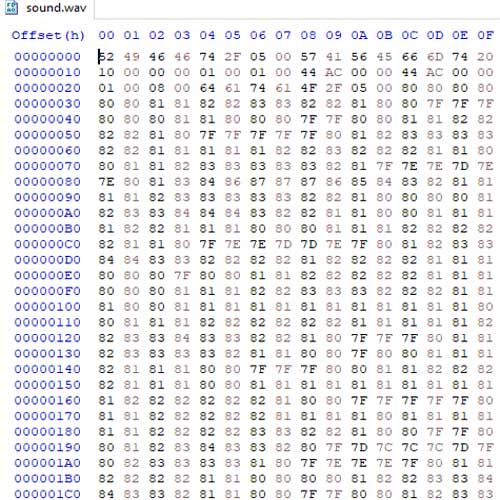
Then use Ctrl+A to select the complete code, and then go to Edit > Copy as > C to copy the code in C Language format.
Then paste this code into the Arduino IDE.
ESP32 Audio Player Programming Code
This section explains the Arduino code structure for your ESP32 speaker project using the XT_DAC_Audio library.
The complete code for the Contactless ESP32 Audio Player is given at the end of the page. Here we are explaining some important parts of the code. In this program, we are going to use the XT DAC Audio library from XTronical. The XT DAC Audio library can be downloaded from here.
So, as usual, start the code by including all the required libraries. SoundData.h file contains the Hex code for the .Wav file that is to be played.
Here's the detailed breakdown of the ESP32 audio player code structure. This header file stores your converted audio data for the ESP32 music player:
#include "SoundData.h"
#include "XT_DAC_Audio.h"
In the next line, create an object of type XT_Wav_Class that is used by the DAC audio class, passing .wav data as a parameter. DacAudio, the main player class object, in which 25 is the DAC PIN where the amplifier pin is connected.
XT_Wav_Class Sound(sample);
XT_DAC_Audio_Class DacAudio(25,0);
Inside the setup() function, initialise the Serial Monitor at a baud rate of 115200 for debugging purposes.
void setup() {
  Serial.begin(115200);
Inside the loop() function, fill the sound buffer with data and check if the sound is playing or not; if not, play the sound in the loop.
void loop() {
  DacAudio.FillBuffer();
  if(Sound.Playing==false)
    DacAudio.Play(&Sound);
  Serial.println(DemoCounter++);
}
Testing Your ESP32 Music Player
Once the code is ready, connect the speaker to GPIO 25 of the ESP32 through LM386 or any other amplifier module. Now connect the ESP32 to the Laptop and upload the code. Once the code is uploaded, the ESP32 starts playing the Audio. Sound quality can be changed using the potentiometer of the Amplifier module.
Technical Summary and GitHub Repository
Dive into the technical insights behind the project, covering circuit design, code structure, and system operation. Explore the GitHub repository for open-source resources, including schematics, firmware, and setup guides to build your own version.


Troubleshooting Common ESP32 Audio Player Issues
| Problem | Possible Causes | Solutions |
| No sound from speaker | Wrong pin connection, speaker damaged, code error | Verify GPIO 25 connection, test speaker with battery, check Serial Monitor for errors, measure DAC output voltage with multimeter |
| Low volume output | Low amplifier gain, weak power supply, incorrect impedance | Increase LM386 gain potentiometer, use 5V/1A power supply, verify 8-ohm speaker impedance, check VIN pin voltage |
| Audio cuts out intermittently | Buffer underrun, power fluctuations, loose connections | Remove delay() functions, add decoupling capacitors, secure all jumper wires, optimize FillBuffer() call frequency |
| Compilation errors | Missing libraries, incorrect board selection, syntax errors | Install XT_DAC_Audio library, select ESP32 Dev Module board, verify SoundData.h format, check for array comma errors |
| Robotic/digital sound | Wrong sample rate, incorrect encoding format | Re-export WAV at 16000Hz, ensure Unsigned 8-bit PCM encoding, verify mono channel (not stereo) in audio file |
| ESP32 crashes during playback | Array too large, memory overflow, insufficient power | Reduce audio file length, use SPIFFS storage, increase power supply capacity, monitor free heap memory |
Frequently Asked Questions About ESP32 Speaker
⇥ Why does my ESP32 speaker audio player sound distorted?
Distorted audio usually results from too much amplifier gain, a low power supply, or wrong WAV encoding. Decrease the LM386 potentiometer gain setting, provide a good 5V power supply, check the WAV file as Unsigned 8-bit PCM format, and include filtering capacitors in your speaker amp circuit.
⇥ What GPIO pin do I use for the ESP32 speaker output?
Use GPIO 25 or GPIO 26 for audio output since they are the only pins with in-built DAC (Digital-to-Analog Converter) capability on ESP32. GPIO 25 is DAC channel 1 and GPIO 26 is DAC channel 2, both giving 8-bit resolution analog output, which is required for music player applications.
⇥ How much audio can the ESP32 memory hold?
ESP32 has around 320KB of usable flash program memory to hold audio. With a 16kHz sample rate, this will fit about 20 seconds of audio. If you want to play back audio that is longer than this, you will need an external SPIFFS filesystem or SD card storage which can hold hours of audio for your audio projects.
⇥ Is it an option to use a different amplifier over the LM386 with the ESP32?
Yes, any alternatives like PAM8403, MAX98357A (I2S), TDA2822 are compatible with ESP32. PAM8403 has more power, MAX98357A uses a digital I2S in for better audio control. LM386 is still very common due to being easy to use and having fewer components needed for use in speaker amp applications.
⇥ Why does my ESP32 audio player include background noise?
Background hum or noise usually stems from inadequate grounding, power supply ripple, or electromagnetic interference. Share a common ground for all circuit components, insert a 100µF capacitor in parallel across the ESP32 power pins, employ shielded cable for speaker connections, and apply a stable, regulated power supply for a clean speaker output.
⇥ What is the highest sample rate for ESP32 audio playback?
ESP32 DAC can theoretically achieve 1MHz sampling, but in practical music playback, it is best under 8000-16000 Hz in considering memory and processing limitations. Music player applications for richer quality can use the I2S interface to interface with external DAC chips, supporting sample rates up to 32kHz-44.1kHz.
⇥ How do I add multiple songs to my ESP32 music player?
In SoundData.h, you can generate as many byte arrays as you'd like to define multiple songs, or configure SPIFFS/SD card file system storage. At that point, you could add a switch that accesses different song playback based on button press. For multi-song playback and larger music libraries, you can put an SD card in the ESP32 formatted in FAT32 that will allow you to store dozens of songs without consuming any of the ESP32's flash memory.
⇥ Is the ESP32 a good choice for commercial audio projects?
The ESP32 8-bit DAC has sufficient audio quality for providing notifications, alarms, or playback of a voice recording. For pro-audio, you would want to use the ESP32's I2S interface to an external 16-bit or 24-bit DAC such as a PCM5102A, which will allow you to achieve CD-quality playback. This method is used in commercial audio projects and as a means to stream audio.
Conclusion
Constructing an audio player with the ESP32 audio player demonstrates the capability of the ESP32 platform that extends beyond its usual microcontroller use. Combining Digital-to-Analog conversion, audio signal processing, and amplification will form the basis for your ESP32 music player. The cute combination of an LM386 ESP32 will allow an easy pathway into audio electronics projects.
Whether you are exploring the ESP32 audio projects for educational reasons or creating an audio prototype for a commercial application, understanding the basics of ESP32 speaker output opens up ways to create voice interfaces, notifications, and a full multimedia device. This speaker with ESP32 configuration discussed here is a step toward advanced audio applications such as multi-channel playback, live audio processing, and audio streaming.
The ESP32 speaker amplifier circuit with LM386 also provides plenty of power for small-scale applications, and keeps the design simple.
This comprehensive ESP32 audio player guide was created by electronics engineers with extensive experience in embedded systems and audio circuit design. We've tested this configuration with multiple ESP32 variants and speaker types to ensure reliability and reproducibility. All circuit diagrams and code examples have been verified through practical implementation.
Hope you enjoyed the project. A working video and complete code are given below. SoundData.h header file can be downloaded from here. If you have any doubts, leave them in the comment section.
Projects in a Similar Realm
The following are some projects that are related to Audio. If you are looking for more options, just explore them for more details:

Understanding the Fundamentals of Digital Audio
This article is meant to acquaint you with the basic concepts of digital audio and the terminology related to this. If any of the following makes sense to you, then it’s a good place to start!

Wireless Audio Transfer Using LASER Light
In this article, we are going to discuss how to transfer audio through laser light. This is a fun little project, and the concept is similar to what we see in fibre optics cable. We will use a laser light to send data from one point to another.

Arduino-based Audio Spy Bug using NRF24L01
In this project, we are going to build an audio bug using Arduino and NRF24L01. This audio spy bug is highly customizable and can be easily integrated with other devices and systems. The NRF24L01 module allows transmission over a specific channel, ensuring that our transmissions remain private up to a level
Complete Project Code
#include "SoundData.h"
#include "XT_DAC_Audio.h"
XT_Wav_Class Sound(sample);
XT_DAC_Audio_Class DacAudio(25,0);
uint32_t DemoCounter=0;
void setup() {
  Serial.begin(115200);
}
void loop() {
  DacAudio.FillBuffer();
  if(Sound.Playing==false)
    DacAudio.Play(&Sound);
  Serial.println(DemoCounter++);
}
I followed the instructions and upload the sketch to esp32, all I got is statics on the speaker. Any idea why?