
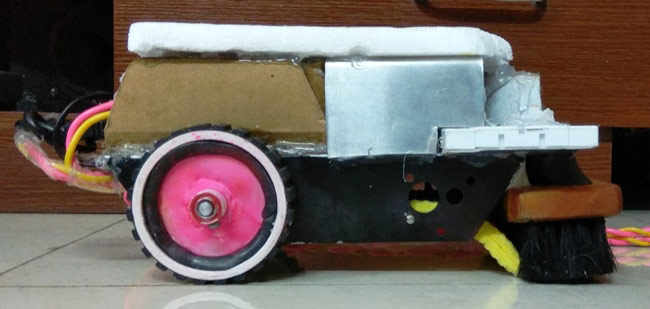
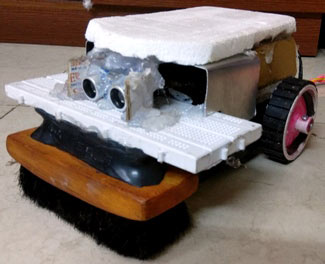
Automatic floor cleaners are nothing new, but they all share a common problem. They all are too expensive for what they do. Today, we will make a Automatic Home cleaning Robot that only costs a small fraction of the ones in the market. This Robot can detect the obstacles & objects in front of it and can continue moving, avoiding the obstacles, until the whole room is cleaned. It has a small brush attached to it to clean the floor.
Also check our Smart Vacuum Cleaning Robot using Arduino
Component Required:
- Arduino UNO R3.
- Ultrasonic Sensor.
- Arduino Motor Driver shield.
- Wheel Drive Robot Chassis.
- Computer to Program the Arduino.
- Battery for the Motors.
- A Power Bank To Power The Arduino
- A Shoe Brush.
- A Scotch Brite Scrub Pad.
Note: Instead of using batteries, you can also use a long 4-stranded wire as we did. Though this is not a very elegant or practical solution but you can do if you’re not planning to use it in the real world every day. Make sure the cable’s lengths are enough.
Before going into detail lets discuss about Ultrasonic first.
HC-SR04 Ultrasonic Sensor:
The Ultrasonic Sensor is used to measure the distance with high accuracy and stable readings. It can measure distance from 2cm to 400cm or from 1 inch to 13 feet. It emits an ultrasound wave at the frequency of 40KHz in the air and if the object will come in its way then it will bounce back to the sensor. By using that time which it takes to strike the object and comes back, you can calculate the distance.
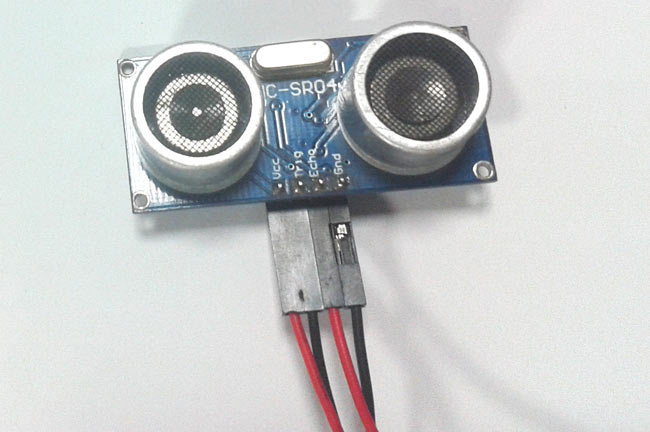
The ultrasonic sensor uses a technique called “ECHO”. “ECHO” is simply a reflected sound wave. You will have an ECHO when sound reflects back after reaching a dead end.
HCSR04 module generates a sound vibration in ultrasonic range when we make the ‘Trigger’ pin high for about 10us which will send a 8 cycle sonic burst at the speed of sound and after striking the object, it will be received by the Echo pin. Depending on time taken by sound vibration to get back, it provides appropriate pulse output. If the object is far away then it takes more time for ECHO to be heard and the output pulse width will be big. And if the obstacle is near, then the ECHO will be heard faster and output pulse width will be smaller.
We can calculate the distance of the object based on the time taken by ultrasonic wave to return back to the sensor. Since the time and speed of sound is known we can calculate the distance by the following formulae.
Distance= (Time x Speed of Sound in Air (343 m/s))/2.
The value is divided by two since the wave travels forward and backward covering the same distance. Thus the time to reach obstacle is just half the total time taken
So Distance in centimeter = 17150*T
We have previously made many useful project using this Ultrasonic sensor and Arduino, check them below:
- Arduino Based Distance Measurement using Ultrasonic Sensor
- Door Alarm using Arduino and Ultrasonic Sensor
- IOT Based Dumpster Monitoring using Arduino
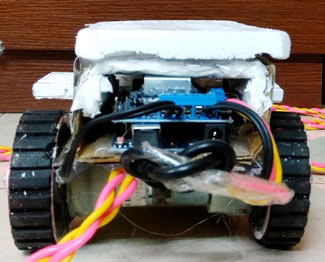
Assembly of Floor Cleaner Robot:
Mount the Arduino on the chassis. Make sure you don’t short circuit anything in case your chassis is made of metal. It is a good idea to get a box for the Arduino and the motor controller shield. Secure the motors with the wheels and chassis using screws. Your chassis should have options to do this from the factory, but if it doesn't, you can improvise a different solution. Epoxy isn’t a bad idea. Mount the shoe brush on the front of the chassis. We used a combination of M-Seal epoxy and drilled screws for this, though you can use any other solution that might be easier for you. Mount the Scotch Brite scrub pad behind the brush. We used a shaft going across the chassis that holds it in play, though this is improvisable as well. A spring loaded shaft can be used to accompany it. Mount the batteries (or cables on the back of the chassis). Epoxy or a battery holder are good ways to do this. Hot glue isn’t bad either.
Wiring and Connections:
Circuit for this Automatic Home Cleaning Robot is very simple. Connect the Ultrasonic sensor to the Arduino as mentioned below and place the Motor Driver shield on to the Arduino like any other shield.

The Trig pin of Ultrasonic is connected to the 12th pin on the Arduino, the Echo pin is connected to the 13th pin, the voltage pin to the 5V pin and the Ground pin to the ground pin. The Echo pin and the Trig pin allow the Arduino to communicate with the sensor. Power is delivered to the sensor through the voltage and Ground pins, and the Trig and Echo pins allow it to send and receive data with the Arduino. Learn more about Interfacing Ultrasonic sensor with Arduino here.
The motor shield should have at least 2 outputs, and they should be connected to your 2 motors. Normally, these outputs are labelled “M1” and “M2” or “Motor 1” and “Motor 2”. Wire your batteries and power bank up to the motor shield and Arduino respectively. Do not cross connect them. Your motor shield should have an input channel. If you’re using wires, connect them to AC adapters.
Programing Explanation:
Open the Arduino IDE. Paste the complete Arduino code, given at the end of this tutorial, into the IDE. Connect your Arduino to the computer. Select the port in Tools/Port. Click the upload button.
Test the robot. If it turns too little or too much, experiment with the delays until perfect.
Before going into the code, we need to install the Adafruit Motor Shield Library to drive the DC motors. Since we are using the L293D motor driver shield, we need to download the AFmotor Library from here. Then add it into your Arduino IDE library folder. Ensure you rename it to AFMotor. Learn more about installing this library.
Code is easy and can be understood easily, but here we have explained few parts of it:
Below code sets up the robot. First we have included the Adafruit Library for driving the motors with Motor driver shield. After that, we defined Trig pin and Echo pin. It also sets up the motors. It sets the Trig pin to output and the Echo pin to input.
#include <AFMotor.h>
#define trigPin 12
#define echoPin 13
AF_DCMotor motor1(1,MOTOR12_64KHZ);
AF_DCMotor motor2(2, MOTOR12_8KHZ);

void setup() {
  pinMode(trigPin, OUTPUT);
  pinMode(echoPin, INPUT);
}
Below code tells the Arduino to loop the following commands. After that, it uses the sensor to transmit and receive ultrasonic sounds. It calculates the distance it is from the object once ultrasonic waves bounces back, after noting that the object is within the set distance, it tells the Arduino to rotate the motors accordingly.
void loop() {
  long duration, distance;
  digitalWrite(trigPin, LOW);
  delayMicroseconds(2);
  digitalWrite(trigPin, HIGH);
  delayMicroseconds(10);
  digitalWrite(trigPin, LOW);
  duration = pulseIn(echoPin, HIGH);
  distance = (duration/2) / 29.1;
  if (distance < 20) {
motor1.setSpeed(255);
motor2.setSpeed(0);
motor1.run(BACKWARD);
motor2.run(BACKWARD);
delay(2000); //CHANGE THIS ACCORDING TO HOW THE ROBOT TURNS.
This makes the robot turn by rotating one motor and keeping the other stagnant.
Below code makes the robot turn both motors in the same direction in order to make it move forward until it detects an object in the aforementioned boundary.
  else {
    motor1.setSpeed(160); //CHANGE THIS ACCORDING TO HOW FAST YOUR ROBOT SHOULD GO.
    motor2.setSpeed(160); //CHANGE THIS TO THE SAME VALUE AS YOU PUT IN ABOVE.
    motor1.run(FORWARD);
    motor2.run(FORWARD);
}
Complete Project Code
#include <AFMotor.h>
#define trigPin 12
#define echoPin 13
AF_DCMotor motor1(1,MOTOR12_64KHZ);
AF_DCMotor motor2(2, MOTOR12_8KHZ);

void setup() {
  pinMode(trigPin, OUTPUT);
  pinMode(echoPin, INPUT);
}

void loop() {

  long duration, distance;
  digitalWrite(trigPin, LOW);
  delayMicroseconds(2);
  digitalWrite(trigPin, HIGH);

  delayMicroseconds(10);
  digitalWrite(trigPin, LOW);
  duration = pulseIn(echoPin, HIGH);
  distance = (duration/2) / 29.1;

  if (distance < 20) {
motor1.setSpeed(255);
motor2.setSpeed(0);
motor1.run(BACKWARD);
motor2.run(BACKWARD);
delay(2000); //CHANGE THIS ACCORDING TO HOW THE ROBOT TURNS.
}
  else {
motor1.setSpeed(160); //CHANGE THIS ACCORDING TO HOW FAST YOUR ROBOT SHOULD GO.
    motor2.setSpeed(160); //CHANGE THIS TO THE SAME VALUE AS YOU PUT IN ABOVE.
    motor1.run(FORWARD);
    motor2.run(FORWARD);
}
}
Comments
If we connect the motor shield on arduino ... where to connect the ultra sensor ?? The 12 13 gnd and 5v pins are occupied
you can use any two digital I/O for trigger and echo. Then mention it in the program
Hello,
I really enjoy this design and I'm attempting to recreate it. I'm interested in how the trigger and echo pins were connected to the Arduino, since pins 12 and 13 are occupied by the motor shield. Please get back to me as soon as you can.
Thank you for your time :)
They are not occupied by motor shield. The pins are again shown on top of the motor shield. IT just passes through the motor shield
Can you please provide me the circuit diagram and block diagram
how many volt required for the battery ?
But where is it checking if it is covering all parts of the room?
It does not check if its covering the room, but if it runs for a long time it might cover the whole carpet area. The bot is ot smart enough to plan its path
how do we connect the motor shield and aruino
The motor shield will have pins on its bottom you just have to press it on top of the Arduino board and they both will be connected you no need to connect wires
can i use some 3.7v batteries instead of 9v or 12v? also how long will it last?
No you cannot use a 3.7V in place of a 9V battery. To understand why you should read some basics on what is voltage and current and how it is used to power things
I am getting errors in the code like trigerPin is not declared .....do i have to make any changes in
the code
Sorry, i have error with the power.
My Robot can't run with powerbank (5v),
But if i use 9v battery, sometimes stop, and sometimes run (if i rotate the wheel).
It Just can run, if i using ac adapter (5v) or using USB power (5v) from laptop or pc, with low speed.
Can you solve my problem? Im confused about this problem.
Sorry for my bad English.
Sir I need the circuit diagram and block diagram of this project please provide me that
Can i use a relay and a motor instead of motor driver shield if its possible specify the type
is it okay if i will use Arduino Uno? not Uno r3. will it work properly? honest answer for my rush project plsss

nice proj