
This page features a curated collection of Arduino Uno projects designed specifically for beginners and intermediate learners. Arduino Uno is the most widely used board for learning electronics, making it ideal for understanding basic sensors, actuators, and microcontroller programming.
All projects listed here include clear circuit diagrams, Arduino Uno-compatible code, and step-by-step explanations covering real-world applications such as automation, robotics, and IoT fundamentals.

In this project we are going to design a 3x3x3 LED CUBE and connect it to Arduino UNO to get different patterns. For a beginner we will start with a simple pattern.
A typical 3*3*3 LED cube connected to UNO is shown in the image above, the cube consists of 27 Light Emitting Diodes, these 27 LEDs are arranged in rows and columns forming a cube…

In previous article of Getting Started with LabVIEW, we have seen about LabVIEW and how it can be graphically programmed and executed in computer (software level). Now in this article we learn about How to Interface LabVIEW with Arduino Board.
Requirements
To interface LabVIEW with Arduino, you require the following software’s and hardware’s,
LabVIEW…
Sensors have always been a vital component in any Project. These are the ones which convert the real real-time environmental data into digital/variable data so that it can be processed by electronics. There are many different types of sensors available in the market and you can select one based on your requirements. In this project we will learn how to use a Hall sensor a.k.…

Detecting motions or movements has always been important in most projects. With the help of the PIR Sensor it has become very easy to detect human/animal movements. In this project we will learn how we can interface a PIR Sensor with a microcontroller like Arduino. We will interface an Arduino with PIR module and blink a LED and beep a Buzzer whenever a movement is detected…

In this DIY project we make a 3-Channel Arduino Relay Shield Circuit for relay based applications. We designed an isolated PCB for 3 relays. By using this Arduino Relay Shield, we can operate 3 AC appliances at a time. We have put a two pin screw terminal blocks (Neutral, NO) for connecting appliances. Here we have provided PCB layout, circuit…

In this post we are going to control a Servo Motor using a web browser with the help of Arduino and Wi-Fi module ESP8266. The ESP8266 will establish a connection between the servo and the web browser through the IP address and then by moving the Slider on the web page, the servo will move accordingly. Even by setting Port Forwarding in your router, you can control the Servo…

A Tilt Sensor switch is an electronic device that detects the orientation of an object and gives its output High or Low accordingly. Basically, it has a mercury ball inside it which moves and makes the circuit. So tilt sensor can turn on or off the circuit based on the orientation.
In this project, we are interfacing Mercury switch / Tilt sensor…

In this tutorial we are going to interface a DC motor to Arduino UNO and control it's speed using PWM (Pulse Width Modulation) concept. This feature is enabled in UNO to get variable voltage over constant voltage. The method of PWM is explained here; consider a simple circuit as shown in figure. This tutorial uses the L293D IC, we have also built a DC motor speed…

We all are familiar with dice and often played LUDO or SANP SIDI (Snake & Ladders) game by using dice. Dice is a squire type solid box which contains 6 different numbers on all of its sides. We throw dice on a surface to get a random number while playing the games. In this project we have tried to replicate it with a digital dice using arduino uno board. In place of…
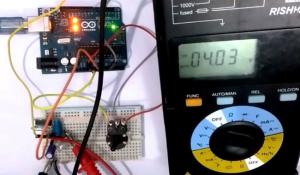
In this project we are going to make a Buck Converter Circuit using Arduino and N-Channel MOSFET with a maximum current capacity of 6 amps. We are going to step down 12v DC to any value between 0 and 10v DC. We can control the output voltage value by rotating the potentiometer.
A buck converter is a DC to DC converter, which steps down DC voltage.…

In this project we control direction and speed of a 24v high current motor using Arduino and two relays. No power switches are needed for this circuit, just two push buttons and in Potentiometer to control the direction and speed of DC Motor. One push button will rotate motor clockwise and other will rotate it counter clockwise. One n-channel MOSFET is required to…

In this article, we are going to Control the Robot Car through the G sensor of our mobile phone and you will be able to move the Robot just by tilting the Phone. We will also use Arduino and RemoteXY app for this G-Sensor Controlled Robot. RemoteXY app is used to create the interface in the Smart Phone for controlling the Robot. We will add the joystick in the interface so…