ARDUINO UNO is an ATMEGA controller based board designed for electronic engineers and hobbyists. Arduino based program development environment is an easy way to write the program when compared to other environment development programs.
Components Required
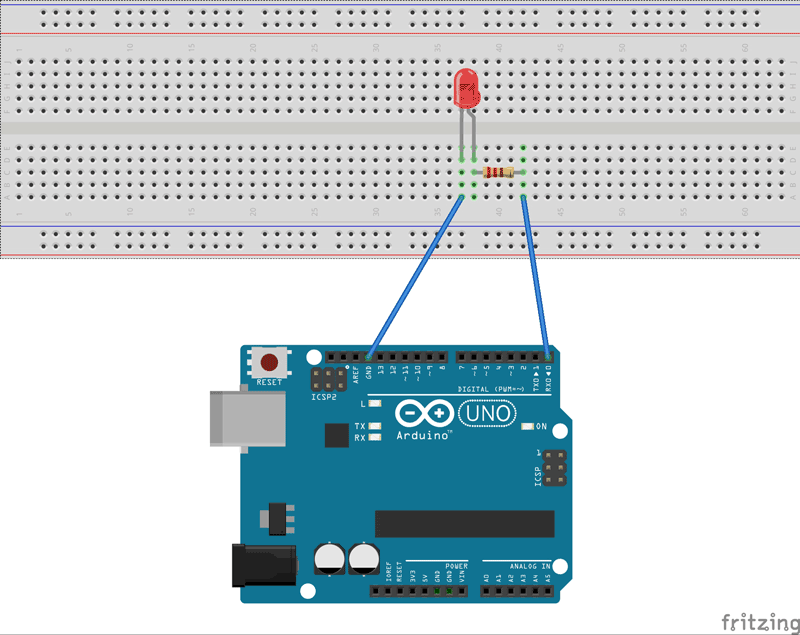
Hardware: Arduino uno board, connecting pins, 220Ω resistor, LED, breadboard.
Software: Arduino Nightly (https://www.arduino.cc/en/Main/Software)
Circuit Diagram and Working Explanation

Here we are going to write a program to blink an LED for every 500ms. In arduino uno, a LED will be already designed at the pin13, but we are not going to use it. Here we are going to connect an indicating LED to PIN0 through a current limiting resistor.
The controller in arduino is already programmed to work on external crystal. So we need not to worry about fuse bits or anything. The arduino works on 16Mhz crystal clock, which is already embedded in the board.
Complete Project Code
// The setup function runs when you press reset or power the board
void setup()
{
 // initialize digital pin 0 as an output.
pinMode(0, OUTPUT);
 }
// the loop function runs over and over again forever
void loop()
{
digitalWrite(0, HIGH);   // turn the LED on (HIGH is the voltage level)
delay(500);              // wait for a second
digitalWrite(0, LOW);    // turn the LED off by making the voltage LOW
delay(500);              // wait for a second
}


