In this comprehensive UnoArduSim tutorial, I will be taking you through one of the best Arduino simulators out there for programming, and debugging without hardware. Whether you are searching for UnoArduSim download instructions or how to utilise this robust UnoArduSim software, this tutorial shows you everything you need to know about the Uno Ardu Sim platform.
Arduino Uno is one of the most popular micro-controllers available and has a very large community of developers that support it. The cost and ease of use of Arduino boards allow them to be a great option for making simple DIY electronics projects. An Arduino simulator like UnoArduSim can help you quickly create and debug your code, as you do not need any hardware or physical connections to test your programs. The UnoArduSim simulator allows you to debug easier especially if you are not sure whether there is a software bug or a hardware problem. In this tutorial, we will be learning about UnoArduSim, a simulator which has Arduino Uno and Mega boards and has an option to select up to 24 I/O devices.
Quick Overview
Duration: 1-2 hours | Type: Microcontroller Programming | Difficulty: Beginner-Intermediate
Technical Scope:
Arduino simulation, debugging, coding
Use Cases:
Prototyping, learning Arduino, debugging code
Table of Contents
What is UnoArduSim Arduino Simulator?
UnoArduSim was developed by Professor Simmons of Queen’s University, Ontario, Canada. He used the platform to teach second-year students of the Department of Electrical and Computer Engineering. The graphical simulator was developed to allow students to test their robotic code without requiring any additional hardware. You can check out our tutorial on Debugging Tools on the Arduino IDE with internal features to debug the code.
The UnoArduSim Arduino simulator enables you to perform real-time code debugging on Arduino Uno and Arduino Mega boards. This UnoArduSim software is employed to compile and test the code. It supports all native Arduino language features except the 'goto' statement. In addition, some C/C++ language features it does not support include Bit-saving, union, and the oddball "comma operator is also unsupported. Explore our comprehensive overview of EDA and circuit simulation software to find the best tools for designing, analysing, and simulating electronic circuits.
UnoArduSim Download and Installation Instructions
UnoArduSim Software System Requirements
Before proceeding with the UnoArduSim download, ensure your system meets these requirements:
- Windows 7/8/10/11 (32-bit or 64-bit)
- Minimum 2GB RAM
- 100MB free disk space
- NET Framework 4.0 or above
How to Download UnoArduSim
To begin using this Arduino simulator, follow these download steps for UnoArduSim:
- Go to the official UnoArduSim website
- Go to the Downloads section
- Click on the newest version of the UnoArduSim software
- Save the ZIP file to your preferred location
- Unzip the downloaded ZIP file
- Find and double-click UnoArduSim.exe to open the Arduino simulator
UnoArduSim Software Interface and Features
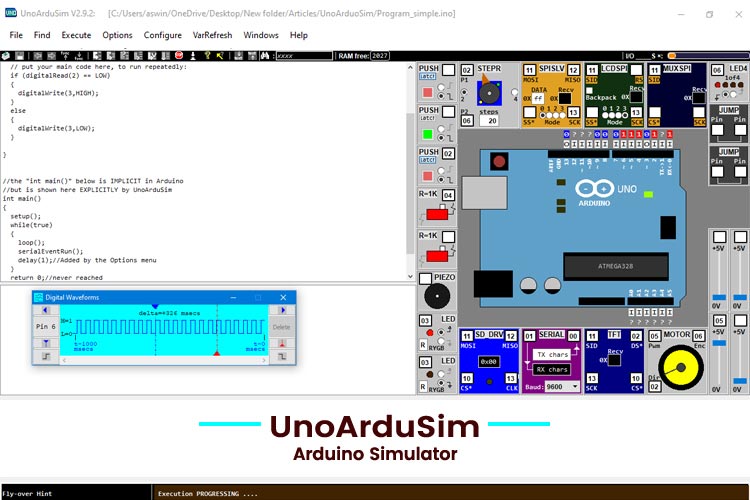
This simulator has a very interactive and easy-to-understand interface. The interface of the Simulator is broadly divided into three parts. The code pane, Variable Pane and the Lab Bench Pane. Apart from the 3 panes, there is a menu bar containing all the menu options and a toolbar containing icons for quick actions. The image below shows the interface of UnoArduSim.

Code Pane Features
From the name itself, we can understand that the code pane contains the code or the program. The code pane can be used to track the execution when the program is running, and it also highlights any errors in the code with a red colour highlight.
Double-clicking the code pane opens the Edit/View, where you can modify the code. It has a useful feature that lets you conveniently select the built-in function calls (or built-in'#define' constants) to be included in your code from the list provided. It also gives an option to auto-add add semicolon or highlight the functions.

Variable Pane Functionality
It is situated under the code pane on the bottom left side of the screen. It contains the current values for every user. The window also displays values of variables during execution.

Lab Bench Pane Components
The lab bench pane shows the selected Arduino board, i.e. either an Uno or Mega. It also has different peripherals, which are selected using the Configure option. The microcontroller on the Lab Bench Pane behaves exactly like a real board. All the I/O devices and both the microcontrollers, i.e. 'Uno' and 'Mega', are very accurate. The electrical model of the components is good for analysing the behaviour of your program accurately, even the electrical pins will be flagged. For example, when you reset the board, the indicator LED blinks. The Lab Bench Pane is shown in the image below:

The board also features an option to observe the waveform at each I/O pin. It can be done when you are executing the program; you have to click on the specific pins to see the digital waveform. You can select up to 4 waveforms to be displayed on the screen.

Advanced Features and Menu Options
The Menu bar contains all the options to operate and control the simulation. It gives us options such as File, Find, Execute, Options, Configure, VarRefresh, Windows and Help. A brief introduction to all the functions is given below:
File:
Load INO / PDE Prog - Allows the user to choose a program file having the selected extension. The program is immediately given a Parse.
Edit/View (Ctrl-E) - It opens the editor window.
Save - Save the edited code to the existing file.
Save As - Save the edited code into a new file.
Next ( '#include ') - Used for displaying the next '#include' file in the Code Pane
Previous - Used for displaying the previous file in the Code Pane
Exit - Used for exiting the simulator.
Execute:
Step-Into (F4) - Used to proceed instruction by a single instruction
Step-Over (F5) - Used to proceed instruction by a single instruction over one complete function call.
Step-Out-Of (F6) - Advances execution by just enough to leave the current function.
Run-To (F7) - Runs the program only till the desired line.
Run (F9) - It executes and runs the code.
Halt (F10) - It stops the execution of the code.
Reset - It is used to reset the program to the start state.
Slow Motion - It is used to slow time by a factor of 10.
Available I/O Devices in UnoArduSim
The UnoArduSim simulator I/O Devices consist of two types: small 'I/O' devices and Big 'I/O' devices. The division is made on the basis of the physical size of the device. Push button, Switched Resistor, Piezo Speaker, Coloured LED, 4-LED Row, 7-Segment LED, Pin Jumper and Analog Slider are the small 'I/O' devices. The Big 'I/O' devices consist of Servo Motor, DC Motor, and other peripherals like MUX, Displays, etc. All the input and output peripherals are shown in the image below:

A user can choose a maximum of 16 smaller 'I/O' devices and 8 Big 'I/O' devices in the Uno Ardu Sim environment.
UnoArduSim Simulator Limitations and Considerations
The simulator comes with a few limitations. The biggest limitation is that libraries such as <Servo.h>, <Wire.h>, <OneWire.h>, <SPI.h>, <EEPROM.h> can only be emulated. Their functionality is directly built into the simulator, and hence, the actual files are not searched.
Library Support Limitations
The supported libraries are 'SoftwareSerial.h', 'SPI.h', 'Wire.h', 'OneWire.h', 'Servo.h', 'Stepper.h', 'SD.h', 'TFT.h' and 'EEPROM.h'. And therefore, the other libraries won’t work as they will contain unsupported directives and unrecognised files.
Real-time Execution Constraints
The execution time of Arduino program instructions is not accurate as they are not modelled accurately; therefore, for every loop, a ‘delay()’ instruction is required to run your program that is synchronised to the real-time pin level changes.
Apart from the above-mentioned limitation, the simulator has no support for function calls being made through user-declared function pointers.
Best Arduino Simulator Alternatives to UnoArduSim
The UnoArduSim is an excellent option, and there are many alternatives to Arduino simulator options:
- Tinkercad Circuits
- Virtual Breadboard & Avatar Hardware
- PICSimLab
- Wokwi
- IO Simulator
- Proteus
- Fritzing
Troubleshooting Common UnoArduSim Issues
First, download the software from the website and unzip the file.

In the folder, find the UnoArduSim.exe file and double-click to run the simulator.
The first step is to select your microcontroller. To do that, click on the Configure in the menu bar and open preferences from the drop-down menu which appears. A new pop-up window will appear, where you can select the Board, TWI Bytes, and it has features like auto-indent, auto-insert closing, etc. Choose the board and click on load.

Now, for selecting the Input and output peripherals, again click on the Configure in the menu bar and open ‘I/O Devices’ from the drop-down menu which appears. A new pop-up window will appear, where you can choose all the required peripherals from the given menu.

Compilation
If you already have an Arduino code in a ‘.ino’ or ‘.pde’ format, you could directly upload it by clicking on File>Load INO or PDE.
To write the code, double-click on the Code Pane to open the editor. Alternatively, you can click on the File and click on Edit/View. You can also press Ctrl + E simultaneously to open the Editor.
After writing your program, click on the compile button.

After your compilation is complete, select the required I/O and, according to the pins assigned in your program, assign the pins on the I/O peripherals by typing in the space provided in every peripheral block.

Now, click on the Execute in the menu bar and select the Run option, it will start executing the program.

Now, to see how your setup and code will perform by changing the input, change the values of the input peripheral by clicking on the buttons or change the values on the peripheral symbols to see how your system should perform.6

Conclusion
UnoArduSim is a valuable Arduino simulator with the ability to debug your programs and test your hardware without actual physical components. Whether you are a beginner using this Uno Ardu Sim tutorial or you are using the UNO Ardu Sim software for advanced projects, this Uno Ardu Sim platform has advantages for any Arduino development.
The simulator allows you to debug more easily than a real-time microcontroller due to the ability to see highlighted errors or monitor variable values that may be causing issues. You may be new to microcontrollers and Arduino programming, or you may be someone who just wants to debug code super fast and does not want to waste time or money on real components; you will see that this UnoArduSim simulator is fantastic.
The UnoArduSim download is simple, and the learning curve is not steep, so if you are ready to start, then the process should be simple. I hope this guide will help you take advantage of this powerful Arduino simulator for all your programming and debugging needs.
Frequently Asked Questions About UnoArduSim
⇥ How close is UnoArduSim to actual Arduino Uno hardware accuracy?
UnoArduSim offers about 95% accuracy for digital I/O operations and simple Arduino functions. But timing accuracy is not precise because of simulation overhead. Test on real hardware for critical timing applications. The Uno Ardu Sim is fantastic for experimenting with programming principles and troubleshooting logic problems.
⇥ How does UnoArduSim differ from other Arduino simulators, such as Tinkercad?
UnoArduSim provides offline capability, advanced debugging features, and variable watching in real-time. This UnoArduSim software is not online and doesn't require an internet connection like that of online simulators, and offers advanced debugging features such as step through and waveform analysis. Tinkercad has the most impressive visual circuit design feature.
⇥ Am I able to simulate Arduino Mega projects using the UnoArduSim sample projects?
Yes, UnoArduSim contains both Arduino Uno and Arduino Mega boards. You may change boards via Configure > Preferences. The Arduino Mega simulation contains all of the additional digital and analog pins available, and is ideal for when you have more complicated projects with additional I/O pins required.
⇥ Why do my UnoArduSim downloads always get quarantined by antivirus?
Some antivirus software will mark UnoArduSim as potentially unwanted software, not because it is unwanted and unwanted but simply because it has an .exe extension and a simulation capability. This is a false positive. Queen's University's official UnoArduSim software is safe. Disable your antivirus when downloading and installing, just when you bring it back online and trust UnoArduSim in your antivirus software.
⇥ Is it possible to export my UnoArduSim projects to the actual Arduino IDE?
Yes, the UnoArduSim code can be exported as .ino files and directly imported into the Arduino IDE. As UnoArduSim operates with standard Arduino language syntax, the majority of code transfers without issue. Disregard any debugging code that is specific to UnoArduSim and ensure library compatibility prior to uploading to actual hardware.
likecopy
Build Up Your Arduino Programming Toolkit
Advance your skills with tutorials that guide you from virtual simulations to hands-on development.
How to Debug an Arduino Project
We have some internal features on Arduino IDE to debug a code. We can use the compiler, Serial Monitor, Serial Plotter, or even on the Arduino IDE Pro, we have a Serial Debugger. Now, let’s discuss one by one about the Internal Debugging Tools.
Beginners Guide to Arduino IDE and Arduino Programming
Arduino IDE is the cross-platform and we can program Arduino Board using Arduino IDE. Arduino IDE consists of a feature-rich code editor, compiler, programmer, serial console, serial plotter and many other features.
Burn Arduino Bootloader in ATmega328 IC
In this tutorial, we will see how replace Arduino board with Atmega328 IC and with few other components. For using Atmega328 IC in place of arduino, first we have to burn Arduino Bootloader in it and then we will program it using FTDI or using Arduino Board.


